Friends

This is default featured post 1 title

Go to Blogger edit html and find these sentences.Now replace these sentences with your own descriptions.This theme is Bloggerized by Lasantha Bandara - Premiumbloggertemplates.com.

This is default featured post 2 title

Go to Blogger edit html and find these sentences.Now replace these sentences with your own descriptions.This theme is Bloggerized by Lasantha Bandara - Premiumbloggertemplates.com.

This is default featured post 3 title

Go to Blogger edit html and find these sentences.Now replace these sentences with your own descriptions.This theme is Bloggerized by Lasantha Bandara - Premiumbloggertemplates.com.

This is default featured post 4 title

Go to Blogger edit html and find these sentences.Now replace these sentences with your own descriptions.This theme is Bloggerized by Lasantha Bandara - Premiumbloggertemplates.com.

This is default featured post 5 title

Go to Blogger edit html and find these sentences.Now replace these sentences with your own descriptions.This theme is Bloggerized by Lasantha Bandara - Premiumbloggertemplates.com.

Saturday, March 5, 2011

How to change Window Color and Appearance

One of the graphical changes in Windows Vista is the fact that, if Aero is enabled, the titlebars and borders of each window are translucent. By default, all your windows will have a light blue color. However, it can be changed at any time so that it fits your taste. In this article I will show you how to do it.
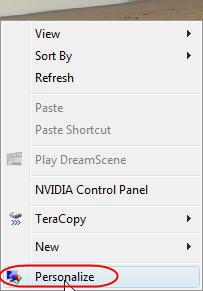
The first step is to right-click on your desktop and click on 'Personalize'.
Windows Color and Appearance
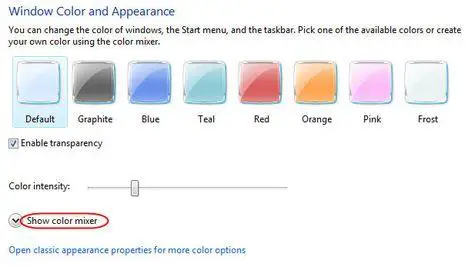
Then click on 'Window Color and Appearance'.
Windows Color and Appearance
In this window you can change the color of the windows, start menu and taskbar. If you don't like the available options, you can click on 'Show color mixer' to create your custom colors.
Windows Color and Appearance
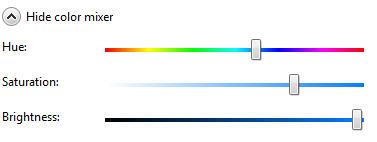
A small roll-out menu will reveal three options: hue, saturation and brightness. If you move the sliders right or left you will see the color of the windows and taskbar changing.
Windows Color and Appearance
However there is a slight 'problem' that might annoy you: unless you pick out a very bright color, the color of the taskbar and all maximized windows will continue to have a shade of black. Unless you change the theme of your desktop, that shade of black will always remain.
After you have decided the color that you prefer, click on the OK button and the new color will be applied.
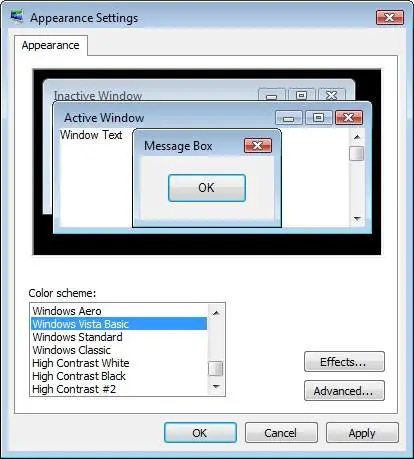
POSSIBLE PROBLEM: Many users reported that, after they click on 'Window Color and Appearance', they see a window like the one below.
Windows Color and Appearance
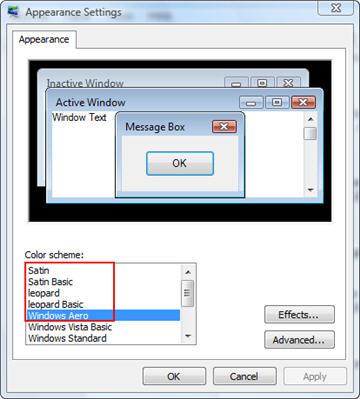
If this applies to you, then choose Windows Aero in the Color scheme list, click on OK and restart the procedure described above. You will now find all the menus and options described above.
NOTE: Windows Aero is not included in Windows Vista Home Basic. If you have this version, you won't be able to enable Aero and use it. You must upgrade to at least Windows Vista Home Premium.

Windows DreamScene

DreamScene is a tool that allows people to use videos and other optimized animations as desktop wallpapers. It is included in the Windows Ultimate Extras package and can be downloaded using the Windows Update service. At this time Microsoft released a Technical Preview version as the final product is not yet ready.
The good part about DreamScene is the fact that it uses your video card for display and not your processor so your PC will have enough resources available for performing other tasks. You can use any video as a wallpaper as long as it is saved in the ".wmv" or ".mpeg" format. Also, you can use DeskScapes - a free application that extends Windows DreamScene with the ability to run so called ".dream" animated wallpapers. ".dream" files can be looped videos, or dynamically generated in 3D, or change-based on a set of triggers.
Adding animated desktop wallpapers to your desktop using DreamScene is simple. Just follow the video below.
How to use Windows DreamScene (2MB)
If, for some reason, you want to stop the desktop animation, right click on your desktop and select Pause DreamScene.
NOTE: Windows DreamScene is available only for Windows Vista Ultimate.

Windows Aero

In this tutorial we will speak about the new graphical interface for Windows Vista. It's name is Aero and it is an acronim for Authentic, Energetic, Reflective and Open. Aero it is intended to be the most powerful, efficient and aesthetically pleasing user interface ever included in a Windows operating system.
Aero looks very good, offering new glass and translucent effects for the Windows Vista menus and desktop. All this eye candy has its costs. If you want to run Aero with full effects you will need a system that meets the following minimum requirements: 1 GHz processor, 1GB of memory and a DirectX 9 compatible video card with 128MB of memory.
However, if you do not have a very powerful system or you want to squeeze a bit of performance from your system, you can easily customize the Aero interface.
This is how you do it:
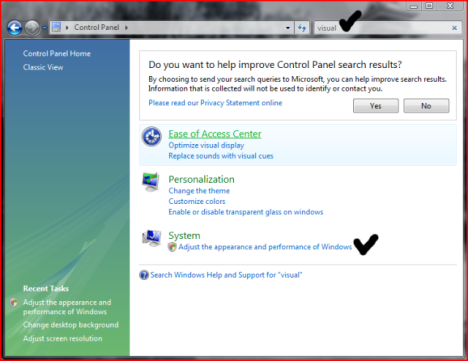
First, enter the Control Panel and type "visual" in the search box, as shown in the screenshot below.
Control Panel
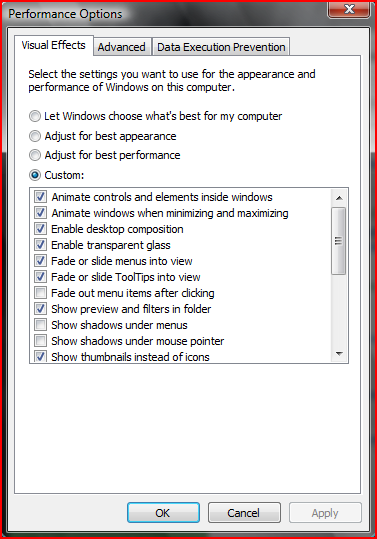
One of the results shown will be System - Adjust the appearance and performance of Windows. Click on it and the Performance Options window will be launched.
Click on the Visual Effects tab and make the configurations you want. If you do not want to disable Aero but you want more performance from your system we recommend that you turn off the transparency effects.
Performance Options
If you want to completely disable the Aero interface, click the Adjust for best performance checkbox. The Windows Vista interface will look very similar to the one in Windows 2000 but will not eat so much of your system's resources.
Aero disabled

Pimp My Windows Vista

One of the greatest thing about Windows Vista™ is its looks. When you start it for the first time it certainly has some of the "Wow" factor Microsoft is talking about in its commercials. When you compare it to the previous Windows operating systems, the Windows Vista desktop looks really great. Even so, people will surely get bored by all the eye candy after a while.
So, what do you do when you get bored with the looks of your operating system? You do what MTV does - you PIMP it!

Free Wallpapers Collections
First, you should try this High Resolution Windows Vista Desktop Wallpaper Pack made by Hamad Darwish. This is a great collection of Windows Vista wallpapers that did not make the cut into the final Windows Vista Collection. If you did not download them already, you should definitely check them out.
A second destination should be the download section of the Windows Vista Ultimate Team Blog. Here you can find a list of high resolution wallpapers that can fit even a 30-inch flat panel monitor.
As a third destination we recommend Brajeshwar B. Oinam's blog. He posted a pretty big collection of wallpapers and download links.
Another great source for free high-resolution wallpapers is Dmitri Sawizki's gallery on deviantART. He posted an archive with 30 plants wallpapers and links to other similar works. All the pictures have a resolution of 1920x1440.
As a final destination, you should definitely check out Desktopography, a "Natural designer wallpaper exhibition". This site is a great web experience: nice presentation, beautiful music and great content. Currently you can find three exhibitions that feature gorgeous wallpapers. All the works are offered in various sizes that can fit most flat panel monitors.


Free Software
RocketDock is very cool and smoothly animated application launcher. It provides a nice clean interface to drop shortcuts on for easy access and organization. It comes with plenty of skins that can match with almost any wallpaper and theme. You can also download additional skins from their file repository.
RocketDock
Unfortunately, RocketDock has only one icon set. If you want to use other icons, you must visit their file repository again or search other resources on the internet.
There are similar programs on the internet but we found RocketDock to be the best of them in terms of stability and number of bugs.
A great way to enhance the looks of your Windows Vista desktop is to combine Windows DreamScene with Stardock DeskScapes. Stardock DeskScapes extends Windows DreamScene to support dynamic, animated wallpapers as their desktop background without slowing down the computer or interfering with how you work with your computer.
DeskScapes also supports the new ".Dream" format which supports adding triggers, author information, and dynamic content. You can download animated wallpapers from the Dream Gallery or you can create them yourself using a free tool called DreamMaker.
Alternatively, you can check out Windows Update and download the latest content pack for Windows DreamScene. They recently released four new video backgrounds:
* A field of thistle, with a bee gathering pollen;
* The rushing water of a forest stream;
* A streetlamp reflected in a puddle, with softly falling rain;
* Orange wisps flowing in a computer-generated scene.
Another must have tool is Yod'm 3D. This application is a virtual desktop manager that allows you to have four separate desktops which you can rotate and zoom at will. The effect is simple and very cool. You can have a different wallpaper for each desktop. Unfortunately this feature doesn't work very well with Windows DreamScene. You can have four different wallpapers only if they are static images. If you use both Windows DreamScene and Yod'm 3D you will be able to use only one animated wallpaper for all four desktops.
If you want to change not only the wallpapers but also the boot screen logo, you can do that using Vista Boot Logo Generator. This tool allows you to change the loading bar with any static wallpaper. Unfortunately, the procedure of replacing the default boot logo is a bit difficult and if you don't know what you are doing, it is better to use the default one. If you want to give it a try, then you must read this guide to learn how to replace the default logo with your custom made ones.


Commercial Software
Windows Blinds - with Windows Blinds you can make Windows Vista look even better and also add some functionality. This tool allows you to create your own skins and add new buttons to the title bar. Starting with version 5.5, Windows Blinds offers support for Windows Vista, updated skins and better performance compared to previous versions.


Software in Beta Stages
Ave3dUserPic - is a small free tool that adds a 3D effect and rotates the user's picture from the Start Menu. Unfortunately this is a work in progress that is not very stable and has plenty of bugs.
Video: Pimp Your Windows Vista - Part1 (12MB)
Video: Pimp Your Windows Vista - Part2 (7MB)

Pimp My Windows Vista: How to install new themes

The new Aero interface of Windows Vista looks really nice, but after a while you get bored of the same colors and shapes. This is why in this tutorial I will show you how to install a new theme on Windows Vista. The process is not an easy one, as we need to install some additional software, but the result will be quite satisfying.
IMPORTANT: Before starting this procedure you should log on as an administrator. If your user is not administrator, the procedure will fail.
If User Account Control (UAC) is enabled, you will be asked for permission each time you copy files to important Windows folders such as the ones mentioned below. Each time it shows up, click on Continue and the files will be copied over.
Before starting this procedure, it is recommended to create a System Restore snapshot. In case of failure, it will be very easy for you to revert back to the initial state.
Also, keep in mind that this tutorial is published with no warranties. We are not responsible for any problems you might have with your system. We tested everything multiple times on two separate computers and we did not encounter any problems. However, this is not a warranty that the procedure will work the same on all computers & configurations.
Installing VistaGlazz
The first step is to install a software called VistaGlazz.
Before you do this, you need to check if you have Windows Vista or Windows Vista with Service Pack 1 installed.
You can find out by opening the 'Control Panel'. Type 'control panel' in the Start Menu search bar and click on the first result. Alternatively, you can just click on its Start Menu shortcut.
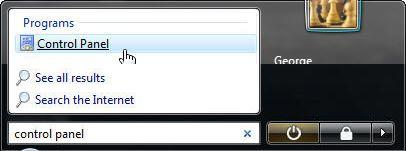
Then click on 'System and Maintenance'.

And then on System.

Here you can see if you have Service Pack 1 (SP1) installed or not.
This is how it looks when you don't have SP1 installed.

And this is how it looks when you have it installed.
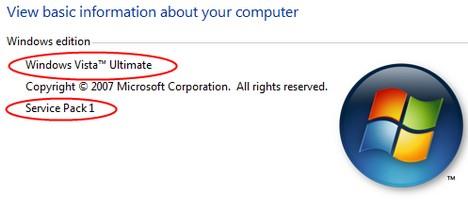
If you have SP1 installed then go to the CodeGazer homepage and download the latest version of VistaGlazz that is compatible with Windows Vista SP1. Right now, this version is VistaGlazz beta 3. Alternatively you can download it by clicking on this direct download link.
If you have Windows Vista without SP1 then, from the same page, download VistaGlazz 1.0. Alternatively you can download it by clicking on this direct download link.
After the download is done, run the setup and install VistaGlazz. Now run the application with administrative rights by right clicking on its desktop icon and selecting 'Run as administrator'.

When launched, click on 'I agree' to continue.
Now, three icons will appear: the first one will show you the status of the system '.dll' files from your computer, the second icon will show you the status of the '.msstyle' files and the last one will offer you different ways to contact the developer of the application.


Patching '.dll' and '.msstyle' files
Now click on the first icon and then on 'Patch originals' in order to replace the original '.dll' files with the ones that would allow you to install themes.
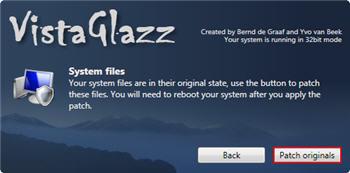
After the patching process you will have to reboot your PC. Click on the Reboot button or, if you intend to restart later, click on the Quit button.
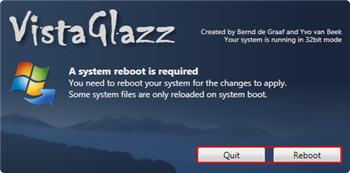
After the restart, run VistaGlazz with administrative rights again, click on 'I agree' and then on the second icon.
Now, click the 'Patch style' button and the Windows Vista theme engine will restart in order to apply the changes made to the original files.
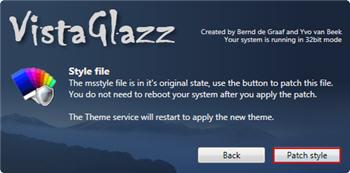
The first change that you should see is that the taskbar and titlebar are now transparent even if a window is maximized. Now you can close the VistaGlazz application.
Tip: If you want to restore your original Windows Vista theme files, open VistaGlazz and click on the first icon. Click on the 'Unpatch files' button and restart your PC. Then open VistaGlazz again, click on the second icon and click on the 'Restore original' button. After this, your default Windows Vista theme files will be restored.


Installing a new theme
The best place to search for new Vista themes is deviantart.com.
For demonstration purposes I will install a theme called Aero Dynamic. In order to install it, click on the 'Download' button from the left and save the file on your disk.
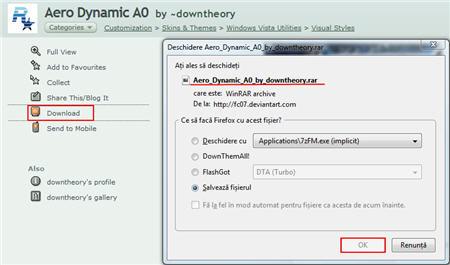
Now extract all the files from the archive.

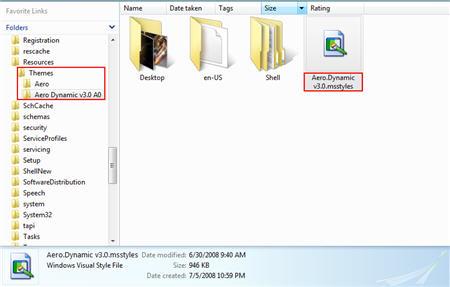
Each valid theme has to have the files and folders shown in the screenshot above: en-US, Shell, a file with the '.msstyle extension and a file with the '.theme extension.
Now you need to copy these files and folders to your Windows Vista Themes folder. First, open Windows Explorer and navigate to 'C:\Windows\Resources\Themes' or go to the Run button, click on it, type '\Windows\Resources\Themes' and click on OK.
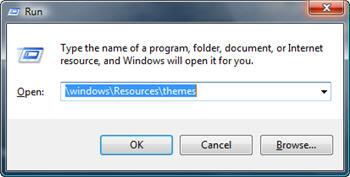
Here copy the folder with the theme that you wish to install and, if any, the file with the '.theme extension.
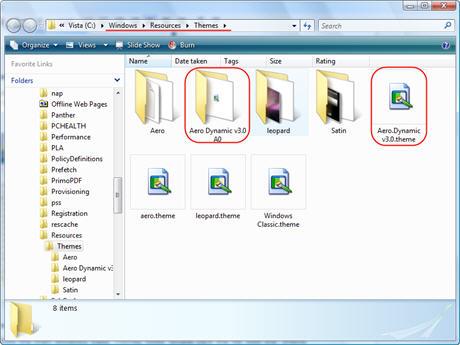
Then, double click the file with the '.theme' extension. In my case that file is 'Aero.Dynamic.v3.0.theme'.
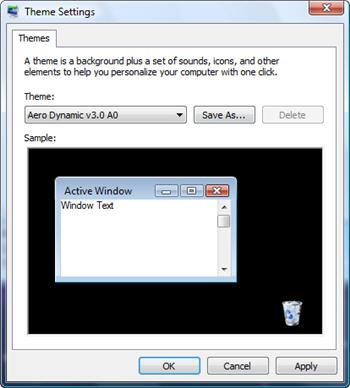
A new window called Themes Settings will open. If the theme that you want to install is already selected, click on OK.
If there is no '.theme' file, enter the theme's folder and double click on the file that has the extension '.msstyle'. In my case that file is 'Aero.Dynamic.v3.0.msstyle'.
Right after you double clicked that file, a new window will appear with the Appearance Settings of Windows Vista.
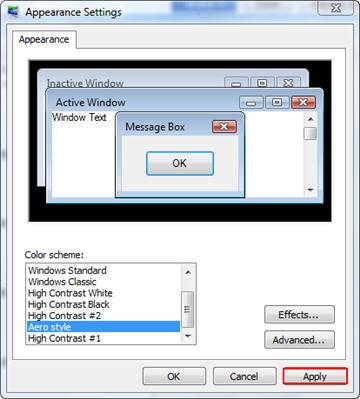
Scroll down the color schemes until you find your theme. However, you should keep in mind that, by default, all the newly installed themes are named 'Aero style'. Select it and then click on 'Apply'.
After a short 'Please wait' moment and possibly a blank screen, your new theme will be applied.
Tip: If the theme has additional files or folders, read the 'Readme.txt' file and follow the instructions.


Rename the newly installed themes with VistaDeskHack
If you have multiple themes installed, you might have noticed that in the Appearance Settings window they all have the name 'Windows Aero'.
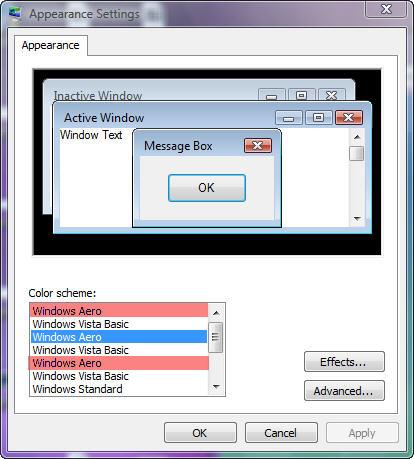
In order to change this and see their real name, you have to install a small application that will auto-rename each theme. The software application name is VistaDeskHack 1.1 and it can be downloaded from RapidShare. Alternatively, you can download it directly from our site. You will find it at the bottom of this page.
Download and extract the archive. Open it, right click on the DeskHack_Install.cmd file and select 'Run as administrator'.
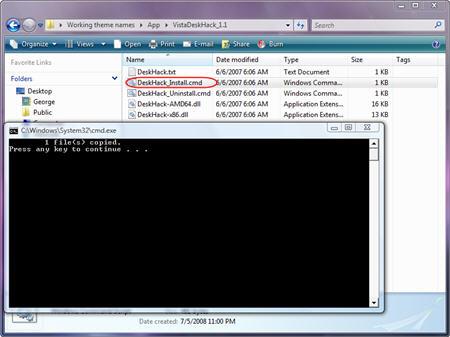
A Command Prompt window will open and after a second a message that says: '1 file(s) copied. Press any key to continue...' will appear. Press any key and the window will close.
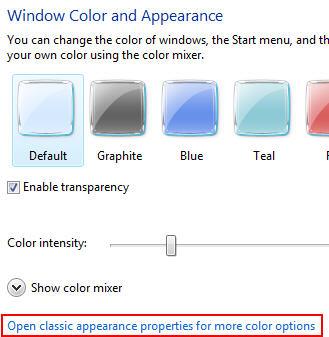
When you will open the Appearance Settings window all the new themes that you have installed will have their own 'original' name. To open the Appearance Settings window, right click on your Desktop and select Personalize -> Windows Colors and Appearance -> 'Open classic appearance properties for more colors options'.


How to revert to the default Aero theme
If for some reason you don't like the themes you have installed, reverting to the default Vista Aero theme is quite easy:
right click anywhere on your desktop and select Personalize.
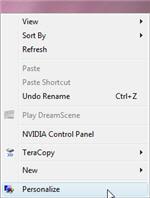
Now click on Windows Colors and Appearance.

Then click on the 'Open classic appearance properties for more colors options' link.
From the new window select Windows Aero and click OK.
Pimp My Windows Vista: How to change your logon screen

We will continue our 'Pimp My Windows Vista' series with an article showing you how to change your logon screen. To do this, you will first need to download and install a special tool, called LogonStudio. The tool can be downloaded directly from here.
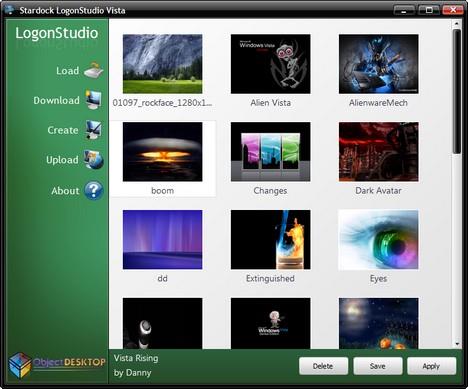
After you have downloaded and installed LogonStudio, start the application. As you can see in the screenshot below, the application lets you Load logon screens, Download them from the internet, Create and Upload one of your own creations.
First, you will need to download logon screens from the internet. Clicking on the Download button will take you to the WinCustomize gallery. Browse through the gallery and download the screens you like.
Tip: in order to download as many logon screens as you want, you should create a free account on the WinCustomize site. By having an account with them, you will be able to download files without the limitations imposed to anonymous visitors.
Stardock LogonStudio Vista
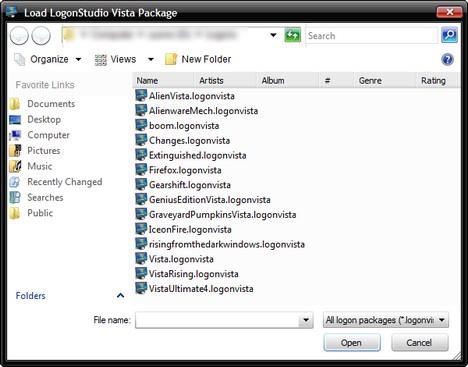
After you have downloaded the logon screens you like, click on the Load button and load them all one by one into LogonStudio. Once you have finished, select the one you want to use and click on the Apply button.
Stardock LogonStudio Vista
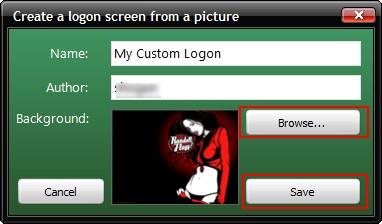
You can also create your custom logons, by using the wallpapers you have on your computer. To do this, click on the Create button from the main screen. Then, click on Browse and select the wallpaper you want to use as your logon screen. After that, type a name and then click on Save. Now, select it with the mouse and click on the Apply button.
Stardock LogonStudio Vista
You can also upload your own logons to the WinCustomize gallery. To do this, select the logon screen you want to upload, click on the Upload button and then follow the instructions on the WinCustomize site.

How to enable Natural Search and how to use it

One of the less known features of Windows Search and implicitly of Windows Vista, is the ability to search using natural language. What does natural language search mean? Basically, it means searching by using the same terms you would when asking a person to search for something. For example, instead of searching using 'kind:email author:Joe after:08/01/2008', you would type 'email from Joe received this month' or, instead of using 'kind:pictures location:London' you would use 'pictures in London'. Sounds more simple and natural, right?
In this tutorial I will show you how to enable the Natural Language Search and I will give you a few examples about how to use it.
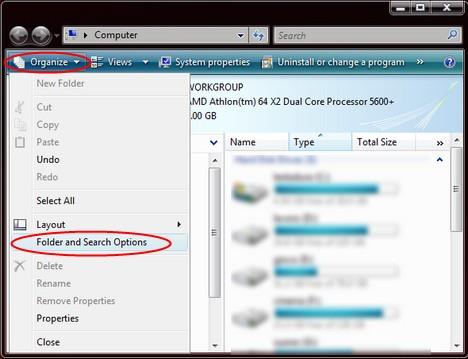
Enabling the natural language search is done from the Folder Options window. There are several ways to launch it. One option is to double click on the Computer icon and then click on Organize -> Folder and Search Options.
Folder Options
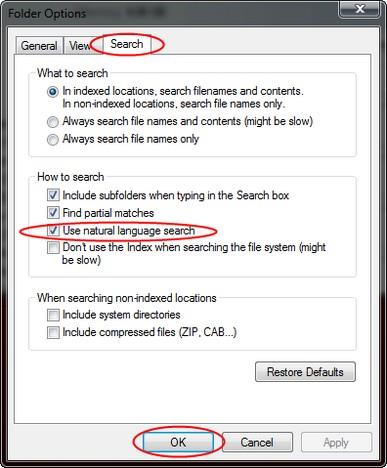
An alternate method is to search the term 'folder' in the Control Panel and to click on the Folder Options shortcut. Once the Folder Options window is opened, go to the Search tab and check the option that says 'Use natural language search'. Then, click OK.
Folder Options
Now you can start searching by using natural language terms. Depending on how you configured Windows Search, you will be able to search for files, e-mail messages, shortcuts, etc. If you do not know what files and folders are indexed by Windows Search, read this guide. You will learn which locations are already indexed and you will understand how to add or remove a location. After you have done the final configuration and all the new locations have been indexed you will be able to start searching.
I have tried to find a reference guide with the syntax for natural language search. Unfortunately, I have found only the Windows Search Advanced Query Syntax provided by Microsoft. This details all the syntax to be used when natural language search is not enabled. However, I have learned that this guide can be useful for the natural language search syntax as well. When using the normal syntax, you need to specify 'file kinds': kind:email, kind:music, kind:song, kind:folders, etc. When using natural search you just type: email, music, song, folders, without using 'kind:'.
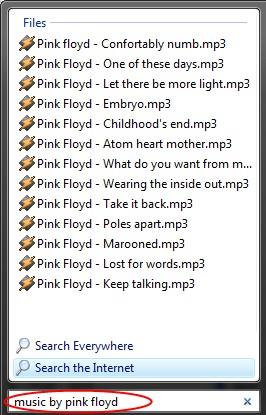
Natural Language Search
To help you better understand how to create natural language searches, here are a few more examples:
  • When searching for music, instead of using 'kind:music artist:Pink Floyd', type 'music Pink Floyd' or 'music by Pink Floyd'. You can search also for albums, tracks, etc (e.g.'album High Hopes');
  • When searching e-mail messages use statements like these:'email from Joe received this month', 'mail to George about Windows Vista', 'email from Ana sent yesterday';
  • When searching for documents, use: '*.doc created this year', 'document about Windows Vista', etc;
Also, remember that wildcards (such as *) and logical operators (such as AND, NOT, OR) work with natural language search and are very effective at filtering the search results. Since there is no official syntax guide on how to build natural language search terms, feel free to experiment and share your knowledge with us. I'm sure many people will find your insights to be very useful.

#
### ###