Friends

This is default featured post 1 title

Go to Blogger edit html and find these sentences.Now replace these sentences with your own descriptions.This theme is Bloggerized by Lasantha Bandara - Premiumbloggertemplates.com.

This is default featured post 2 title

Go to Blogger edit html and find these sentences.Now replace these sentences with your own descriptions.This theme is Bloggerized by Lasantha Bandara - Premiumbloggertemplates.com.

This is default featured post 3 title

Go to Blogger edit html and find these sentences.Now replace these sentences with your own descriptions.This theme is Bloggerized by Lasantha Bandara - Premiumbloggertemplates.com.

This is default featured post 4 title

Go to Blogger edit html and find these sentences.Now replace these sentences with your own descriptions.This theme is Bloggerized by Lasantha Bandara - Premiumbloggertemplates.com.

This is default featured post 5 title

Go to Blogger edit html and find these sentences.Now replace these sentences with your own descriptions.This theme is Bloggerized by Lasantha Bandara - Premiumbloggertemplates.com.

Sunday, May 1, 2011

How to Enable / Activate Aero Theme in Windows Vista and 7 Home Basic Edition

As we all know the new Aero theme is not provided in "Windows Vista and 7 Home Basic Edition", all other editions provide this new cool interface. But there is a registry trick to enable the Aero interface in Vista and 7 Home Basic edition:
1. Open regedit and goto:
HKEY_CURRENT_USER\Software\Microsoft\Windows\DWM
2. In right-side pane change value of "Composition" to 1 and "CompositionPolicy" to 2.
3. Restart your system and you'll be able to select the Aero interface from Desktop Properties.
If you want a ready-made code for doing this, then download following ZIP file, extract it, run the extracted .REG file and accept the confirmation:
Download Link
NOTE: Your system must meet the minimum requirements to use Aero interface in Vista and 7.

How to Customize / Tweak Windows Vista ScreenSavers using Registry?

As we all know Microsoft shipped Windows Vista with a few new cool Screen savers which are:
Aurora
Bubbles
Mystify
Ribbons
Although these screen savers are cool but the worst thing is we are not allowed to change their settings. There is no Options box to change the settings.
Actually the screen savers were initially developed to be customizable but the Options window was disabled while releasing them for no reason?
If you open the screen savers MUI files in Resource Hacker or Resource Tuner, then you'll find their Options dialog boxes.
But you can use registry to make changes in these screen saver settings. Here I'll tell you about the registry locations and all customizable options for these screen savers:
Aurora:
1. Open regedit and goto:
HKEY_CURRENT_USER\Software\Microsoft\Windows\Current Version\Screensavers\Aurora
2. In right-side pane, create following DWORD values given in BOLD and set their values as mentioned below them:
Amplitude
Min Value - 500000000
Max Value - 2000000000
Brightness
Min Value - 1000000000
Max Value - 1050000000
NumLayers
Min Value - 1
Max Value - 15
Speed
Min Value - 1000000000
Max Value - 2100000000
AllScreensSame
This DOWRD value is used for multiple monitors. If you set it to 1, then all monitors will use the same configuration file and will show same screen saver otherwise not.
SpanMultiMon
This DWORD value is used for multiple monitors. If you set it to 1, then screen saver will move between both monitors otherwise it'll show on both screens separately.
Bubbles:
1. Open regedit and goto:
HKEY_CURRENT_USER\Software\Microsoft\Windows\Current Version\Screensavers\Bubbles
2. In right-side pane, create following DWORD values given in BOLD and set their values as mentioned below them:
ShowShadows
To enable - 1
To disable - 0
MaterialGlass
To show Transparent Bubbles - 1
To show Solid bubbles - 0
ShowBubbles
For Transparent Background - 1
For Black Background - 0
TurbulenceNumOctaves
Min Value - 1
Max Value - 255
TurbulenceSpeed
Min Value - 0
Max Value - 10
TurbulenceForce
To enable - 1
To disable - 0
Radius
For Small Bubbles - 1090000000
For Large Bubbles - 1130000000
SphereDensity
For less Bubbles on Screen - 1000000000
For More Bubbles on Screen - 2100000000
AllScreensSame
This DOWRD value is used for multiple monitors. If you set it to 1, then all monitors will use the same configuration file and will show same screen saver otherwise not.
SpanMultiMon
This DWORD value is used for multiple monitors. If you set it to 1, then screen saver will move between both monitors otherwise it'll show on both screens separately.
Mystify:
1. Open regedit and goto:
HKEY_CURRENT_USER\Software\Microsoft\Windows\Current Version\Screensavers\Mystify
2. In right-side pane, create following DWORD values given in BOLD and set their values as mentioned below them:
LineWidth
Min Value - 1000000000
Max Value - 1080000000
NumLines
Min Value - 1
Max Value - 100
Blur
To enable - 1
To disable - 0
AllScreensSame
This DOWRD value is used for multiple monitors. If you set it to 1, then all monitors will use the same configuration file and will show same screen saver otherwise not.
SpanMultiMon
This DWORD value is used for multiple monitors. If you set it to 1, then screen saver will move between both monitors otherwise it'll show on both screens separately.
Ribbons:
1. Open regedit and goto:
HKEY_CURRENT_USER\Software\Microsoft\Windows\Current Version\Screensavers\Ribbons
2. In right-side pane, create following DWORD values given in BOLD and set their values as mentioned below them:
RibbonWidth
Min Value - 1000000000
Max Value - 1080000000
Numribbons
Min Value - 1
Max Value - 100
Blur
To enable - 1
To disable - 0
AllScreensSame
This DOWRD value is used for multiple monitors. If you set it to 1, then all monitors will use the same configuration file and will show same screen saver otherwise not.
SpanMultiMon
This DWORD value is used for multiple monitors. If you set it to 1, then screen saver will move between both monitors otherwise it'll show on both screens separately.
NOTE: You can play with the above mentioned options by settings their values to anything falling under their limits. There are a few other unknown options available but I have not mentioned them cause we don't know their use.
If you want to revert back to default settings, then simply delete the newly created DWORD values.

Will Your PC Run Windows Vista? Check Yourself Using Windows Vista Upgrade Advisor

If you want to use Windows Vista but not sure whether your PC will run Vista or not, then don't ask anyone about it. Just download "Windows Vista Upgrade Advisor" and check yourself. Windows Vista Upgrade Advisor is designed to help Windows XP users identify whether their PCs are ready for an upgrade to Windows Vista, which edition of Windows Vista meets their needs, and which features of Windows Vista will be able to run on their PCs.
Windows Vista Upgrade Advisor will help you determine if your current PC is ready for an upgrade to Windows Vista. It will also help you to choose the edition of Windows Vista that's right for you. Download the Upgrade Advisor to run an analysis of your current PC and use the detailed feedback to ensure that your PC is ready for the edition of Windows Vista that you want.
Download Windows Vista Advisor

Speed Up Windows Vista – Master Tutorial to Make Windows Vista Super Fast

So you are using Windows Vista and feel that its slower than Windows XP? Then you have come to the right place. Following tutorial will help you in tweaking your Windows Vista to the max and you'll feel a significant improvement in your system performance. So without wasting any time lets start:
1. Following is a registry file containing a few registry modifications, which are completely safe and can increase the performance of Windows Vista. Just download the attached ZIP file, extract it and then run the file:
Tweak Windows Vista
Restore Default Settings (Use this file if you want to restore default Windows settings)
2. Right-click on My Computer icon on Desktop and select Properties (or press <WIN> key + <Pause/Break> key), click on Advanced system settings link in left side pane (You can also open it by typing sysdm.cpl in RUN or start menu search box and press Enter). Now click on Settings button in Performance section:

Now disable all unnecessary options in Visual Effects tab, you can remain following options enabled according to your requirements:
  • Enable desktop composition (If you want to use Windows Aero theme)
  • Enable transparent glass (If you want to use transparency in Windows)
  • Show preview and filters in folder (If you use Details Pane in Explorer)
  • Show thumbnails instead of icons (If you want to show thumbnails in Explorer)
  • Show window contents while dragging (If you want windows to show content while moving them)
  • Smooth edges of screen fonts (If you want to show smooth fonts)
  • Use drop shadows for icon labels on the desktop (If you want to show shadows under desktop icon labels)
  • Use visual styles on windows and buttons (If you want to use Windows Aero or Basic theme.)

3. Open Folder Options and click on View tab:

Now disable following options:
  • Display file size information in folder tips.
  • Display simple folder view in Navigation pane.
  • Hide extensions for known file types.
  • Show encrypted or compressed NTFS files in color.
  • Show pop-up description for folder and desktop items.
Other options don't affect the system performance. You can enable/disable them according to your requirements.
4. Right-click on My Computer icon on Desktop and select Manage (You can also open it by typing services.msc in RUN or start menu search box and press Enter).
Now goto Services & Applications -> Services. Here you can set a few unnecessary services to Manual, which will not start with windows and will decrease the boot time and will increase system performance.
Please follow the following tutorial to know about which services can be safely set to MANUAL:
Windows Vista Services Configuration: Turn Off / Disable Unnecessary Services to Optimize Performance
5. Type msconfig in RUN or Startmenu search box and press Enter. Now goto Startup tab and deselect the unnecessary entries, which you don't want to start automatically with Windows, e.g. you can disable VGA driver utility, Sound Card utility, etc to speed up the startup time and to increase system performance.
You can also disable these items using Windows Defender. Open Windows Defender and click on Tools and then click on "Software Explorer".
6. Open Sound in Control Panel (or type mmsys.cpl in RUN or Startmenu search box and press Enter), goto Sounds tab and select No Sounds in Sound Scheme section. Or you can remain some of your favorite sounds but set Exit Windows, Windows Logoff, Windows Logon and Start Navigation to (None).
7. Also don't forget to:
  • Defrag the hard disk regularly
  • Install only necessary software
  • Use the latest device drivers
  • Keep your Windows up-to-date
After following all the above mentioned points, you'll definitely notice major improvements in your Windows Vista performance.

How to Fix Folder Rename Problem in Windows Vista?

A few Vista users have mailed us about a strange problem. Whenever they try to rename a file or folder, Windows shows following error message:
If you are also facing this problem, just download following Zip file, extract it and then run the extracted .REG file:
Download Link
Restart your system and your problem should be fixed.

Clear Type Tuner: Microsoft Powertoy for Windows

Clear Type Tuner is a Microsoft Powertoy for Windows XP but also works in Windows Vista & 7. You can use this powertoy to change the fonts settings which makes the fonts looking smooth and easy to read on screen. Download Link

How to Create Customized Desktop Toolbars in Windows Vista?

Lots of Windows Vista users complain that they can't create desktop toolbars in Vista like Windows XP. This functionality has been removed in Vista. But here I'm telling you a very simple way to create your own desktop toolbars in Vista as given in following screenshot:
So follow these steps to create your own desktop toolbars in Vista:
1. If you have My Computer icon on Desktop, then drag it and drop it at top, it'll convert in a toolbar. You can also drag-n-drop it at left or right side of screen. Remember it'll not work at the taskbar side.
2. You can also create a new folder on desktop and then drag-n-drop it. It'll also create a toolbar.
3. Now you can add other toolbars too in this new toolbar by right-clicking on empty area on the toolbar and select "Toolbars" option.
4. You can drag-n-drop icons in the toolbars.
5. You can also change other settings like:
Show Text
Show Title
View -> Large Icons
View -> Small Icons
Always on Top
Auto-Hide
6. To close the toolbar, right-click on it and select "Close Toolbar". Or you can drag-n-drop it at desktop and then click on Close button.

VistaThumbnailSizer: Easy and Quick Way to Change Windows Vista Taskbar Thumbnails Size

In Windows Vista, if you are using Aero theme then you cam notice new thumbnails which appear when you hover the mouse cursor over the opened program buttons in taskbar. Its a new and cool feature in Windows Vista. It shows the live previews of the running programs without activating their windows. Thanks to "Andreas Verhoeven" who has made a little utility to easily and quickly increase / decrease these thumbnails size.

You just need to download the Zip file, extract it and run the EXE file. You can change the height / width of thumbnails, add / remove "Fade-in" animation and if you like it and want to run this utility automatically whenever you start Windows, then you can add its entry in startup by clicking on "Start AveVistaThumbnailSizer with Windows" button.
You can download this utility here:
Download Link
Homepage

How to Add / Remove Items from New Menu in Windows?

In Windows, whenever we right-click on Desktop or Explorer, we get "New" menu which contains shortcuts for various known file types. We can easily create new files using this handy "New" menu.
Sometimes we may want to remove a few unwanted items from "New" menu or we may want to add a few necessary items to "New" menu which are not present. So in this tutorial, I'll tell you how can you add / remove items to / from "New" menu:
A. To Add an Item in "New" menu:
1. Open regedit and expand "HKEY_CLASSES_ROOT" key.
2. Now look for the file type which you want to add in "New" menu, e.g. for adding MP3 file type look for .MP3 key.
3. Right-click on it and select "New -> Key" and give it name "ShellNew".
4. In right-side pane, right-click and select "New -> String Value". Give it name "NullFile" and press Enter.
5. Thats it. You'll immediately get the file type entry in "New" menu.
B. To Remove an Item from "New" menu:
1. Open regedit and expand "HKEY_CLASSES_ROOT" key.
2. Now look for the file type which you want to remove from "New" menu, e.g. for removing MP3 file type look for .MP3 key.
3. Expand it and delete the "ShellNew" key.
4. Thats it. The file type will be removed from "New" menu.

How to Set Your Desired Wallpaper as Folder Background in Windows Vista and 7

We have posted a tutorial about settings your desired wallpaper as background image in any folder: How to Set Your Desired Wallpaper as Folder Background Image in Windows XP

But this method no longer works in Windows Vista and 7. So today we are going to share a small utility which allows you to set any wallpaper as background image in folders in Windows Vista and 7.
Thanks to Andreas for creating "Vista Folder Background". It integrates itself in Explorer and adds a new tab "Folder Background" in Folder Customization dialog box.

Download Link (Windows Vista)
And thanks to LeeWhittington @ DA for porting the tool to Windows 7.
Download Link (Windows 7) (32-bit)
Download Link (Windows 7) (64-bit)

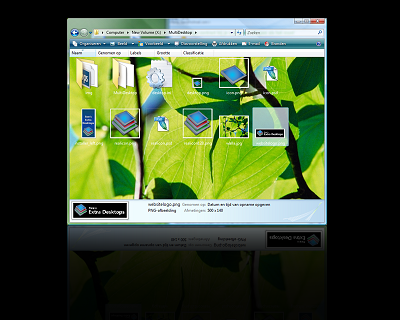
Extra Desktops: An Utility To have Multiple Desktops in Windows XP and Vista

Extra Desktops is an application that allows to use extra desktops, besides the normal desktop. Use a desktop for storing your downloads, use one filled with your regularly played MP3, use another one for the files of that project you are currently working on. With ExtraDesktops, there is no need anymore to browse to all these folders you regularly use: simply hit a key, and the files are right there on your desktop!

It works on both Windows XP and Vista. Make sure you have the following package installed:
Visual Studio 2005 SP1 Runtime Files
You can download it using following link:
Download Link
Homepage

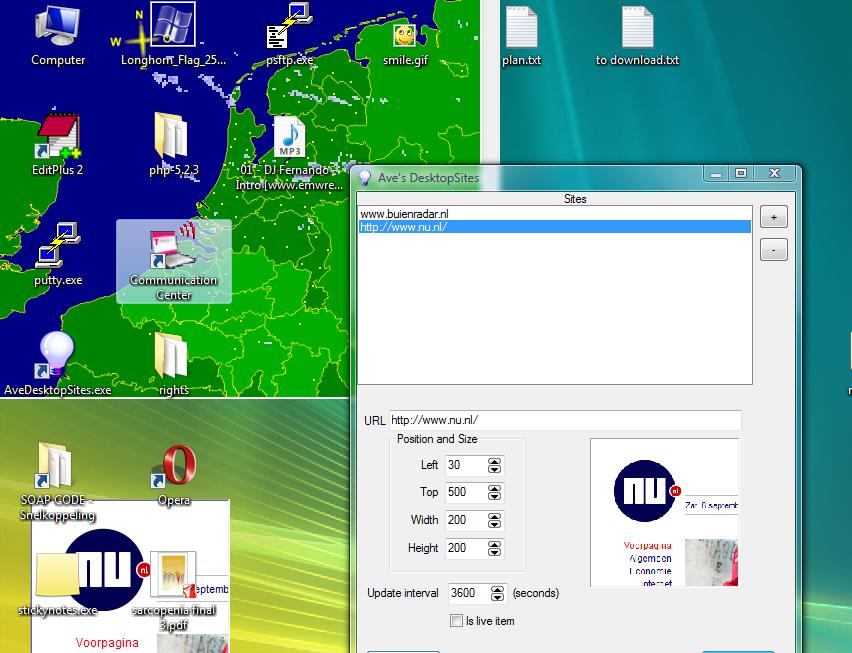
AveDesktopSites: An Alternative for Missing Active Desktop Feature in Windows Vista

AveDesktopSites is a small replacement for the Active Desktop utility that is no longer present in Windows Vista. Basically, the application shows websites on the desktop, but, unlike Active Desktop, they can not be interacted with. Download Ave Desktop Sites
This is useful for showing website data, such as news or weather images on your desktop.
Download Link
Homepage

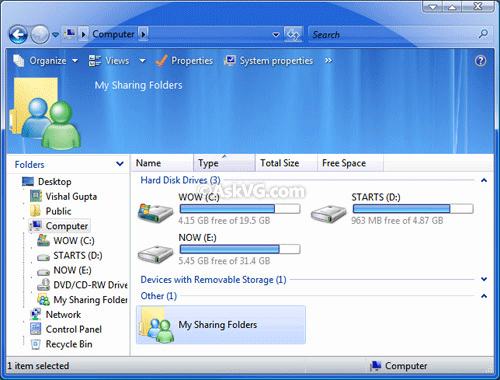
How to Remove Nokia PC Suite Folder, Web Folders, My Sharing Folders or Other Unwanted Items from My Computer?

Whenever you open My Computer in Windows, you see a few extra items like Web Folders, My Sharing Folders, Nokia PC Suite folder, etc. Actually they are installed by some software like Nokia PC Suite, Windows Live Messenger, Microsoft Forntpage, etc.
Sometimes we want to remove them to make the My Computer window clean but we can't find any way to remove them.
So here I'll tell you a very simple way to remove them easily and permanently:
1. Open regedit and goto:
HKEY_LOCAL_MACHINE\SOFTWARE\Microsoft\Windows\Current Version\explorer\MyComputer\NameSpace
2. Under this key, you'll see a few keys having name in following format:
{xxxxxxxx-xxxx-xxxx-xxxx-xxxxxxxxxxxx}

3. These keys represents those My Computer items. If you select any key, you can see its description in right-side pane.
4. So delete your desired key and it'll remove the unwanted item from My Computer window.
5. Following are the keys for My Sharing Folders and Web Folders:
My Sharing Folders - {FC9FB64A-1EB2-4CCF-AF5E-1A497A9B5C2D}
Web Folders - {BDEADF00-C265-11D0-BCED-00A0C90AB50F}
Printers & Faxes - {2227A280-3AEA-1069-A2DE-08002B30309D}
Network Connections - {7007ACC7-3202-11D1-AAD2-00805FC1270E}
Administrative Tools - {D20EA4E1-3957-11D2-A40B-0C5020524153}
Fonts - {D20EA4E1-3957-11D2-A40B-0C5020524152}
Scheduled Tasks - {D6277990-4C6A-11CF-8D87-00AA0060F5BF}
Recycle Bin - {645FF040-5081-101B-9F08-00AA002F954E}
BONUS TIP: You can use the same method to add your desired items in My Computer window. Just goto the registry key mentioned in point 1 and add a new key having name mentioned in point 5.

#
### ###