Friends

This is default featured post 1 title

Go to Blogger edit html and find these sentences.Now replace these sentences with your own descriptions.This theme is Bloggerized by Lasantha Bandara - Premiumbloggertemplates.com.

This is default featured post 2 title

Go to Blogger edit html and find these sentences.Now replace these sentences with your own descriptions.This theme is Bloggerized by Lasantha Bandara - Premiumbloggertemplates.com.

This is default featured post 3 title

Go to Blogger edit html and find these sentences.Now replace these sentences with your own descriptions.This theme is Bloggerized by Lasantha Bandara - Premiumbloggertemplates.com.

This is default featured post 4 title

Go to Blogger edit html and find these sentences.Now replace these sentences with your own descriptions.This theme is Bloggerized by Lasantha Bandara - Premiumbloggertemplates.com.

This is default featured post 5 title

Go to Blogger edit html and find these sentences.Now replace these sentences with your own descriptions.This theme is Bloggerized by Lasantha Bandara - Premiumbloggertemplates.com.

Sunday, June 26, 2011

How to Open Help Files (.hlp) in Windows 7 that Require Windows Help Program (WinHlp32.exe)?

As you know Windows Vista doesn't contain "Windows Help Program (WinHlp32.exe)" which is required to display 32-bit help files having .hlp file extension. Microsoft decided to remove the program from Windows Vista, 7 and all future Windows versions because WinHlp32.exe has not had a major update for many years, and it does not meet their standards for all new Microsoft programs.
But Microsoft realizes that this may cause some problems for customers who want to upgrade to Windows 7 but still rely on 32-bit .hlp files. Therefore, Microsoft is making WinHlp32.exe available as a download from the Microsoft Download Center.
So if you are using Windows 7 and want to open .hlp files, you should download and install following update released by Microsoft:
Download Windows Help program (WinHlp32.exe) for Windows 7
Download Windows Help program (WinHlp32.exe) for Windows Server 2008

Is Your PC Ready for Windows 7? Check Yourself Using Windows 7 Upgrade Advisor v2

Microsoft is going to release Windows 7 to public tomorrow, October 22nd, 2009. If you are planning to purchase a copy of Windows 7 RTM, you should first check whether your current system is compatible with Windows 7 or not. "Windows 7 Upgrade Advisor" helps you in find out whether your PC is ready for Windows 7 or not. It scans your PC for potential compatibility issues and lets you know about your Windows 7 upgrade options. Within minutes, you'll get a report that tells you if your PC meets the system requirements, if any known compatibility issues with your hardware, devices, and installed programs are found, and gives guidance on what to do to before installing Windows 7 on your PC.
Before you begin: Be sure to plug in and turn on any USB devices or other devices, such as printers, external hard disks, and scanners, that you regularly use with the PC you're checking.
Download Link

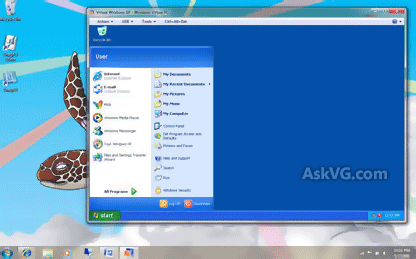
Windows XP Mode RTM Available for Public, Download NOW

"Windows XP Mode" is specially designed for small and medium-sized businesses to help ease the migration process to Windows 7 by providing additional compatibility for their older productivity applications. Users can run and launch Windows XP applications in Windows XP Mode directly from a Windows 7 desktop. Windows_7_XP_Mode.png
Recently final version of "Windows XP Mode" was released to MSDN and TechNet subscribers, and today Microsoft has released it to public.
Its available for free and can be downloaded using following link:
Download Windows XP Mode RTM for Windows 7

Hindi Language Interface Pack (LIP) Available for Windows 7

Microsoft has released the first Language Interface Pack (LIP) for Windows 7. That's a good news for Indian users as the first LIP available is Hindi. Hindi_LIP_for_Windows_7.png
Now you can enjoy Windows 7 interface in Hindi.
You can download it using following link:
Download Hindi LIP for Windows 7
Thanks to our friend "Rob Margel" for this news...

Why Microsoft Used the Name Windows 7? Explanation Inside

Windows 7 has been released to public but many people are so much confused about its name. People are talking about why did Microsoft use the name Windows 7? In this topic, we'll try to explain the reason behind it!
Mike Nash @ "The Windows Blog" posted why Microsoft decided to name it Windows 7:
The decision to use the name Windows 7 is about simplicity. Over the years, we have taken different approaches to naming Windows. We've used version numbers like Windows 3.1, or dates like Windows 98, or "aspirational" monikers like Windows XP or Windows Vista. And since we do not ship new versions of Windows every year, using a date did not make sense. Likewise, coming up with an all-new "aspirational" name does not do justice to what we are trying to achieve, which is to stay firmly rooted in our aspirations for Windows Vista, while evolving and refining the substantial investments in platform technology in Windows Vista into the next generation of Windows.
Simply put, this is the seventh release of Windows, so therefore "Windows 7" just makes sense.
And if you are confused why Windows 7 is the 7th release of Windows, here is another simple explanation:
First Windows version was Windows 1.0. Second was Windows 2.0 and third was Windows 3.0. When Windows NT was released, it was code versioned as Windows 3.1. Windows 95, 98, 98 SE and ME (Millennium Edition) were code versioned as Windows 4.0 as all were using Non-NT kernel or 9x kernel.
Windows 2000 was code versioned as Windows 5.0 and Windows XP as Windows 5.1. Next version was Windows Vista which was code versioned as Windows 6.0. Since Windows 7 is the next Windows version, Microsoft decided to call it Windows 7 for easy and better understanding.
1.0: Windows 1.0
2.0: Windows 2.0
3.0: Windows 3.0
3.1: Windows NT
4.0: Windows 95, 98, 98SE, ME
5.0: Windows 2000
5.1: Windows XP
6.0: Windows Vista
7.0: Windows 7

Create Windows 7 Bootable USB Drive or DVD Using Official “Windows 7 USB/DVD Download Tool” from Microsoft

Also take a look at other similar tools: A Bootable USB, WinToFlash, Setup from USB, Win32 Disk Imager and UNetbootin.
If you download your Windows 7 copy using Microsoft Store or your MSDN/TechNet/Connect account, it comes in ISO file format which needs to burn to a DVD.
What to do if you don't have a DVD drive? You can create a bootable USB drive to install Windows 7.
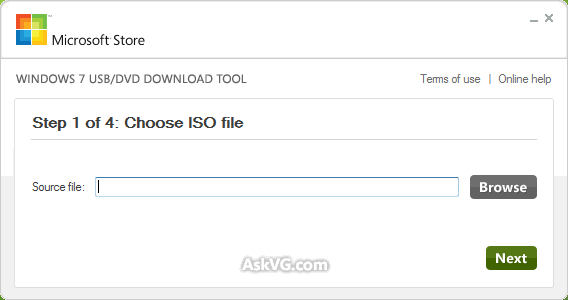
Microsoft has released a new utility "Windows 7 USB/DVD Download Tool" which allows you to create a bootable USB drive to install Windows 7. It also allows you to create bootable DVD.
Windows_7_USB_DVD_Download_Tool.png
You can download it using following link:
Download Windows 7 USB/DVD Download Tool
How to Use:
  • After downloading and installing the tool, when you launch it, it'll ask you to select the path where you have stored Windows 7 ISO file. Provide the ISO file path and click on "Next" button.
  • Now it'll ask you whether you want to create bootable USB drive or DVD. Click on the desired button.
  • If you select "USB Device", it'll ask you to insert the USB device. If your USB device is compatible, it'll be automatically detected by the tool.
  • Click on "Begin Copying" button. Now you'll be prompted to format the USB device. Accept the confirmation.
  • That's it. The tool will start copying the installation files to USB device.
  • At last, it'll show a message that "Bootable USB device created successfully".
System Requirements:
  • Windows XP SP2, Windows Vista, or Windows 7 (32-bit or 64-bit)
  • Pentium 233-megahertz (MHz) processor or faster (300 MHz is recommended)
  • 50MB of free space on your hard drive
  • DVD-R drive or 4GB removable USB flash drive

Customize Windows 7 Login Screen Using Account Screen Editor

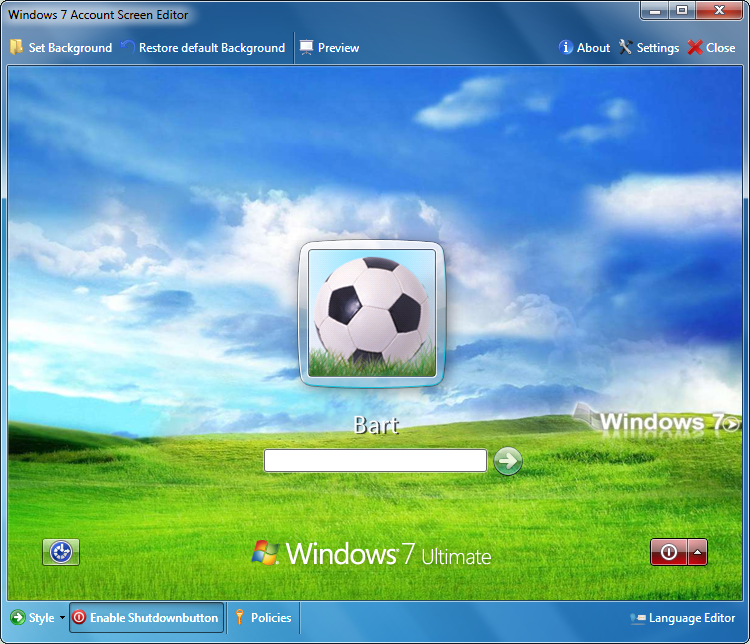
Today we are sharing a free tool, "Windows 7 Account Screen Editor" which provides an easy way to customize Windows 7 login screen background.
Click on "Set background" button and choose a picture for your login screen. Click on "Default background" button to restore default login scren background.
If a picture is too large, it'll automatically resize the picture.
You can download it using following link:
Download Link

Texturize Windows XP, Vista and 7 Taskbar using Taskbar Texturizer

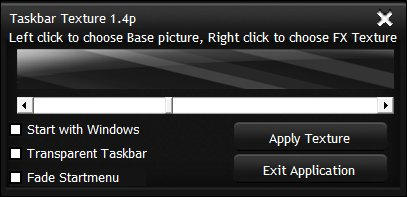
Here is another awesome tool created by our friend "Solo-Dev" @ DA. "Taskbar Texturizer" is a small tool which can add various textures to your Windows Taskbar to make it more stylish.
Its portable, so you don't need to install it. It can also be set to run at windows start up, along with auto-applying the last skin that was chosen.
The start menu also becomes transparent with the slider.
It comes with 10+ textures to choose from. It works in Windows XP, Vista and 7.
You can download it using following link:
Download Link
More Info

Microsoft Released FREE Windows 7 Product Guide, Download NOW

Microsoft has released an official Windows 7 Product Guide which is available in PDF and XPS formats for download. It provides a detailed look at the many new and improved features in Windows 7. The guide is designed as an accurate source of information that can help you to understand how Windows 7 Simplifies Everyday Tasks, Works the Way You Want, and Makes New Things Possible.
The guide is also designed to provide IT Professionals with information about how to Make People Productive Anywhere, Manage Risk Through Enhanced Security and Control, and Reduce Costs by Streamlining PC Management.This is not a help and how to guide. Rather, it provides an overview of the many exciting features in Windows 7 and pointers to more information.
Brandon LeBlanc @ The Windows Blog made the official announcement about this product guide:
This easy to read guide gives you a clear overview of the features in Windows 7 without a lot of technical jargon that you might find in other content. The guide was designed to educate and inform readers about benefits you get from adopting Windows 7.
Windows 7 Product Guide has three major sections:
Introduction - Describes how Microsoft designed Windows 7, what editions of Windows 7 are available and what is new.
Windows 7 for You - Goes over features in Windows 7 that, simplify everyday tasks, works the way you want, and makes new things possible.
Windows 7 for IT Professionals - Explains how Windows 7 can make people productive anywhere, manage risk though enhanced security and control, and reduce costs by streamlining PC management.  This section also has an overview of the Microsoft Desktop Optimization Pack to help you learn about how this set of applications can help you get to a more managed and optimized desktop.
You can download the guide using following link:
Download Link

How to Disable Windows 7 Taskbar Tab Preview Thumbnails in Mozilla Firefox?

If you are using recently released Mozilla Firefox 3.6 or 4.0 version, you might have noticed that it supports Taskbar preview thumbnails for each tab in Windows 7, i.e. Firefox shows preview thumbnails for each tab when you hover mouse cursor over its taskbar button as shown in following screenshot: Taskbar_Tab_Previews_in_Mozilla_Fir.png
Some of our readers found it annoying and want to disable this new functionality. So here we are giving step by step procedure to disable Taskbar tab previews in Mozilla Firefox:
1. Open firefox and type about:config in the addressbar and press Enter. It’ll confirm, click on I’ll be careful, I promise! button.
2. Now type taskbar in the Filter box. It’ll show following entries:
browser.taskbar.previews.cachetime
browser.taskbar.previews.enable
browser.taskbar.previews.max
3. The entry "browser.taskbar.previews.enable" would be set to true. Double-click on it or right-click on it and select "Toggle". It'll set its value to false.
Enable_Taskbar_Tab_Previews_in_Mozi.png
4. That's it. Now Firefox will no longer show preview thumbnails for each tab in Taskbar.
No_Taskbar_Tab_Previews_in_Mozilla_.png
Also Read:

Windows 7 in a Box: Get All System Settings in One Place

"Windows 7 in a Box" is a small application which allows you to easily access almost all system settings in one place. You can open Desktop Personalization, Task Manager, Registry Editor, Device Manager, UAC Settings, Paint, Notepad, Calculator and many other useful system programs. You can even log off, restart or shut down your system using this small utility. Windows_7_in_a_box.png
The best thing about this program is its portability. You don't need to install it. Simply run the EXE file and access all system settings. You can even carry it in your USB drive.
You can download it using following link:
Download Link
Thanks to our reader "Laxorm" for sharing it...

Messenger Aero Switcher: Disable Aero UI in Windows Live Messenger (WLM) Under Windows Vista and 7

If you use latest version of Windows Live Messenger (WLM) under Windows Vista or 7, you might have noticed that it uses Windows Aero theme to draw window borders, titlebar buttons, etc. Older versions of WLM didn't use Aero frame, they used to provide their own GUI. If you miss the old GUI and want to get it back, you can get it by turning Aero theme off in Windows but that's not a perfect solution as it'll affect the whole system look. Then what to do? Don't worry, here is the ultimate solution.
"Messenger Aero Switcher" is a small tool to easily turn Aero off or on for WLM without affecting any other Windows application.
Simply run the tool and select the desired option. It'll immediately apply the change.
Windows_Live_Messenger_Aero_Switche.png
You can download it using following link:
Download Link
Homepage

[Registry Method] How to Prevent Themes to Change Desktop Icons & Mouse Pointers in Windows 7?

Windows 7 comes with lots of bundled themes which can be applied using Desktop Personalization window. You can also download many free Windows 7 themes using Microsoft official Windows 7 theme gallery. But almost all these themes come with their own pre-defined mouse cursors and Desktop icons and when you apply a theme, it changes the Desktop icons and cursors automatically without even asking you. It becomes annoying when you have manually changed them in past.
You can prevent themes to change icons and cursors by changing a few options in Mouse and Desktop Icons settings. You can read following tutorial which shows how to do the task:
How to Prevent Themes to Change Desktop Icons & Mouse Pointers in Windows 7?
You can also use Registry Editor to do the same task and today in this tutorial, we are going to share the registry method.
Follow these simple steps to prevent themes to automatically change Desktop icons and mouse cursors in Windows 7 using registry:
1. Type regedit in RUN or Startmenu Searchbox and press Enter. It'll open Registry Editor.
2. Now go to following key:
HKEY_CURRENT_USER\Software\Microsoft\Windows\CurrentVersion\Themes
3. In right-side pane, create or modify following 2 DWORD values:
ThemeChangesDesktopIcons
ThemeChangesMousePointers
And set their values to 0
ThemeChangesDesktopIcons_MousePoint.png
4. That's it. Now themes will not change Desktop icons and mouse cursors automatically.
PS: If you want to don't want to manually change registry, download following registry scripts to do the task automatically. After downloading, extract ZIP file and run the desired registry script:
Download Registry Script

Download Update for Windows 7 to Fix Data Corruption Issue for Secure Digital (SD) Cards

Microsoft has released an update "KB976092" for Windows 7 which fixes a data corruption issue for Secure Digital (SD) cards. If you are using Windows 7, you should download and install this update. Problem overview:
You have an NTFS formatted SD card. You use Advanced Direct Memory Access (ADMA) to transfer data between the SD card and a computer that is running Windows 7 system. When you transfer data from the computer to the SD card, the data on the SD card may be corrupted. Additionally, unexpected problems may occur when you try to use the affected data.
During an ADMA transfer process, the Secure Digital Bus Driver (Sdbus.sys) converts the DMA data structure of the operating system to the ADMA data structure of the SD card. The DMA and the ADMA data structures are also known as descriptor tables. A descriptor table contains a data length value and a buffer address. The data-length field is 16-bit, and it has a maximum size of 64 kilobytes (KB). However, during the data conversion process, the Sdbus.sys driver does not check the buffer size in the descriptor table of the system. Therefore, the Sdbus.sys driver may set an incorrect data length in the SD descriptor table. For example, the Sdbus.sys driver may set the data length to something longer than 0xFFFF. Also, I/O corruption occurs, in this scenario. This, in turn, causes data corruption.
You can download the update using following link:
Download Link

Download Link (64-bit)

Get Classic Start Menu Back in Windows 7 Using CWSM

There is no doubt, Windows 7 comes with lots of new features but its also true that some important functionality have been removed from Windows 7 like good old Classic start menu. Classic start menu was very useful and easy to use but for some unknown reasons, Microsoft has removed it from Windows 7. Now if you want to get it back, you'll need to take help of 3rd party software.
Today we are sharing a freeware "Classic Windows Start Menu" which can provide a similar Classic start menu in Windows 7. Following is a screenshot of CWSM in action:
Classic_Windows_Start_Menu.png
As you can see, it looks very similar to Classic start menu. The most impressive thing about CWSM is that it uses Aero engine to render its interface so you get a glassy start menu which looks great.
Its a portable utility so you don't need to install it. You can also customize it for your needs. For example, you can modify the text of menus, change background image, change left-side logo, change icons, etc. You can do all these things by modifying files present in its folder.
You can also make it more glassy by modifying "strings.xml" file and set "<MENU BACKGROUND PRESENT>Yes</>" to "<MENU BACKGROUND PRESENT>No</>":
Customize_Classic_Windows_Start_Men.png
Once you do it, exit from CWSM by right-click on Start ORB (Start button) and click on "Yes" button in confirmation dialog box. Then run cwsm.exe again. Now it'll look as following:
Classic_Windows_Start_Menu_without_.png
There are also some BMP files in its folder: logoffback.bmp, ribbon.bmp, shutdownback.bmp which can be modified to change Log off dialog box, left-side logo and Shutdown dialog box background images respectively.
You can download it using following link:
Download Link
(Scroll down to the end of the page to see download links.)
NOTE: It also works in Windows XP and Vista.
Thanks to our active reader "Bryan" for sharing this utility via email...
NOTE: You can also check other free tools to get Classic Start Menu back in Windows 7 at following link:
Ultimate Collection of the Best Free Tools to Get Classic Start Menu Back in Windows 7

How to Disable Autorun Functionality in Windows Using Registry Editor?

Whenever you insert a USB drive, CD/DVD, etc into your system, Windows automatically launches an Autorun dialog box which allows you to select an action from the given list. You can browse the content, play media files, etc using Autorun dialog box. Sometimes you might find the Autorun functionality annoying and might want to disable it permanently. Today in this tutorial, we are going to share a small registry method to disable Autorun functionality in Windows.
This method works in almost all Windows versions including XP, Vista and 7.
1. Type regedit in RUN or Startmenu searchbox and press Enter. It'll open Registry Editor.
2. Go to following key:
HKEY_CURRENT_USER\Software\Microsoft\Windows\CurrentVersion\Policies\Explorer
If the above key doesn't exist, create it.
3. In right-side pane, create a new DWORD value NoDriveTypeAutoRun and set its value to any of following according to your requirements:
FF - To disable AutoRun on all drives
20 - To disable AutoRun on CD-ROM drives
4 - To disable AutoRun on removable drives
8 - To disable AutoRun on fixed drives
10 - To disable AutoRun on network drives
40 - To disable AutoRun on RAM disks
1 - To disable AutoRun on unknown drives
Disable_Autorun_Functionality.png
4. If you want to disable Autorun on a combination of drives, you'll need to calculate sum of the values. For example, if you want to disable Autorun on CD-ROM drives and removable drives, you'll need to set the value to 20+4=24.
5. If you want to restore the Autorun functionality, simply delete the NoDriveTypeAutoRun DWORD value created in Step 3 Or you can set the default value which is given below:
Windows 2000: 95
Windows XP: 91
Windows Server 2003: 95
Windows Vista, Server 2008 and 7: 91
6. If you want to disable Autorun functionality for all users in your system, use the "HKEY_LOCAL_MACHINE" instead of "HKEY_CURRENT_USER" mentioned in Step 2.
PS: If you are not very familiar with Registry and want a ready-made registry script to do the task automatically, simply download following ZIP file, extract it and run the desired REG file. It'll ask for confirmation, accept it:
Download Registry Script

System Screensavers Tweaker: Access Secret Hidden Screen Saver Settings in Windows Vista and 7

Windows Vista and 7 come with some new and interesting screen savers like Aurora, Mystify, Ribbons and Bubbles. All these screen savers are good but the worst part is you are not allowed to customize their settings. There are no options available to customize any of these screen savers. We have posted a tutorial to customize these screen savers settings using registry:
How to Customize / Tweak Windows Vista ScreenSavers using Registry?
If you are not familiar with Registry Editor, you can use a new small tool which allows you to easily customize these hidden settings.
"System Screensavers Tweaker" is a small portable tool created by our friend "Happy Bulldozer aka hb860" which helps you in easily customizing Windows Vista and 7 screen savers.
System_Screensavers_Tweaker.png
You can modify various hidden settings like speed, amount, shadow, transparency, etc.
It supports both 32-bit as well as 64-bit both Windows versions.
Download Link
If you like this, you might also like other similar articles posted in following section: Software, Windows 7, Windows Vista.

Download “AeroVG Se7en” Theme for Windows 7

NOTE: This theme has been featured by Microsoft.
"AeroVG" theme is one of the most popular themes available for Windows Vista. It provides excellent transparency in Taskbar, Startmenu, Explorer, etc. It also changes lots of visual things like menubar, addressbar, progressbar and much more.
Lots of Windows 7 users requested to make the same theme for Windows 7. Today I'm very pleased to announce the release of "AeroVG Se7en" theme which is a Windows 7 port of my "AeroVG" theme for Vista.
IMPORTANT:
If you are using previous Beta versions of "AeroVG Se7en" theme, then run "First Run Me.bat" file to delete previous Beta versions and install new RTM version of theme.
If you are not using any previous Beta version, simply run "Install Theme.exe" file to install and apply final version of "AeroVG Se7en" theme.
I hope you guys will like the final version. :)

You can download it using following link:
Download "AeroVG Se7en RTM" Theme for Windows 7
Also go through following tutorial which describes how to use 3rd party themes in Windows7:
How to Install & Use 3rd Party (Custom) Themes in Windows 7?
If you are a Windows Vista user, you can also enjoy this theme using following link:
Download “AeroVG” Theme for Windows Vista

Truth Behind Hidden Secret “God Mode” (or GodMode) Found in Windows 7

So everyone is talking about the new "God Mode" found in Windows 7. Is it really new to Windows 7? Is it really a hidden secret thing? Lets understand it with the help of a very simple story. 2 persons are discussing about "GodMode":
Person 1: Did you know Windows 7 contains a hidden secret "God Mode"?
Person 2: (Surprised...) Really? I didn't. Can you please let me know how to access it?
Person 1: Sure. Just create a new folder anywhere in Windows 7. You can create it on Desktop or within Windows Explorer and give it following name:
God Mode.{ED7BA470-8E54-465E-825C-99712043E01C}
Voilla. Now you'll have access to all Control Panel settings page in a single place as shown in following screenshot:
Windows_7_Gode_Mode.png
Person 2: (Excited...) Wow. Amazing. Its too cool. But hey! I tried to use my name instead of "God Mode" while renaming the folder and its still working. So what's so special about giving it name "God Mode"?
Person 1: (Confused and looking at the front wall...) Hmmm. Guess what, you are right mate. I checked and it works for any string but the code given after the decimal point is must and should not be changed.
Person 2: Yeah. So "God Mode" has nothing to do with this special Control Panel page. I investigated and found that actually this page is called "All Tasks" and you can get more information about it from Windows Registry.
Type regedit in RUN or Startmenu Searchbox and press Enter. It'll open Registry Editor. Now go to following key:
HKEY_CLASSES_ROOT\CLSID\{ED7BA470-8E54-465E-825C-99712043E01C}
Or press "Ctrl+F" in Registry Editor and search for {ED7BA470-8E54-465E-825C-99712043E01C} string. It'll open the same key for you.
Now you can see, this key have "All Tasks" as default value.
Windows_7_Gode_Mode_in_Registry.png
Person 1: True mate.
Person 2: Actually this special "All Tasks" page is neither any easter egg nor any hidden secret thing. It was developed by Windows developers to show search results. Whenever you search for any term in control panel window, the "All Tasks" page is searched for the term and if any search result is found, its shown to the user.
In fact, there is no need to create a new folder to access it. You can directly access it using following command in RUN or Windows Explorer addressbar:
shell:::{ED7BA470-8E54-465E-825C-99712043E01C}
You can also create a shortcut using following command:
explorer.exe shell:::{ED7BA470-8E54-465E-825C-99712043E01C}
And its not any new thing in Windows 7. It was also present in Windows Vista.
Person 1: Says nothing and leaves the room...
PS: If you want a ready-made "Windows 7 God Mode" shortcut, download following ZIP file, extract it and run the extracted file. It'll directly launch the so called hidden secret GodMode:
Download "Windows 7 God Mode" Shortcut

How to Get Windows Media Player (WMP) 12 Taskbar Toolbar (Taskband) Back in Windows 7 by Restoring wmpband.dll File

If you are using Windows 7 and missing the good old Taskbar Toolbar aka Taskband in Windows Media Player 12 (WMP 12), here is something very interesting for you. "Justin Buser" @ our friend site WinMatrix has found an excellent way to bring WMP 12 Taskbar Toolbar back in Windows 7.
If you don't know what is WMP Taskbar Toolbar or Taskband, please visit this topic.
Here are step-by-step instructions to enable WMP 12 Taskbar Toolbar in Windows 7:
1. Actually Taskbar Toolbar or Taskband is stored in a DLL file called "wmpband.dll" which is found in "Windows Media Player" directory present in "Program Files" folder. Microsoft removed this DLL file from WMP 12 folder, that's why the toolbar no longer exists in Windows 7.
You can copy this DLL file from WMP 11 folder present in Windows Vista to Windows 7. If you don't have access to a Vista system, you can directly download it from following link:
Download Link
2. Once you download the above ZIP file, extract it and you'll get the required DLL file for both 32-bit and 64-bit Windows versions. Copy the appropriate DLL file and paste it to "Windows Media Player" directory present in "Program Files" folder. Just type %programfiles%\Windows Media Player in Explorer addressbar and press enter and it'll open the "Windows Media Player" directory.
Copy_WMPBand_dll_File.png
3. Now right-click on Computer icon on desktop and select Manage, it'll open a new window. Now go to Services & Applications -> Services. You can also open the same from Administrative Tools -> Computer Management. Or you can directly open "Services" list by providing services.msc command in RUN or Startmenu search box.
Now right-click on "Windows Media Player Network Sharing" service and select "Stop". It'll stop the service.
WMP_Network_Sharing_Service.png
4. Now you'll need to register "WMPBand.dll" file. Type following string in RUN or Startmenu Searchbox and press Enter:
regsvr32 "%programfiles%\Windows Media Player\wmpband.dll"
Register_WMPBand_dll_file.png
5. That's it. Now run Windows Media Player. Minimize it and select "Toolbars -> Windows Media Player" option by right-clicking on the Taskbar and you'll be able to enjoy the Taskbar Toolbar aka Taskband in Windows 7:
WMP12_Mini_Taskbar_Toolbar_Taskband.png

Microsoft Cooking Windows 7 Service Pack 1 (SP1)

Windows 7 was released to manufacturing on August 6th and to public on October 22nd and now it seems that Microsoft has started working on the first Service pack for Windows 7. Rafael @ Within Windows has found something interesting regarding SP1 for Windows 7.
Similar to previous external beta service pack rollouts, Microsoft has enabled – via updates you already installed – a beta 'candidacy check' within its Windows Update software.
Windows_7_SP1.png
Just like Windows Vista, a registry key and value pair need to be added prior to being authorized to download the new software.
Key: HKEY_LOCAL_MACHINE\Software\Microsoft\Windows\CurrentVersion\WindowsUpdate\Win7SP1
Value: SPORTM (REG_SZ)
Data: Unknown (likely a server-side checked GUID)

How to Add Windows 7 “God Mode” Shortcut in Desktop Context Menu?

We have talked about "God Mode" found in Windows 7 which allows quick access to all Control Panel options in a single place. Windows_7_Gode_Mode.png
To access this hidden "God Mode" you have to create a new folder or a new shortcut but today in this tutorial, we are going to tell you how to add a shortcut to "God Mode" in Desktop context menu so that you can quickly and easily access it by right-clicking on Desktop and selecting "God Mode" option.
God_Mode_in_Desktop_Context_Menu.png God_Mode_in_Top_Desktop_Context_Men.png God_Mode_in_Bottom_Desktop_Context_.png
Following are the required steps:
1. Type regedit in RUN or startmenu search box and press Enter. It'll open Registry Editor.
2. Now go to:
HKEY_CLASSES_ROOT\DesktopBackground\Shell
3. Now we'll need to create a new key under "Shell" key. Right-click on "Shell" key and select "New -> Key". Give the new key any desired name e.g. "GodMode" (without quotes).
4. Now in right-side pane, change value of "Default" to your desired name which you want to show in Desktop context menu. We have chosen God Mode in our example.
5. Now right-click on the new key which we created in step 3, e.g. GodMode and select "New -> Key". Give the new key name of command.
6. In right-side pane, change value of "Default" to:
explorer shell:::{ED7BA470-8E54-465E-825C-99712043E01C}
7. To set an icon for the shortcut, select the key created in Step 3 and in right-side pane, create a new String value "Icon". Set its value to your desired icon. We have set it to control.exe in our example to show Control panel icon for it.
To set its position in the context menu, create a new String value "Position" and set its value to:
Top (To show it at top)
Bottom (To show it at bottom)

8. That's it. Now you can have "God Mode" shortcut with an icon in Desktop context menu.
PS. If you want a ready-made registry script to do the task automatically, download following ZIP file, extract it and run the desired REG file:
Download Registry Script

How to Add Windows 7 “God Mode” Shortcut in My Computer Context Menu?

As you all know "God Mode" in Windows 7 allows quick access to all Control Panel options in a single place. Windows_7_Gode_Mode.png
To access this hidden "God Mode" you have to create a new folder or a new shortcut but today in this tutorial, we are going to tell you how to add a shortcut to "God Mode" in My Computer context menu so that you can quickly and easily access it by right-clicking on My Computer icon and selecting "God Mode" option.

Following are the required steps:
1. Type regedit in RUN or startmenu search box and press Enter. It'll open Registry Editor.
2. Now go to:
HKEY_CLASSES_ROOT\CLSID\{20D04FE0-3AEA-1069-A2D8-08002B30309D}
3. Now we'll need to create a new key under "Shell" key. Right-click on "Shell" key and select "New -> Key". Give the new key any desired name e.g. "GodMode" (without quotes).
4. Now in right-side pane, change value of "Default" to your desired name which you want to show in Desktop context menu. We have chosen God Mode in our example.
5. Now right-click on the new key which we created in step 3, e.g. GodMode and select "New -> Key". Give the new key name of command.
6. In right-side pane, change value of "Default" to:
explorer shell:::{ED7BA470-8E54-465E-825C-99712043E01C}
7. To set an icon for the shortcut, select the key created in Step 3 and in right-side pane, create a new String value "Icon". Set its value to your desired icon. We have set it to control.exe in our example to show Control panel icon for it.

8. That's it. Now you can have "God Mode" shortcut with an icon in My Computer context menu.
PS. If you want a ready-made registry script to do the task automatically, download following ZIP file, extract it and run the desired REG file:
Download Registry Script

How to Pin Windows 7 “God Mode” Shortcut to Taskbar?

We know "God Mode" in Windows 7 allows quick access to all Control Panel options in a single place. Windows_7_Gode_Mode.png
To access this hidden "God Mode" you have to create a new folder or a new shortcut but today in this tutorial, we are going to tell you how to pin "God Mode" shortcut to Windows 7 Taskbar so that you can quickly and easily access it.
Following are the required steps:
1. First you'll need to create a new shortcut. To do this, right-click on Desktop and select "New -> Shortcut":
New_Shortcut.png
2. It'll launch "Create Shortcut" wizard. Now enter following string in location box:
explorer shell:::{ED7BA470-8E54-465E-825C-99712043E01C}

3. After entering the location, click on "Next" button. Now type God Mode in name box and click on "Finish" button. It'll create a new shortcut on Desktop.
4. Now its time to change the icon. Right-click on the shortcut and select "Properties". Click on "Change Icon" button. Type control.exe in text box and press Enter. Select the Control panel icon, click on OK button and then Apply the changes.
PS: If you don't want to create the shortcut manually and want a ready-made "God Mode" shortcut, download following ZIP file, extract it and you'll get the desired shortcut:
Download "Windows 7 God Mode" Shortcut
5. Now you just need to pin this new shortcut to Taskbar. You can either drag-n-drop the shortcut to Taskbar or right-click on the shortcut and select "Pin to Taskbar" option:

6. That's it. Now you can enjoy the "God Mode" shortcut in Taskbar:

Also Read:
How to Add Windows 7 “God Mode” Shortcut in Desktop Context Menu?
How to Add Windows 7 “God Mode” Shortcut in My Computer Context Menu?

Librarian: A Library Manager for Windows 7

Librarian is an excellent piece of software created by our friend "Happy Bulldozer aka hb860". It allows you easily tweak Libraries in Windows 7. It is a multi-language application which allows you to:
  • Create a new library with any folder(s) inside
  • Change library's icon through standard Windows dialog
  • Rename library
  • Change content type of new or current library
  • Change "default save location" option
  • Change "Show in Navigation Pane" option
  • Show library as XML
Librarian
You can download it using following link:
Download Link

How to Get Windows XP Styled Classic “Alt+Tab” Switcher Screen in Windows Vista and 7?

Whenever you press "Alt+Tab" key combination in Windows Vista or 7, it shows a new improved screen which shows running application names along with their live thumbnails so that you can see the window content before switching to them. The "Alt+Tab" switcher screen also shows "Desktop" in the list so that you can directly access Desktop icons without minimizing all running applications manually.
Alt_Tab_in_Windows_7.png
Its good and very handy but some people might find it annoying as it takes some time to show the switcher screen and selecting the running application. If you also find it annoying or boring and want to bring back the good old Windows XP styled Classic "Alt+Tab" Switcher screen in Windows Vista and 7, this tutorial will help you.
Windows_XP_Classic_Alt_Tab_Switcher.png
Please follow these simple steps:
1. Type regedit in RUN or startmenu search box and press Enter. It'll open Registry Editor.
2. Now go to:
HKEY_CURRENT_USER\Software\Microsoft\Windows\CurrentVersion\Explorer
3. In right-side pane, create a new DWORD value AltTabSettings and set its value to 1
AltTabSettings_DWORD.png
4. That's it. Now whenever you'll press "Alt+Tab" keys together, it'll show Windows XP styled classic "Alt+Tab" Switcher screen instead of the new screen.
5. To restore default Aero enabled "Alt+Tab" Switcher screen, simply delete the AltTabSettings DWORD value created in step 3. Log off and login again to take effect.
NOTE. If you want a ready-made registry script to do the task automatically, download following ZIP file, extract it and run the extracted REG file:
Download Registry Script
BONUS TIP: If you don't want to set the Classic "Alt+Tab" Switcher screen permanent but want to enjoy it temporarily, then you can follow these simple steps:
  • Press and hold Left or Right Alt key.
  • Now press and release the other Alt key on your keyboard but keep pressing the first Alt key.
  • Now press Tab key and you'll get the Windows XP styled Classic "Alt+Tab" Switcher screen.
Its a bug in Windows Vista and 7. Actually this bug can also be reproduced in Windows Vista Beta versions...

[FIX] Welcome Screen is Displayed for 30 Seconds If a Solid Color is Set as Desktop Background in Windows 7

Some Windows 7 and Server 2008 R2 users might face a weird bug which has been confirmed by Microsoft and would be fixed in upcoming SP1. The bug appears when you set a Solid Color as Desktop background.
  • Right-click on desktop and select Personalize option.
  • Click on Desktop Background at the bottom of the window.
  • Select Solid Colors option in Picture location list.
  • Now select any solid color and click on Save changes button.
Now if you try to log on to your computer, Welcome screen would be displayed for 30 seconds before showing your Desktop.
To fix this problem, you can set any image as Desktop background or create a new image in MS Paint or any other image editing software, fill it with your desired solid color and set it as Desktop background.
There is also a registry method available to fix this issue which requires following steps to follow:
1. Type regedit in RUN or startmenu search box and press Enter. It'll open Registry Editor.
2. Now go to:
HKEY_LOCAL_MACHINE\SOFTWARE\Microsoft\Windows\CurrentVersion\Policies\System
3. In right-side pane, create a new DWORD value DelayedDesktopSwitchTimeout and set its value to 5
DelayedDesktopSwitchTimeout.png
4. That's it. Log off or restart your system and your problem should be solved.
NOTE. If you want a ready-made registry script to do the task automatically, download following ZIP file, extract it and run the extracted REG file:
Download Registry Script
PS: You can also request Microsoft for a hotfix to fix this problem.

7 Taskbar Tweaker: Ultimate Utility to Tweak Windows 7 Superbar

Windows 7 comes with new "Superbar" which is an enhanced version of old Taskbar. Superbar provides lots of new features like support to pin an item to Taskbar, Jumplists, etc. Some of you might not like these newly introduced features so today we are sharing a small but useful utility which helps in tweaking Windows 7 Taskbar. "7 Taskbar Tweaker" is a small utility which allows you to tweak various Taskbar features like:
  • Show standard window menu on right click instead of jumplist
  • Close or focus a window on middle click instead of running a new instance
  • Disable grouping of windows by file path or application id
  • Cycle through windows of a grouped button on left click instead of showing a thumbnail preview
  • Open with while dropping a file on a taskbar button instead of pinning
  • Disable thumbnail previews
7_Taskbar_Tweaker.png
Its a portable utility so you don't even need to install it. Simply extract the RAR file and run the extracted EXE file.
You can download it using following link:
Download Link
Homepage

“Windows Experience Pack” Available for Windows XP, Vista and 7

The Windows Experience Blog has announced the availability of "Windows Experience Pack" which has been developed for people with PCs running Windows 7 and/or Windows Live Essentials. With the Windows Experience Pack, you are able to create an alter-ego of yourself in a specific destination – a beach, mountain, safari, or city. When you create your alter-ego, you create a fully customized avatar for that destination that becomes a part of a Windows Live Messenger and Windows 7 theme for your PC. You'll also be able to download a .jpg image of your avatar to share, print, or use as your icon on social networks.
For a specific destination you pick, the following Windows Live Messenger elements are created for you to use in Messenger for your alter-ego:
  • 1 static Display Picture
  • Up to 4 Dynamic Display Pictures
  • A Wink
  • 7 new Emoticons
  • A new Messenger Scene
For Windows 7, you are given the choice between 3 desktop backgrounds for your destination and a screensaver featuring multiple photos from your destination.
The Windows Experience Pack was created and optimized for Windows 7, but it can be downloaded and used on PCs running Windows XP or Windows Vista too (although performance and features may vary).
Windows Experience Pack

#
### ###