Friends

This is default featured post 1 title

Go to Blogger edit html and find these sentences.Now replace these sentences with your own descriptions.This theme is Bloggerized by Lasantha Bandara - Premiumbloggertemplates.com.

This is default featured post 2 title

Go to Blogger edit html and find these sentences.Now replace these sentences with your own descriptions.This theme is Bloggerized by Lasantha Bandara - Premiumbloggertemplates.com.

This is default featured post 3 title

Go to Blogger edit html and find these sentences.Now replace these sentences with your own descriptions.This theme is Bloggerized by Lasantha Bandara - Premiumbloggertemplates.com.

This is default featured post 4 title

Go to Blogger edit html and find these sentences.Now replace these sentences with your own descriptions.This theme is Bloggerized by Lasantha Bandara - Premiumbloggertemplates.com.

This is default featured post 5 title

Go to Blogger edit html and find these sentences.Now replace these sentences with your own descriptions.This theme is Bloggerized by Lasantha Bandara - Premiumbloggertemplates.com.

Sunday, April 3, 2011

Create Animation

Well since I modified my avatar and signature last time, I saw that many people wanted to know how I did that :wink:
How I gave such lifeness? So here is the answer in a tutorial :cool2:
 Okey lets start the resurrection of our Avatars and Signatures :ar:
First lets add some blinking stars in to our avatar.
 Note :ar: To get the successful results, I recommend to use Adobe Imageready CS2
  :info: Basically you can follow all this with only Image ready application but since I'm a much addict towards Photoshop I'll use both :mdr:
 Hey I forgot to say, a nice music please :lol:
 Ok first of all, find a better avatar to add blinking stars or just design one :wink:
 http://img205.imageshack.us/img205/5558/allob9.png
 http://img204.imageshack.us/img204/9986/1fw9.png
 Then go to the layer at the top.
Press Ctrl+Shift+N to create a new layer at the top & name it 'Star 1'
 Select a white to transparent gradient and from the gradient type, choose 'Diamond'
 http://img204.imageshack.us/img204/9513/2gb2.png
 Put a little star in the 'Star 1' layer like this,
 http://img230.imageshack.us/img230/7974/3db2.png
 Then Press Ctrl+Shift+N to build up anothe layer and name it 'Star 2'
Put another white star in that layer like this (not in the same place as 'Star 1' )
 http://img204.imageshack.us/img204/2962/4gf6.png
 So then, as for your desire, add many stars as you like, but remember, each star must have it's own layer (a layer must contain only one star)
 As for mine, I created nine stars in nine layers
 http://img207.imageshack.us/img207/1746/6vi1.png
 but in the canvas, they look like this,
 http://img204.imageshack.us/img204/7793/5cl2.png
 Ok now it's the time to press the magic button :wink:
 Switch to Image Ready now
 http://img69.imageshack.us/img69/2039/7dz8.png   or just press Ctrl+Shift+M
 When you oen the document in Image ready, make sure to open the 'Animation' window
 http://img207.imageshack.us/img207/7075/8kr2.png
 Let's start working :666:
  :ar: First of all select the opasity of the all star layers (Star 1-Star 8) to 0% but Keep the last star layer (Star 9) opasity to 100%
 http://img207.imageshack.us/img207/5306/9wq8.png
 Go to the animation Window,
 Hit Duplicate Current Frame and you'll have another frame
 http://img207.imageshack.us/img207/5356/11ax2.png
 Go to the Frame No 2 from the Animation Window and there, set the 'Star 9' Opasity to 0% and 'Star 1' Opaity to 100%
 In the Canvas It'll look like this
 http://img207.imageshack.us/img207/8120/12qi5.png
 Now press the Tween Button in the Animation Window :oui: (With Frame 2 Selected)
 http://img207.imageshack.us/img207/9747/13hq8.png
 In the Tween Parameters, Set the number of Frames to add to 5 (the other parameters are not important to be discussed here)
 http://img82.imageshack.us/img82/6789/14bc9.png
 Hit 'OK' and you'll see new Five frames between the ones you've edited :smile:
 Click to 
zoom
 If you play the animation now,
 http://img82.imageshack.us/img82/2607/16bo1.png
 It'll look like this
 http://img209.imageshack.us/img209/3836/1tw8.gif
 Ok now, enough with viewing a part :bad: let's finish this :mdr:
 Go to the last frame from the 'Animation Window' (Frame 7) and there, hit to Duplicate the Frame.
 In the new frame, set 'Star 1' Opasity to 0% and 'Star 2' Opasity to 100%
 Tween them now ( :info: you'r previous parameters will be saved automatically. So you don't want to change the number of 'Frames to Add' )
 Then Go back to the last Frame,
 Set 'Star 2' Opasity = 0%
'Star 3' Opacity = 100%
 Repeat this untill you change,
 'Star 8' Opacity = 0%
'Star 9' Opacity = 100%
 Now there should be 55 Frames in the Animation Window :oui:
 If you play the animation now, you must obtain this
 http://img204.imageshack.us/img204/5681/2de2.gif
 And now Go to File>Save Optimised and give a god damn name to the gif :lol:
 Ok It's over now. :smile:
 Have some nice coffee till I continue this thread in telling how to get this

Create Simple Script to Show / Hide File Extensions in Windows XP, Vista and 7

Recently we posted a tutorial about creating script to show / hide hidden files and folders in Windows: Create Simple Script to Show / Hide Hidden Files and Folders in Windows XP, Vista and 7
Today in this tutorial, we are going to share another similar script which can be used to show / hide file extensions in Windows.
This script when executed, checks the status of "Hide extensions of known file types" option and toggles its value. So if its set to hide file extensions, it changes the option to show file extensions and vice versa.
Simply copy paste following code in NOTEPAD and save the file with name "Show_File_Extension_On_Off.vbs" (including quotes):
FileExt = "HKCU\Software\Microsoft\Windows\CurrentVersion\Explorer\Advanced\HideFileExt"
Set Sh = WScript.CreateObject("WScript.Shell")
St = Sh.RegRead(FileExt)
If St = 1 Then
Sh.RegWrite FileExt, 0, "REG_DWORD"
Else
Sh.RegWrite FileExt, 1, "REG_DWORD"
End If
Sh.SendKeys("{F5}")
That's it. You can place this script at any location like Desktop, Quick Launch toolbar and whenever you need to toggle the "Hide extensions for known file types" option, simply run the script.
PS: If you don't want to create the script manually or face any problem while creating the script, you can download a ready-made script using following link:
Download Script

Add “Show / Hide File Extensions” Option in Desktop and Explorer Context Menu under Windows XP, Vista and 7

ecently we posted a simple script to toggle "Hide extensions for known file types" option in Windows: Create Simple Script to Show / Hide File Extensions in Windows XP, Vista and 7
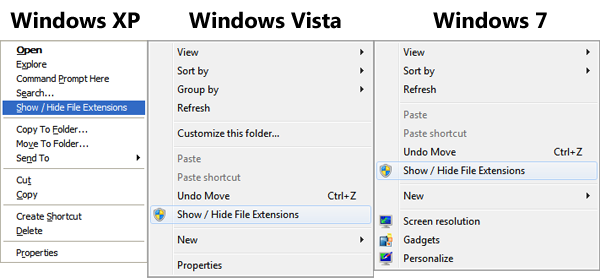
And now we'll tell you how to add an option "Show / Hide File Extensions" in Desktop and Explorer context menu (menu which appears when you right-click) to make the task faster and easier.

In Windows XP, you'll need to right-click on a folder to get the option. In Windows Vista and 7, you can right-click on an empty area in Explorer or Desktop to get the option.
HOW-TO:
Simply download following ZIP file, extract it and run the "Install.exe" file present in the "Windows XP" or "Windows Vista and 7" folders depending upon which Windows are you using.
Download Link

Kill All Not Responding Programs On The Fly Using A Simple Shortcut

"This program is not responding" is a very common error message which you get in Windows. Many times we find a program not responding and we have to perform an End Task operation on it using Task Manager. Wouldn't it be great if we have a shortcut on Desktop or in Taskbar which can automatically kill all not responding programs upon execution? Just double-click on the shortcut and it'll End Task/kill all not responding programs.
Today we'll tell you how to create a simple shortcut which kills all not responding programs automatically so you don't need to open Task Manager and select the program and perform End Task on it.
Following are the simple steps to follow:
1. Right-click on Desktop and select "New -> Shortcut":
New_Shortcut.png
2. It'll launch "Create Shortcut" wizard. Now enter following string in location box:
taskkill /F /FI "STATUS eq NOT RESPONDING"

3. After entering the location, click on "Next" button. Now type Kill Not Responding Tasks in name box and click on "Finish" button. It'll create a new shortcut on Desktop.
4. Now its time to change the icon. Right-click on the shortcut and select "Properties". Click on "Change Icon" button. Type explorer.exe in text box and press Enter. Select the 2nd icon in 3rd column, click on OK button and then Apply the changes.
5. That's it. You'll get the desired shortcut on Desktop:
Kill_Not_Responding_Tasks_Shortcut.png
NOTE: If you don't want to create the shortcut manually and want a ready-made shortcut, download following ZIP file, extract it and you'll get the shortcut:
Download Shortcut

Download X-Setup Pro for FREE: Ultimate Tweaking Software for Microsoft Windows

X-Setup Pro is the ultimate in system configuration or tweaking as some people would say. It covers all types of options and has many useful features. X-Setup Pro is not yet another Windows Hacker; it is the ultimate tool for black belt system tuning and tweaking, running on Windows 95, 98, NT 4.0, 2000, ME, XP, Vista and 7.
X-Setup Pro allows you to change nearly 1800 settings with some simple button clicks. This makes X-Setup Pro the most complete hacker/tweaking utility ever available.
X-Setup Pro is extremely easy to use. It has an Explorer-like look and the famous back and next buttons you already know from your Internet browser. Plus, X-Setup Pro offers wizards that assist you when changing the configuration - there has never been an easier way to hack your Windows.
X-Setup_Pro.png
Supported operating systems:
  • Windows 98
  • Windows NT 4.0
  • Windows ME
  • Windows 2000 All Versions
  • Windows XP All Versions
  • Windows Server 2003 All Versions
  • Windows Vista All Versions
  • Windows 7 All Versions
Download Link

Close All: Small Tool to Close All Running Program Windows On The Fly

"Close All" tool lets you to close all running applications with just one click. It doesn't use system resources because it only flashes a 'close' signal to all open windows on the desktop and then ceases. Just create a shortcut to the tool in the Start Menu, Quick Launch, Windows 7 Taskbar or elsewhere. You can always add a hotkey to this shortcut. It is really very handy if you are running ~20 applications and want them all to quit instantly. It works just as if you were pressing the close button for each application.
Closeall.png
It doesn't require installation. No settings are stored in the Windows Registry or file system.
Just download and extract the ZIP file and create a shortcut of "CloseAll.exe" file which can be later put on Desktop, in Quick Launch toolbar or pin to Windows 7 Taskbar.
Download Link
Homepage
You can also prevent certain applications from being to be closed by Close All by appending -x="application_name.exe" at the end of the "Target" string in Properties of the CloseAll application shortcut. You can separate multiple values with "|" (pipe) as well.

Enhance Windows Taskbar’s Auto-Hide Functionality Using Taskbar Activate

Many Windows users want to customize Taskbar's Auto-Hide feature as there are no settings available by default to customize it. You can't customize Auto-Hide time delay, Always on Top settings, etc. Today we are going to share an excellent small utility "Taskbar Activate" which extends the Auto-hide functionality of Taskbar and provides an interface to customize various settings.
Taskbar Activate manages activation and deactivation of the Windows Taskbar. It is specially useful for accessing the Taskbar with special applications running (full screen windows, always on top windows, etc). It also prevents an inopportune Taskbar window appearing over your application when the mouse goes close to the screen border.
Taskbar Activate awakes your Taskbar when it is hidden by a full screen window.
Once installed, you can access its Settings using its system tray icon.
Taskbar_Activate_Settings.png
You can download it using following link:
Download Link
Download Link (Portable)
Homepage

XTweaker: A Free Portable Tweaking Utility for Windows XP, Vista and 7

We have posted about "Windows 7 Little Tweaker" in past which allows you to tweak a few interesting things in Windows 7. Today we are sharing another similar tool "XTweaker" which works in Windows XP, Vista and 7.
XTweaker.png
It allows you to:
  • Add Msconfig to My Computer Context Menu
  • Add Userpasswords2 to Control Panel
  • Clear Pagefile on Shutdown
  • Add Command Prompt here to Folder Context Menu
  • Decrease Delay of Startmenu
  • Disable Annoying Messages in Internet Explorer
  • Disable Indexing Service
  • Disable Remote Registry Service
  • Hide the Run As… option from Context menu
  • Remove Shared Documents from My Computer
  • No Rebooting after Windows Updates
  • Disable low disk space check
These tweaks will help you in making your Windows Faster and running the way you want.
This tool is portable means you don’t have to install it.
Download Link

How to Disable Warning Message While Unchecking “Hide Protected Operating System Files” Option in Folder Options

When you try to uncheck "Hide Protected Operating System Files (Recommended)" Option in Folder Options in Windows OS, you get a warning message asking for confirmation as shown in following screenshot: Warning_Unhide_Protected_OS_Files.png
It becomes quite annoying if you frequently enable/disable this option.
Today in this tutorial, we'll tell you how to completely remove this warning message so that you can enable/disable the option without getting the irritating warning message window.
1. Type regedit in RUN or startmenu search box and press Enter. It'll open Registry Editor.
2. Now go to:
HKEY_LOCAL_MACHINE\SOFTWARE\Microsoft\Windows\CurrentVersion\Explorer\Advanced\Folder\SuperHidden
3. In right-side pane, delete String value "WarningIfNotDefault".
Disable_Warning_Unhide_Protected_OS.png
That's it. Now you'll not receive the warning message.
PS. If you want a ready-made registry script to do the task automatically, download following ZIP file, extract it and run the desired REG file:
Download Registry Script

WinToFlash: Utility to Create Bootable USB Drive to Install Windows XP, Server 2003, Vista, Server 2008 and 7

WinToFlash is a software for transfer your Windows XP, Server 2003, Vista, Server 2008 and 7 setup from CD or DVD to USB. This is about you can install your Windows from flash drive, USB pen, HDD, etc to your computer or netbook. And this is not all it can do. WinToFlash can transfer your live CD or DVD to USB card, for example, BartPE. After all you can erase your USB media and format it with Windows for every day use.
WinToFlash.png
Features list:
  • Windows XP/2003/Vista/2008/7 to USB transfer
  • WinPE to USB transfer
  • USB media erasing, full or quick
  • Create the USB drive with emergency boot loader
  • DOS to USB transfer
Download Link

How to Open Any Program by Typing its Name in RUN Dialog Box in Windows?

I want to know how to create a registry entry for application shortcuts?
example:
For opening a notepad we go to start - run and type notepad
For opening paint brush we use start - run and type mspaint
Similarly i want to set keywords for opening specific applications in my desktops.
For that what is the registry keyword i need to create / modify... Pls guide me
looking forward for your reply.
Thanks in advance
Yes. That can be done easily using Windows Registry. You can open any desired 3rd party program by just typing its name in RUN or Start menu Search box and press Enter.
Launch_Application_from_RUN.png
You'll need to set the application path in Windows Registry so that Windows can know about the application at the time of execution.
PS: Before starting the tutorial lets assume that our desired application name is "My Application". Its an EXE file and is stored in "C:\Program Files\My Application\" folder. It'll help you in easily understand the tutorial.
So without wasting any time, lets start our tutorial:
1. Type regedit in RUN or startmenu search box and press Enter. It'll open Registry Editor.
2. Now go to:
HKEY_LOCAL_MACHINE\SOFTWARE\Microsoft\Windows\CurrentVersion\App Paths
3. Now we'll need to create a new key under "App Paths" key. Right-click on "App Paths" key and select "New -> Key". Set its name to your desired application name along with its extension e.g. My_Application.exe
4. Select the key created in Step 3 and in right-side pane, set value of "Default" to the full path of application's EXE file e.g. C:\Program Files\My Application\My Application.exe
5. Again in right-side pane, create a new String value "Path" and set its value to the folder containing your application EXE file e.g. C:\Program Files\My Application\
Create_App_Paths_in_Windows_registr.png
6. That's it. Now you can launch your desired application by just typing its name in RUN or Start menu Search box.
NOTE: If you want a ready-made registry script to do the task automatically, then copy paste following code in Notepad and save the file with name "AskVG.REG" (including quotes).
Windows Registry Editor Version 5.00
[HKEY_LOCAL_MACHINE\SOFTWARE\Microsoft\Windows\CurrentVersion\App Paths]
[HKEY_LOCAL_MACHINE\SOFTWARE\Microsoft\Windows\CurrentVersion\App Paths\My Application]
@="C:\\Program Files\\My Application\\My Application.exe"
"Path"="C:\\Program Files\\My Application\\"
You just need to replace BOLD part of the above script with the correct application name and path. After saving the file, run it and it'll add the program path to Registry so that you can launch it directly from RUN and Start menu Search box.

#
### ###