Friends

This is default featured post 1 title

Go to Blogger edit html and find these sentences.Now replace these sentences with your own descriptions.This theme is Bloggerized by Lasantha Bandara - Premiumbloggertemplates.com.

This is default featured post 2 title

Go to Blogger edit html and find these sentences.Now replace these sentences with your own descriptions.This theme is Bloggerized by Lasantha Bandara - Premiumbloggertemplates.com.

This is default featured post 3 title

Go to Blogger edit html and find these sentences.Now replace these sentences with your own descriptions.This theme is Bloggerized by Lasantha Bandara - Premiumbloggertemplates.com.

This is default featured post 4 title

Go to Blogger edit html and find these sentences.Now replace these sentences with your own descriptions.This theme is Bloggerized by Lasantha Bandara - Premiumbloggertemplates.com.

This is default featured post 5 title

Go to Blogger edit html and find these sentences.Now replace these sentences with your own descriptions.This theme is Bloggerized by Lasantha Bandara - Premiumbloggertemplates.com.

Wednesday, June 29, 2011

Microsoft Touch Pack for Windows 7

The most interesting feature about Windows 7 is its in-built touch capability which didn't get much attention among Windows 7 testers. Today Microsoft introduced "Microsoft Touch Pack for Windows 7" which consists of some applications providing touch capabilities. Here are the details taken from "Windows 7 team Blog":
Microsoft Touch Pack for Windows 7 is a set of six multi-touch optimized applications and games that are designed to truly showcase the capabilities of Windows Touch in Windows 7. It consists of 3 casual games, and 3 Microsoft Surface applications that have been created for Windows 7:
Microsoft Surface Globe:
It uses the Virtual Earth 3D engine to display a 3D version of the world. Using multi-touch, you can navigate to different regions, get local information, and “pin” your favorite locations. You can even “fly” around 3D models of buildings in some cities.
Microsoft Surface Collage:
Take your favorite digital photos and arrange and resize them using only your fingertips with Microsoft Surface Collage! Once you have your photos in an arrangement you like, it’s simple to save your collage and make it your desktop background.
Microsoft Surface Lagoon:
It's a screensaver that you can interact with using multi-touch. It recreates the natural environment of water and schooling fish. It is really relaxing to run your fingers through the “water” and hold your finger down and watch the fish gather around.
Microsoft Blackboard:
Solve a puzzle game of physics, called Microsoft Blackboard, by creating a nifty machine on a virtual blackboard. Use gestures to rotate and resize gears, fans, seesaws and more to move balloons and balls toward the light bulbs - and victory.
Microsoft Rebound:
Use your fingers to propel a ball and annihilate your opponent in Microsoft Rebound. Play against the computer or challenge a friend and battle it out in the electrified court to see who the champion is.
Microsoft Garden Pond:
You can guide your origami creations to peaceful areas on the pond or direct them with gestures to complete goals that have been set for you. Gently move the origami by making ripples in the water.
In order to use the Microsoft Touch Pack for Windows 7 – you’ll need a Windows 7 PC that supports multi-touch. The Microsoft Touch Pack for Windows 7 will be available to PC makers (OEMs) who will have the option to pre-install some, none, or all of the applications available in the Microsoft Touch Pack for Windows 7 on PCs designed for Windows Touch.

How to Disable Display of Recent Search Entries in Windows 7 Explorer Search Box?

We have received so many mails about this particular problem so today we decided to post the solution here so that everyone can follow it without any need to send the query to us. Windows 7 automatically stores the search entries which you enter in Windows Explorer Search box:
Recent_Search_History.png
Whenever you click into the Search box, it displays the recent search entries automatically. While its useful for frequent search users, it might become problematic if you use a shared computer and don't want other people know about your recent searches.
So if you want some privacy and don't want people know what you search, here are some easy to use instructions to disable the display of recent search entries in Search box:
1. Type gpedit.msc in RUN or Startmenu Search box and press Enter. It'll open Group Policy Editor.
2. Now go to:
User Configuration > Administrative Templates > Windows Components > Windows Explorer
3. In right-side pane, double-click on "Turn off display of recent search entries in the Windows Explorer search box" and set it to Enabled.
Disable_Recent_Search_History.png
4. That's it. Now Windows will no longer display the recent search entries in Search box.
NOTE: If you don't want to completely disable the display of recent search entries but want to remove a particular entry from the list, then you can simply hover on the entry in Search box and press "Delete" key. It'll immediately delete it from the list.

Hacking “Screen Resolution”, “Gadgets” and “Personalize” Options in Windows 7 Desktop Context Menu

NOTE: This tutorial has been featured by Microsoft. AskVG.com was the first website posting this unique trick.
Windows 7 Desktop context menu contains 2 extra options which were not present in Windows Vista:
  • Screen resolution
  • Gadgets
Win_7_Desktop_Context_Menu_with_Gad.png
Windows 7 stores all these 3 options "Screen resolution", "Gadgets" and "Personalize" under following Registry key:
HKEY_CLASSES_ROOT\DesktopBackground\Shell
This key is new in Windows 7 and none of previous Windows versions including Vista used it.
Here in this tutorial, we'll learn:
  • How to remove "Screen resolution", "Gadgets" and "Personalize" options
  • How to change position of these options
  • How to change icons of these options
  • How to change names of these options
  • How to enable "Personalize" option in Safe Mode
1. How to Remove "Screen resolution", "Gadgets" and "Personalize" Options
Although Windows 7 provides these 2 extra options but it makes the whole context menu a bit larger and some people might not like it. If you are also among those people who prefer minimal things, here are the steps to remove all or any of these 3 context menu items:
Personalize_Only.png Screen_Resolution_Only.png Gadgets_Only.png
1. Type regedit in RUN or startmenu search box and press Enter. It'll open Registry Editor.
2. Now go to:

How to Remove “Next Desktop Background” Option from Windows 7 Desktop Context Menu?

Recently we posted a detailed tutorial to hack Windows 7 Desktop context menu: Hacking "Screen Resolution", "Gadgets" and "Personalize" Options

Here is another small tutorial to remove "Next Desktop Background" option from Desktop context menu which appears when you use Desktop SlideShow feature which allows you to run a SlideShow of selected wallpapers.
Next_Desktop_Background.png
Personally I don't like this extra option because it makes the whole context menu a bit large which doesn't look good. So here are the steps to remove it:
1. Type regedit in RUN or startmenu search box and press Enter. It'll open Registry Editor.
2. Now go to:
HKEY_CLASSES_ROOT\DesktopBackground\shellex\ContextMenuHandlers
3. This key contains a sub-key "DesktopSlideshow".
Desktop_Slideshow_Key.png
4. Delete it and the option will be removed from Desktop context menu.
PS: If you want a ready-made registry script to do the task automatically, download following ZIP file, extract it and run "Remove Next Desktop Background Option.reg" file to remove the option. There is also a "Restore. reg" file to restore the option.
Download Registry Script

How to Add Program Shortcuts and Other Useful Shortcuts with Icons in Windows 7 Desktop Context Menu?


NOTE: This tutorial has been featured by Microsoft. AskVG.com was the first website posting this unique trick.
Today we'll learn how to add any desired program shortcut in Desktop context menu. Also we'll learn to add other useful shortcuts like "Change Wallpaper", "Screensaver", etc.
We have posted a few similar tutorials long time back:
Above tutorials do the same job but there is some difference between these old methods and the new one which we'll discuss today.
In old method, we can't define program icon and the option position in context menu but this new method will allow you to set an icon for the shortcut as well as define its position like on top or bottom.
So here we start the tutorial:
1. Type regedit in RUN or startmenu search box and press Enter. It'll open Registry Editor.
2. Now go to:
HKEY_CLASSES_ROOT\DesktopBackground\Shell
3. Now we'll need to create a new key under "Shell" key. Right-click on "Shell" key and select "New -> Key". Give the new key any desired name e.g. "Registry Editor" (without quotes).
4. Now we'll need to create another new key. Right-click on the new key which we created in the last step e.g. Registry Editor and select "New -> Key". Give the new key name of command.
5. Now select "command" key and in right-side pane, you'll see "Default" String value. Double-click on it and set its value to the path of desired program's EXE file. For example, if you want to add "Registry Editor" shortcut, then set value of "Default" to regedit.exe
Adding_Program_Key.png
6. Now the new shortcut will start appearing in Desktop Context Menu.
New_Program_Shortcut.png
7. Now some advanced options!
You can now define the shortcut icon and position.
To set an icon for the shortcut, select the key created in Step 3 and in right-side pane, create a new String value "Icon". Set its value to your desired icon or simply put the path of program's EXE file and it'll automatically show its default icon.
To set its position in the context menu, create a new String value "Position" and set its value to:
Top (To show it at top)
Bottom (To show it at bottom)
Adding_Program_Key2.png
That's it. Now you'll see an icon near the program shortcut and its new position.
New_Program_Shortcut2.png
8. If you want a ready-made registry script to do the task automatically, then copy paste following code in Notepad and save the file with name "AskVG.REG" (including quotes).
Windows Registry Editor Version 5.00
[HKEY_CLASSES_ROOT\DesktopBackground\Shell\regedit]
@="Registry Editor"
"Icon"="regedit.exe"
"Position"="Bottom"
[HKEY_CLASSES_ROOT\DesktopBackground\Shell\regedit\command]
@="regedit.exe"
Run the file and it'll add the program shortcut in Desktop context menu.
If you want to add other program shortcut, then simply change the BOLD part in the script.
NOTE: You can use this method to add any desired program shortcut or to add various useful shortcuts in Desktop context menu. You just need to simply change the Key name and the value of "command" key to the correct path.
Change_Wallpaper.png Change_Screensaver.png System_Properties-1.png

[Confirmed] No More 3 Application Limit in Windows 7 Starter Edition

Recently it was said that Microsoft might remove 3 application limit from Windows 7 Starter Edition. Today Microsoft has confirmed it. Now its official that Windows 7 Starter Edition will not have this limit and users will be able to run as many applications as they want. Brandon LeBlanc @ Windows 7 Team Blog said:
For the first time, we will be making Windows 7 Starter available worldwide on small notebook PCs. We are also going to enable Windows 7 Starter customers the ability to run as many applications simultaneously as they would like, instead of being constricted to the 3 application limit that the previous Starter editions included.
It is important to note that Windows 7 Starter still includes only a subset of the features offered in the higher editions of Windows 7 such as Windows 7 Home Premium, Windows 7 Professional and above. Windows 7 Starter does not include:
  • Aero Glass, meaning you can only use the “Windows Basic” or other opaque themes. It also means you do not get Taskbar Previews or Aero Peek.
  • Personalization features for changing desktop backgrounds, window colors, or sound schemes.
  • The ability to switch between users without having to log off.
  • Multi-monitor support.
  • DVD playback.
  • Windows Media Center for watching recorded TV or other media.
  • Remote Media Streaming for streaming your music, videos, and recorded TV from your home computer.
  • Domain support for business customers.
  • XP Mode for those that want the ability to run older Windows XP programs on Windows 7.
That's really a wise move. But what about the changing wallpaper restriction?

How to Add Your Name in Windows 7 Desktop Context Menu

NOTE: This tutorial has been featured by Microsoft. AskVG.com was the first website posting this unique trick.
Recently we posted a detailed tutorial about adding your desired application shortcut in Windows 7 Desktop context menu:
Add Program Shortcuts and Other Useful Shortcuts in Windows 7 Desktop Context Menu
Today we'll use the same tutorial for some interesting stuff.
You can add your name at top of the menu and can open any program, Explorer, Documents folder or User Accounts by clicking on it.
Name_in_Win_7_Desktop_Context_Menu.png
You can also add an icon for it as shown in the above screenshot.
So here is the step-by-step guide:
1. Type regedit in RUN or startmenu search box and press Enter. It'll open Registry Editor.
2. Now go to:
HKEY_CLASSES_ROOT\DesktopBackground\Shell
3. Now we'll need to create a new key under "Shell" key. Right-click on "Shell" key and select "New -> Key". Give the new key any desired name e.g. "Name" (without quotes).
4. Now in right-side pane, change value of "Default" to your desired name which you want to show in Desktop context menu. We have chosen ~:: VISHAL ::~ in our example.
5. Now right-click on the new key which we created in step 3, e.g. Name and select "New -> Key". Give the new key name of command.
6. In right-side pane, change value of "Default" to explorer.exe if you want to open Explorer by clicking on it. We have chosen Control userpasswords to open User Accounts applet in our example.
7. To set an icon for the shortcut, select the key created in Step 3 and in right-side pane, create a new String value "Icon". Set its value to your desired icon. We have set it to imageres.dll,206 in our example.
To set its position in the context menu, create a new String value "Position" and set its value to:
Top (To show it at top)
Bottom (To show it at bottom)
We have set it at top.
Add_Name_in_Win_7_Desktop_Context_M.png
8. That's it. Now you can have your name with an icon in Desktop context menu.
PS. If you want a ready-made registry script to do the task automatically, then copy paste following code in Notepad and save the file with name "AskVG.REG" (including quotes).
Windows Registry Editor Version 5.00
[HKEY_CLASSES_ROOT\DesktopBackground\Shell\name]
@="~:: VISHAL ::~"
"Icon"="imageres.dll,206"
"Position"="Top"
[HKEY_CLASSES_ROOT\DesktopBackground\Shell\name\command]
@="Control userpasswords"
Run the file and it'll add the program shortcut in Desktop context menu.
To change the name, icon or associated application path,simply change the BOLD part in the script.

Windows 7 RTM in July 2009 and General Availability on October 22nd

Today at Computex, the largest computer exhibition in Asia taking place in Taiwan, Steve Guggenheimer, the corporate vice president of the Original Equipment Manufacturer (OEM) Division announced both the RTM and the general availability dates for Windows 7. Windows_7_RTM.png
According to the announcement, Windows 7 will be in stores for the holidays, beginning October 22nd, 2009. In order for this to happen, the RTM (Release to Manufacturing) will be made available to Microsoft partners in the last two weeks of July.
As customers purchase new PCs over the summer and onwards, they will be given the option to participate in the Windows 7 Upgrade Option program. This will be made available to anyone buying a PC with Windows Vista Home Premium and above. At the time of purchase, the PC will run Vista, but when Windows 7 becomes publicly available, they will be given the option to upgrade for either a low cost or free, depending on the manufacturer.
Thanks to "Channel 10" for this info...

How to Pin My Computer, Recycle Bin & Other Useful Shortcuts to Windows 7 Taskbar

Windows 7 allows you to pin your favorite programs to Taskbar so that you can access them quickly whenever you want. To pin a program to Taskbar you just need to right-click on its shortcut and select "Pin to Taskbar" option: Pin_to_Taskbar.png
Here in this tutorial, we'll learn how to pin various useful system shortcuts like Control Panel, My Computer, Recycle Bin, Programs and Features, etc to Windows 7 Taskbar.
So without wasting any time, here we start the tutorial:
1. First you'll need to create a new shortcut. To do this, right-click on Desktop and select "New -> Shortcut":
New_Shortcut.png
2. It'll launch "Create Shortcut" wizard. Now you'll need to enter the command to open desired system shortcut. You can use any of following commands to create the desired shortcut:
explorer shell:MyComputerFolder (for My Computer shortcut)
explorer shell:RecycleBinFolder (for Recycle Bin shortcut)
explorer shell:ControlPanelFolder (for Control Panel shortcut)
explorer shell:Administrative Tools (for Administrative Tools shortcut)
explorer shell:ChangeRemoveProgramsFolder (for Programs and Features shortcut)
explorer shell:NetworkPlacesFolder (for Network shortcut)
explorer shell:Favorites (for Favorites shortcut)
explorer shell:Games (for Games shortcut)
explorer shell:Fonts (for Fonts shortcut)
explorer shell:UserProfiles (for Users folder shortcut)
explorer shell:Profile (for your username folder shortcut)
explorer shell:Public (for Public folder shortcut)
explorer shell:My Documents (for Documents shortcut)
explorer shell:Common Documents (for Public Documents shortcut)
explorer shell:My Music (for Music folder shortcut)
explorer shell:CommonMusic (for Public Music folder shortcut)
explorer shell:My Pictures (for Pictures folder shortcut)
explorer shell:CommonPictures (for Public Pictures folder shortcut)
explorer shell:My Video (for Videos folder shortcut)
explorer shell:CommonVideo (for Public Videos folder shortcut)
explorer shell:Downloads (for Downloads folder shortcut)
explorer shell:CommonDownloads (for Public Downloads folder shortcut)
Creating_New_Shortcut.png
3. After entering the command, click on "Next" button. Now enter a meaningful name for your new shortcut and click on "Finish" button.
Providing_Name_to_Shortcut.png
4. It'll create a new shortcut on Desktop:
New_Shortcut_on_Desktop.png
5. Now its time to change the new shortcut icon. Right-click on the shortcut and select "Properties". Click on "Change Icon" button.
Clicking_Change_icon_Button.png
6. Now you can browse and select any desired icon. We'll recommend to use imageres.dll file for selecting new icon as this file contains lots of good looking icons:
Changing_Icon_of_Shortcut.png
7. After selecting the new icon, click on OK and then Apply the changes.
8. Now you just need to pin this new shortcut to Taskbar. You can either drag-n-drop the shortcut to Taskbar or right-click on the shortcut and select "Pin to Taskbar" option:
Pinning_to_Taskbar.png
9. That's it. You can pin as many shortcuts as you want to Taskbar using this tutorial:
System_Shortcuts_Pinned_to_taskbar.png

Windows 7 Login Screen Rotator

Here is an excellent tool for Windows 7 users which allows you to choose up to 10 images and displays them randomly at each login.
You can select the images using "Choose Image" button.
Once you select all images, click on "Enable Settings and Exit" button. It'll ask you to select the initial image which will be used as the first login screen background.
That's it. Now you can enjoy different login screens at each login.
If you want to restore the default login screen, run the "Remove files and settings.exe" file included in the pack and it'll restore the default login screen.
You can download it using following link:
Download Link
Homepage

How to Customize Windows 7 Login Screen Text and Button Set

As you all know Windows 7 allows to customize Login screen background without using any 3rd party software. You can simply follow a few easy steps to change the background easily and quickly which are mentioned in following tutorial: Windows 7 Supports Login Screen Customization Without 3rd Party Software
Although you can change the background, but sometimes you might face problem with the text and buttons shown at login screen. When you use a light wallpaper as background, the text and buttons might not be visible properly, same case happens with a darker background.
To overcome this problem, Microsoft has provided a small registry trick to change the text and buttons look.
Here are the step-by-step instructions to customize text and button set look in Windows 7 login screen:
1. Type regedit in RUN or Startmenu Searchbox and press Enter. It'll open Registry Editor.
2. Now go to following key:
HKEY_LOCAL_MACHINE\SOFTWARE\Microsoft\Windows\CurrentVersion\Authentication\LogonUI
3. In right-side pane, create a new DWORD value ButtonSet and set its value to any of following according to your requirements:
0 – Lighter text shadows, darker (more opaque) buttons (Windows default)
1 – Darker text shadows, lighter (more translucent) buttons (for lighter backgrounds)
2 – No text shadows, opaque buttons (for darker backgrounds)
Change_Win_7_Login_Screen_button_se.png
4. That's it. Now you can see the modified text and button set at login screen.
No Shadow:
Without_Shadow.png
Light Shadow:
With_Light_Shadow.png
Dark Shadow:
Dark_Shadow.png
NOTE: If you want a ready-made registry script to do the task automatically, download following ZIP file, extract it and run the desired REG file:
Download Registry Script
PS: If you want to use a free tool to customize Windows 7 login screen, check following list:
Ultimate Collection of the Best Free Tools to Customize Windows 7 Login Screen

Get Glass Notepad in Windows Vista and 7

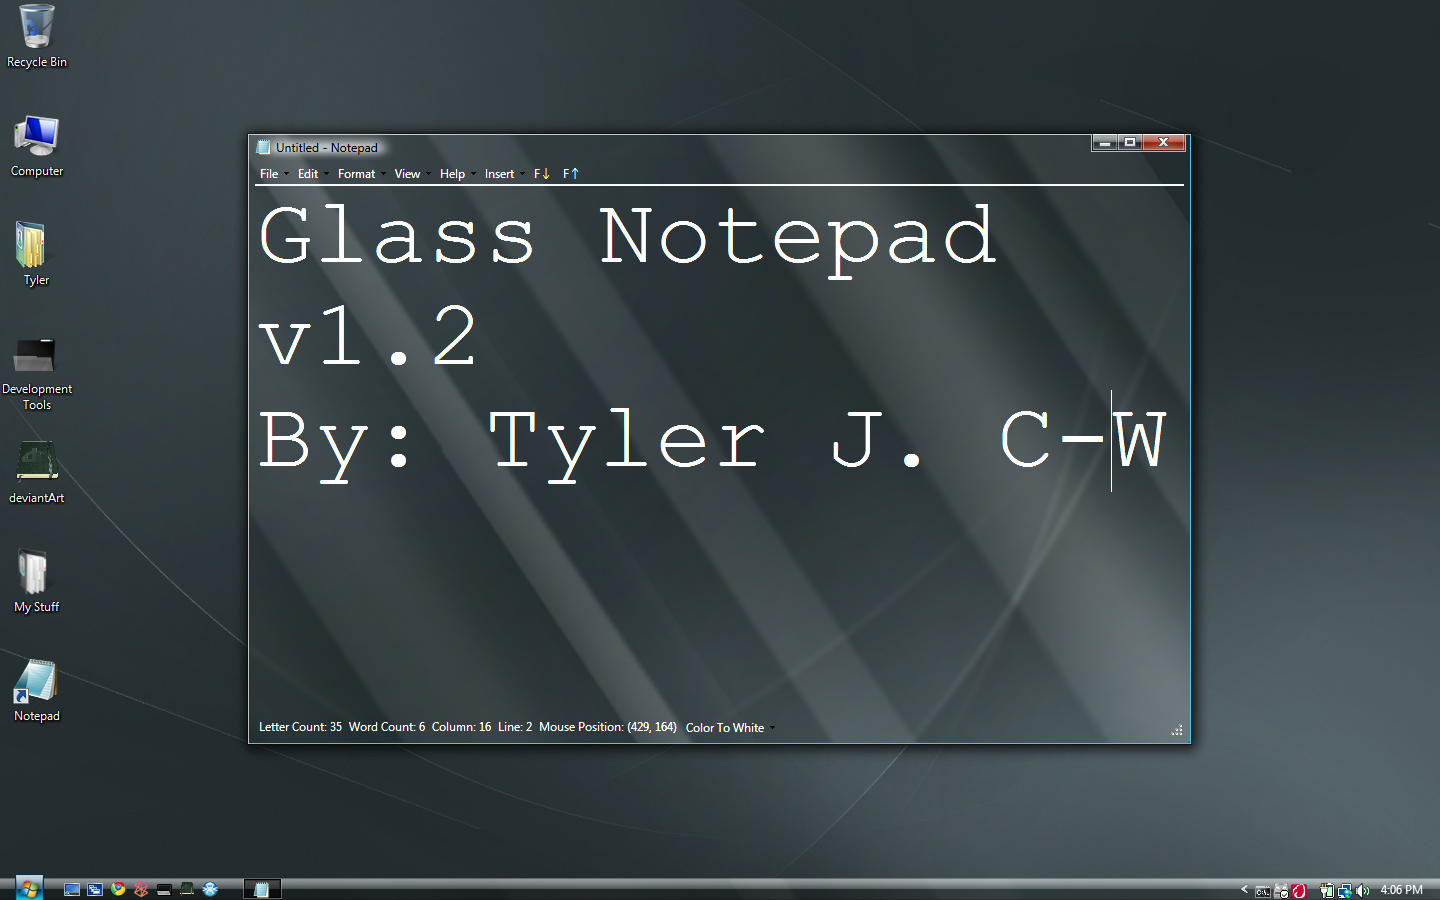
We have posted about "Glass CMD" in past which can enable Aero Glass in Command Prompt window under Windows Vista and 7. Now today we are going to share a similar thing with you all. "Glass Notepad" is a standalone application for Windows Vista and 7 which provides full Glass interface. So if your graphics card supports Aero theme, you will definitely enjoy this nice application.

It supports all basic Notepad functions and the Menus are almost same as Windows default Notepad. It should also work in earlier Windows versions like Windows XP.
You can download it using following link:
Download Glass Notepad
More Info

Windows 7 Build 7232 Leaked, New Wallpaper Inside

Its time for another Windows 7 build leak. This time the build is 7232 which was compiled on 10th June 2009. The complete build number is 7232.winmain.090610-1900.
There are no visual changes as usual but a new wallpaper has been included in this build.

You can download this new wallpaper using following link:
Download Wallpaper (via TheVista.Ru)

Keyboard Shortcuts List for Windows Media Player in Windows 7

"Windows Experience Blog" has posted a big list of useful keyboard shortcuts for Windows Media Player in Windows 7. You can use these shortcuts for a variety of activities in Windows Media Player ranging from switching to Player Mode to turning on or off shuffle to shifting between play speeds. Following is the complete list:
Shortcut Action State
Ctrl + 1 Switches to library mode From any mode
Ctrl + 2 Switches to skin mode From any mode
Ctrl + 3 Switches to player mode From any mode except full screen
Ctrl + 7 Add to Play In library mode
Ctrl + 8 Add to Burn In library mode
Ctrl + 9 Add to Sync In library mode
Ctrl + A Selects everything in a list In the library or list
Ctrl + B Previous (Item or Chapter) With content playing
Ctrl + E Focus on Search text box and switch to library mode if not there
Ctrl + F Next (Item or Chapter) With content playing
Ctrl + H Turn on/off shuffle mode
Ctrl + J Eject In any mode
Ctrl + M Toggle menu bar in library In any mode
Ctrl + N Create playlist In library mode
Ctrl + O Shows Open Dialog In any mode
Ctrl + P Play/Pause Toggle With content queued up
Ctrl + Q Adds selected track to open list Default is Play list
Ctrl + S Stops Playback With content playing
Ctrl + T Turn on/off repeat mode In any mode
Ctrl + U Shows Open URL Dialog In any mode
Ctrl + W Stops playback With content playing or paused
Ctrl + Shift + B Rewinds playing content With DVD playing
Ctrl + Shift + C Caption On/Off Toggle Playing content which has captions
Ctrl + Shift + F Fast forwards playing content With content playing
Ctrl + Shift + G Play Speed Fast With content playing
Ctrl + Shift + N Play Speed Normal With content playing
Ctrl + Shift + S Play Speed Slow With content playing
Ctrl + Right Arrow Next playlist in playlist history Focus not on Seek bar
Ctrl + Left Arrow Previous playlist in playlist history Focus not on Seek bar
Ctrl + Right Arrow Skip forward (large increment) Focus on Seek bar
Ctrl + Left Arrow Skip backward (large increment) Focus on Seek bar
Shift + Right Arrow Skip forward (small increment) Focus on Seek bar
Shift + Left Arrow Skip backward (small increment) Focus on Seek bar
Right Arrow Skip forward Focus on Seek bar
Left Arrow Skip backward Focus on Seek bar
Ctrl + Click Resize player to image In Now Playing mode
Escape Return to Now Playing Full Screen Mode
F1 Opens Help file In any mode
F2 Edit meta data column In library mode with an item selected
F4 Switch view mode In library mode, focus in list view
F5 Refresh screen Focus on library or in online services
F6 Increases album art Focus in list view
Shift + F6 Decreases album art Focus in list view
F7 Mutes sound In any mode
F8 Decrease sound volume In any mode
F9 Increases sound volume In any mode
F10 Show menu bar in library From any mode
Shift + F10 Context menu shortcut In any mode
Alt + 1 Video Size 50% In Now Playing or skin mode, with a video playing
Alt + 2 Video Size 100% In Now Playing or skin mode, with a video playing
Alt + 3 Video Size 200% In Now Playing or skin mode, with a video playing
Alt + Enter Full Screen Toggle In Now Playing, skin, or full screen mode

Windows 7 RTM on June 26th 2009?

We have seen enough Windows 7 build leaks lately and now it seems even Microsoft is tired of it. Recently Windows 7 RTM Escrow build 7260 leaked which came with no GUI changes but with a new wallpaper. Now Neowin is reporting that Microsoft is set to RTM Windows 7 by June 26th 2009.
Windows_7_RTM.png
Folks inside Microsoft who wish to remain anonymous have also indicated that many people internally are growing tired and bored of the leaks and want development to conclude as soon as possible.
So if everything goes fine, we can get Windows 7 RTM next weekend. Fingers crossed!

A Bootable USB: Utility to Create Bootable USB Drive to Install Windows Vista, Server 2008 and 7

Also take a look at other similar tools: Windows 7 USB/DVD Download Tool, WinToFlash, Setup from USB, Win32 Disk Imager and UNetbootin.
Imagine a situation where you need to install Windows Vista or 7 in a system but you don't have access to DVD drive. We all know Windows Vista, Server 2008 or 7 comes in DVDs and you'll need a DVD drive to install them. Then how will you install them? The solution is, you can create a bootable USB drive which can be used to install Windows without using DVD drive.
We have posted a detailed tutorial to create such bootable USB drive long time back, you can read about it here.
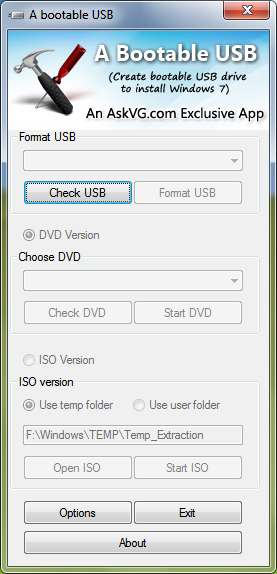
The above method is very easy to follow but wouldn't it be great if we can use a utility to do the whole task automatically? Our reader "Aris" has created a small utility exclusively for AskVG readers which creates a bootable USB drive to install Windows Vista, Server 2008 or 7.
Prerequisites:
  • A USB Drive (4 GB or more)
  • Windows Vista, Server 2008 or 7 ISO image or DVD
  • Host OS: Windows Vista (SP1 or SP2), Server 2008 or 7
How to Use:
Once you meet the requirements, run the utility. Its a portable utility so doesn't need installation. Simply run it and check the option "I have read and accepted the following License Agreement". Now click on OK button and it'll launch the main application.

It also shows a Help window so that you can use the utility easily. The utility requires only 4 easy steps to follow:
  • Check USB drive (To check whether your USB drive is attached or not)
  • Format USB drive
  • Choose DVD or ISO image (To copy the required files to USB drive)
  • Start the process to create bootable USB drive
Download Link
PS: It also works in 64-bit Windows versions.
NOTE: If you face problem while formatting the USB drive, click on "Options" button and then select "QUICK" option.
Also take a look at other similar tools: Windows 7 USB/DVD Download Tool, WinToFlash, Setup from USB, Win32 Disk Imager and UNetbootin.

Windows 7 Release Candidate (RC) Downloads will End August 15th

Windows 7 RC build 7100 was released to public on May 5th and is still available to download. But Microsoft has announced that it'll close the RC download program on August 15th, so if you have not downloaded Windows 7 RC build, its time to grab your copy. Here is what "Springboard Series Blog" says:
Still on the Windows 7 Beta,? You need to move to the RC and fast. Starting July 1st, the Beta will start to reboot every 2 hrs and expire Aug 1st.
Want to download the RC? The RC download program closes August 15. After that, you won’t be able to get the download, but you can still install the RC and get a key if you need one. (To get a key, just go to the Downloads page and follow the instructions.)
If you’re using the Windows 7 Release Candidate, we hope you like what you see. Let us know - go to http://input.microsoft.com and tell us what you think. You’ll be able to give feedback on various aspects of the operating system.
So hurry up and download your copy now:
Download Windows 7 RC Build

How to Remove Unwanted Items from Addressbar History in Windows E xplorer?


Recently a visitor asked us how can he remove unwanted items from the drop-down box of Windows Explorer addressbar? We are sure many of you also want to know the same. Whenever we open a path using Explorer addressbar, its automatically stored in the history and anyone can see it by clicking on the addressbar drop-down arrow. Windows_Explorer_Addressbar_History.png
You can follow these simple steps to remove unwanted items from Windows Explorer addressbar history:
1. Type regedit in RUN dialog box and press Enter. It'll open Registry Editor.
2. Now go to following key:
HKEY_CURRENT_USER\Software\Microsoft\Windows\CurrentVersion\Explorer\TypedPaths
In right-side pane, you'll see various String values with the name url1, url2, url3 and so on. Their value will be set to the path which you see in addressbar drop-down history.
Remove_Windows_Explorer_Addressbar_.png
3. You just need to delete the String value which contains the path which you want to remove from addressbar history list. e.g. if you want to remove the 4th item "C:\ProgramData\Microsoft\Windows" from history, then delete the "url4" String value.
4. That's it. Now the deleted path will no longer appear in Explorer addressbar history.
PS: If you want to clear the whole history, you can right-click on the addressbar in Windows Explorer and select "Delete history" option.
NOTE: You can also visit following related articles:
How to Remove Any Particular URL from Internet Explorer URL History?
How to Remove An Item from RUN Dialog Box History / MRU List?
How to Remove Location History from Desktop Background List in Windows Vista and 7

Microsoft Announced Windows 7 Pricing and Upgrade Program Details

Microsoft has announced the pricing details and upgrade option program for Windows 7. Today "Windows 7 Team Blog" posted the details:
Today we’re announcing details for the Windows 7 Upgrade Option Program, pricing, and a special pre-order offer for select markets.
But first, I want to talk a little bit more about GA and the worldwide availability of Windows 7. OEMs will start shipping PCs with Windows 7 in all language versions beginning on GA, October 22nd.
On October 22nd, Windows 7 will be available in the following 14 languages: English, Spanish, Japanese, German, French, Italian, Dutch, Russian, Polish, Brazilian Portuguese, Korean, Simplified Chinese, Traditional Chinese and Chinese (Hong Kong).
Then on October 31st, the remaining 21 languages will become available: Turkish, Czech, Portuguese, Hungarian, Swedish, Danish, Norwegian, Finnish, Greek, Ukrainian, Romanian, Arabic, Lithuanian, Bulgarian, Estonian, Slovenian, Hebrew, Thai, Croatian, Serbian Latin, and Latvian.
Windows 7 Upgrade Option Program will kick off tomorrow, June 26th! Anyone who buys a PC from a participating OEM or retailer with Windows Vista Home Premium, Business or Ultimate on it will all receive an upgrade to the corresponding version of Windows 7 at little or no cost to customers. The Windows 7 Upgrade Option Program will be available until January 31st, 2010 – and is global! For more information on taking advantage of the Windows 7 Upgrade Option Program, visit www.windows.com/upgradeoffer.
The estimated retail prices for upgrade packaged retail product of Windows 7 in the U.S. are:
  • Windows 7 Home Premium (Upgrade): $119.99
  • Windows 7 Professional (Upgrade): $199.99
  • Windows 7 Ultimate (Upgrade): $219.99
And the estimated retail prices for full packaged retail product of Windows 7 in the U.S. are:
  • Windows 7 Home Premium (Full): $199.99
  • Windows 7 Professional (Full): $299.99
  • Windows 7 Ultimate (Full): $319.99
This means that Windows 7 Home Premium full retail product is $40.00 less than Windows Vista Home Premium today.
We are excited to introduce a special time limited offer! We will offer people in select markets the opportunity to pre-order Windows 7 at a more than 50% discount. In the US, this will mean you can pre-order Windows 7 Home Premium for USD $49.99 or Windows 7 Professional for USD $99.99. You can take advantage of this special offer online via select retail partners such as Best Buy or Amazon, or the online Microsoft Store (in participating markets).
This program begins tomorrow in the U.S., Canada and Japan. The offer ends July 11th in the U.S. and Canada and on July 5th for Japan or while supplies last. Customers in the UK, France and Germany, can pre-order their copy of Windows 7 starting July 15th and will run until August 14th (or supplies last) to ensure folks don’t miss out on this. Act fast if you want to be the first in line to get Windows 7 at this screaming deal! Note: The special low pre-order price will vary per country.
For more information on this special pre-order offer, click here.

Jumplist Launcher: Create Custom Jumplists in Windows 7

indows 7 comes with a new feature "Taskbar Jumplist" which appears when you right-click on a taskbar button. Its one of the most useful features of Windows 7. But what if you want to create your own jumplist? Windows 7 doesn't allow that but there is a very small freeware "Jumplist Launcher" which allows you to add upto 60 files/programs inside a jumplist.
Jumplist_Launcher.png
Features List:
  • No installation and rubbish in the registry
  • Creates jumplists with up to 60 programs or files which can then be directly started
  • The jumplist entries can be grouped
  • After creating the jumplist, no program needs to run in the background
  • You can have multiple Jumplist-Launcher-Icons (with different files/programs) on your superbar by copying the folder
  • Files can be dragged into the Jumplist-Launcher from Windows-Explorer
  • Icon and name of the entry can be customized
  • Jumplist-items can be added by dragging single files on Jumplist-Launchers taskbar-icon while holding the shift-key
How to Use:
  • Start Jumplist-Launcher.exe
  • Add Groups by clicking the ‘Add Group’ button and rename them by clicking on their name in the treeview
  • Add files/programs by either clicking on the ‘…’ button or directly dragging them into the Jumplist-Launcher window
  • You can reorganize the order of groups and files by selecting them in the treeview and pressing the up or down-button
  • If needed change the number of max. Jumplist-items
  • When you are done, click on ‘Create Jumplist’ to save everything and Create the jumplist
  • Pin the program to the superbar
  • Close the program
Download Link
Homepage

Get Good Old Classic Start Menu Back in Windows 7 Using CSMenu

What? There is no Classic Start menu in Windows 7? That's the most common question which Windows 7 users ask us. Actually Microsoft has completely removed Classic start menu from Windows 7 and you are forced to use the new Vista like start menu. Although the new start menu is much better than the classic one, lots of people still prefer the Classic one. So what to do? Here is the solution.
"CSMenu" is a small application for Windows 7 which can bring the Classic start menu back in Windows 7. You just need to install it and run the application. There is also a portable version available so you can run it without installing.
Following is a screenshot of CSMenu in action:
Classic_Startmenu_in_Windows_7.png
You can Pin its shortcut to Taskbar so that you can use it similar to Start button.
You can also hide default Start ORB (Start button) using "Start Killer".
You can give it a try using following link:
Download Link
Homepage
NOTE: When we install it, it didn't create its shortcut in Programs menu or Desktop. If you also face this problem, you can run its EXE file from "%programfiles\CSMenu" folder.
PS: At the installation time, make sure to select "Custom Installation" option and uncheck "Install the Ask Toolbar" checkbox.
NOTE: You can also check other free tools to get Classic Start Menu back in Windows 7 at following link:
Ultimate Collection of the Best Free Tools to Get Classic Start Menu Back in Windows 7

How to Add Recycle Bin, Run, Search and Many Other Useful Shortcuts in My Computer?

NOTE: This tutorial has been featured by Microsoft. AskVG.com was the first website posting this unique trick.
Recently someone asked us how to add "Recycle Bin" shortcut in My Computer? Actually its very easy and can be done using a very simple registry trick which we are going to reveal in this tutorial.
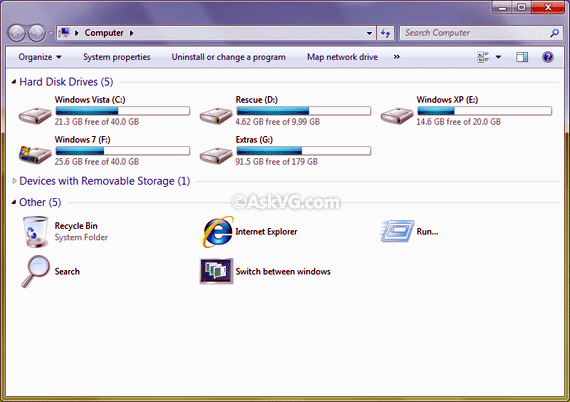
Today we'll learn how to add various useful shortcuts in My Computer window for quick and easier use as shown in following screenshot:
Add_Items_in_My_Computer_Window.png
So without wasting any time, here we start the tutorial:
1. Type regedit in RUN or startmenu search box and press Enter. It'll open Registry Editor.
2. Now go to following key:

#
### ###