Friends

This is default featured post 1 title

Go to Blogger edit html and find these sentences.Now replace these sentences with your own descriptions.This theme is Bloggerized by Lasantha Bandara - Premiumbloggertemplates.com.

This is default featured post 2 title

Go to Blogger edit html and find these sentences.Now replace these sentences with your own descriptions.This theme is Bloggerized by Lasantha Bandara - Premiumbloggertemplates.com.

This is default featured post 3 title

Go to Blogger edit html and find these sentences.Now replace these sentences with your own descriptions.This theme is Bloggerized by Lasantha Bandara - Premiumbloggertemplates.com.

This is default featured post 4 title

Go to Blogger edit html and find these sentences.Now replace these sentences with your own descriptions.This theme is Bloggerized by Lasantha Bandara - Premiumbloggertemplates.com.

This is default featured post 5 title

Go to Blogger edit html and find these sentences.Now replace these sentences with your own descriptions.This theme is Bloggerized by Lasantha Bandara - Premiumbloggertemplates.com.

Wednesday, January 12, 2011

Add Turn Off, Restart & Log Off Options To My Computer Context Menu

This is one of the most useful registry tweaks for Windows XP & Vista.For one,this adds Turn Off, Restart & Log off options to My Computer context menu. For two, this is a really useful tweak! We can add these three options to the context menu of Computer(My Computer) by editing Windows Registry. No need to worry if you don’t know how to edit Windows Registry. Copy and paste the below code in your notepad and save it as computer.REG(.REG is must) anywhere in your system. Now run this file to add these three options to Computer(My Computer) context menu:
Windows Registry Editor Version 5.00
;Add log off option to My Computer(Computer) context menu
[HKEY_CLASSES_ROOT\CLSID\{20D04FE0-3AEA-1069-A2D8-08002B30309D}\shell\ Log Off \command]
@=”shutdown -l -f -t 2″
;Add log off option to My Computer(Computer) context menu
[HKEY_CLASSES_ROOT\CLSID\{20D04FE0-3AEA-1069-A2D8-08002B30309D}\shell\ Restart \command]
@=”shutdown -r -f -t 3″
;Add log off option to My Computer(Computer) context menu
[HKEY_CLASSES_ROOT\CLSID\{20D04FE0-3AEA-1069-A2D8-08002B30309D}\shell\ Turn Off computer \command]
@=”shutdown -s -f -t 3″
No need to log off or restart your system.Just right click on Computer(My Computer) to view the three new options.
Note: This tweak works fine in XP & Vista.

How To Increase The Number Of Simultaneous Downloads In IE 7

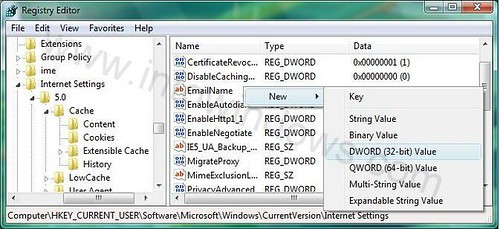
Anyone who has been involved in browsing for more than a while know that Internet Explorer 7 supports only 2 simultaneous downloads. This is quite annoying if you don’t use Download Manager for Internet Explorer. Although, you can use download manager for better experience, you can also increase the number of simultaneous downloads by tweaking Windows Registry a-bit. Below are the instructions:
1. Type “regedit”(without quotes) in Vista start menu search box or in the Run dialog box and hit enter.
2. Click “Continue” for the User Account Control (UAC) prompt.
3. Jump on to the following key in the Windows Registry Editor:
HKEY_CURRENT_USER\Software\Microsoft\Windows\CurrentVersion\Internet Settings
4. In the right pane, right-click and create a new DWORD (32-bit) and rename it as “MaxConnectionsPer1_0Server “(without quotes).

5. Now, you need to modify its value. Double click on “MaxConnectionsPer1_0Server” and change the value to 3.

Two Free Registry Monitoring Tools

We install many security tools from antivirus to password manager. In this list I have two small free utilities that would come in handy to monitor Windows Registry. Windows doesn’t provide any Registry monitoring tool natively. So, we have to search for good tools.
After looking into some old forums and my own small software database I could find two tools which are good enough to monitor Windows Registry. Needless to say, you can install any one to monitor Registry.
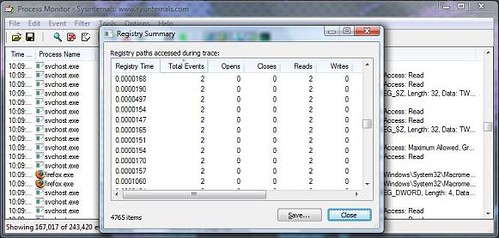
1. Process Monitor: This advanced tool is from Microsoft. Process Monitor is a free tool for Windows that shows real-time file system, Registry and process/thread activity. It has some cool features, they are:
* Monitoring of process and thread startup and exit, including exit status codes
* Monitoring of image (DLL and kernel-mode device driver) loads
* More data captured for operation input and output parameters
* Non-destructive filters allow you to set filters without losing data
* Capture of thread stacks for each operation make it possible in many cases to identify the root cause of an operation
* Reliable capture of process details, including image path, command line, user and session ID
* Configurable and moveable columns for any event property
* Filters can be set for any data field, including fields not configured as columns
* Advanced logging architecture scales to tens of millions of captured events and gigabytes of log data
* Process tree tool shows relationship of all processes referenced in a trace
* Native log format preserves all data for loading in a different Process Monitor instance
* Process tooltip for easy viewing of process image information
* Detail tooltip allows convenient access to formatted data that doesn’t fit in the column
* Cancellable search
* Boot time logging of all operations
The installer is just 1.2MB in size and can be downloaded from below source.
|Download Process Monitor|
2. RegShot: This is another cool free too for Windows which takes the snapshot of Windows Registry and then compares it with a second one. The report can be produced in text or HTML format for further reference. And report also contains a list of all modifications that have taken place between snaphot1 and 2.

How To: Put Back Network Connections & Display Settings Applets In Vista Control Panel

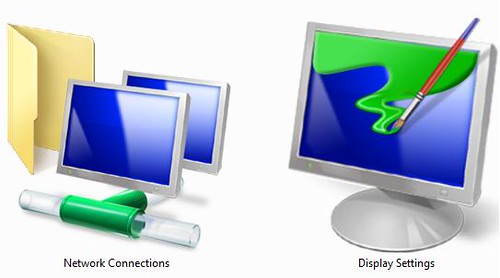
After switching from XP to Vista, you might have noticed that there are no Network Connection and Display Settings applets present in Vista Control Panel. Thought most of us use run commands to open Network Connections (ncpa.cpl) and also Display Settings (desk.cpl) it would be good to see both applets back in the Control Panel of Vista again.
Network 
Connections
So, how to put it back? You need to do a simple change to Windows registry to make this happen. Follow the below procedure:
1. Type regedit either in Start menu search box or in Run dialog box and hit enter to open Windows Registry editor.
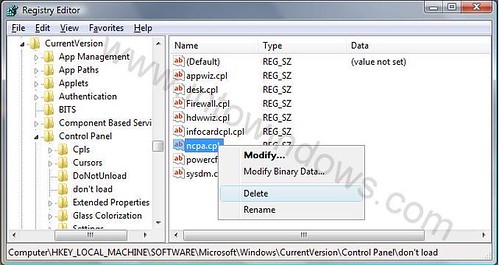
2. Next browse to the following key:
HKEY_LOCAL_MACHINE\SOFTWARE\Microsoft\Windows\CurrentVersion\Control Panel\don’t load
3. Here you need to delete two keys from the right-side pane: desk.cpl and ncpa.cpl
Vista 
Netwok Connections
4. Close Windows Registry editor and open Control Panel to view new Network Connections and Display Settings applets.
Note: You can delete other items like firewall.cpl (adds Firewall applet) and appwiz.cpl (adds Add/remove applet) to get those icons back in Control Panel.

How To: Remove Shutdown, Restart & Hibernate Options From Start Menu & Shutdown Dialog Box

Well, you have decided to download a huge movie say 50GB on your family PC with slow internet connection, and you don’t like to interrupt the download process till the download gets completed.

If you really like to keep the computer running for next two days without any disturbance then removing the Shutdown, Hibernate and Restart options from the Start menu and Shutdown dialog box sounds like a good idea as even you can’t shut down your own system accidently once you finish this small tweak.
You can also use this method if your system is running 24*7, just like mine!
Windows 7 startmenu
Although there are other ways to keep your computer running for next two days without interrupts, removing those options would be safe. You need to edit the Windows Registry a bit to achieve this. Below are the step-by-step instructions to remove Shutdown, Restart and Hibernate options from Start menu and Shutdown dialog box.
Procedure:

How To: Remove “Send Feedback” Link In Windows 7

If you have installed Windows 7 BETA, chances are high that you have already noticed the “Send Feedback” link that appears in the title bar of the windows and dialog boxes.

Basically, by using this “Send Feedback” link you can report any issues to Microsoft so that they can fix all these glitches in the next version. However, if you don’t like the idea, just use the below procedure to get rid of it.
Feedback
To remove the link you need to do a small tweak to Windows Registry. Follow the below simple instructions to remove the link.
1. Type REGEDIT in Start menu search box and hit enter.
2. Navigate to the following key:
HKEY_CURRENT_USER\Control Panel\Desktop
3. On the right hand side look for the entry named FeedbackToolEnabled and modify its value to 0 (Zero).
Send Feedback
If you can’t find FeedbackToolEnabled entry , then create a new 32-bit DWOD value and rename it as FeedbackToolEnabled and set the value to 0 (Zero) to remove the Send Feedback link.
4. Once you do the above steps, close the Windows Registry.
5. Logoff and logon your Windows 7 to see the change.

Mojopac 2.0 Released

Probably, Mojopac is the software which re-defined the portable software world by allowing the users to take the entire PC on any storage device such as iPod or USB drive. Today, Mojopac has been updated to the version 2.0 with new features. Once you install the Mojopac on your USB, you can carry it anywhere like your notepad. Just plug the Mojopac powered USB into any PC and you are ready with your familiar desktop with your favorite applications. Mojopac will not affect the PC it is connected to, and the PC you connect to will not affect Mojopac powered USB.

Moreover, your applications, your browsing history, and your data is never left behind on the PC it is connected to. Mojopac available in two versions free/paid, with the later one having few extra features.
What’s new in Mojopac 2.0?
*New user interface
*Windows XP SP3 and hotkey virtualization
*Host security scanning and isolation
|Downlaod Mojopac free|
|Download Mojopac paid|

5 Free Portable Security Applications for Your USB Stick

Ask anyone these days about the need to have antivirus software on USB sticks and I’ll bet you almost no one will you challenge it.
[ad#ad-1]
Since USB sticks are available for only few dollars and as floppies and CDs have become outdated, peoples have begun to use USB sticks in their everyday use. As you might know, like floppies USB stickshave also become a great mediator to transport Viruses and other malicious programs.
In order to keep your USB drive and PC safe, you need to use the portable security softwares which are available for free of cost. In this guide, we will introduce five free security softwares which can be used to prevent Viruses and other malicious things.
1.Clam Win Portable: Clam win Portable is the portable version of ClamWin antivirus, so you can scan files on the go. You can use this portable application on your USB flash drive,CD or iPod.
2.KeePass Portable: This is also the portable version of the famous KeePass Password Safe utility, which lets you carry your internet, email and other passwords with you safely.
3.RoboForm2Go: Like KeePass RoboForm2Go is also a password manager. It stores all your login information and can run directly from a USB drive. You can use it on any computer with no information left behind.
4.Omziff: Omziff is a standalone encryption and security utility which allows you to encrypt/decrypt a file, using several well known encryption algorithms.
5.Lock Note: Lock note allows you to store any information using 256-bit AES encryption.You can enter any important information and then simply close LockNote. You will be asked to enter the password to set a password for it. You can create multiple copies of LockNote.

Ultimate Windows Tweaker – A Must Have Freeware

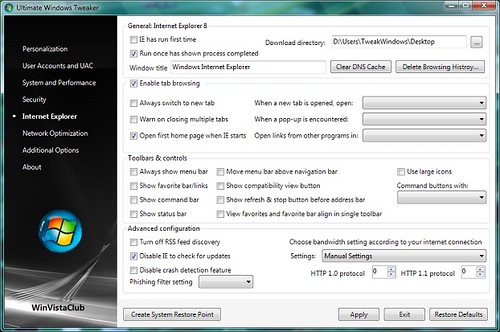
Windows Vista Club has finally released the much awaited Ultimate Windows Tweaker, a must have utility for Windows Vista users. As this freeware is a standalone program, you can use it without installation and also can carry on your USB drive. Ultimate Tweaker has been packed with more than 130 registry tweaks to speed-up and enhance your Windows Vista.
The freeware has been developed by Ramesh Kumar, a MVP. Ultimate Windows Tweaker is just 300KB in size and supports both 32-bit and 64-bit Vista. The program also detects whether you have IE 7 or IE 8 installed and accordingly offers you the relevant tweaks only.
The tweaks are classified under seven categories and can be accessed through a common interface, just like your Windows Vista Control Panel.
1) Personalization,
2) User Accounts & UAC,
3) System & Performance,
4) Security,
5) Internet Explorer (IE7 / IE8)
6) Network Optimization
7) Additional Options
You can find all the features and information at WinVistaClub. If you have any doubts and suggestions, please Visit Support page.

How To Install & Use PortableApps Pack In Windows?

Portable applications come in handy when you are away from your PC. This may sound like very basic information for those who have been using system for while but most of the new users are not aware of this wonderful feature and application.
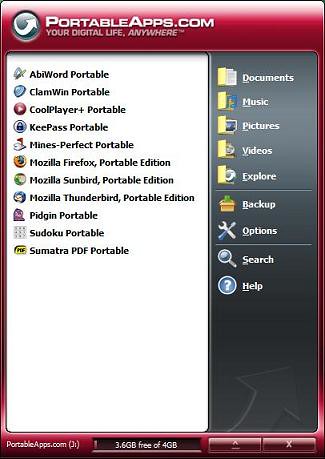
Portable applications can be carried on your USB flash drive and use on any system without installing or adding registry entries to the host system. There are many small-portable applications but here is a pack which covers everything from antivirus to games.
PortableApps suite is a huge collection of portable applications such as Antivirus, Calendar, Browser, Email client, Office suite and many free utilities that can be used on USB drive. There are two versions: Standard (115MB) and Lite(35MB).The major difference between two versions is, the standard PortableApps suite comes with OpenOffice portable while the later one comes with AbiWorld.
How to install it?
1. Download the PortableApps suite from here.
2. Insert your USB drive into the USB port.
3. Run the Portable Apps suite installer file.
4. Select your USB drive as destination folder.
5. It will take few minutes to get installed.
6. Once the installation is finished, double-click StartPortableApps to open the application launcher.
Now, you can carry your USB drive anywhere and access all the programs on the go.

Recover Deleted Files Using Recuva Freeware

Recuva is a free data recovery software to restore accidentally deleted files from your Windows machine. Recuva can restore text files, images, video files easily with a few clicks. The program is very simple to use and takes just few MBs on your system. Once run the program, Recuva asks you few information about the file which need to be recovered by Recuva. You can give some basic information like types of files (Picture, music, Video, documents, other), location of the file before it was deleted (Recycle bin, any drives, Media card) to start the recovery process.
Recuva scans your system and shows the number of files found with file information such as last modified date, location/path of file, size, state, comments etc. Recuva also comes with an advanced mode to customize the system scan. You can recover single or multiple files at time from tree view of files.
Recuva supports NTFS, FAT 12, FAT 16, FAT 32 and NTFSS file systems and can even run from a USB flash drive.
|Download Recuva|
|Download Portable Recuva (for USB)|

Password Protect An Image Using LockImage Freeware

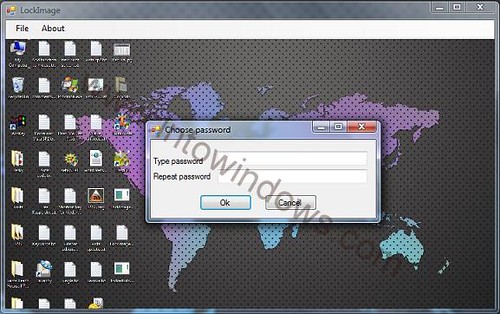
We usually protect documents with a password so that no other can read the file. But, what do you do if you need to secure an image that is crucial for you? Though you can use WinRAR and WinZip, here is a very small utility that secures your image with a password. LockImage is a small free utility that helps you protect your images with a password. LockImage doesn’t need any installation. LockImage converts your image into an executable with embedded image viewer.
As LockImage doesn’t require any installation, you can download and run the file with peace of mind. In other words it’s a portable application which can be carried on your USB drive.
Run the file and use File open option to import any image file to LockImage. Now, once you try to save this imported file LockImage asks you enter the password for this file before it creates a protected image. Next time, whenever you try to open this file, you need to enter the password to view the file.
As for the performance, the utility works perfectly fine if you are ready to have an exe file in place of image file. The ability to store a password in an executable file is an excellent feature but the catch is it takes almost double the size of the actual image file, making you use this utility for crucial image files only. Overall, this is really a cool tool to have in your software collection to keep all your image files safe.

Encrypt Your Notes With LockNote

Security is becoming a major problem these days as hackers are using advanced tricks in their kitty to get most out of your system. Keeping your confidential notes in just a text file is no longer can be considered as safe. We need good encryption software to encrypt all our crucial notes and information.
LockNote is a standalone freeware utility which can be used to encrypt your information is a more secured way. It uses AES 256-bit encryption which is more secure and reliable. As already mentioned it doesn’t require any installation, making it is carrying LockNote on a USB drive.
Locknote
Features:
  • Store your passwords, serial numbers and confidential notes in a safe place.
  • LockNote doesn’t require installation, can be carried on USB flash drives.
  • Simply drag and drop any text file on LockNote window to encrypt the file.
Once you startup the LockNote program, you will be presented with a simple screen where you can read the more information about LockNote program and kick start encrypting your information by simply typing in. To encrypt the entered info, simply select Save As option where you will be asked to assign a password for the encrypted file. Next time when you want to access the file, you need to enter the password.
LockNote stores the file in .exe format so that you can even carry and open your files on an unknown computer where LockNote program is not available. However note that LockNote only encrypts .txt files only.

Download Google Chrome 2.0 Portable

We know that most of the power users like and love Mozilla Firefox over any other browsers. But  there are few users who are actually liking the new adventure of Google that has gained many good reviews ever since it was released in last September.
chrome
Google Chrome has been updated to 2.0 recently and you can download it from the Chrome site. If you are using Chrome as a primary browser then you might like to carry the portable version the Chrome on your USB thumb drive to use the favorite browser on any Windows machine.

Though Google is not providing the portable version of the browser, some enthusiasts have managed to create a portable version of the browser. You can get the portable version of the browser from the below link. Don’t get confused as the site is in German language.

Download the portable version of the Chrome 2 from stadt-bremerhaven site and then extract it. Once you extract the download pack you will get a folder named Portable Google Chrome. Open the folder and double-click on Chrome Loader file to run the browser.

Download Portable OpenOffice 3.1.0

OpenOffice is one of the well known office suite for Windows, Mac and Linux. If there is an office suite (free) that matches with Microsoft Office is Open Office.
openoffice
Open Office suite comes with almost all the features that you find in Microsoft Office. Another advantage is that it stores all your data in an international open standard format and can also read and write files from other common office software packages.

The portable version of OpenOffice 3.1.0 is 198MB and can be downloaded from the link below.

Download Portable VirtualBox

VirtualBox is a well known free virtualization solution for Windows, Mac & Linux. We have covered a few VirtualBox based guides such as how to install Windows 7 on VirtualBox and also how to install and carry Windows 7 on a USB flash drive just like a portable application, in the past.
virtualbox
VirtualBox is good virtualization product for Windows. Here is what the VirtualBox user manual says: Sun VirtualBox is a collection of powerful virtual machine tools, targeting desktop computers, enterprise servers and embedded systems.

With VirtualBox, you can run unmodified operating systems – including all of the software that is installed on them – directly on top of your existing operating system, in a special environment called a virtual machine.

VirtualBox supports following (host) operating systems:
# Windows XP, all service packs (32-bit)
# Windows Server 2003 (32-bit)
# Windows Vista (32 & 64-bit)
# Windows Server 2008 (32-bit & 64-bit)
# Windows 7 (32-bit & 64-bit)

#
### ###