Friends

This is default featured post 1 title

Go to Blogger edit html and find these sentences.Now replace these sentences with your own descriptions.This theme is Bloggerized by Lasantha Bandara - Premiumbloggertemplates.com.

This is default featured post 2 title

Go to Blogger edit html and find these sentences.Now replace these sentences with your own descriptions.This theme is Bloggerized by Lasantha Bandara - Premiumbloggertemplates.com.

This is default featured post 3 title

Go to Blogger edit html and find these sentences.Now replace these sentences with your own descriptions.This theme is Bloggerized by Lasantha Bandara - Premiumbloggertemplates.com.

This is default featured post 4 title

Go to Blogger edit html and find these sentences.Now replace these sentences with your own descriptions.This theme is Bloggerized by Lasantha Bandara - Premiumbloggertemplates.com.

This is default featured post 5 title

Go to Blogger edit html and find these sentences.Now replace these sentences with your own descriptions.This theme is Bloggerized by Lasantha Bandara - Premiumbloggertemplates.com.

Friday, July 1, 2011

How to Get Windows Media Player (WMP) 12 Taskbar Toolbar (Taskband) Back in Windows 7 by Downgrading to Version 11

As we all know "Windows 7" comes with Windows Media Player 12 version which contains lots of new features and also the interface is a bit different from previous versions. But tbh I don't like WMP12. Its a bit buggy and the most annoying thing is it doesn't provide the taskbar toolbar aka mini toolbar which was one of the best thing in Windows Media Player.
If you also don't like WMP12 and want to get the good ol' mini toolbar back in Windows 7, then this tutorial will help you.
In this tutorial, we'll downgrade the WMP version in Windows 7. We'll install WMP11 and it'll bring the taskbar toolbar back as shown in following screenshots:
WMP11 Running in Windows 7:
WMP11_in_Win_7_Thumb.png
WMP Taskbar Toolbar in Windows 7:
WMP_Toolbar_in_Win_7.png
So here are the required steps:
1. Right-click on Computer icon on desktop and select Manage, it'll open a new window. Now go to Services & Applications -> Services. You can also open the same from Administrative Tools -> Computer Management. Or you can directly open "Services" list by providing services.msc command in RUN or Startmenu search box.
Now right-click on "Windows Media Player Network Sharing" service and select "Stop". It'll stop the service.
2. Now you'll need to take ownership of following files/folders:
  • "Windows Media Player" folder in "Program Files" folder
  • All files starting with wmp in "Windows\System32" folder
  • wmploc.dll.mui file in "Windows\System32\en-US" folder
How will you take the ownership? Just follow the steps given in following tutorial:
Add Take Ownership Option in File / Folder Context Menu in Windows Vista and 7
PS: Make sure to take the backup of all above mentioned files/folders, so that you can restore them if something goes wrong.
3. Now download following ZIP file, extract it and run the extracted EXE file:
Download ZIP File
This installer will install WMP11 and will ask to restart your system. Select the second option to not restart the system and finish the installation.
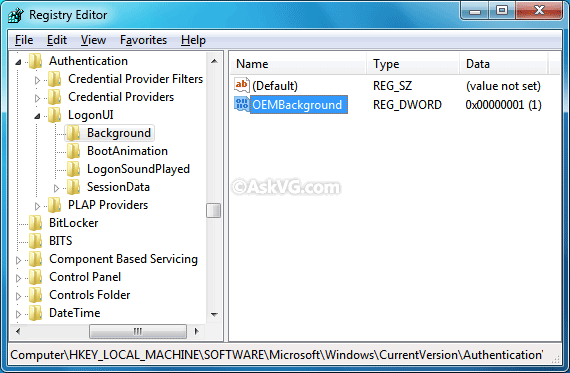
4. Now type regedit in RUN dialog box and press Enter. Now delete Installed Versions key under following key:
HKEY_LOCAL_MACHINE\SOFTWARE\Microsoft\MediaPlayer\Setup
5. That's it. Now restart your system and get ready to enjoy the WMP 11 version and WMP taskbar toolbar in Windows 7.
Thanks to Lord Devrexster from WinMatrix for this information...

Get the Good Old Movie Maker 2.6 in Windows Vista and 7

The new Windows Live pack includes "Movie Maker Beta" version which provides the new ribbon interface but many advanced users are not happy with this new version. Lots of essential features like timelines, adding text on videos, audio edits, etc have been removed from this new version to make the application simple and easy to use. But IMO these removed features were the most important and essential features in Movie Maker and now the stripped beta version is a bit useless for lots of people.
If you also feel the same and want to get the good old Movie Maker with all the required features, then here is a good news for you. Microsoft has released Movie Maker 2.6 for Windows Vista which also works in Windows 7.
Movie_Maker.png
So download it from following link and install in your Windows if you miss the old Movie Maker:
Download Movie Maker 2.6

5 Test Updates Coming for Windows 7 Beta (Build 7000) on 24 February 2009

Here is some important information for Windows 7 users. Microsoft is going to release 5 test updates for Windows 7 Beta (Build 7000) on Tuesday, February 24, 2009. Remember that all these updates will not install automatically. They will be clearly described as test updates in Windows Update.
How to Install the Updates:
To install these updates, you'll need to go to Control Panel -> Windows Update and then select the updates and install them.
What will these Updates Do:
These updates will not deliver any new feature or fix. They will simply replace some system files with new ones to help Microsoft in verifying its ability to deliver and manage the updating of Windows 7 in certain scenarios in the future.
If you don't want to install them, you can simply hide them by right-click on the update and select "Hide update" option.
These updates are only available for Windows 7 Beta Build 7000 and you'll be able to install them even if your Windows 7 copy is not activated.

Fix] Windows 7 Boot Screen Changed to Vista Style

Its a very annoying and common problem in Windows 7. After getting numerous e-mails about this problem, we decided to post this solution. As we all know Windows 7 contains a new animated boot screen which shows animated items/balls that come together to form Windows logo.

Sometimes it starts showing the old Vista styled boot screen which contains only a green progressbar with black background.
Most of the time it happens when a user tries to repair the boot loader or adds a new entry for Windows 7.
If you are also facing this problem, then here is a very simple and working solution for you:
1. Boot into Windows 7 and click on "Start button -> All Programs -> Accessories". Now right-click on "Command Prompt" and select "Run As Administrator". If you are prompted to enter password, enter the password and continue. You can also open Command Prompt in Administrator mode by typing "cmd" in Startmenu Search box and press "Ctrl+Shift+Enter".
2. Now provide following command:
bcdedit /set {current} locale en-US
The above command is for English version of Windows, if you are using some other language version, then change "en-US" to your own locale.
3. Exit Command Prompt and restart your system. Now the new animated Windows 7 boot screen should be back in action.
NOTE: If the above method doesn't work for you, provide following command again using Command Prompt:
bcdboot %WinDir% /l en-US
And restart your system. It'll work now.

How to Link Your Windows 7 User Account with Windows Live ID

Did you know you can link your Windows Live ID with your Windows 7 user account? Yep, if you are a Windows 7 user and also have a Windows Live ID, you can link both of them. Why? Here is what Microsoft has to say:
Through the online provider, the Sign-in Assistant helps a Windows 7 application running on one computer identify and communicate with other computers that are associated with the same Windows Live ID. Just by linking your Windows Live ID to the user account on each Windows 7 computer you own, you enable those computers to identify each other and work together more easily than has been possible in the past. Applications can take advantage of this capability to support scenarios as in the following example:
On his homegroup, Bob wants to share certain documents with his wife but not with his kids. Simply by specifying his wife’s Windows Live ID user name, Bob can give his wife exclusive permission to access documents on his computer.
Here is the step by step guide to do the task:
1. Open Control Panel and click on "User Accounts" applet. Now click on "Link online IDs" link given in left sidebar.
2. Now click on "Add an online ID provider" link given at the bottom.
3. It'll open a web page in your browser. You'll need to click on the "Windows Live" logo present in the middle.
4. It'll open a new web page where you can download the "Windows Live ID Sign-in Assistant" which will install the required "Windows Live ID online provider".
PS: You can download the "Windows Live ID sign-in assistant" directly by going to following link:
Download Windows Live ID Sign-in Assistant
Now you can ask why should you follow steps 1-3 when you can directly download the sign-in assistant using the above mentioned link? The answer is very simple. At the moment only "Windows Live ID online provider" is available but there would be many other online providers in future and you'll need to follow steps 1-3 to install them.
5. After installing the sign-in assistant, again go to Control Panel -> User Accounts -> Link online IDs. Now you'll notice the newly added "Windows Live ID online provider".
6. Click on "Add linked ID" link and it'll show following login box where you'll need to provide your Windows Live credentials.
7. After filling the credentials, click on "Sign in" button. It'll take a few seconds and your Windows 7 user account will be linked with your Windows Live account:
New_Online_ID_Added.png
8. If you want to edit or remove the linked Windows Live ID later, you can do by clicking on "Update credential" or "Remove linked ID" links, respectively.

Download 5 New Updates for Windows 7 Beta (Build 7000) NOW

Recently we posted about 5 new updates coming for Windows 7 Beta (Build 7000). These updates were scheduled for 24 February 2009 and now Microsoft has released the updates. These updates will not install automatically and you'll need to manually install them.
Go to Control Panel -> Windows Update and then select the updates and install them.
These updates will not deliver any new feature or fix. They will simply replace some system files with new ones to help Microsoft in verifying its ability to deliver and manage the updating of Windows 7 in certain scenarios in the future.
NOTE: No. of available updates might differ for different systems.

How to Remove “Gadgets” Option from Windows 7 Desktop Context Menu?

Recently someone asked us how can he remove "Gadgets" option from Windows 7 Desktop context menu as he doesn't use any gadgets on Desktop? Win_7_Desktop_Context_Menu_with_Gad.png
If you also don't like this extra option in Desktop context menu and want to remove it, then this tutorial will help you.
You can remove this option by uninstalling the complete Gadget application. How will you do that? Here are the required steps:
1. Open Control Panel, click on "Programs and Features" and then click on "Turn Windows features on or off" link present in left sidebar:
Turn_Windows_Features_on_or_off.png
2. It'll open another window, now uncheck "Windows Gadget Platform" option from the list and click on OK button:
Uninstalling_Windows_Gadget_Platfor.png
3. That's it. It'll uninstall the Gadget application and the "Gadgets" option will be removed from Desktop context menu:
Win_7_Desktop_Context_Menu_without_.png
Its good for people who like minimal context menu and don't use Gadgets on Desktop.

Windows 7 Allows You to Remove IE, WMP and Many Other Windows Components

Now its official. Today Microsoft made an official announcement that Windows 7 will allow its users to remove several unwanted Windows components, which are tightly integrated into Windows shell. Most of them are already available in Windows Vista, some new components are as follows:
  • Windows Media Player
  • Windows Media Center
  • Windows DVD Maker
  • Internet Explorer 8
  • Windows Search
  • Handwriting Recognition (through the Tablet PC Components option)
  • Windows Gadget Platform
  • Fax and Scan
  • XPS Viewer and Services (including the Virtual Print Driver)
In the above list, the components which we found most interesting are "Internet Explorer", "Windows Search", "Windows Media Player" and "Windows Media Center".
Its really surprising to see that Microsoft put an option to completely remove IE from Windows but wait, is it really true? Well here is what Windows 7 team says:
If a feature is deselected, it is not available for use.  This means the files (binaries and data) are not loaded by the operating system (for security-conscious customers) and not available to users on the computer. These same files are staged so that the features can easily be added back to the running OS without additional media. This staging is important feedback we have received from customers who definitely do not like to dig up the installation DVD.
So that means even though you remove the component from the list, it'll not uninstall itself completely but it would disappear from the system. The component files will be stored within the system for future use.
Windows 7 team again clears the "Remove" part:
It is worth describing the details of “remove” since this too is a place where there are engineering and customer decisions to be made. We’ve already seen one decision which is to make sure we keep the features staged for future use so that a DVD is not required. A second decision is that we also continue to support the APIs available for features where these APIs are necessary to the functionality of Windows or where there are APIs that are used by developers that can be viewed as independent of the component. As many of you know these are often referred to as “dependencies” and with Windows the dependencies can run both internal to Windows and external for ISVs.
Whatever the remove option does but one thing is sure, Microsoft is doing the right things with Windows 7. Its development is going very fast and users are getting better control over Windows.
We also found following lines interesting in the whole post:
We’ve received feedback for features that should be even more customizable (such as Explorer or the logon screen) or features that should be added to Windows (such as a PDF format reader, security tools, or disk utilities). And we’ve received feedback that some users might prefer to run Windows without certain features.
If they mention it, there must be some reason behind it. So get ready to see a new login screen and modified Explorer in later builds. Also it would be interesting to see a built-in PDF reader and Disk Utility in Windows 7.

UI Changes from Windows 7 Beta Build 7000 to RC Build 7048

As we all know Windows 7 RC build 7048 has been leaked recently and it'll be released to public very soon. The one and only build which was released to public last time, was Beta build 7000. The Beta build 7000 was compiled on December 12, 2008, at 2:00pm and the RC build 7048 was compiled on February 19, 2009 at 6:45pm, so there is more than two months gap between both builds compilation.
Do you want to know what are the UI changes in this new RC build which were not present in the previous beta build?
New Start ORB (Start button):
The first change which you notice after installing Windows 7 RC build is the new Start ORB.
It has been changed and now the glowing part looks cleaner and better than the previous one.
Control Panel:
The second big change is the new white-grey sidebar in System Properties and other Control Panel applets.
Also a drop-down menu "View by" has been added in Control Panel to switch between Large and Small icons.
Desktop Context Menu:
The Desktop context menu has also been modified.
There is a new "Show desktop gadgets" option in context menu which allows you to easily show/hide desktop gadgets.
"Gadgets" icon has been changed.
All options text now follows "Sentence case", i.e. only the first letter of the first word is capital.
Alt+Tab with Aero Peek:
Now whenever you press "Alt+Tab", Windows uses "Aero Peek" to hide other applications windows so that you can concentrate more on the selected application in Alt+tab list.
No Red 'x' icon in Internet Explorer:
All previous IE versions used to show an ugly red 'x' icon on an image when the image was not found or not loaded. But now IE in RC build no longer shows it, it shows a blank box instead.
Also IE is no longer Beta or RC in this build, its final now.
Program Compatibility Options:
Now RC build contains 3 new options in program compatibility list:
  • Windows XP (Service Pack 3)
  • Windows Vista (Service Pack 1)
  • Windows Vista (Service Pack 2)
IE, WMP and many other Windows applications are removable now:
As we earlier posted, now users can remove many Windows applications like IE, WMP, Media Center, Windows Search, etc using "Programs and Features" list.
Windows 7 Allows You to Remove IE, WMP and Many Other Windows Components
New Program Icons, Wallpapers and Sound Schemes:
Some Windows applications have new icons now like MS Paint, Calculator, etc.
Also there are a few new wallpapers and sound schemes in this build.

Download Windows 7 Beta Build Wallpapers and User Pics

Recently leaked Windows 7 beta build comes with lots of new wallpapers and user pics.
If you want to enjoy them in other Windows versions, you can download them using following link:
Download Windows 7 Beta Build Wallpapers and User Pics
Its a ZIP file. Extract it using WinRAR or 7-Zip and you'll get separate folders containing Wallpapers and User Pics.
To use User Pics, copy the BMP files present in "Userpictures" folder to following folder:
Windows XP:
C:\Documents and Settings\All Users\Application Data\Microsoft\User Account Pictures\Default Pictures
Windows Vista & 7:
C:\ProgramData\Microsoft\User Account Pictures\Default Pictures
NOTE: Replace C: with the drive letter where Windows is installed in your system.
Thanks to fediaFedia for sharing this stuff...

List of Important Changes from Windows 7 Beta to RC

Steven from "Engineering Windows 7 Team" posted a list of 28 important changes from Windows 7 Beta to RC which was compiled by "Chaitanya Sareen". Here is what "Steven" says:
Hey folks, just wanted to provide another update (building on the recent post on some changes since Beta) on some of the changes you will see in the Release Candidate.  Again, there are many and this is not an exhaustive list.  Of course we continue to gather telemetry from the large number of people running the Beta full time.  Just a reminder, the Beta is the only official build from Microsoft.  Chaitanya compiled this list from a broad set of feature teams focused on visible changes based on feedback that go beyond "bug fixes", though we included some of the more widely reported bugs on this list as well.

Windows 7 Supports Login Screen Customization Without 3rd Party Software, How-to Instructions Inside

Did you know? Windows 7 allows you to easily change the background of login screen, so you can use any of your favorite wallpaper as login screen background without using any 3rd party software. How to do that? Just follow these simple steps:
1. Type regedit in RUN or Startmenu search box and press Enter. It'll open Registry Editor.
2. Now go to following key:
HKEY_LOCAL_MACHINE\SOFTWARE\Microsoft\Windows\CurrentVersion\Authentication\LogonUI\Background
3. Now in right-side pane, change value of OEMBackground to 1
Enable_Custom_Login_Backgrounds_in_.png
PS: You can use following ready-made registry script to enable custom login backgrounds, no need to manually apply the hack using 1-3 steps:
Download Registry Script
4. Now go to following folder:
%windir%\System32\oobe
Here %windir% represents "Windows" folder present in the system drive where Windows 7 is installed.
5. Create a new folder "info" inside oobe folder. Then again create a new folder "backgrounds" inside info folder. So the final path would be:
%windir%\System32\oobe\info\backgrounds
6. Now copy any desired wallpaper to this new "backgrounds" folder but following conditions must be followed:
  • The image name must be backgroundDefault.jpg.
  • The image size must be less than 256 KB.
  • The image format must be JPG.
Copy_Custom_Login_Backgrounds_in_Wi.png
7. That's it. Once you copy the wallpaper to "backgrounds" folder, your Windows 7 login screen will start using this new wallpaper as background. You can check the new login screen background by logging off or locking Windows.
Custom_Login_Background_in_Win_7.png
PS: You can also use custom sized images based upon your screen resolution with the following names:
  • backgroundDefault.jpg
  • background768×1280.jpg  (0.6)
  • background900×1440.jpg  (0.625)
  • background960×1280.jpg  (0.75)
  • background1024×1280.jpg (0.8)
  • background1280×1024.jpg (1.25)
  • background1024×768.jpg  (1.33-)
  • background1280×960.jpg  (1.33-)
  • background1600×1200.jpg (1.33-)
  • background1440×900.jpg  (1.6)
  • background1920×1200.jpg (1.6)
  • background1280×768.jpg  (1.66-)
  • background1360×768.jpg  (1.770833-)
NOTE: The backgroundDefault.jpg image is loaded and stretched-to-fit when a resolution/ratio-specific background cannot be found. If the background cannot be loaded (e.g. image physically too large, incorrect ratio, etc.), the default image is loaded from imagesres.dll file.

Nimi Visuals: Add Various Eye Candy Effects to Windows

Nimi (formerly known as Tophaz) is a small program that adds various window effects that can be adjusted by user. Currently, those are: Transparency effects, with fading
  • Desktop shadows - turn all windows transparent and click-through when desktop is selected. Holding mouse with button pressed over transparent window activates it again.
  • Window fading in on creation - fade in window on it's creation
  • Contrast screen - creates contrast between active and non-active windows
  • Taskbar and start menu transparency(no fading)
  • Ttransparency on window move and resize
Jelly effects
  • Window kinetics - window will its momentum during move
  • Jelly windows - deform window shape depending on direction of its move in wobbly style
  • Jelly bounce - Makes window bounce on activation
Illusion effects
  • Creation sparkle - creates sparkle on titlebar at window creation
  • Contrastful windows - decrease saturation of non-active windows.
Other
  • Window quiver - minimizes or restore non-active windows on active window quiver movement
  • Window snap - maximizes window to half-width of screen when it's left more than half outside screen
  • Picture wallpaper-board - generate wallpaper filled with random images from User picture folder or Nimi folder in application data folder
  • Picture highlight - generate wallpaper containing one image from User picture folder, highlighted on adapted background
  • Screen frost - cover wallpaper under ice.

It supports Windows XP, Vista and 7 and should also work in Windows 2000.
Download Link
More Info

How to Fix Old Classic Context Menu Problem in Windows Vista and 7

Sometimes Windows Vista and 7 users face a strange problem. Whenever they right-click on an item or in free space, they get the old classic context menu instead of the new WPF enabled context menu as shown in following screenshot: Classic_Context_Menu_Problem.png
This problem occurs because of Norton products. Actually Norton installs its own entry in context menu which breaks whole context menu and Windows starts showing the classic context menu. As you can see in the above screenshot, there is an entry for "Norton AntiVirus".
To solve this problem, you just need to either disable Norton context menu entry from its Settings or uninstall Norton completely. It'll fix the problem and you'll get the new WPF enabled context menu back:
Classic_Context_Menu_Problem_Fixed.png

RunMe: Application Launcher for Windows

"RunMe" is a simple and portable application launcher for Windows which can be used as a dock as well. It supports almost all Windows versions including Windows XP, Vista and 7. RunMe.png
You can add any desired program by just dragging and dropping the shortcut to the launcher. If you want to delete any existing item, then simply drag n drop the item outside of the launcher.
Its highly customizable and you can change its position, effects, skins using its Settings which can be accessed by right-clicking on the launcher and selecting the "Settings" option.
RunMe_Settings.png
There are skins available which can change its look to match with Windows Vista and 7:
RunMe_Skins.png
So if you are a dock lover and want to use something new, then you should give it a try.
Download Link
Thanks to "Odoiporos" for mentioning it...

Windows 7 Restricted Edition

Confusing? Actually we are talking about "Windows 7 Starter Edition" here which should be better called "Windows 7 Restricted Edition". Why? As we all know previous Windows Starter Editions didn't allow users to open more than 3 programs simultaneously and the same restrictions is found in recently leaked Windows 7 Starter Edition Build 7068.
Windows_7_Starter_Edition_3_Program.jpg
But the most irritating and surprising thing in Windows 7 Starter Edition is the restriction over changing Desktop Wallpaper.
Windows 7 Starter Edition contains a grayed-out version of default Windows 7 beta wallpaper showing the fish on Desktop.
Windows_7_Starter_Edition_Build_706.jpg
And the worst thing is, users are not allowed to change the wallpaper. There is no "Personalize" option in Desktop context menu:
Windows_7_Starter_Edition_Context_M.jpg
Also no other ways to change wallpaper works like changing wallpaper using Windows Photo Gallery, web browser, etc. That's really strange and hard to understand why Microsoft restricted such a basic feature even free Linux distros allow to change wallpapers.
Also there are no extra wallpapers in Starter Edition.
Thanks to "Paul Thurrott" who installed the recently leaked Windows 7 Build 7068 and tested all different editions like Starter, Home Basic, Home Premium, Professional and Ultimate and found this interesting restriction in Starter Edition.
Also "Rafael" @ WithinWindows describes how this restriction works in Windows 7 Starter Edition. He posts:
In Windows 7, a new licensing bit was introduced – ChangeDesktopBackground-Enabled. On Starter Edition SKUs, this bit is set to 0, disabling background setting capabilities in Windows Photo Viewer and the Display/Theme Control Panel applets. The infection goes deeper into system files shell32.dll and themeui.dll too, hard-coding the wallpaper to %windir%\web\wallpaper\windows\img0.jpg.
He also posts a workaround for it:
1. As an Administrator, reset the permissions on img0.jpg, and overwrite file with any other picture
2. Use third-party software (note: changes will likely not persist, untested)

Kode smile facebook

Smiley bisa dipergunakan dengan salah satu kode yang tersedia.

happy :-) :) :] =)

robot :|]

curly lips :3

pacman :v

upset >:O >:-O >:o >:-o

confused o.O O.o

squint -_-

kiki ^_^

heart <3

kiss :-* :*

angel O:) O:-)

devil 3:) 3:-)
Shark (^^^)

unsure :/ :-/ :\ :-\

cry :'(

grumpy >:( >:-(

sunglasses 8-| 8| B-| B|

glasses 8-) 8) B-) B)

wink ;-) ;)

gasp :-O :O :-o :o

grin :-D :D =D

tongue :-P :P :-p :p =P

sad :-( :( :[ =(

Chris Putnam :putnam:

Taskbar Eliminator: Hide / Remove Windows Taskbar

Did you ever want to hide / remove Windows taskbar so that you can use a dock and can get more space on Desktop? Although you can set the taskbar to "Auto-hide" but it also hides the Start button. "Taskbar Eliminator" is a great portable application which can hide the Taskbar but shows the start button so that you can access your programs.

Its very handy if you use a dock. Just run the EXE file and it'll hide the taskbar. If you want to show the taskbar again, press the "Ctrl + Alt + T" keys and it'll show the main window where you can easily unhide the taskbar again. Also you can set the program to start automatically with Windows.
It works on almost all Windows versions including Windows 98, 2000, XP, Vista and 7.
Download Link
Homepage
Thanks to "JosephR" for mentioning it..

Windows 7 Starter Edition AND 3 Applications Limit

s we all know Windows 7 Starter Edition contains 3 applications limit, i.e. you can't run more than 3 applications simultaneously. But is it really true? It seems so. In Windows 7 starter edition, if you try to run a new program and 3 programs are already running, you get following message:
Windows_7_Starter_Edition_3_Program.jpg
Our friend Paul Thurrott investigates more into this issue and finds some interesting info as stated below:
You will often have far more than three applications running before you see it. How is that?
One theory is that the built-in applications don't count, or perhaps its just Explorer-based apps. For example, you can launch SnagIt (third party app), WMP, and IE 8, and then launch Paint. No problem. The, launch WordPad. No complaints. Windows Anytime Upgrade.
But if you try to launch Windows Fax and Scan at this point ... bam. Or Windows Live Photo Gallery. Blocked. But launch Windows Explorer? No complaints. It starts right up.
OK, let's start over.
No apps are running. Launch, in order, SnagIt, Windows Live Photo Gallery, Windows Live Movie Maker, and then Windows Fax and Scan. No problem. That's four apps right there. Now launch IE 8 ... nope, it's blocked. But Windows Explorer will run. So will Windows Anytime Update. WMP? No.
Oh, and ESET NOD32 is running in the background the whole time.
So it seems you can have more than 3 applications running simultaneously in Windows 7 Starter Edition which is a good thing to know. Isn't it?

[Windows 7 Bug] User Picture Disappears from Start Menu After Resizing Taskbar

We have posted about 2 annoying bugs which we found in Windows 7 builds while beta testing: [Windows 7 Bug] Items Reappear After Deleting From Navigation Pane in Windows Explorer
[Windows 7 Bug] User Picture Disappears from Start Menu
All above mentioned bugs have been fixed in the newer builds but now a new bug has arrived. It was found in Windows 7 build 7057.
You can re-create this bug using following steps:
1. Unlock the taskbar by right-click on the taskbar and uncheck "Lock the taskbar" option.
2. Now resize the taskbar and drag it to the maximum height. Now click on Startmenu and user picture will disappear from the startmenu.
3. That's OK. Since there is not much space available on the screen, that's why Windows doesn't show the user picture. But now resize the taskbar again and set it to normal height.
Now the bug appears, Windows still doesn't show the user picture in startmenu even though we have restored the taskbar height:
No_Userpic_in_7_Startmenu.png
4. To restore the user picture, you'll need to drag-n-drop the taskbar to left, right or top of the screen and then restore it back on bottom. Now user picture will start showing in startmenu.
Also check:

iCalcy: An iPhone Look-a-like Calculator for Windows

If you are an iPhone lover, then you'll definitely love this new portable calculator. "iCalcy" is a portable calculator for Windows which looks like iPhone.
It can perform all standard calculator operations. You can also rotate it into either portrait or landscape orientation, just like an iPhone.
All functions in portrait orientation are supported, including + - X and ÷, as well as memory and sign capabilities.
As we earlier mentioned, iCalcy is a stand-alone application, so it doesn't need any installation and you can directly run it or carry on your USB drive.
You can download it using following link:
Download iCalcy
Homepage
Thanks to JohnT for mentioning it...

#
### ###