Friends

This is default featured post 1 title

Go to Blogger edit html and find these sentences.Now replace these sentences with your own descriptions.This theme is Bloggerized by Lasantha Bandara - Premiumbloggertemplates.com.

This is default featured post 2 title

Go to Blogger edit html and find these sentences.Now replace these sentences with your own descriptions.This theme is Bloggerized by Lasantha Bandara - Premiumbloggertemplates.com.

This is default featured post 3 title

Go to Blogger edit html and find these sentences.Now replace these sentences with your own descriptions.This theme is Bloggerized by Lasantha Bandara - Premiumbloggertemplates.com.

This is default featured post 4 title

Go to Blogger edit html and find these sentences.Now replace these sentences with your own descriptions.This theme is Bloggerized by Lasantha Bandara - Premiumbloggertemplates.com.

This is default featured post 5 title

Go to Blogger edit html and find these sentences.Now replace these sentences with your own descriptions.This theme is Bloggerized by Lasantha Bandara - Premiumbloggertemplates.com.

Thursday, June 23, 2011

How to Pin “Network Connections” Shortcut to Windows 7 Taskbar?

In this tutorial, we'll learn how to add "Network Connections" shortcut to Windows 7 Taskbar so that you can access it quickly and easily. Following are the required steps:
1. First you'll need to create a new shortcut. To do this, right-click on Desktop and select "New -> Shortcut":
New_Shortcut.png
2. It'll launch "Create Shortcut" wizard. Now enter following string in location box:
explorer shell:::{7007ACC7-3202-11D1-AAD2-00805FC1270E}

3. After entering the location, click on "Next" button. Now type Network Connections in name box and click on "Finish" button. It'll create a new shortcut on Desktop.
4. Now its time to change the icon. Right-click on the shortcut and select "Properties". Click on "Change Icon" button. Type ncpa.cpl in text box and press Enter. Select the icon, click on OK button and then Apply the changes.
PS: If you don't want to create the shortcut manually and want a ready-made shortcut, download following ZIP file, extract it and you'll get the desired shortcut:
Download "Network Connections" Shortcut
5. Now you just need to pin this new shortcut to Taskbar. You can either drag-n-drop the shortcut to Taskbar or right-click on the shortcut and select "Pin to Taskbar" option:

6. That's it. Now you can enjoy the "Network Connections" shortcut in Taskbar:

Also Read:

[Windows 7 Fix] Deleting 1000+ Files in a Single Batch Deletes them Permanently and Don’t Put Them in Recycle Bin

Ever tried to delete more than 1000 files in a single batch in Windows 7? Never try it or you'll not be able to recover them because Windows 7 will not put them in Recycle Bin. It'll delete them permanently. Delete_1000_Files_Bug_Win_7.png
Actually its a bug in Windows 7 and Server 2008 R2. Deleting 1000+ files deletes them permanently and don't put them in Recycle Bin. Microsoft has confirmed this bug and has released updates to fix the issue.
You can download the fix using following links:
Download Link (Windows 7)
Download Link (Windows 7 64-bit)
Download Link (Windows Server 2008 R2 64-bit)
Download Link (Windows Server 2008 R2 IA-64)

Download Free “Microsoft Download Manager” from Microsoft

Microsoft has released a free download manager for Windows. "Microsoft Download Manager" enables you to download files from the Internet in a more reliable and faster way than using a browser alone. Using the Download Manager makes it easier to download large files such as an application or multimedia files.
The Download Manager has been specifically designed to manage file downloads from supporting Microsoft Web sites in a secure and reliable way. Once started, the Download Manager displays an easy-to-use interface that shows the status of downloads and enables you to resume downloads if they have failed.
Microsoft_Download_Manager.png
Currently it supports downloads from Web addresses starting with http://
It can be used in Windows XP, Vista, Server 2003, Server 2008 and 7.
You can download it using following link:
Download Link

Windows Show Desktop Link: Get the Good Old “Show Desktop” Icon Back in Windows 7

We all know that Microsoft has moved the "Show Desktop" icon present in "Quick Launch" toolbar to the extreme right of Taskbar aka Superbar in Windows 7. Now its shown as a transparent rectangle in the new Superbar. Many users found it quite annoying and difficult to use and want to get the good old "Show Desktop" icon back in Windows 7.
We have posted a detailed tutorial to get the good old "Show Desktop" icon back in Windows 7 which can be found at following link:
How to Get the Good Old “Show Desktop” Feature Back in Windows 7?
Today we are going to share a small app which can also bring the "Show Desktop" icon back in Windows 7.
"Windows Show Desktop Link" is a small and portable utility developed by "RealityTouchDesign" @ DA. You just need to pin this app to the Taskbar by dragging and dropping its EXE file to the Taskbar and it puts the "Show Desktop" icon back.
Show_Desktop_Windows_7.png
You can download it using following link:
Download Link

Create Simple Script to Show / Hide Hidden Files and Folders in Windows XP, Vista and 7

We have posted a tutorial in past to show / hide hidden files and folders quickly and easily in Windows. It provides 2 registry scripts to enable / disable "Show hidden files and folders" option on the fly: Show/Hide Hidden Files & Folders on the fly in Windows XP, Vista & 7
Today in this tutorial, we are going to share a small script which can also be used to enable / disable "Show hidden files and folders" option in Windows.
This script when executed, checks the status of "Show hidden files and folders" option and toggles its value. So if its set to show hidden files, it changes the option to hide hidden files and vice versa.
Simply copy paste following code in NOTEPAD and save the file with name "Show_Hidden_Files_On_Off.vbs" (including quotes):
Hidden = "HKCU\Software\Microsoft\Windows\CurrentVersion\Explorer\Advanced\Hidden"
SHidden = "HKCU\Software\Microsoft\Windows\CurrentVersion\Explorer\Advanced\ShowSuperHidden"
Set Sh = WScript.CreateObject("WScript.Shell")
St = Sh.RegRead(Hidden)
If St = 2 Then
Sh.RegWrite Hidden, 1, "REG_DWORD"
Sh.RegWrite SHidden, 1, "REG_DWORD"
Else
Sh.RegWrite Hidden, 2, "REG_DWORD"
Sh.RegWrite SHidden, 0, "REG_DWORD"
End If
Sh.SendKeys("{F5}")
That's it. You can place this script at any location like Desktop, Quick Launch toolbar and whenever you need to toggle the "Show hidden files and folders" option, simply run the script.
PS: If you don't want to create the script manually or face any problem while creating the script, you can download a ready-made script using following link:
Download Script

Create Simple Script to Show / Hide File Extensions in Windows XP, Vista and 7

Recently we posted a tutorial about creating script to show / hide hidden files and folders in Windows: Create Simple Script to Show / Hide Hidden Files and Folders in Windows XP, Vista and 7
Today in this tutorial, we are going to share another similar script which can be used to show / hide file extensions in Windows.
This script when executed, checks the status of "Hide extensions of known file types" option and toggles its value. So if its set to hide file extensions, it changes the option to show file extensions and vice versa.
Simply copy paste following code in NOTEPAD and save the file with name "Show_File_Extension_On_Off.vbs" (including quotes):
FileExt = "HKCU\Software\Microsoft\Windows\CurrentVersion\Explorer\Advanced\HideFileExt"
Set Sh = WScript.CreateObject("WScript.Shell")
St = Sh.RegRead(FileExt)
If St = 1 Then
Sh.RegWrite FileExt, 0, "REG_DWORD"
Else
Sh.RegWrite FileExt, 1, "REG_DWORD"
End If
Sh.SendKeys("{F5}")
That's it. You can place this script at any location like Desktop, Quick Launch toolbar and whenever you need to toggle the "Hide extensions for known file types" option, simply run the script.
PS: If you don't want to create the script manually or face any problem while creating the script, you can download a ready-made script using following link:
Download Script

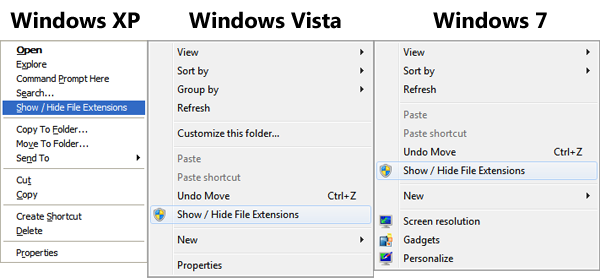
Add “Show / Hide File Extensions” Option in Desktop and Explorer Context Menu under Windows XP, Vista and 7

Recently we posted a simple script to toggle "Hide extensions for known file types" option in Windows: Create Simple Script to Show / Hide File Extensions in Windows XP, Vista and 7
And now we'll tell you how to add an option "Show / Hide File Extensions" in Desktop and Explorer context menu (menu which appears when you right-click) to make the task faster and easier.

In Windows XP, you'll need to right-click on a folder to get the option. In Windows Vista and 7, you can right-click on an empty area in Explorer or Desktop to get the option.
HOW-TO:
Simply download following ZIP file, extract it and run the "Install.exe" file present in the "Windows XP" or "Windows Vista and 7" folders depending upon which Windows are you using.
Download Link
It'll automatically install the required files and will ask you to add the option into Windows Registry, accept the confirmation by clicking on "Yes" button and then OK.
If you like this, you might also like other similar articles posted in following section: Windows 7, Windows Vista, Windows XP.
Also check out the most popular articles of our website: Popular Articles. popular

Kill All Not Responding Programs On The Fly Using A Simple Shortcut

"This program is not responding" is a very common error message which you get in Windows. Many times we find a program not responding and we have to perform an End Task operation on it using Task Manager. Wouldn't it be great if we have a shortcut on Desktop or in Taskbar which can automatically kill all not responding programs upon execution? Just double-click on the shortcut and it'll End Task/kill all not responding programs.
Today we'll tell you how to create a simple shortcut which kills all not responding programs automatically so you don't need to open Task Manager and select the program and perform End Task on it.
Following are the simple steps to follow:
1. Right-click on Desktop and select "New -> Shortcut":
New_Shortcut.png
2. It'll launch "Create Shortcut" wizard. Now enter following string in location box:
taskkill /F /FI "STATUS eq NOT RESPONDING"

3. After entering the location, click on "Next" button. Now type Kill Not Responding Tasks in name box and click on "Finish" button. It'll create a new shortcut on Desktop.
4. Now its time to change the icon. Right-click on the shortcut and select "Properties". Click on "Change Icon" button. Type explorer.exe in text box and press Enter. Select the 2nd icon in 3rd column, click on OK button and then Apply the changes.
5. That's it. You'll get the desired shortcut on Desktop:
Kill_Not_Responding_Tasks_Shortcut.png
NOTE: If you don't want to create the shortcut manually and want a ready-made shortcut, download following ZIP file, extract it and you'll get the shortcut:
Download Shortcut
PS: You can also pin this shortcut to Taskbar if you are using Windows 7. Either drag-n-drop the shortcut to Taskbar or right-click on the shortcut and select "Pin to Taskbar" option.
Also Read:

Download X-Setup Pro for FREE: Ultimate Tweaking Software for Microsoft Windows

UPDATE: X-Setup Pro have been shut down and now its absolutely free to download and use.
X-Setup Pro is the ultimate in system configuration or tweaking as some people would say. It covers all types of options and has many useful features.
X-Setup Pro is not yet another Windows Hacker; it is the ultimate tool for black belt system tuning and tweaking, running on Windows 95, 98, NT 4.0, 2000, ME, XP, Vista and 7.
X-Setup Pro allows you to change nearly 1800 settings with some simple button clicks. This makes X-Setup Pro the most complete hacker/tweaking utility ever available.
X-Setup Pro is extremely easy to use. It has an Explorer-like look and the famous back and next buttons you already know from your Internet browser. Plus, X-Setup Pro offers wizards that assist you when changing the configuration - there has never been an easier way to hack your Windows.
X-Setup_Pro.png
Supported operating systems:
  • Windows 98
  • Windows NT 4.0
  • Windows ME
  • Windows 2000 All Versions
  • Windows XP All Versions
  • Windows Server 2003 All Versions
  • Windows Vista All Versions
  • Windows 7 All Versions
Download Link
PS: In case you lost your serial number use this one instead: XSA092-11TA9R-8K12YT

How to Add “Kill Not Responding Tasks” in Desktop Context Menu Under Windows Vista and 7

Recently we posted about a cool "Kill Not Responding Tasks" shortcut which can kill all not responding programs on the fly: Kill All Not Responding Programs On The Fly Using A Simple Shortcut
Today in this tutorial, we'll tell you how to add this shortcut in Desktop context menu so that you can access it quickly and easily.

It'll only work in Windows Vista and 7.
Following are the required steps:
1. Type regedit in RUN or startmenu search box and press Enter. It'll open Registry Editor.
2. Now go to:
HKEY_CLASSES_ROOT\DesktopBackground\Shell (for Windows 7)
HKEY_CLASSES_ROOT\Directory\Background\Shell (for Windows Vista)
3. Now we'll need to create a new key under "Shell" key. Right-click on "Shell" key and select "New -> Key". Give the new key name "Kill Not Responding Tasks".
4. Now right-click on the new key which we created in step 3 and select "New -> Key". Give the new key name of command.
5. In right-side pane, change value of "Default" to:
taskkill /F /FI "STATUS eq NOT RESPONDING"

6. That's it. Now you'll have "Kill Not Responding Tasks" shortcut in Desktop context menu.
PS: Windows 7 users can also set an icon and position for the shortcut.
To set the icon, select the key created in Step 3 and in right-side pane, create a new String value "Icon". Set its value to explorer.exe,9
To set its position in the context menu, create a new String value "Position" and set its value to:
Top (To show it at top)
Bottom (To show it at bottom)
PS. If you want a ready-made registry script to do the task automatically, download following ZIP file, extract it and run the desired REG file:
Download Registry Script

Close All: Small Tool to Close All Running Program Windows On The Fly

"Close All" tool lets you to close all running applications with just one click. It doesn't use system resources because it only flashes a 'close' signal to all open windows on the desktop and then ceases. Just create a shortcut to the tool in the Start Menu, Quick Launch, Windows 7 Taskbar or elsewhere. You can always add a hotkey to this shortcut. It is really very handy if you are running ~20 applications and want them all to quit instantly. It works just as if you were pressing the close button for each application.
Closeall.png
It doesn't require installation. No settings are stored in the Windows Registry or file system.
Just download and extract the ZIP file and create a shortcut of "CloseAll.exe" file which can be later put on Desktop, in Quick Launch toolbar or pin to Windows 7 Taskbar.
Download Link
Homepage
You can also prevent certain applications from being to be closed by Close All by appending -x="application_name.exe" at the end of the "Target" string in Properties of the CloseAll application shortcut. You can separate multiple values with "|" (pipe) as well.
Thanks to our reader "Ghost Eclipse" for sharing it...

Enhance Windows Taskbar’s Auto-Hide Functionality Using Taskbar Activate

Many Windows users want to customize Taskbar's Auto-Hide feature as there are no settings available by default to customize it. You can't customize Auto-Hide time delay, Always on Top settings, etc. Today we are going to share an excellent small utility "Taskbar Activate" which extends the Auto-hide functionality of Taskbar and provides an interface to customize various settings.
Taskbar Activate manages activation and deactivation of the Windows Taskbar. It is specially useful for accessing the Taskbar with special applications running (full screen windows, always on top windows, etc). It also prevents an inopportune Taskbar window appearing over your application when the mouse goes close to the screen border.
Taskbar Activate awakes your Taskbar when it is hidden by a full screen window.
Once installed, you can access its Settings using its system tray icon.
Taskbar_Activate_Settings.png
You can download it using following link:
Download Link
Download Link (Portable)
Homepage

XTweaker: A Free Portable Tweaking Utility for Windows XP, Vista and 7

We have posted about "Windows 7 Little Tweaker" in past which allows you to tweak a few interesting things in Windows 7. Today we are sharing another similar tool "XTweaker" which works in Windows XP, Vista and 7.
XTweaker.png
It allows you to:
  • Add Msconfig to My Computer Context Menu
  • Add Userpasswords2 to Control Panel
  • Clear Pagefile on Shutdown
  • Add Command Prompt here to Folder Context Menu
  • Decrease Delay of Startmenu
  • Disable Annoying Messages in Internet Explorer
  • Disable Indexing Service
  • Disable Remote Registry Service
  • Hide the Run As… option from Context menu
  • Remove Shared Documents from My Computer
  • No Rebooting after Windows Updates
  • Disable low disk space check
These tweaks will help you in making your Windows Faster and running the way you want.
This tool is portable means you don’t have to install it.
Download Link
Thanks to our reader "JX Great" for creating and sharing this little app...

Revealing Hidden Secret Tool in Windows 7 = Problem Steps Recorder (PSR)

Did you know Windows 7 contains a hidden secret troubleshooting tool which is called "Problem Steps Recorder" (PSR)? This tool is not available from any general location like Start menu, Control Panel or Explorer.
To launch this tool, you just need to provide "psr" command in RUN or Start menu Search box.
It'll launch the program which looks like following:
Problem_Steps_Recorder_PSR.png
This tool is basically a simple screen capturing tool which can be used to record screenshots of various steps performed by a user. Just click on "Start Record" button and it'll start saving all the steps which you perform onwards. To stop recording, click on "Stop Record" button.
It prompts you to tell the location where you want to save the file. It creates a ZIP file containing an MHTML file which stores screenshots of all steps performed by you along with a brief description of each.
You can also add your own comments using "Add Comment" button during recording.
You can also set a default location to save the file so that you don't need to tell the location each time you record something. To do this, click on the little arrow near Help button and select "Settings".
Problem_Steps_Recorder_PSR_Settings.png
You can also disable recording of screenshots by settings "Enable screen capture" option to No. In this case, it'll only record a description of your steps not images.
If you want to send the recorded file to someone, you can do this by using "Send to E-mail recipient" option.
You can also increase number of screenshots to be saved in the file using Settings.
Its a great tool available for Windows 7 users and IMO each OS should contain something like this.
If you like this, you might also like other similar articles posted in following section: Windows 7.
Also check out the most popular articles of our website: Popular Articles. popular

How to Disable Warning Message While Unchecking “Hide Protected Operating System Files” Option in Folder Options

When you try to uncheck "Hide Protected Operating System Files (Recommended)" Option in Folder Options in Windows OS, you get a warning message asking for confirmation as shown in following screenshot: Warning_Unhide_Protected_OS_Files.png
It becomes quite annoying if you frequently enable/disable this option.
Today in this tutorial, we'll tell you how to completely remove this warning message so that you can enable/disable the option without getting the irritating warning message window.
1. Type regedit in RUN or startmenu search box and press Enter. It'll open Registry Editor.
2. Now go to:
HKEY_LOCAL_MACHINE\SOFTWARE\Microsoft\Windows\CurrentVersion\Explorer\Advanced\Folder\SuperHidden
3. In right-side pane, delete String value "WarningIfNotDefault".
Disable_Warning_Unhide_Protected_OS.png
That's it. Now you'll not receive the warning message.
PS. If you want a ready-made registry script to do the task automatically, download following ZIP file, extract it and run the desired REG file:
Download Registry Script

WinToFlash: Utility to Create Bootable USB Drive to Install Windows XP, Server 2003, Vista, Server 2008 and 7

Also take a look at other similar tools: A Bootable USB, Windows 7 USB/DVD Download Tool, Setup from USB, Win32 Disk Imager and UNetbootin.
WinToFlash is a software for transfer your Windows XP, Server 2003, Vista, Server 2008 and 7 setup from CD or DVD to USB. This is about you can install your Windows from flash drive, USB pen, HDD, etc to your computer or netbook.
And this is not all it can do. WinToFlash can transfer your live CD or DVD to USB card, for example, BartPE. After all you can erase your USB media and format it with Windows for every day use.
WinToFlash.png
Features list:
  • Windows XP/2003/Vista/2008/7 to USB transfer
  • WinPE to USB transfer
  • USB media erasing, full or quick
  • Create the USB drive with emergency boot loader
  • DOS to USB transfer
Download Link

WEI Share: Share Your Windows 7 “Windows Experience Index” Score with World

WEI Share (We Share) is an open-source WPF application that takes your Windows Experience Index score and shares it with the world (anonymously) and lets you post your WEI score to Facebook for bragging rights. One question might come in your mind, Why would I want to share my WEI score with the world?
There are two reasons. First of all, since there is no site on the Web where you can compare your Windows 7 WEI scores today, WEI Share enables you to go and compare what computers get for their WEI scores. Having thousands of machines WEI scores is a great reference point for customers shopping for a new PC.
Second, WEI scores, i.e. a computer's speed, are dependent on the quality of the drivers. Sometimes WEI scores go up, sometimes they go down. WEI Share will allow you to see which drivers have the best performance on your machine.
Download Link
Thanks to "Larry Larsen" @ Microsoft for launching and sharing it...

7 Logon Changer: Change Windows 7 Login Screen on the Fly

Our friend "krishnanblr" has created a small tool which allows you to change login screen background on the fly. You just need to double-click on the preview box, select the desired image, right- click on it and select "Set as Logon" option to apply it.
Its a very small and easy to use tool which can be downloaded using following link:
Download Link
Homepage
NOTE: You can also check other free tools to customize Windows 7 login screen at following link:
Ultimate Collection of the Best Free Tools to Customize Windows 7 Login Screen

How to Open Any Program by Typing its Name in RUN Dialog Box in Windows?

UPDATE: A small utility is available to do the whole task automatically: Run It
One of our readers "Balaji" asked us following question:
Hi Vishal,
I want to know how to create a registry entry for application shortcuts?
example:
For opening a notepad we go to start - run and type notepad
For opening paint brush we use start - run and type mspaint
Similarly i want to set keywords for opening specific applications in my desktops.
For that what is the registry keyword i need to create / modify... Pls guide me
looking forward for your reply.
Thanks in advance
Yes. That can be done easily using Windows Registry. You can open any desired 3rd party program by just typing its name in RUN or Start menu Search box and press Enter.
Launch_Application_from_RUN.png
You'll need to set the application path in Windows Registry so that Windows can know about the application at the time of execution.
PS: Before starting the tutorial lets assume that our desired application name is "My Application". Its an EXE file and is stored in "C:\Program Files\My Application\" folder. It'll help you in easily understand the tutorial.
So without wasting any time, lets start our tutorial:
1. Type regedit in RUN or startmenu search box and press Enter. It'll open Registry Editor.
2. Now go to:
HKEY_LOCAL_MACHINE\SOFTWARE\Microsoft\Windows\CurrentVersion\App Paths
3. Now we'll need to create a new key under "App Paths" key. Right-click on "App Paths" key and select "New -> Key". Set its name to your desired application name along with its extension e.g. My_Application.exe
4. Select the key created in Step 3 and in right-side pane, set value of "Default" to the full path of application's EXE file e.g. C:\Program Files\My Application\My Application.exe
5. Again in right-side pane, create a new String value "Path" and set its value to the folder containing your application EXE file e.g. C:\Program Files\My Application\
Create_App_Paths_in_Windows_registr.png
6. That's it. Now you can launch your desired application by just typing its name in RUN or Start menu Search box.
NOTE: If you want a ready-made registry script to do the task automatically, then copy paste following code in Notepad and save the file with name "AskVG.REG" (including quotes).
Windows Registry Editor Version 5.00
[HKEY_LOCAL_MACHINE\SOFTWARE\Microsoft\Windows\CurrentVersion\App Paths]
[HKEY_LOCAL_MACHINE\SOFTWARE\Microsoft\Windows\CurrentVersion\App Paths\My Application]
@="C:\\Program Files\\My Application\\My Application.exe"
"Path"="C:\\Program Files\\My Application\\"
You just need to replace BOLD part of the above script with the correct application name and path. After saving the file, run it and it'll add the program path to Registry so that you can launch it directly from RUN and Start menu Search box.

[FIX] Common Problems While Installing Windows 7 Service Pack 1 (SP1) Beta

As we all know Microsoft will release public beta of Service Pack 1 (SP1) for Windows 7 and Server 2008 R2 by the end of July. Microsoft has started publishing troubleshooting articles to help you in fixing some common problems which might occur while installing SP1. Windows_7_SP1.png
You might face following problems while installing SP1 in Windows 7 and Server 2008 R2:
Problem 1:
When installing SP1, you might get an "Installation was not successful" error message. The most common causes of this problem are:
  • An inconsistency in the Windows Servicing Store. The Windows Servicing Store is a feature that is required to successfully install the service packs.
  • A program on your computer, such as antivirus or antispyware programs, is interfering with the installation of the service pack.
Solution:
To try to solve this problem, first download and run the System Update Readiness Tool. The System Update Readiness Tool can help fix problems that might prevent Windows updates and service packs from installing.
Download System Update Readiness Tool
More Info
Problem 2:
If you try to install SP1 with Microsoft Security Essentials or Microsoft Forefront Client Security already installed on your computer, your security program might prevent the successful installation of the service pack.
Solution:
To successfully install SP1, you or a network administrator will have to uninstall Microsoft Security Essentials or Microsoft Forefront Client Security, install the service pack, and then reinstall your security program.
More Info
Problem 3:
While installing SP1, you might get "Windows has detected unsupported languages files" error message.
Solution:
SP1 can only be installed on a computer that is running a German, Spanish, French, English, or Japanese version of Windows 7 or Windows Server 2008 R2.
More Info
Thanks to our friend "Rob Margel" for sharing these Windows help articles...

AeroBar: Show Titlebar Text in Windows Vista and 7 Explorer

UPDATE: Utility version updated to 1.3 which now allows you to easily enable/disable titlebar text. Run the utility once to show titlebar text and run it again to disable titlebar text. So now the utility acts like a switch.
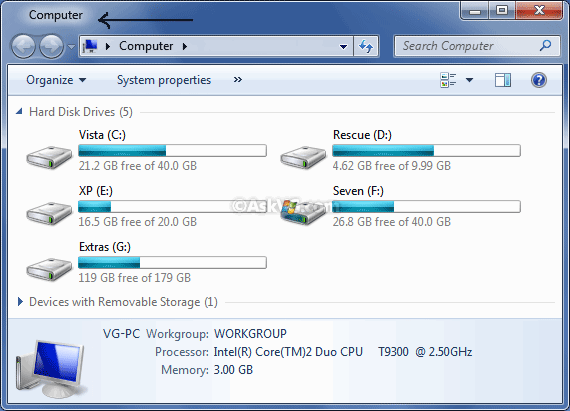
Have you ever wondered why Explorer Windows don't show titles in Windows Vista and 7? In earlier versions of Windows, we could see titlebar text in explorer windows but it has been removed in Vista and 7. Actually titlebar text was removed to make the Explorer clean and minimal.
But if you look carefully, other applications like Notepad, Paint, Internet Explorer, etc show the text in titlebar, so there must be a way to show it in Windows Explorer as well.
"AeroBar" is a very small and standalone application which can show the titlebar text in Windows Vista and 7 Explorer.
Titlebar_Text_in_7_Explorer.png
Simply download the utility from following link:
Download Link
Run it and you'll see titlebar text in all Explorer windows. There is no need to install the app as its portable. If you like it and want to use it, you can add its shortcut in Windows startup.
To remove the titlebar text, run the utility again.

Classic Shell: Get “Up” Button and Titlebar Text Back in Windows Vista and 7 Explorer

Almost all Windows Vista and 7 users complain about missing "Up" button and Titlebar text in Windows Explorer toolbar. We have blogged about "Mavis Up Button" which can bring back the "Up" button but its not free, you need to pay $4.95 to purchase it. We have also blogged about "AeroBar" which can bring back the titlebar text back in Windows Vista and 7 Explorer.
The good news is that our favorite tool "Classic Shell" can also bring back the good old "Up" button as well as titlebar text and icon in Windows Explorer as you can see in the following screenshot:
Classic_Shell_Settings.png
We have already blogged about it in past:
Classic Shell: Get Classic Start Menu & Explorer Toolbar Buttons Back in Windows Vista & 7
When we blogged about this tool, it only provided Classic Start menu, Classic Explorer toolbar buttons and a few other things. But now a new version is available which comes with following changes:
  • Shows Titlebar text and icon
  • Disable Addressbar Breadcrumbs
  • Adds "Up" button in Explorer titlebar
  • New toolbar icons to match Vista and 7
  • New skins for Classic Start menu
  • Brings back file size feature in Statusbar
You can visit following link to read more information and download this tool:
Download Link
Homepage

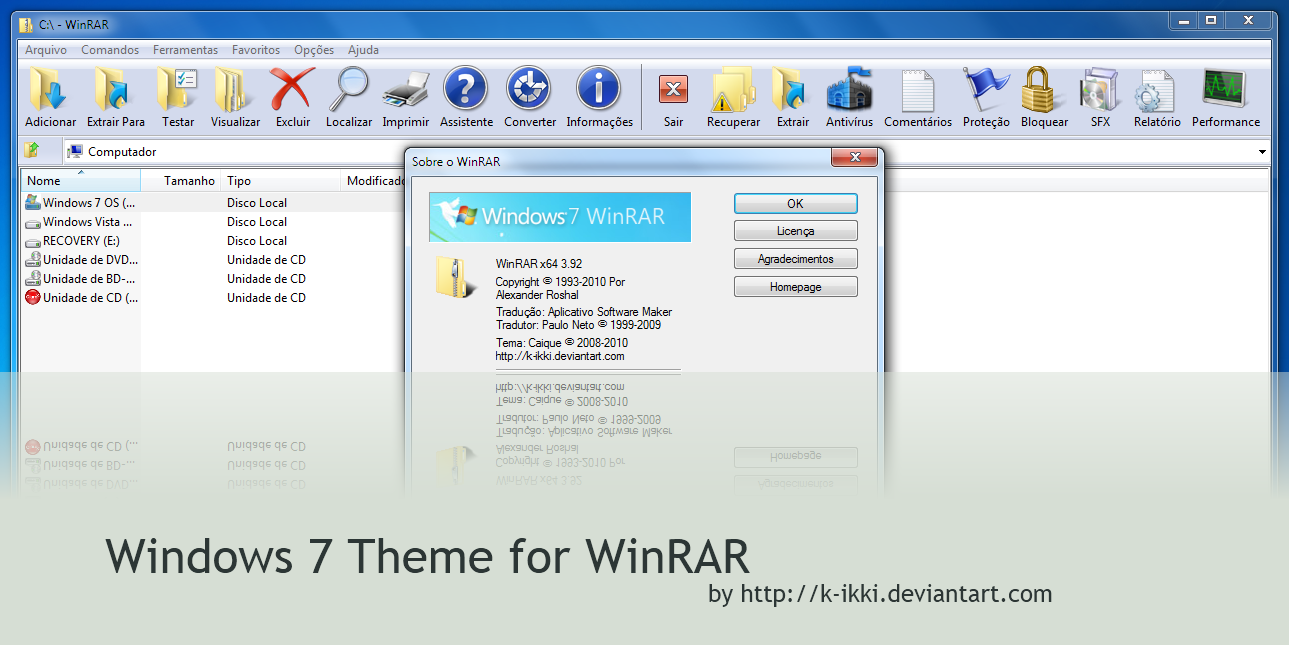
FREE Download Windows 7 Theme for “WinRAR” Archiver

WinRAR is one of the most famous archive manager for Windows, Mac OS and Linux. If you use WinRAR and don't like its default theme, icons, here is something interesting for you. "K-lkki" @ DA has created an awesome looking Windows 7 theme for WinRAR which changes all default icons with new Windows 7 icons.

Simply download the file, extract it and run the extracted "Windows 7.theme.rar" file. It'll install the theme which can be applied by selecting "Options -> Themes -> Windows 7" in WinRAR window.
Download Theme
Download WinRAR
Thanks to our reader "Kyle" for sharing it...

Hide or Show Windows Taskbar on the Fly

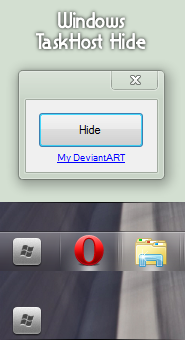
"Windows Taskbar Hide" is a very small and portable tool created by "B0M8" @ DA which allows you to hide or show Taskbar easily and quickly. It might become very handy if you use a dock utility like RK Launcher, Rocket Dock, etc.
Simply run the tool and click on "Hide" button or press "F9" to hide Taskbar. If you want to show the Taskbar again, click on "Show" or press "F12" key.

You can download it using following link:
Download Link

Windows 7 SP1 RTM (Final Version) Will Release in First Half of 2011

Recently Microsoft released Public Beta version of SP1 for Windows 7 and Server 2008 R2. Since its a Beta version, it'll expire on June 30, 2011. If you are wondering when will the final version of SP1 will release, here is some interesting info for you.
Windows_7_SP1.png
According to "Brandon LeBlanc" @ Windows Team Blog:
If you are an IT Professional interested in testing Windows 7 SP1, you can download the public beta via the Springboard Series on TechNet where you will find the download as well as other key deployment and support tools. For everyone else, Windows 7 SP1 will be available in the first half of 2011 through the usual channels.
So its clear that we'll get our hands on Windows 7 SP1 in the first half of 2011. ;)

Run It: Small Utility to Allow Opening Any Program by Typing its Name in RUN Dialog Box in Windows

Recently we posted a tutorial about opening a program by just typing its name in RUN dialog box in Windows:
How to Open Any Program by Typing its Name in RUN Dialog Box in Windows?
The above tutorial requires Registry editing and if you are not comfortable with it, our reader ".Rain" has created a small utility to do the whole task automatically.
"Run It" is a very small and portable utility which allows you to add any program reference to Windows Registry so that you can launch it by just typing its name in Start menu RUN dialog box. For example, you have installed 3rd party software "Internet Download Manager" and its executable file name is "IDMan.exe". If you try to launch it by just typing "IDMan" in RUN, it'll give error that Windows cannot find the exe. But if you add its reference in Registry using "Run It", you can launch it by simply typing its name in RUN.

How To Use:
1. Either type full path of the program's exe in the text box or click on the yellow folder icon and browse to the EXE file.
2. Once you select the EXE file, click on "RUN it" button. It'll immediately add the reference to Registry.
3. Now you can launch the program by typing its name in RUN dialog box.
Download Link
Thanks again to our reader ".Rain" for developing the tool...

How to Customize Thumbnail Preview Border for Images and Videos in Windows Vista and 7 Explorer?

In Windows Vista and 7 Explorer, if you set "Thumbnail" view for a folder containing images or videos, it shows the thumbnails having a nice looking border with shadow effect. In this tutorial, we'll tell you about a small registry trick which helps you in customizing these thumbnails border. You can remove the drop-shadow effect or add different effects to the thumbnails.
Windows_Explorer_Thumbnail_Preview_.png
So without wasting time lets start the tutorial:
1. Type regedit in RUN or startmenu search box and press Enter. It'll open Registry Editor.
2. Now go to:
HKEY_CLASSES_ROOT\SystemFileAssociations\image (to customize border for images)
HKEY_CLASSES_ROOT\SystemFileAssociations\video (to customize border for videos)
3. In right-side pane, look for a DWORD value "Treatment". It would be set to 2 for images and 3 for videos by default. Double-click on it and set its value to any of following:
0 - To remove the border (Makes thumbnail preview a little bit faster)
1 - To add drop-shadow effect
2 - To add photo-shadow effect
3 - To add video reel like effect
Customize_Thumbnail_Preview_Border.png
4. Close Registry Editor and log off and log on again. You can also End Task and restart Explorer using Task Manager.
5. That's it. Now you can have different thumbnail preview borders in Explorer as shown in following screenshot:
Windows_Explorer_Thumbnail_Preview_.png
PS. If you want a ready-made registry script to do the task automatically, download following ZIP file, extract it and run the desired REG file:
Download Registry Script

#
### ###