Friends

This is default featured post 1 title

Go to Blogger edit html and find these sentences.Now replace these sentences with your own descriptions.This theme is Bloggerized by Lasantha Bandara - Premiumbloggertemplates.com.

This is default featured post 2 title

Go to Blogger edit html and find these sentences.Now replace these sentences with your own descriptions.This theme is Bloggerized by Lasantha Bandara - Premiumbloggertemplates.com.

This is default featured post 3 title

Go to Blogger edit html and find these sentences.Now replace these sentences with your own descriptions.This theme is Bloggerized by Lasantha Bandara - Premiumbloggertemplates.com.

This is default featured post 4 title

Go to Blogger edit html and find these sentences.Now replace these sentences with your own descriptions.This theme is Bloggerized by Lasantha Bandara - Premiumbloggertemplates.com.

This is default featured post 5 title

Go to Blogger edit html and find these sentences.Now replace these sentences with your own descriptions.This theme is Bloggerized by Lasantha Bandara - Premiumbloggertemplates.com.

Saturday, April 2, 2011

AutoRun Disabler: Portable Utility to Disable Autorun Functionality in Windows

We have blogged about a detailed tutorial in past which teaches you how to disable Autorun functionality in Windows: How to Disable Autorun Functionality in Windows Using Registry Editor?
It requires some registry skills. Once again our regular reader "Masroor Aijaz aka JX Great" has created another excellent tool called "AutoRun Disabler" which allows you to disable Autorun functionality for different kind of drives like CD drive, removable drives, etc quickly and easily.

Its a portable utility so you don't need to install it. Simply download the ZIP file, extract it and run the EXE file. Select the desired option from the list and click on OK button to apply it.
Download Link

How to Disable / Remove Annoying Shutdown Event Tracker (Shutdown Reason UI) in Windows Server 2003 / 2008?

UPDATE: Tutorial updated with registry method.
If you are using Windows Server 2003 or 2008, you might have noticed that whenever you click on Shutdown button, it shows a dialog box asking you the reason behind shutting down the system. You have to select an option from drop-down box or write into Comment box to be able to shutdown the system.

Many people find it very annoying and want to disable it but they don't know how to disable it.
Today in this tutorial, we'll tell you a simple way to completely remove this annoying dialog box:
METHOD 1: Using Group Policy Editor
1. Type gpedit.msc in RUN dialog box and press Enter.
2. It'll open Group Policy Editor. Now go to:
Computer Configuration -> Administrative Templates -> System
3. In right-side pane, look for "Display Shutdown Event Tracker" option.

4. Now double-click on "Display Shutdown Event Tracker" and select "Disabled". Apply it and the annoying dialog box will never appear again.
NOTE: You can also use this method to enable Shutdown Event Tracker in Windows client OS like Windows XP, Vista, 7, etc. Just set the option value to "Enabled".
METHOD 2: Using Registry Editor
If you face problems while using Group Policy Editor, you can also use Registry Editor to do the same task.
1. Type regedit in RUN dialog box and press Enter.
2. It'll open Registry Editor. Now go to:
HKEY_LOCAL_MACHINE\SOFTWARE\Policies\Microsoft\Windows NT
3. Under "Windows NT" key, look for a key "Reliability". If its not present, create it.
4. Now select "Reliability" key and in right-side pane, look for following 2 DWORD values:
ShutdownReasonOn
ShutdownReasonUI
If the DWORD values are not present, create them.
5. Now set values of both DWORD to 0

6. That's it. Now you'll not see the reason dialog box while shutting down the system.
Thanks to our readers "Config" and "Dragonsbane777" for sharing registry method.
NOTE: You can also use this method to enable Shutdown Event Tracker in Windows client OS like Windows XP, Vista, 7, etc. Just set the values of both DWORD to 1 using Step 5.

How to Show Large Icons in Quick Launch Toolbar in Windows Taskbar?

That's one of the frequently asked questions on this website. Many people who download "SevenVG RTM" theme, always ask how to show large icons in Quick launch toolbar to mimic Windows 7's Superbar. Actually its a very simple task which requires a few easy steps but most of the people are not aware of it.
So today in this tutorial, we'll tell you how to show large icons in Quick launch toolbar in Windows Taskbar. This trick works in all Windows versions including XP, Vista and 7.
1. First of all enable Quick Launch toolbar by right-clicking on Taskbar and selecting "Toolbars -> Quick Launch".
Windows 7 users can take a look at following tutorial to enable it:
How to Get the Good Old “Quick Launch” Toolbar Back in Windows 7?
Small_Quick_Launch_Toolbar_Icons.png
It'll start showing Quick Launch toolbar in Taskbar with small icons by default.
2. Now unlock Taskbar by right-clicking on Taskbar and unchecking "Lock the Taskbar" option.
3. Right-click on Quick launch toolbar drag handle (dotted lines at the beginning of toolbar) and select "View -> Large Icons" option.
Set_Largel_Quick_Launch_Toolbar_Icons.png
4. That's it. It'll make the icons large in the toolbar.
Largel_Quick_Launch_Toolbar_Icons.png

Microsoft Releases Fix for Random Incorrect Icon Change Problem in Windows XP, Vista and 7

Microsoft has confirmed an issue in Windows XP, Vista and 7 which causes random incorrect icon change problem due to icon cache not updating correctly.
Problem Symptom:
Some icons in the following locations are randomly changed to other icons on a computer that is running Windows XP, Windows Vista, or Windows 7:
  • My Computer
  • Windows Explorer
  • Desktop
  • Quick Launch bar
Problem Cause:
This issue occurs because the icon cache is not updated correctly.
Solution:
To fix this problem, follow these steps:
1. Close all open windows if a Close Open Programs Interaction dialog box is displayed.
2. Verify the Max Cached Icons string value that locates in the following registry subkey equals to 2000:
HKEY_LOCAL_MACHINE\Software\Microsoft\Windows\CurrentVersion\Explorer
3. Delete IconCache.db that locates in the following path:
Windows XP
%userprofile%\Local Settings\Application Data
Windows Vista or Windows 7
%userprofile%\AppData\Local
PS: You can download the "Diagnose and repair Windows File and Folder Problems automatically" troubleshooter to automatically fix the problem. To run this troubleshooter, click the Run now button at following link:
Download Fix

List of Environment Variables in Windows XP, Vista and 7

Environment variables work like placeholder or alias for drives, file/folder names and various paths. We here at AskVG frequently use environment variables reference in our tutorials like %windir%\Resources, %programfiles%\Internet Explorer, etc. Many people don't know about them and get confused how to access the mentioned path.
So today we are going to list some important and frequently used system-defined environment variables in this article which will help you in better understanding them.
Most of these environment variables are same for Windows XP and Windows Vista/7 but some are different. So we are listing them separately for XP and Vista/7.
Windows XP Environment Variables
Environment Variable Path
%ALLUSERSPROFILE% C:\Documents and Settings\All Users
%APPDATA% C:\Documents and Settings\{username}\Application Data
%COMMONPROGRAMFILES% C:\Program Files\Common Files
%COMMONPROGRAMFILES(x86)% C:\Program Files (x86)\Common Files
%COMSPEC% C:\Windows\System32\cmd.exe
%HOMEDRIVE% C:
%HOMEPATH% C:\Documents and Settings\{username}
%PROGRAMFILES% C:\Program Files
%PROGRAMFILES(X86)% C:\Program Files (x86) (only in 64-bit version)
%SystemDrive% C:
%SystemRoot% C:\Windows
%TEMP% and %TMP% C:\Documents and Settings\{username}\Local Settings\Temp
%USERPROFILE% C:\Documents and Settings\{username}
%WINDIR% C:\Windows
Windows Vista and 7 Environment Variables
Environment Variable Path
%ALLUSERSPROFILE% C:\ProgramData
%APPDATA% C:\Users\{username}\AppData\Roaming
%COMMONPROGRAMFILES% C:\Program Files\Common Files
%COMMONPROGRAMFILES(x86)% C:\Program Files (x86)\Common Files
%COMSPEC% C:\Windows\System32\cmd.exe
%HOMEDRIVE% C:
%HOMEPATH% C:\Users\{username}
%LOCALAPPDATA% C:\Users\{username}\AppData\Local
%PROGRAMDATA% C:\ProgramData
%PROGRAMFILES% C:\Program Files
%PROGRAMFILES(X86)% C:\Program Files (x86) (only in 64-bit version)
%PUBLIC% C:\Users\Public
%SystemDrive% C:
%SystemRoot% C:\Windows
%TEMP% and %TMP% C:\Users\{username}\AppData\Local\Temp
%USERPROFILE% C:\Users\{username}
%WINDIR% C:\Windows
NOTE: Here C: is the system drive where Windows is installed in your system. It might differ for you if you installed Windows in a different drive in your system.

[Official Windows 7 Themes Update] Microsoft Releases “Cherry Blossom” Theme for Windows 7

Microsoft has released another new theme "Cherry Blossom" for Windows 7.
Download Link
Download the .themepack file, double-click on it and Windows will automatically install and apply it.
PS: You can also download other official Windows 7 themes, Desktop gadgets and wallpapers from Microsoft using following steps:
1. Right-click on Desktop and select "Personalize". Now click on "Get more themes online" link:
Get_more_windows_7_themes_online.png
2. It'll open following webpage in your browser:
Windows 7 Themes
Alternatively you can directly open the above URL in your browser.
3. From the above webpage, you can download various free themes, gadgets and wallpapers for Windows 7.

Download New Wallpaper Found in Latest Windows 8 Milestone 3 Build

The latest Windows 8 Milestone 3 build comes with a new wallpaper which is very minimal and looks awesome on screen. Our friend "Stephen Chapman" has shared the new wallpaper which looks as following:

Download Link

[UPDATE] Download Leaked Windows 8 Metro Inspired “Aero Lite” Theme for Windows 7

Recently we posted about a leaked build of Windows 8 which features a new Metro inspired "Aero Lite" theme.
Leaked Windows 8 Build Features “Aero Lite” Metro UI and Language Explorer
Now you can enjoy the theme in Windows 7. Our friend "thepanda-x" @ DA has created a look-like theme for Windows 7 which provides the awesome Aero Lite interface in Windows 7.

You can download it using following link:
Download Link

How to Show / Add Accidentally Removed Bluetooth Icon in System Tray?

Today we are going to talk about one of the most annoying problem in Windows! As we know Windows shows "Bluetooth" icon in system tray and if you click on it or right-click on it, it shows a menu. The problem starts when "Remove Icon" option is listed at the bottom of the menu and you click on it accidentally and BOOM!!! The bluetooth icon disappears from system tray and you don't find any option to bring it back.
IMO "Remove Icon" should not be listed at the bottom as there are very high chances a user will click on that option accidentally as most of the time the last option in a menu opens the icon Settings. And the worst thing is that it even doesn't ask for any kind of confirmation so that user can cancel his action.
Anyway, if you are also among those frustrated users and have accidentally removed the icon from system tray, here are 2 simple methods to bring the icon back:
  • Method 1: Using Hidden Bluetooth Settings Window
  • Method 2: Using Registry Editor
Method 1: Using Hidden Bluetooth Settings Window
If you look into Control Panel to change Bluetooth settings, you'll not find it. You can follow following simple steps to access it:
1. Type bluetooth in Startmenu searchbox and it'll show a few entries in result set. Click on "Change Bluetooth Settings" entry.

2. It'll open Bluetooth Settings window where you can enable bluetooth icon by selecting "Show the Bluetooth icon in the notification area" option and apply it.

3. That's it. It'll restore the bluetooth icon in system tray.
Method 2: Using Registry Editor
If the above method doesn't work for you, you can follow a very simple registry trick to bring it back:
1. Type regedit in RUN or startmenu searchbox and press Enter. It'll open Registry Editor.
2. Now go to following key:
HKEY_CURRENT_USER\Control Panel\Bluetooth
3. In right-side pane, look for a DWORD value Notification Area Icon. It would be set to 0. Either set its value to 1 or delete it.

4. That's it. Restart or log off your system and bluetooth icon will be back in system tray.

Create Simple Script to Close and Restart Explorer Automatically in Windows XP, Vista and 7

Many times we need to log off or restart Windows to apply the changes made by a registry script or software. Sometimes we can avoid the log off or restart by doing a simple "End Task" of Windows Explorer and restart Explorer using Task Manager. But doing End Task and restarting Explorer using Task Manager requires a few manual steps. Wouldn't it be great if you can get a simple shortcut on Desktop or Quick launch toolbar and simply click on it to automatically end task and restart Explorer?
Today in this tutorial, we are going to share a simple Batch script which can end task of Explorer and then restart it automatically.
Simply copy paste following code in NOTEPAD and save the file with name "Restart_Explorer.bat" (including quotes):
@ECHO OFF
echo.
echo.
echo ==========================================
echo Simple Script to Restart Windows Explorer
echo.
echo Created by "Vishal Gupta" for AskVG.com
echo ==========================================
echo.
echo.
echo STEP 1: Closing Explorer . . .
echo.
TASKKILL /F /IM explorer.exe
echo.
echo.
echo STEP 2: Starting Explorer . . .
start explorer.exe
echo.
echo SUCCESS: Explorer is running.
echo.
echo.
PAUSE
That's it. You can place this script at any location like Desktop, Quick Launch toolbar and whenever you need to restart Explorer, simply run the script.
PS: If you don't want to create the script manually or face any problem while creating the script, you can download a ready-made script using following link:
Download Link

Universal Theme Patcher
"Universal Theme Patcher" is an excellent UxTheme Patcher which supports Windows XP SP2/SP3, Server 2003, Vista SP1/SP2, Server 2008 and Windows 7. It can be used in both 32-bit (x86) and 64-bit (x64) systems.
You can download it using following links:
Download Link | Mirror1 | Mirror2
Following are simple steps to use this awesome tool:
1. You just need to run its EXE file and it'll ask you to select the language.
2. Click on OK button and it'll detect the OS and condition of the system files. It'll show you the information and will ask you for confirmation.
3. Click on Yes button. Now you'll see the main interface of this tool. You just need to click on the "Patch" button given for each file:
Universal_Theme_Patcher_Main_Screen.png
4.Once you patch a file, the "Restore" button gets activated so that you can restore the default file in future.
5. Restart your system and you'll be able to use 3rd party themes in Windows without any problem.
VistaGlazz
VistaGlazz is another free and very easy to use UXtheme patcher for Windows XP, Vista and 7.
VistaGlazz2.png
Simply run the program, accept the agreement and click on the first "Computer" icon to patch your system.
You can download it using following link:
Download Link
UxStyle
"UxStyle" is a very small utility created by our friend "Rafael" @ Withinwindows.
UxStyle is a light-weight system service named Unsigned Themes, complimentary to the Themes service, and a kernel driver, sizing in at ~500k and ~17kb respectfully (beta builds). The service handles the enabling/disabling of custom theme support and the kernel driver handles patching. For 64-bit platforms, the kernel driver is signed with a digital certificate, as required by Microsoft.
Simply download and install the tool and get ready to enjoy 3rd party themes. It works in Windows XP, Vista and 7.
Note that it doesn't have any UI. It'll run as a service in background and will allow you to use 3rd party themes.
Download Link
Applying Custom 3rd Party Theme
Once you have patched Windows, copy your desired theme folder (containing a .theme file and a folder containing .msstyles file) to "%windir%\Resources\Themes\" folder (where %windir% means "Windows" directory present in system drive where Windows is installed. Most probably C: drive). Now double-click on .theme file and it'll apply the theme or you can apply it using Desktop Properties.
You can find various themes in our following sections:
Windows 7 Themes
Windows Vista Themes
Windows XP Themes

Autorun Manager: Portable Utility to Disable / Enable Autorun Functionality in Windows

We have blogged about a detailed tutorial in past which teaches you how to disable Autorun functionality in Windows: How to Disable Autorun Functionality in Windows Using Registry Editor?
It requires some registry skills. But our regular reader "Hackerpunk1" has created an awesome tool called "Autorun Manager" which allows you to disable or re-enable Autorun functionality for different kind of drives like CD drive, removable drives, etc quickly and easily.

It also allows you to apply the same settings to all existing Windows users.
Its a portable utility so you don't need to install it. Simply download the ZIP file, extract it and run the EXE file. Select the desired option from the list and click on Apply button.
Download Link

[Windows Utilities Launcher] Access Device Manager, Task Manager, Services Manager and Many Other Useful System Shortcuts in Windows XP, Vista and 7

Task Manager, Device Manager, Display Properties, Add/Remove Programs are a few system utilities which we use frequently while working in Windows. But we have to follow a few steps to open these utilities. Wouldn't it be great if we can have a single window providing access to all such useful system utilities in a single place? Thanks to "ShraOne" @ DA for creating "Windows Utilities Launcher" which is a portable application, i.e. you even don't need to install it. Just run its EXE file and access all frequently used system utilities in a single step.

As you can see in above screenshot, it provides access to following system utilities:
  • Computer Management
  • Device Manager
  • Disk Manager
  • Performance Monitor
  • Display Properties
  • Services
  • Task Manager
  • System Configuration
  • Add/Remove Programs
  • Disk Cleanup
  • Time and Date
You can also access Notepad, Calculator and Task Manager from its system tray icon.
Its really a useful application specially for system administrators. You can download it using following link:
Download Link

Vista Drive Status: Get Windows Vista and 7 Drive Status Bar in Windows XP Explorer

We all know that Windows Vista and 7 show small status bar below the drives in Windows Explorer. If you are still on XP and want to get the same functionality, here is an interesting and free utility for you. The utility is called "Vista Drive Status" developed by "elektrownik". The utility is also mentioned in our XP to Vista and XP to 7 tutorials.
Following is a screenshot of this utility in action:

You just need to download it using following link, extract the Zip file and run the "vsdrv.exe" file. That's it. It'll automatically add the status bar below drive icons in XP Explorer.
Download Link
If you want to remove the drive status bar, simply run "uninstall.cmd" file present in the same folder.

List of Best “Microsoft Fix it” Troubleshooters to Automatically Diagnose and Repair PC Problems

Microsoft has put the best of its "Fix it" troubleshooters in a single place at following link: List of Most Common Microsoft Fix it Troubleshooters
Microsoft Fix it troubleshooters help you automatically diagnose and repair problems with common computer problems, such as audio, Internet, and printing problems. If your problems aren't fixed, Fix it troubleshooters provide you with the next steps to take.
Simply download and run the Mats_run.exe file whose name most closely matches the issue that you are experiencing.
When you run the Mats_run.exe file, a wizard will guide you through the troubleshooting experience. The troubleshooter downloads and installs the required components, and then analyzes your computer to look for issues that can be resolved automatically.
If the problem cannot be fixed by the troubleshooter automatically, the wizard will guide you through additional support options and resources that are available to help you resolve this problem.

Microsoft Releases “Fix It” for MHTML Script Injection Vulnerability

Recently Microsoft released Security Advisory 2501696 to alert customers to a publicly disclosed vulnerability in the MHTML protocol handler. This vulnerability could allow attackers to construct malicious links pointing to HTML documents that, when clicked, would render the targeted document and reflected script in the security context of the user and target location. The end result of this type of vulnerability is script encoded within the link executed in the context of the target document or target web site. By default, the MHTML protocol handler is vulnerable on Windows XP and all later supported Windows versions. Internet Explorer is an attack vector, but because this is a Windows vulnerability, the version of IE is not relevant.
To fix this vulnerability, download following "Fix it" solution to enable the Network Protocol Lockdown for mhtml: for all security zones:
Download Link
More Info

Add Customized Strings (OEM Information) and Logo in System Properties Dialog Box of Windows XP

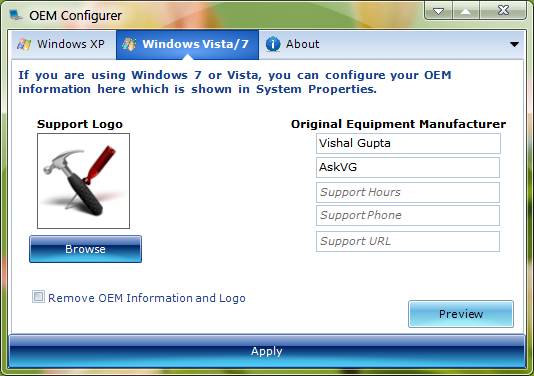
We have told you how to add customized OEM logo and strings in System Properties window of Windows Vista and 7: Add Customized Strings (OEM Information) in System Properties Dialog Box of Windows Vista and 7
Recently one AskVG reader "TacoTaco" asked us how to add the same information in Windows XP system?
Today in this tutorial, we'll tell you how to add OEM information and logo in Windows XP's System properties dialog box. You'll get following output after following this tutorial:

Notice the new OEM logo and text near processor and RAM information.
Once you click on "Support Information" button, it'll open a new dialog box:

So here we start our tutorial:
1. You'll need following 2 files in "Windows\System32" folder to show OEM information and logo in System Properties dialog box:
  • OEMlogo.bmp
  • OEMinfo.ini
OEMlogo.bmp file shows the logo in System Properties dialog box. You can create your own desired BITMAP using any image editing software like Adobe Photoshop, etc or you can use Windows built-in app MSPaint. The maximum allowed dimension for the BMP file is 180x114 px. Although you can create your image less than the mentioned dimensions.
OEMInfo.ini file is a text file which can be created using any text editor like Windows built-in Notepad. It contains some predefined strings in following format:
[General]
Manufacturer=
Model=
[Support Information]
Line1=
Line2=
1st section [General] is required but 2nd section [Support Information] is optional.
Following is an example of a ready-made OEMInfo.ini file:
[General]
Manufacturer=Tweaking with Vishal
Model=http://www.AskVG.com
[Support Information]
Line1=This file was provided by:
Line2=
Line3=Vishal Gupta
Line4=
Line5=Who is a Microsoft MVP
Line6=
Line7=And also runs Tweaking with Vishal website.
Line8=
Line9=http://www.AskVG.com
You can put any desired text in each line after the equal (=) sign.
2. Once you create both OEMLogo.bmp and OEMInfo.ini files, copy the files to %windir%\System32 folder. Here %windir% means "Windows" directory present in system drive where Windows is installed in your system e.g. C:\Windows. For more information check this topic.
3. That's it. Now you can see the new OEM information and logo in System Properties of Windows XP.
NOTE: Even if you want to show only the logo, both files OEMLogo.bmp and OEMInfo.ini must be present in "Windows\System32" folder.
PS: If you are using Windows 98 or Me, place both files in "Windows\System" folder instead of "Windows\System32" and if you are using Windows 2000, place both files in "WinNT\System32" folder.
NOTE: For your convenience, we are attaching ready-made OEMLogo.bmp and OEMInfo.ini files which can be downloaded using following links:
Download OEMLogo.bmp file
Download OEMInfo.ini file
Download the above ZIP files, extract them and you'll get the desired files. You can edit them and put your desired image or text there.

Run Editor: Yet Another Small Utility to Allow Opening Any Program by Typing its Name in RUN Dialog Box in Windows

We have posted a tutorial in past about opening a program by just typing its name in RUN dialog box in Windows: How to Open Any Program by Typing its Name in RUN Dialog Box in Windows?
One of our reader ".Rain" also created a small utility to do the whole task automatically which was called "RunIt".
The same tutorial again inspired our one of very active reader "Hackerpunk1" and he created a similar tool called "Run Editor".
"Run Editor" is another very small and portable utility which allows you to add any program reference to Windows Registry so that you can launch it by just typing its name in Start menu RUN dialog box. For example, you have installed 3rd party software "Internet Download Manager" and its executable file name is "IDMan.exe". If you try to launch it by just typing "IDMan" in RUN, it'll give error that Windows cannot find the exe. But if you add its reference in Registry using "Run Editor", you can launch it by simply typing its name in RUN.

How To Use:
1. Either type full path of the program's exe in the text box or click on the yellow folder icon and browse to the EXE file.
2. Once you select the EXE file, click on "Create" button.
3. Now provide your desired keyword name and again click on "Create" button. It'll immediately add the reference to Registry.
4. Now you can launch the program by typing its name in RUN dialog box.
Download Link

Microsoft Disables Autorun in Windows 2000, XP and Vista via Windows Updates

Autorun is the most widely used way by malicious items to spread in a Windows system. Many virus create autorun.inf file in removable media to spread in your system. Windows 7 comes autorun disabled for removable media by default. Autorun is only enabled for CD/DVD drives in Windows 7.
The same behavior was applied in Windows 2000, XP, Vista, Server 2003 and 2008 by an update "KB971029" which was released by Microsoft in 2009.
Now Microsoft has released this update via Windows Updates so that more people can know about this update and install it in their systems.
You can install it via Windows Updates. Its an optional update btw.

OEM Configurer: Utility to Add Customized Strings (OEM Information) in System Properties Dialog Box of Windows XP, Vista and 7

We have posted tutorials for customizing System Properties window in Windows XP, Vista and 7:
The above tutorials inspired our reader "Masroor Aijaz aka JX Great" and he created an awesome portable utility "OEM Configurer" which allows you to customize Windows XP, Vista and 7 System Properties window look without any manual editing. You just need to enter desired text and select desired logo file and it'll do the rest automatically.

It also allows you to customize and change various items in System Properties window like Owner name, processor name, etc.
Download Link

QTTabBar is Back in Action, Add Tab Feature to Windows Explorer

We have already posted about "QTTabBar" in past when it was developed for Windows XP and Vista users. Suddenly its development was stopped by the developer.
Now a new version of QTTabBar is available for download which comes with lots of new improvements and support for Windows 7 as well.
QTTabBar is a wonderful shell extension adding tabs and many other features to Windows Explorer. The extension was written by a Japanese developer known as "Quizo" and now its being updated by "Paul Accisano".
QT_Tabbar.png
What's New?
  • Now works in Windows 7 as well
  • Desktop Bar restored for XP/Vista
  • F2 rename selection functionality restored
  • "Use old ListView control" option enabled
  • "Display column headers in all views" option enabled
  • General stability improvements
  • Tabbar/Toolbar positioning now works correctly on XP
  • Search box no longer mysteriously shrinks when focused
  • Full Row Select can be enabled/disabled when the SysListView32 is used
  • Libraries can be dropped into
You can download it using following link:
Download Link

Restarter: Restart Explorer, uxms Service and Kill Not Responding Tasks Using Windows System Tray

UPDATE: New version released with major updates.
We have posted following tutorials in past:
The above tutorials inspired our reader "Masroor Aijaz aka JX Great" and he created an awesome app "Restarter".
"Restarter" is a very small and portable utility which sits in system tray and allows you to directly "Restart Explorer", "Restart uxms Service" and "Kill Not Responding Tasks" using its context menu.
As a bonus, it also allows you to start a few useful Windows utilities: Task Manager, Calculator and Notepad.
You can also log off, restart and shut down your system using it.
Simply click on it or right-click on it and select the desired option.

It also allows you to add it to Startup.
Download Link

Hacking System Properties Dialog Box (Sysdm.cpl) in Windows XP

NOTE: If you are facing problems while saving the file after editing in resource hacker, then make sure you have disabled WFP (Windows File Protection) service using WFP Patcher, it can be found in our "Download" section.
Also if you are getting error "Can't create file...", that means you have edited and saved the file in past and there is a backup file which need to be deleted before saving this file again. Go to "System32" folder and you'll see a file having "sysdm_original.cpl". Delete it and try to save the file in resource hacker.
In this tutorial, we'll tell you how to change the first tab "General" in System Properties dialog box of Windows XP. Following is a screenshot of the dialog box which you'll get after following this tutorial:

1. Here are some images, which will be required to add in dialog box. Download the ZIP file, extract it and you'll get the BMP files:
Download BITMAPs
2. Open %windir%\System32\sysdm.cpl file in Resource hacker.
3. Now we'll need to replace existing 1.BMP file with the downloaded one. To do this:
  • Goto Bitmap -> 1 -> 1033.
  • Click on Action -> Replace Bitmap....
  • Click on Open file with new bitmap... button.
  • Select the new downloaded 1.BMP file and click on Open button.
  • Finally click on Replace button.
4. Now we'll need to add remaining downloaded BMPs in the file. To do this:
  • Click on Action -> Add a new Resource ....
  • Click on Open file with a new resource... button.
  • Select 4.BMP and click on Open button.
  • Give 4 in Resource Name and 1033 in Resource Language text boxes.
  • Finally click on Add Resource button.
5. Repeat 4th Step for other BMPs (5.BMP & 6.BMP) also. (Resource Name for 5.BMP & 6.BMP will be 5 & 6 respectively and Resource Language will be 1033 for both).
6. Now go to Dialog -> 101 -> 1033 and replace existing code with the following code:
101 DIALOGEX 32, 10, 376, 215
STYLE DS_FIXEDSYS | DS_MODALFRAME | WS_POPUP | WS_VISIBLE | WS_CAPTION
CAPTION "General"
LANGUAGE LANG_ENGLISH, SUBLANG_ENGLISH_US
FONT 8, "MS SHELL DLG"
{
CONTROL 6, 0, STATIC, SS_BITMAP | SS_CENTERIMAGE | WS_CHILD | WS_VISIBLE | WS_GROUP, 1, 4, 106, 207
CONTROL "Windows Edition", 304, BUTTON, BS_GROUPBOX | WS_CHILD | WS_VISIBLE, 110, 5, 265, 73
CONTROL "", 52, STATIC, SS_LEFT | WS_CHILD | WS_VISIBLE | WS_GROUP, 130, 20, 162, 8
CONTROL "", 54, STATIC, SS_LEFT | WS_CHILD | WS_VISIBLE | WS_GROUP, 130, 36, 100, 8
CONTROL "", 58, EDIT, ES_LEFT | ES_AUTOHSCROLL | ES_READONLY | WS_CHILD | WS_VISIBLE, 147, 192, 107, 8
CONTROL "System", 304, BUTTON, BS_GROUPBOX | WS_CHILD | WS_VISIBLE, 110, 80, 265, 65
CONTROL "", 62, STATIC, SS_BITMAP | SS_CENTERIMAGE | WS_CHILD | WS_VISIBLE, 272, 152, 89, 54
CONTROL 4, 0, STATIC, SS_BITMAP | WS_CHILD | WS_VISIBLE | WS_GROUP, 326, 90, 41, 47
CONTROL 5, 0, STATIC, SS_BITMAP | WS_CHILD | WS_VISIBLE | WS_GROUP, 235, 98, 80, 15
CONTROL "", 63, "Link Window", 0x50000000, 130, 101, 100, 8
CONTROL "", 64, "Link Window", 0x50000000, 130, 91, 100, 8
CONTROL "", 65, "Link Window", 0x50000000, 130, 111, 100, 8
CONTROL "", 66, "Link Window", 0x50000000, 130, 121, 100, 8
CONTROL "", 67, "Link Window", 0x50000000, 130, 131, 100, 8
CONTROL "&More Information", 69, BUTTON, BS_PUSHBUTTON | WS_CHILD | WS_DISABLED | WS_TABSTOP, 235, 123, 80, 14
CONTROL "Windows Activation", 304, BUTTON, BS_GROUPBOX | WS_CHILD | WS_VISIBLE, 110, 147, 265, 60
CONTROL "PID :", 0, STATIC, SS_LEFT | WS_CHILD | WS_VISIBLE | WS_GROUP, 131, 192, 17, 9
CONTROL 1, 0, STATIC, SS_BITMAP | WS_CHILD | WS_VISIBLE | WS_GROUP, 309, 13, 64, 59
CONTROL "This version of Windows is Genuine.", 0, STATIC, SS_LEFT | WS_CHILD | WS_VISIBLE | WS_GROUP, 131, 180, 115, 10
CONTROL "Copyright (c) 2006 Microsoft Corporation. All rights reserved.", 0, STATIC, SS_LEFT | WS_CHILD | WS_VISIBLE | WS_GROUP, 115, 54, 195, 9
CONTROL "", 56, EDIT, ES_LEFT | ES_AUTOHSCROLL | ES_READONLY | WS_CHILD | WS_VISIBLE, 130, 160, 100, 8
CONTROL "", 57, EDIT, ES_LEFT | ES_AUTOHSCROLL | ES_READONLY | WS_CHILD | WS_VISIBLE, 130, 170, 100, 8
}
7. Click on Compile Script button

#
### ###