Friends

This is default featured post 1 title

Go to Blogger edit html and find these sentences.Now replace these sentences with your own descriptions.This theme is Bloggerized by Lasantha Bandara - Premiumbloggertemplates.com.

This is default featured post 2 title

Go to Blogger edit html and find these sentences.Now replace these sentences with your own descriptions.This theme is Bloggerized by Lasantha Bandara - Premiumbloggertemplates.com.

This is default featured post 3 title

Go to Blogger edit html and find these sentences.Now replace these sentences with your own descriptions.This theme is Bloggerized by Lasantha Bandara - Premiumbloggertemplates.com.

This is default featured post 4 title

Go to Blogger edit html and find these sentences.Now replace these sentences with your own descriptions.This theme is Bloggerized by Lasantha Bandara - Premiumbloggertemplates.com.

This is default featured post 5 title

Go to Blogger edit html and find these sentences.Now replace these sentences with your own descriptions.This theme is Bloggerized by Lasantha Bandara - Premiumbloggertemplates.com.

Tuesday, April 12, 2011

Visual Subst: Automatically Create Virtual Drives for Your Desired Folder in Windows Explorer

We have posted about the "subst" DOS command in past which allows you to create a virtual drive for your desired folder in Windows Explorer which helps in quick and easy access to your frequently used folders. Create a Virtual Drive for Your Desired Folder in My Computer Using Subst Command
Today we are going to share a small and portable utility "Visual Subst" which helps in creating these virtual drives quickly and easily by providing a GUI instead of manually creating the drives using the DOS command.
Visual Subst is a small tool that allows you to associate the most accessed directories with virtual drives. It uses the same API similar to the console 'subst' utility, but makes it easier to create and remove virtual drives in a GUI way.
Visual_Subst.png
It can be used in almost all Windows versions including XP, Vista and 7.
Visual Subst does not require installation. It is fully portable because all settings are stored into a .INI file. However there is a simple installer provided which will help you to create some program shortcuts.
Download Link (Portable Zip File)
Download Link (Setup EXE File)

Microsoft Fix It Center Online: Automatic Troubleshoot Windows Problems

Good news for Windows users. Microsoft has announced "Fix It Center Online" which finds and fixes many common PC and device problems automatically. It also helps prevent new problems by proactively checking for known issues and installing updates. Fix it Center helps to consolidate the many steps of diagnosing and repairing a problem into an automated tool that does the work for you. You can use any computer with Internet connection to get started with Fix it Center. Simply download the Fix it Center client and follow the on-screen instructions to complete the setup. You can install Fix it Center client on as many PCs you like.
Upon installation of the Fix it Center client, it automatically downloads the latest troubleshooters in Microsoft library to your PC. The troubleshooters can "find and fix" issues immediately or "find and notify" you of the issues it detected. The "find and notify" puts you in control – you decide which issues you want the troubleshooters to resolve. No matter what you choose, it shows you a report of what was performed on your PC and offer you options to learn or further investigate the issue or submit a support request at Fix it Center Online.
Microsoft_Fix_It_Center_Online.png
Microsoft Fix it Center makes getting support easier than ever, with tools that help solve the issues you have now and prevent new ones.
  • Easy to Install and Run: Easy-to-use wizards will guide you through the set-up process and help you anytime you need support.
  • Automated: With automated troubleshooters, Fix it Center helps solve issues with your PC, even if you're not sure what the exact problem is. Fix It Center scans your device to diagnose and repair problems, then gives you the option to "Find and fix" or to "Find and report".
  • Preventive Care: By helping you find and fix issues before they become real problems, Fix it Center helps keep your PC running smoothly and automatically downloading the latest solutions.
Fix it Center can be installed on:
  • Windows XP SP3
  • Windows XP Pro (64-bit) SP2
  • Windows Vista
  • Windows 7
  • Windows Server 2003 SP2
  • Windows Server 2008
  • Windows Server 2008 R2
You can download Fix it Center client using following link:
Download Fix it Center now
Fix it Center Homepage

How to Remove “Branding Logo” and “Ease of Access” (Accessibility) Button from Windows Vista and 7 Login Screens?

This tutorial has been created mainly for customization lovers. Many times you change Windows login screen background to your favorite wallpaper but the "Windows branding logo" which shows the installed Windows edition name, hides the bottom area of the wallpaper and annoys you like hell. Today in this tutorial, we'll learn how to remove the "Windows branding logo" as well as "Ease of Access" button from login screen in Windows Vista and 7.
Win_7_Login_Screen_wo_Branding.png
So here we start the tutorial:
1. First take ownership of "%windir%\System32\authui.dll" file and then open it in Resource Hacker.
Note: here %windir% represents "Windows" directory which can be found in the system drive where Windows is installed. In most of the cases its C:\Windows.
2. Now press "Ctrl+F" keys or select "Find Text" option from "View" menu.
3. To remove "Windows Branding Logo", type following string in the Find what text box:
element id="atom(Branding)"
Click on "Find Next" button and it'll go to following line as shown in the screenshot:
Branding_enabled_Win_7_Login_Screen.png
4. Replace the existing <element id="atom(Branding)"/> line with following one:
<element id="atom(Branding)" layoutpos="none"/>
Branding_disabled_Win_7_Login_Scree.png
5. Now to remove "Ease of Access" button, search for button id="atom(Accessibility)" string similar to Step 3. It'll show you following line:
<button id="atom(Accessibility)" tooltip="true" layoutpos="left"/>
Simply change layoutpos="left" to layoutpos="none" so that it'll look like following:
<button id="atom(Accessibility)" tooltip="true" layoutpos="none"/>
6. That's it, click on "Compile Script" button and save the file. Now you'll not see the "Windows branding logo" and "Ease of Access" button on login screen.
PS: Windows Vista "authui.dll" file contains only a single instance of (Branding) and (Accessibility) strings, so you'll need to replace them only once using Step 4 and 5 but Windows 7 contains 3 instances of these strings, so you'll need to change all the 3 instances in the file.

How to Remove Shutdown Button from Windows Vista and 7 Login Screens?

Recently we posted a tutorial for removing "Windows Branding Logo" and "Ease of Access" (Accessibility) Button from Windows Vista and 7 Login Screens: How to Remove “Branding Logo” and “Ease of Access” (Accessibility) Button from Windows Vista and 7 Login Screens?
Today in this tutorial, we'll tell you how to remove "Shutdown" button from the Login screen!
Win_7_Login_Screen_wo_Branding.png
Here we start the tutorial:
1. First take ownership of "%windir%\System32\authui.dll" file and then open it in Resource Hacker.
Note: here %windir% represents "Windows" directory which can be found in the system drive where Windows is installed. In most of the cases its C:\Windows.
2. Now press "Ctrl+F" keys or select "Find Text" option from "View" menu.
3. Type Shutdown in Find what text box. Click on "Find Next" button and it'll go to following lines:
<element id="atom(ShutDownFrame)" layout="flowlayout()">
<button id="atom(ShutDown)" accname="resstr(12128)" tooltip="true"/>
<button id="atom(ShutDownOptions)" accname="resstr(12131)" accdesc="resstr(12131)" tooltip="true" shortcut="115"/>
4. Replace the last 2 lines of code with following:
<element id="atom(ShutDownFrame)" layout="flowlayout()">
<button id="atom(ShutDown)" accname="resstr(12128)" tooltip="true" layoutpos="none"/>
<button id="atom(ShutDownOptions)" accname="resstr(12131)" accdesc="resstr(12131)" tooltip="true" shortcut="115" layoutpos="none"/>
Guess what? We are only adding an extra string layoutpos="none" at the end of each line.
5. That's it, click on "Compile Script" button and save the file. Now you'll not see the "Shutdown" button on login screen.
PS: Windows Vista "authui.dll" file contains only a single instance of (ShutDown) string, so you'll need to replace it only once using Step 3 and 4 but Windows 7 contains 3 instances of this string, so you'll need to change all the 3 instances in the file.

[Fix] System Restore Point Creation / Configuration Disabled by Group Policy or System Administrator

Sometimes when you try to create a System Restore point or want to configure System Restore feature in Windows, you find that the Create and Configure buttons are grayed out and you see following messages:
System Restore Point Creation Disabled by Group Policy
System Restore Point Configuration Disabled by System Administrator
Restore_Point_Creation_Configuratio.png
System_Restore_Disabled_XP.png
It happens when the creation of System Restore point or configuration of System Restore is disabled by system administrator.
To fix this problem, you just need to follow these simple steps:
First Method: Using Group Policy Editor
1. Type gpedit.msc in RUN or Startmenu Searchbox and press Enter. It'll open Group Policy Editor.
2. Now navigate to:
Computer Configuration -> Administrative Templates -> System -> System Restore
3. In right-side pane, make sure both "Turn off Configuration" and "Turn off System Restore" options are set to "Not Configured". If both or any of them is set to "Enabled", double-click on the option and set its value to "Not Configured".
Turn_off_Restore_Point_Group_Policy.png
4. That's it. It'll immediately enable System Restore in your system.
Second Method: Using Registry Editor
1. Type regedit in RUN or Startmenu Searchbox and press Enter. It'll open Registry Editor.
2. Now go to:
HKEY_LOCAL_MACHINE\SOFTWARE\Policies\Microsoft\Windows NT\SystemRestore
3. In right-side pane, if you see any of following 2 DWORD values, delete them:
DisableConfig
DisableSR
Turn_off_Restore_Point_Registry_Edi.png
4. Restart or log off your system and System Restore will be enabled.
NOTE: If you don't want to do the task manually and want a ready-made registry script to do the task automatically, download following ZIP file, extract it and then run .REG file:
Download Registry Script

Enable “Pin to Start Menu” Option for Folders in Windows XP, Vista and 7

Pinning an item to Start menu helps you in accessing that item quickly and easily. By default Windows only allows programs or shortcuts to be pinned to Start menu. You can't pin a folder to Start menu. Reason? No reason. Weird? 100 %. In this tutorial, we are sharing a very small and simple registry trick which can enable "Pin to Start Menu" option for folders as well so that you can pin them to Start menu without any problem as shown in following screenshot:
Folder_Pinned_to_Start_menu.png
Simply follow these simple steps:
1. Type regedit in RUN or Startmenu Search box and press Enter. It'll open Registry Editor.
2. Now go to following key:
HKEY_CLASSES_ROOT\Folder\ShellEx\ContextMenuHandlers\
3. Under this key, create a new key with the name {a2a9545d-a0c2-42b4-9708-a0b2badd77c8}
4. That's it. Now press "SHIFT" key and right-click on any desired folder and you'll get "Pin to Start Menu" option.
Pin_Folder_to_Start_menu.png
5. If you want to remove "Pin to Start Menu" option in future, you can delete the key created in Step 3.
NOTE: If you want to remove the pinned folder from Start menu, you can right-click on the pinned folder in Start menu and select "Remove from this list" option. Alternatively, you can press "SHIFT" key and right-click on the folder in Explorer window and select "Unpin from Start Menu" option.
PS: If you don't want to do the task manually, download following ZIP file, extract it and you'll get the required registry script to do the task automatically. You just need to run the .REG file and it'll add the option:
Download Registry Script

Microsoft Releases Updates for Windows Vista, Server 2008 and 7 to Support Secure Digital (SD) Cards Larger Than 32 GB

Microsoft has released updates for Windows Vista, Server 2008 and 7 to support Secure Digital (SD) cards that are larger than 32 GB. Actually Windows Vista, Server 2008 and 7 contain a bug which appears when you try to connect a SD card larger than 32 GB. Windows can't calculate the correct size of the SD card.
In Windows, the capacity of SD cards that are equal to or lower than 32 GB is calculated correctly. However, for SD cards that are larger than 32 GB, the high bits are shifted incorrectly by 6 bits instead of 16 bits. Therefore, the capacity is calculated incorrectly.
Windows Vista and Server 2008 users can request for the update using following link:
Request Hotfix for Windows Vista and Server 2008
Windows 7 and Server 2008 R2 users can download the update using following links:
Download Update for Windows 7
Download Update for Windows 7 (64-bit)
Download Update for Windows Server 2008 R2 (64-bit)
Download Update for Windows Server 2008 R2 (IA-64)

Enable Hidden Secret Control Panel Items in Windows Vista and 7

Did you know Windows Vista and 7 hide some important items in Control Panel from you? Surprised? Lets talk in details! Actually Windows allows you to show or hide specific items in Control Panel using simple registry trick which is described in details in following tutorial:
How to Hide / Show Specific Control Panel Applets / Icons in Windows?
Using the same trick Microsoft has disabled some items in Control Panel in Windows Vista and 7 for no reason. Really, those hidden items are useful and might be very important for some users but for some unknown reason, those are hidden by default.
Today in this tutorial, we'll tell you how to enable those hidden items in Control Panel so that you can access them whenever you want.
1. Type regedit in RUN or Startmenu Search box and press Enter. It'll open Registry Editor.
2. Now go to following key:
HKEY_LOCAL_MACHINE\SOFTWARE\Microsoft\Windows\CurrentVersion\Control Panel\don't load
3. The above mentioned key contains some .CPL entries in right-side pane which makes them hidden in Control Panel.
Hidden_Control_Panel_Items.png
4. You can simply delete the "don't load" key and all hidden items will be enabled in Control Panel.
PS: Windows 7 users! Please read NOTE 1, NOTE 2 and NOTE 3 given at the end of this tutorial before deleting the key.
Enable_Hidden_Control_Panel_Items.png
As you can see in the above screenshot, the items pointed in dark were hidden by default but now they are enabled using this registry trick.
NOTE 1: If you delete the whole "don't load" key in Windows 7, you might get some duplicate items in Control Panel e.g., you'll get 2 Keyboard, 2 Mouse, 2 Sound entries in Control Panel. To fix this issue, don't delete the whole key, instead only delete following entries from right-side pane:
hdwwiz.cpl
appwiz.cpl
ncpa.cpl
sysdm.cpl
desk.cpl
joy.cpl
Firewall.cpl
collab.cpl
irprops.cpl
tabletpc.cpl
bthprops.cpl
infocardcpl.cpl
NOTE 2: Windows Vista allows you to delete the registry key but Windows 7 will not allow you. You'll need to take permission on the key before deleting it. You can use following simple steps to take permission:
  • Right-click on the "don't load" key and select "Permissions...".
  • It'll open a dialog box, Click on "Advanced" button.
  • It'll open another dialog box, Go to "Owner" tab.
  • Select your Username from the list and click on "Apply" button and then OK.
  • Again click on OK button in the first dialog box.
  • Now again right-click on the same key and select "Permissions...".
  • Select your Username in the list and check the "Allow" option for "Full Control".
  • Click on Apply button and then OK.
NOTE 3: If by any chance you deleted the whole "don't load" key in Windows 7 and getting duplicate items in Control Panel, you can download following ZIP file, extract it and run the extracted .REG file. It'll fix the issue and you'll no longer get duplicate items:
Download Registry Script

How to Get Classic XP Styled “Network Connections” Back in Control Panel Under Windows Vista and 7?

If you are using Windows Vista or 7, you must be missing the good old Classic XP styled "Network Connections" list. In Windows XP, you can access all your network connections quickly and easily using "Network Connections" item in Control Panel but Windows Vista and 7 don't show the connections list in such way. Actually in Windows Vista and 7, "Network Connections" has been replaced by "Network and Sharing Center" which is very complicated compared to XP IMO.
No need to worry, now you can get the classic "Network Connections" back in Vista and 7 Control Panel using this simple tutorial.
This tutorial will use the same trick mentioned in following tutorial:
Enable Hidden Secret Control Panel Items in Windows Vista and 7
So here we start the tutorial:
1. Type regedit in RUN or Startmenu Search box and press Enter. It'll open Registry Editor.
2. Now go to following key:
HKEY_LOCAL_MACHINE\SOFTWARE\Microsoft\Windows\CurrentVersion\Control Panel\don't load
3. The above mentioned key will contain some .CPL entries in right-side pane as shown in following screenshot:
Hidden_Control_Panel_Items.png
4. Delete the "ncpa.cpl" String value from right-side pane and "Network Connections" will get enabled in Control Panel.
Network_Connections_List_Windows_Vi.png
NOTE: Windows Vista allows you to delete the registry value but Windows 7 will not allow you. You'll need to take permission on the key before deleting it. You can use following simple steps to take permission:
  • Right-click on the "don't load" key and select "Permissions...".
  • It'll open a dialog box, Click on "Advanced" button.
  • It'll open another dialog box, Go to "Owner" tab.
  • Select your Username from the list and click on "Apply" button and then OK.
  • Again click on OK button in the first dialog box.
  • Now again right-click on the same key and select "Permissions...".
  • Select your Username in the list and check the "Allow" option for "Full Control".
  • Click on Apply button and then OK.
Now you'll be able to delete "ncpa.cpl" String value in Windows 7 as well.

How to Add “Network Connections” Folder in My Computer?

In this tutorial, we'll learn how to add "Network Connections" list in My Computer window so that you can access it quickly and easily. This tutorial will use the same trick mentioned in following tutorial:
How to Add Recycle Bin, Run, Search and Many Other Useful Shortcuts in My Computer?
So here we start the tutorial:
1. Type regedit in RUN or startmenu search box and press Enter. It'll open Registry Editor.
2. Now go to following key:
HKEY_LOCAL_MACHINE\SOFTWARE\Microsoft\Windows\CurrentVersion\Explorer\MyComputer\NameSpace
3. Now we'll need to create a new key under "NameSpace" key. Right-click on "NameSpace" key and select "New -> Key". Set its name to {7007ACC7-3202-11D1-AAD2-00805FC1270E} as shown in following screenshot:

4. That's it. As soon as you set the value in registry, it'll immediately start showing "Network Connections" in My Computer.
Network_Connections_in_My_Computer.png
NOTE: To delete it from My Computer window, simply delete the key created in Step 3 from registry.
PS: If you want ready-made registry scripts to add the shortcut automatically, then download following ZIP file, extract it and run the .REG file. It'll automatically add "Network Connections" in My Computer window. An uninstall script is also included in the pack to remove the item.
Download Registry Script

How to Add “Network Connections” Shortcut in My Computer Context Menu?

In this tutorial, we'll learn how to add "Network Connections" shortcut in My Computer context menu so that you can access it quickly and easily.
Following are the required steps:
1. Type regedit in RUN or startmenu search box and press Enter. It'll open Registry Editor.
2. Now go to:
HKEY_CLASSES_ROOT\CLSID\{20D04FE0-3AEA-1069-A2D8-08002B30309D}
3. Now we'll need to create a new key under "Shell" key. Right-click on "Shell" key and select "New -> Key". Give the new key name "Network Connections".
4. Now right-click on the new key which we created in step 3 and select "New -> Key". Give the new key name of command.
5. In right-side pane, change value of "Default" to:
explorer shell:::{7007ACC7-3202-11D1-AAD2-00805FC1270E}

6. That's it. Now you can have "Network Connections" shortcut in My Computer context menu.
NOTE: Windows 7 users can also have an icon for the shortcut. To set the icon, select the key created in Step 3 and in right-side pane, create a new String value "Icon". Set its value to ncpa.cpl

How to Add “Network Connections” Shortcut in Desktop Context Menu Under Windows Vista and 7

In this tutorial, we'll learn how to add "Network Connections" shortcut in Desktop context menu so that you can access it quickly and easily. Network_Connections_Desktop_Context.png
It'll only work in Windows Vista and 7.
Following are the required steps:
1. Type regedit in RUN or startmenu search box and press Enter. It'll open Registry Editor.
2. Now go to:
HKEY_CLASSES_ROOT\DesktopBackground\Shell (for Windows 7)
HKEY_CLASSES_ROOT\Directory\Background\Shell (for Windows Vista)
3. Now we'll need to create a new key under "Shell" key. Right-click on "Shell" key and select "New -> Key". Give the new key name "Network Connections".
4. Now right-click on the new key which we created in step 3 and select "New -> Key". Give the new key name of command.
5. In right-side pane, change value of "Default" to:
explorer shell:::{7007ACC7-3202-11D1-AAD2-00805FC1270E}
Add_Network_Connections_Desktop_Con.png
6. That's it. Now you'll have "Network Connections" shortcut in Desktop context menu.
PS: Windows 7 users can also set an icon and position for the shortcut.
To set the icon, select the key created in Step 3 and in right-side pane, create a new String value "Icon". Set its value to ncpa.cpl
To set its position in the context menu, create a new String value "Position" and set its value to:
Top (To show it at top)
Bottom (To show it at bottom)
PS. If you want a ready-made registry script to do the task automatically, download following ZIP file, extract it and run the desired REG file:
Download Registry Script

Download Free “Microsoft Download Manager” from Microsoft

Microsoft has released a free download manager for Windows. "Microsoft Download Manager" enables you to download files from the Internet in a more reliable and faster way than using a browser alone. Using the Download Manager makes it easier to download large files such as an application or multimedia files.
The Download Manager has been specifically designed to manage file downloads from supporting Microsoft Web sites in a secure and reliable way. Once started, the Download Manager displays an easy-to-use interface that shows the status of downloads and enables you to resume downloads if they have failed.
Microsoft_Download_Manager.png
Currently it supports downloads from Web addresses starting with http://
It can be used in Windows XP, Vista, Server 2003, Server 2008 and 7.
You can download it using following link:
Download Link

Create Simple Script to Show / Hide Hidden Files and Folders in Windows XP, Vista and 7

We have posted a tutorial in past to show / hide hidden files and folders quickly and easily in Windows. It provides 2 registry scripts to enable / disable "Show hidden files and folders" option on the fly: Show/Hide Hidden Files & Folders on the fly in Windows XP, Vista & 7
Today in this tutorial, we are going to share a small script which can also be used to enable / disable "Show hidden files and folders" option in Windows.
This script when executed, checks the status of "Show hidden files and folders" option and toggles its value. So if its set to show hidden files, it changes the option to hide hidden files and vice versa.
Simply copy paste following code in NOTEPAD and save the file with name "Show_Hidden_Files_On_Off.vbs" (including quotes):
Hidden = "HKCU\Software\Microsoft\Windows\CurrentVersion\Explorer\Advanced\Hidden"
SHidden = "HKCU\Software\Microsoft\Windows\CurrentVersion\Explorer\Advanced\ShowSuperHidden"
Set Sh = WScript.CreateObject("WScript.Shell")
St = Sh.RegRead(Hidden)
If St = 2 Then
Sh.RegWrite Hidden, 1, "REG_DWORD"
Sh.RegWrite SHidden, 1, "REG_DWORD"
Else
Sh.RegWrite Hidden, 2, "REG_DWORD"
Sh.RegWrite SHidden, 0, "REG_DWORD"
End If
Sh.SendKeys("{F5}")
That's it. You can place this script at any location like Desktop, Quick Launch toolbar and whenever you need to toggle the "Show hidden files and folders" option, simply run the script.
PS: If you don't want to create the script manually or face any problem while creating the script, you can download a ready-made script using following link:
Download Script

Add “Show / Hide Hidden Files” Option in Desktop and Explorer Context Menu under Windows XP, Vista and 7

Recently we posted a simple script to toggle "Show hidden files and folders" option in Windows: Create Simple Script to Show / Hide Hidden Files and Folders in Windows XP, Vista and 7
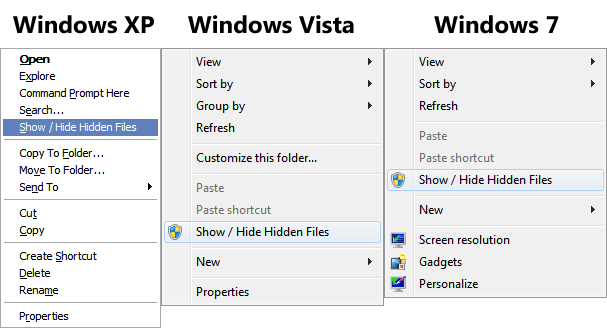
And now we'll tell you how to add an option "Show / Hide Hidden Files" in Desktop and Explorer context menu (menu which appears when you right-click) to make the task faster and easier.

In Windows XP, you'll need to right-click on a folder to get the option. In Windows Vista and 7, you can right-click on an empty area in Explorer or Desktop to get the option.
HOW-TO:
Simply download following ZIP file, extract it and run the "Install.exe" file present in the "Windows XP" or "Windows Vista and 7" folders depending upon which Windows are you using.
Download Link
It'll automatically install the required files and will ask you to add the option into Windows Registry, accept the confirmation by clicking on "Yes" button and then OK.

Create Simple Script to Show / Hide File Extensions in Windows XP, Vista and 7

Recently we posted a tutorial about creating script to show / hide hidden files and folders in Windows: Create Simple Script to Show / Hide Hidden Files and Folders in Windows XP, Vista and 7
Today in this tutorial, we are going to share another similar script which can be used to show / hide file extensions in Windows.
This script when executed, checks the status of "Hide extensions of known file types" option and toggles its value. So if its set to hide file extensions, it changes the option to show file extensions and vice versa.
Simply copy paste following code in NOTEPAD and save the file with name "Show_File_Extension_On_Off.vbs" (including quotes):
FileExt = "HKCU\Software\Microsoft\Windows\CurrentVersion\Explorer\Advanced\HideFileExt"
Set Sh = WScript.CreateObject("WScript.Shell")
St = Sh.RegRead(FileExt)
If St = 1 Then
Sh.RegWrite FileExt, 0, "REG_DWORD"
Else
Sh.RegWrite FileExt, 1, "REG_DWORD"
End If
Sh.SendKeys("{F5}")
That's it. You can place this script at any location like Desktop, Quick Launch toolbar and whenever you need to toggle the "Hide extensions for known file types" option, simply run the script.
PS: If you don't want to create the script manually or face any problem while creating the script, you can download a ready-made script using following link:
Download Script

Add “Show / Hide File Extensions” Option in Desktop and Explorer Context Menu under Windows XP, Vista and 7

Recently we posted a simple script to toggle "Hide extensions for known file types" option in Windows: Create Simple Script to Show / Hide File Extensions in Windows XP, Vista and 7
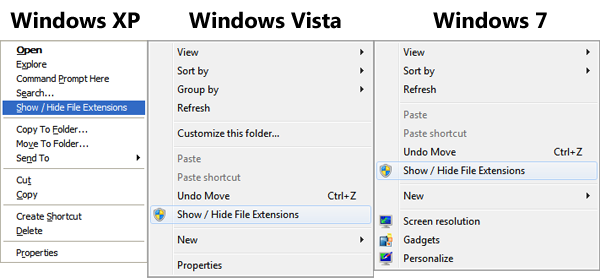
And now we'll tell you how to add an option "Show / Hide File Extensions" in Desktop and Explorer context menu (menu which appears when you right-click) to make the task faster and easier.

In Windows XP, you'll need to right-click on a folder to get the option. In Windows Vista and 7, you can right-click on an empty area in Explorer or Desktop to get the option.
HOW-TO:
Simply download following ZIP file, extract it and run the "Install.exe" file present in the "Windows XP" or "Windows Vista and 7" folders depending upon which Windows are you using.
Download Link
It'll automatically install the required files and will ask you to add the option into Windows Registry, accept the confirmation by clicking on "Yes" button and then OK.

Kill All Not Responding Programs On The Fly Using A Simple Shortcut

"This program is not responding" is a very common error message which you get in Windows. Many times we find a program not responding and we have to perform an End Task operation on it using Task Manager. Wouldn't it be great if we have a shortcut on Desktop or in Taskbar which can automatically kill all not responding programs upon execution? Just double-click on the shortcut and it'll End Task/kill all not responding programs.
Today we'll tell you how to create a simple shortcut which kills all not responding programs automatically so you don't need to open Task Manager and select the program and perform End Task on it.
Following are the simple steps to follow:
1. Right-click on Desktop and select "New -> Shortcut":
New_Shortcut.png
2. It'll launch "Create Shortcut" wizard. Now enter following string in location box:
taskkill /F /FI "STATUS eq NOT RESPONDING"

3. After entering the location, click on "Next" button. Now type Kill Not Responding Tasks in name box and click on "Finish" button. It'll create a new shortcut on Desktop.
4. Now its time to change the icon. Right-click on the shortcut and select "Properties". Click on "Change Icon" button. Type explorer.exe in text box and press Enter. Select the 2nd icon in 3rd column, click on OK button and then Apply the changes.
5. That's it. You'll get the desired shortcut on Desktop:
Kill_Not_Responding_Tasks_Shortcut.png
NOTE: If you don't want to create the shortcut manually and want a ready-made shortcut, download following ZIP file, extract it and you'll get the shortcut:
Download Shortcut

Download X-Setup Pro for FREE: Ultimate Tweaking Software for Microsoft Windows

X-Setup Pro is the ultimate in system configuration or tweaking as some people would say. It covers all types of options and has many useful features. X-Setup Pro is not yet another Windows Hacker; it is the ultimate tool for black belt system tuning and tweaking, running on Windows 95, 98, NT 4.0, 2000, ME, XP, Vista and 7.
X-Setup Pro allows you to change nearly 1800 settings with some simple button clicks. This makes X-Setup Pro the most complete hacker/tweaking utility ever available.
X-Setup Pro is extremely easy to use. It has an Explorer-like look and the famous back and next buttons you already know from your Internet browser. Plus, X-Setup Pro offers wizards that assist you when changing the configuration - there has never been an easier way to hack your Windows.
X-Setup_Pro.png
Supported operating systems:
  • Windows 98
  • Windows NT 4.0
  • Windows ME
  • Windows 2000 All Versions
  • Windows XP All Versions
  • Windows Server 2003 All Versions
  • Windows Vista All Versions
  • Windows 7 All Versions
Download Link

How to Add “Kill Not Responding Tasks” in Desktop Context Menu Under Windows Vista and 7

Recently we posted about a cool "Kill Not Responding Tasks" shortcut which can kill all not responding programs on the fly: Kill All Not Responding Programs On The Fly Using A Simple Shortcut
Today in this tutorial, we'll tell you how to add this shortcut in Desktop context menu so that you can access it quickly and easily.

It'll only work in Windows Vista and 7.
Following are the required steps:
1. Type regedit in RUN or startmenu search box and press Enter. It'll open Registry Editor.
2. Now go to:
HKEY_CLASSES_ROOT\DesktopBackground\Shell (for Windows 7)
HKEY_CLASSES_ROOT\Directory\Background\Shell (for Windows Vista)
3. Now we'll need to create a new key under "Shell" key. Right-click on "Shell" key and select "New -> Key". Give the new key name "Kill Not Responding Tasks".
4. Now right-click on the new key which we created in step 3 and select "New -> Key". Give the new key name of command.
5. In right-side pane, change value of "Default" to:
taskkill /F /FI "STATUS eq NOT RESPONDING"

6. That's it. Now you'll have "Kill Not Responding Tasks" shortcut in Desktop context menu.
PS: Windows 7 users can also set an icon and position for the shortcut.
To set the icon, select the key created in Step 3 and in right-side pane, create a new String value "Icon". Set its value to explorer.exe,9
To set its position in the context menu, create a new String value "Position" and set its value to:
Top (To show it at top)
Bottom (To show it at bottom)
PS. If you want a ready-made registry script to do the task automatically, download following ZIP file, extract it and run the desired REG file:
Download Registry Script

Close All: Small Tool to Close All Running Program Windows On The Fly

"Close All" tool lets you to close all running applications with just one click. It doesn't use system resources because it only flashes a 'close' signal to all open windows on the desktop and then ceases. Just create a shortcut to the tool in the Start Menu, Quick Launch, Windows 7 Taskbar or elsewhere. You can always add a hotkey to this shortcut. It is really very handy if you are running ~20 applications and want them all to quit instantly. It works just as if you were pressing the close button for each application.
Closeall.png
It doesn't require installation. No settings are stored in the Windows Registry or file system.
Just download and extract the ZIP file and create a shortcut of "CloseAll.exe" file which can be later put on Desktop, in Quick Launch toolbar or pin to Windows 7 Taskbar.
Download Link
Homepage
You can also prevent certain applications from being to be closed by Close All by appending -x="application_name.exe" at the end of the "Target" string in Properties of the CloseAll application shortcut. You can separate multiple values with "|" (pipe) as well.

Enhance Windows Taskbar’s Auto-Hide Functionality Using Taskbar Activate

Many Windows users want to customize Taskbar's Auto-Hide feature as there are no settings available by default to customize it. You can't customize Auto-Hide time delay, Always on Top settings, etc. Today we are going to share an excellent small utility "Taskbar Activate" which extends the Auto-hide functionality of Taskbar and provides an interface to customize various settings.
Taskbar Activate manages activation and deactivation of the Windows Taskbar. It is specially useful for accessing the Taskbar with special applications running (full screen windows, always on top windows, etc). It also prevents an inopportune Taskbar window appearing over your application when the mouse goes close to the screen border.
Taskbar Activate awakes your Taskbar when it is hidden by a full screen window.
Once installed, you can access its Settings using its system tray icon.
Taskbar_Activate_Settings.png
You can download it using following link:
Download Link
Download Link (Portable

XTweaker: A Free Portable Tweaking Utility for Windows XP, Vista and 7

We have posted about "Windows 7 Little Tweaker" in past which allows you to tweak a few interesting things in Windows 7. Today we are sharing another similar tool "XTweaker" which works in Windows XP, Vista and 7.
XTweaker.png
It allows you to:
  • Add Msconfig to My Computer Context Menu
  • Add Userpasswords2 to Control Panel
  • Clear Pagefile on Shutdown
  • Add Command Prompt here to Folder Context Menu
  • Decrease Delay of Startmenu
  • Disable Annoying Messages in Internet Explorer
  • Disable Indexing Service
  • Disable Remote Registry Service
  • Hide the Run As… option from Context menu
  • Remove Shared Documents from My Computer
  • No Rebooting after Windows Updates
  • Disable low disk space check
These tweaks will help you in making your Windows Faster and running the way you want.
This tool is portable means you don’t have to install it.
Download Link
Thanks to our reader "JX Great" for creating and sharing this little app...

How to Disable Warning Message While Unchecking “Hide Protected Operating System Files” Option in Folder Options

When you try to uncheck "Hide Protected Operating System Files (Recommended)" Option in Folder Options in Windows OS, you get a warning message asking for confirmation as shown in following screenshot: Warning_Unhide_Protected_OS_Files.png
It becomes quite annoying if you frequently enable/disable this option.
Today in this tutorial, we'll tell you how to completely remove this warning message so that you can enable/disable the option without getting the irritating warning message window.
1. Type regedit in RUN or startmenu search box and press Enter. It'll open Registry Editor.
2. Now go to:
HKEY_LOCAL_MACHINE\SOFTWARE\Microsoft\Windows\CurrentVersion\Explorer\Advanced\Folder\SuperHidden
3. In right-side pane, delete String value "WarningIfNotDefault".
Disable_Warning_Unhide_Protected_OS.png
That's it. Now you'll not receive the warning message.
PS. If you want a ready-made registry script to do the task automatically, download following ZIP file, extract it and run the desired REG file:
Download Registry Script

WinToFlash: Utility to Create Bootable USB Drive to Install Windows XP, Server 2003, Vista, Server 2008 and 7

WinToFlash is a software for transfer your Windows XP, Server 2003, Vista, Server 2008 and 7 setup from CD or DVD to USB. This is about you can install your Windows from flash drive, USB pen, HDD, etc to your computer or netbook. And this is not all it can do. WinToFlash can transfer your live CD or DVD to USB card, for example, BartPE. After all you can erase your USB media and format it with Windows for every day use.
WinToFlash.png
Features list:
  • Windows XP/2003/Vista/2008/7 to USB transfer
  • WinPE to USB transfer
  • USB media erasing, full or quick
  • Create the USB drive with emergency boot loader
  • DOS to USB transfer
Download Link

How to Open Any Program by Typing its Name in RUN Dialog Box in Windows?


UPDATE: A small utility is available to do the whole task automatically: Run It
One of our readers "Balaji" asked us following question:
Hi Vishal,
I want to know how to create a registry entry for application shortcuts?
example:
For opening a notepad we go to start - run and type notepad
For opening paint brush we use start - run and type mspaint
Similarly i want to set keywords for opening specific applications in my desktops.
For that what is the registry keyword i need to create / modify... Pls guide me
looking forward for your reply.
Thanks in advance
Yes. That can be done easily using Windows Registry. You can open any desired 3rd party program by just typing its name in RUN or Start menu Search box and press Enter.
Launch_Application_from_RUN.png
You'll need to set the application path in Windows Registry so that Windows can know about the application at the time of execution.
PS: Before starting the tutorial lets assume that our desired application name is "My Application". Its an EXE file and is stored in "C:\Program Files\My Application\" folder. It'll help you in easily understand the tutorial.
So without wasting any time, lets start our tutorial:
1. Type regedit in RUN or startmenu search box and press Enter. It'll open Registry Editor.
2. Now go to:
HKEY_LOCAL_MACHINE\SOFTWARE\Microsoft\Windows\CurrentVersion\App Paths
3. Now we'll need to create a new key under "App Paths" key. Right-click on "App Paths" key and select "New -> Key". Set its name to your desired application name along with its extension e.g. My_Application.exe
4. Select the key created in Step 3 and in right-side pane, set value of "Default" to the full path of application's EXE file e.g. C:\Program Files\My Application\My Application.exe
5. Again in right-side pane, create a new String value "Path" and set its value to the folder containing your application EXE file e.g. C:\Program Files\My Application\
Create_App_Paths_in_Windows_registr.png
6. That's it. Now you can launch your desired application by just typing its name in RUN or Start menu Search box.
NOTE: If you want a ready-made registry script to do the task automatically, then copy paste following code in Notepad and save the file with name "AskVG.REG" (including quotes).
Windows Registry Editor Version 5.00
[HKEY_LOCAL_MACHINE\SOFTWARE\Microsoft\Windows\CurrentVersion\App Paths]
[HKEY_LOCAL_MACHINE\SOFTWARE\Microsoft\Windows\CurrentVersion\App Paths\My Application]
@="C:\\Program Files\\My Application\\My Application.exe"
"Path"="C:\\Program Files\\My Application\\"
You just need to replace BOLD part of the above script with the correct application name and path. After saving the file, run it and it'll add the program path to Registry so that you can launch it directly from RUN and Start menu Search box.

AeroBar: Show Titlebar Text in Windows Vista and 7 Explorer

UPDATE: Utility version updated to 1.3 which now allows you to easily enable/disable titlebar text. Run the utility once to show titlebar text and run it again to disable titlebar text. So now the utility acts like a switch.
Have you ever wondered why Explorer Windows don't show titles in Windows Vista and 7? In earlier versions of Windows, we could see titlebar text in explorer windows but it has been removed in Vista and 7. Actually titlebar text was removed to make the Explorer clean and minimal.
But if you look carefully, other applications like Notepad, Paint, Internet Explorer, etc show the text in titlebar, so there must be a way to show it in Windows Explorer as well.
"AeroBar" is a very small and standalone application which can show the titlebar text in Windows Vista and 7 Explorer.
Titlebar_Text_in_7_Explorer.png
Simply download the utility from following link:
Download Link
Run it and you'll see titlebar text in all Explorer windows. There is no need to install the app as its portable. If you like it and want to use it, you can add its shortcut in Windows startup.

Classic Shell: Get “Up” Button and Titlebar Text Back in Windows Vista and 7 Explorer

Almost all Windows Vista and 7 users complain about missing "Up" button and Titlebar text in Windows Explorer toolbar. We have blogged about "Mavis Up Button" which can bring back the "Up" button but its not free, you need to pay $4.95 to purchase it. We have also blogged about "AeroBar" which can bring back the titlebar text back in Windows Vista and 7 Explorer.
The good news is that our favorite tool "Classic Shell" can also bring back the good old "Up" button as well as titlebar text and icon in Windows Explorer as you can see in the following screenshot:
Classic_Shell_Settings.png
We have already blogged about it in past:
Classic Shell: Get Classic Start Menu & Explorer Toolbar Buttons Back in Windows Vista & 7
When we blogged about this tool, it only provided Classic Start menu, Classic Explorer toolbar buttons and a few other things. But now a new version is available which comes with following changes:
  • Shows Titlebar text and icon
  • Disable Addressbar Breadcrumbs
  • Adds "Up" button in Explorer titlebar
  • New toolbar icons to match Vista and 7
  • New skins for Classic Start menu
  • Brings back file size feature in Statusbar
You can visit following link to read more information and download this tool:
Download Link

Hide or Show Windows Taskbar on the Fly

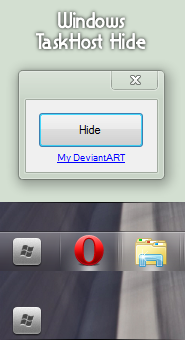
"Windows Taskbar Hide" is a very small and portable tool created by "B0M8" @ DA which allows you to hide or show Taskbar easily and quickly. It might become very handy if you use a dock utility like RK Launcher, Rocket Dock, etc.
Simply run the tool and click on "Hide" button or press "F9" to hide Taskbar. If you want to show the Taskbar again, click on "Show" or press "F12" key.

You can download it using following link:
Download Link

Run It: Small Utility to Allow Opening Any Program by Typing its Name in RUN Dialog Box in Windows

Recently we posted a tutorial about opening a program by just typing its name in RUN dialog box in Windows:
How to Open Any Program by Typing its Name in RUN Dialog Box in Windows?
The above tutorial requires Registry editing and if you are not comfortable with it, our reader ".Rain" has created a small utility to do the whole task automatically.
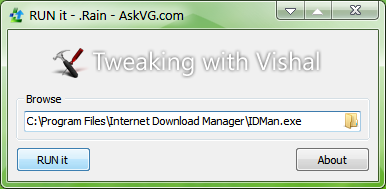
"Run It" is a very small and portable utility which allows you to add any program reference to Windows Registry so that you can launch it by just typing its name in Start menu RUN dialog box. For example, you have installed 3rd party software "Internet Download Manager" and its executable file name is "IDMan.exe". If you try to launch it by just typing "IDMan" in RUN, it'll give error that Windows cannot find the exe. But if you add its reference in Registry using "Run It", you can launch it by simply typing its name in RUN.

How To Use:
1. Either type full path of the program's exe in the text box or click on the yellow folder icon and browse to the EXE file.
2. Once you select the EXE file, click on "RUN it" button. It'll immediately add the reference to Registry.
3. Now you can launch the program by typing its name in RUN dialog box.
Download Link

Is Windows Vista SP3 Coming? List of All Updates and Hotfixes Ready for SP3 Inside

Windows 7 SP1 public beta has been released and if we take a look at our reader "smartie77"'s investigation, we can undoubtedly say that Windows Vista SP3 is also on its way. Thanks to "Smartie77" who spent a lot of time in digging through Windows 7 SP1 content and found that almost all updates available in Windows 7 SP1 have also been released for Windows Vista and Server 2008 by Microsoft.
Almost all those updates apply to Windows Vista SP2 and Server 2008 SP2 labeling as "SP3 release" which clearly indicates that Microsoft is planning to release SP3 for Windows Vista and Server 2008 asap.
"Smartie77" has also compiled a long list of all these updates with a working link to their official page so you can download and install them in your system.
Here are the links to all updates which might get included in SP3 for Windows Vista and Server 2008:
NOTE: These updates and hotfixes are not available via Windows Updates, you'll need to download and install them manually using following links. To download the update, open the URL and click on "View and request hotfix downloads" link given in "Hotfix Download Available" section at the beginning of the page.
OS BLUESCREEN if a heavy load situation exists or if connectivity issues exist: Bluescreen "STOP: 0x000000B8"
IE8 The right side of the first page of a printed .eml file may be truncated if Internet Explorer 8.0 is installed on Vista
IE8 .lnk shortcut does not work correctly when you click the shortcut under the Favorites menu. If Internet Explorer 8 is installed.
OS STABILITY An application or a service that uses the Wmiaprpl.dll module crashes when the application or the service enumerates the returned performance objects under the HKEY_PERFORMANCE_DATA registry key
POSIX SUA Vista Enterprise/Ultimate with Subsystem for Unix installed : The input or output stream is redirected incorrectly in a Korn shell
OS NTFS Some data is corrupted when cached and noncached I/O operations occur by using the same NTFS file handle
OS BLUESCREEN Server2008 only : STOP: 0x0000001a" error on a computer that has an Intel Westmere processor together with the Hyper-V role
OS MEMORY LEAK nonpaged pool memory leak occurs when you use a WFP callout driver in Windows Vista.WFP Callout Drivers are used in 3rd party Firewall and Antivirus Applications
OS INTERNET command "netsh interface ipv4 dump" does not export the subnet mask
OS WORKGROUP SMBv2 Server does not respond to certain FSCTL_SRV_NOTIFY_TRANSACTION requests from Vista clients
OS BASE NTFS WFP drivers may cause a failure to disconnect the RDP connection to a multiprocessor computer
OS X64 FIX Exceptions that are thrown from an application that runs in a 64-bit version of Windows are ignored
OS ACPI POWERSAVE PCI devices are unexpectedly enabled after you resume a Windows Vista system from hibernation
OS ACPI POWERSAVE X64 Vista update enables the OS to take advantage of the Enhanced C1 state (C1E) for lower power consumption offered by multicore processors.
OS X64 FIX slow performance when you render .jpg files on a computer that is running an x64-based version of Windows Vista SP2
OS REMOTE DESKTOP Audio redirection feature for the Macintosh RDP clients is not enabled on the x64 editions of Windows Server 2008 or of Windows Vista.
OS BASE NTFS Virtual Disk Service (VDS) crashes when you try to extend a dynamic volume in an NTFS file system on a Vista computer
APP OFFICE WINWORD Changes are not committed to the SharePoint server when you use WinWord.exe on Vista to save a document : "File is read only".
OS MEDIACENTER Black and white pixels unexpectedly appear on the right side of the screen when you run Windows Media Center in full-screen mode
OS PRINTING Only the header and footer information in an XPS document are printed
OS NETWORK IPv4/IPv6 MIB interface information that is collected by the IP Helper API is blank or incomplete
OS NETWORK Ipv6 ambiguous IPv6 address in Vista
OS NET WORKGROUP OS BLUESCREEN STOP 0x00000050 PAGE_FAULT_IN_NONPAGED_AREA while using SMB connections on Vista.
OS PRINTING PostScript printer does not print a document that contains multiple paper sizes correctly on Vista
OS PERFORMANCE high CPU usage when a full-speed USB 2.0 audio device is connected to the Root Hub of a High-Speed CPU Bus
OS MEMORY LEAK memory leak issue occurs in the Audiodg.exe process when you play audio on Vista
OS BASE NTFS You install two third-party Windows Filtering Platform (WFP) callout drivers. Computer may crash and / or blue screen. WFP Callout Drivers are used in 3rd party Firewall and Antivirus Applications.
OS BASE NTFS / MEMORY LEAK A memory leak occurs when you use a WFP callout driver in Windows Vista
3rd PARTY APPS ENCRYPTION File corruption may occur if you run a program that uses a file system filter driver in Vista. Filter Drivers are used for example in 3rd party encryption Software.
OS BASE PERFORMANCE Logoff process stops responding after you create a logoff Group Policy script on a client computer that is running Windows Vista and has the Tablet PC Input Service running.
OS MEMORY LEAK A memory leak may occur when you use the Microsoft ActiveX Data Objects Library in Windows Vista to query ADODB streams.
.NET WPF based NET framework application experiences different memory leaks with Dot NET 3 5 SP1 installed (Windows6.0-KB981107 and NDP30SP2-KB981107)
.NET In .NET 3.5 SP1, performance problems such as CPU consumption and generally sluggishness were especially noticeable when scrolling within an application that contains many visual elements - this is a performance fix for Vista with dotnet 3.5 sp1 installed (NDP30SP2-KB978520 and Windows6.0-KB978520-v2)
.NET WPF in Vista : Fix for various Graphics crashes and Memory leaks (NDP30SP2-KB967634 and Windows6.0-KB967634-v3)

How to Customize Thumbnail Preview Border for Images and Videos in Windows Vista and 7 Explorer?

In Windows Vista and 7 Explorer, if you set "Thumbnail" view for a folder containing images or videos, it shows the thumbnails having a nice looking border with shadow effect. In this tutorial, we'll tell you about a small registry trick which helps you in customizing these thumbnails border. You can remove the drop-shadow effect or add different effects to the thumbnails.
Windows_Explorer_Thumbnail_Preview_.png
So without wasting time lets start the tutorial:
1. Type regedit in RUN or startmenu search box and press Enter. It'll open Registry Editor.
2. Now go to:
HKEY_CLASSES_ROOT\SystemFileAssociations\image (to customize border for images)
HKEY_CLASSES_ROOT\SystemFileAssociations\video (to customize border for videos)
3. In right-side pane, look for a DWORD value "Treatment". It would be set to 2 for images and 3 for videos by default. Double-click on it and set its value to any of following:
0 - To remove the border (Makes thumbnail preview a little bit faster)
1 - To add drop-shadow effect
2 - To add photo-shadow effect
3 - To add video reel like effect
Customize_Thumbnail_Preview_Border.png
4. Close Registry Editor and log off and log on again. You can also End Task and restart Explorer using Task Manager.
5. That's it. Now you can have different thumbnail preview borders in Explorer as shown in following screenshot:
Windows_Explorer_Thumbnail_Preview_.png
PS. If you want a ready-made registry script to do the task automatically, download following ZIP file, extract it and run the desired REG file:
Download Registry Script

FluentNotepad: Simple Notepad for Windows with Office 2010 Ribbons UI

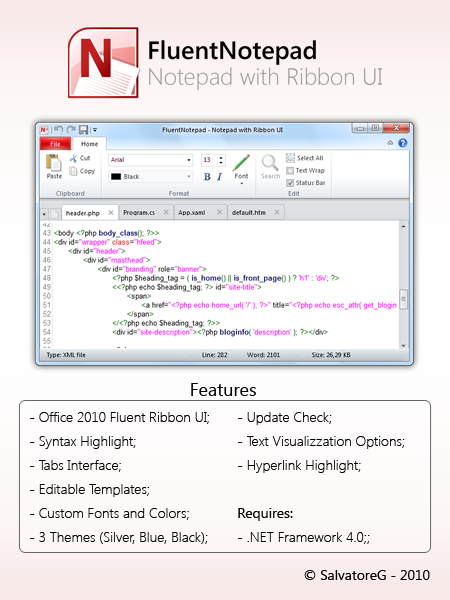
If you love the new ribbon UI available in Microsoft Office and other MS products, you'll definitely love this small but excellent Notepad for Windows. "SalvoG92" @ DA has developed a cool Notepad "FluentNotepad" for Windows which comes with Office 2010 look-like ribbon UI.

It supports all basic Notepad functions and also allows you to minimize ribbons and put Quick Access toolbar below the ribbons similar to Office applications.
Its a wonderful work IMO. Its also portable so you don't need to install it. Simply extract the ZIP file and run the EXE file to launch it.
You can download it using following link:
Download Link
You must install .NET Framework 4.0 to be able to run the app.

Taskbar Drop Shadow: Add Cool Drop Shadow Effect to Windows Taskbar

If you use Windows and love to customize its look or add extra eye candy features, here is an interesting utility for you. "Taskbar Drop Shadow" is a small portable tool developed by "sweatyfish" @ DA which adds a drop shadow effect to Windows Taskbar:
Taskbar_Drop_Shadow.png
Its very simple to use. Download the ZIP file and extract it. You'll get 2 EXE files:
  • Top TB Shadow.exe
  • Bottom TB Shadow.exe
If you have Taskbar on Top, run "Top TB Shadow.exe" and if you have it at bottom, run "Bottom TB Shadow.exe" file.
Download Link
You can customize its settings by right-click on the Taskbar shadow and select "Preferences". Sometimes it might close if you change some settings, you'll need to re-run the EXE file in that case.

The Best FREE Alternatives to Notepad

If you use Windows and use the default "Notepad" a lot for various tasks like writing notes, coding, etc, this topic might be useful for you. Today in this topic, we are going to cover a few FREE applications which look and work similar to Notepad but provide lots of useful features which are missing in Notepad.
So without wasting any time, lets take a look at the free alternatives to Notepad:
Above are the best free alternatives to Notepad. Give them a try and choose whichever fits to your requirements. Our favorite is "Notepad2". Its very light-weighted and provides lots of useful features. "Notepad++" is also a good one.

The Best FREE Alternatives to Microsoft Paint and Adobe Photoshop

Recently we shared some free alternatives to Notepad: The Best FREE Alternatives to Notepad
Today in this topic, we are going to share best FREE alternatives to Windows Paint. Paint is a good tool included in Windows for editing images but it lacks lots of image editing features.
You can also these freeware as alternative to Adobe Photoshop.
Paint.NET
Paint.NET is free image and photo editing software for computers that run Windows. It features an intuitive and innovative user interface with support for layers, unlimited undo, special effects, and a wide variety of useful and powerful tools.
Paint.NET also depends on Microsoft's .NET Framework 3.5 SP1, which is automatically installed if it isn't already on the system.
Download Link
GIMP
GIMP is an acronym for GNU Image Manipulation Program. It is a freely distributed program for such tasks as photo retouching, image composition and image authoring.
It has many capabilities. It can be used as a simple paint program, an expert quality photo retouching program, an online batch processing system, a mass production image renderer, an image format converter, etc.
Download Link
PhotoFiltre
PhotoFiltre is a complete image retouching program. It allows you to do simple or advanced adjustments to an image and apply a vast range of filters on it. It is simple and intuitive to use, and has an easy learning curve. The toolbar, giving you access to the standard filters with just a few clicks, gives PhotoFiltre a robust look.
Download Link
Helios Paint
HeliosPaint is a feature-rich, easy-to-use and powerful paint program for editing photos, drawings and icons. It runs on Microsoft Windows, Apple Mac OS X, Linux and Unix.
Download Link
Photo Pos Pro
Photo Pos Pro Photo Editor is a free photo editor offers users a wide variety of possibilities in the fields of Image Enhancing and Image Editing and in the field of Computer Graphics Design. Using the editor you can perform various tasks, from simple basic tasks to complex tasks; you can edit existing images, create new works based on existing images, create new works from scratch and more.
Thank to our reader "Shahnawaz" for mentioning it.
Download Link
Photoscape
Photoscape is another fun and easy photo editing software that enables you to fix and enhance photos. Thanks to our readers "Chris" and "Prateek" for mentioning it.
Download Link

Microsoft Releases Out-of-Band Security Update to Address Windows Shortcut Exploit aka CPLINK

Windows Shortcut Exploit, also known as CPLINK, is a zero-day vulnerability in all versions of Windows that allows a Windows shortcut link, known as an .lnk file, to run a malicious DLL file. The dangerous shortcut links can also be embedded on a website or hidden within documents. The exploit works when you open a device, network share or WebDav point carrying an infection—you don't need to click on anything for the exploit to work, even if you have AutoPlay and AutoRun disabled.
There was no patch from Microsoft to fix this exploit but now Microsoft has released an out-of-band security update to address this exploit.
According to Microsoft Security Bulletin, this security update resolves the vulnerability in Windows Shell. The vulnerability could allow remote code execution if the icon of a specially crafted shortcut is displayed. An attacker who successfully exploited this vulnerability could gain the same user rights as the local user. Users whose accounts are configured to have fewer user rights on the system could be less impacted than users who operate with administrative user rights.
For users using automatic updates, this update will automatically be applied once it is released. Users not using automatic updates should download, test and deploy this update as quickly as possible.
Download Links:

Microsoft Releases Update (Beta) to Fix and Improve Graphics, Media Foundation and Print in Windows Vista

 Microsoft has released a Platform Update Supplement Beta for Windows Vista. This update provides fixes and improvements to graphics, media foundation and print for Windows Vista platform.
Please note that its a beta release so use it at your own risk and create a System Restore point first before installing it.
This update improves the following issues in Windows Vista SP2:
Graphics:
This update improves text rendering performance of Direct2D and conformance of Direct2D when you use Direct2D in the following modes:
  • Software rendering mode.
  • Hardware rendering mode with a Windows Advanced Rasterization Platform (WARP) type device driver.
Media foundation:
This update enables the playback of MP4 files, H.264 files, and AAC files by using the Source Reader component. Because of this improvement, a Windows compatible browser can handle contents that include the video tag of HTML 5 correctly.
Print functionality:
This update fixes an issue in the XPS-to-GDI conversion (XGC) module when you apply the brush transform attribute of the visual brush. Before you install this update, the coordinates are drawn incorrectly if the following conditions are true:
  • The viewport rectangle of the visual brush is the clip region for a graphic element.
  • You apply the brush transform attribute.
In this situation, the wrong coordinates cause the output to be empty.
After you install this update, the clip region and the path of the visual brush match correctly. Therefore, the output is generated as expected.
Download Link
Download Link (64-bit)
NOTE: Before applying the above update, you'll need to install KB971512 update in your system:
Download KB971512 Update
Download KB971512 Update (64-bit)

Microsoft Releases Windows Intune Beta, Manage and Secure PCs using Cloud Services

Windows Intune simplifies how businesses manage and secure PCs using Windows cloud services and Windows 7—so your computers and users can operate at peak performance, from virtually anywhere. Windows Intune is a comprehensive solution that includes PC management, malware protection, Windows upgrades, and more.
Use the Windows Intune cloud service beta to:
  • Manage updates
  • Protect PCs from malware
  • Proactively monitor PCs
  • Provide remote assistance
  • Track hardware & software inventory
  • Set security policies
The Windows Intune client software is supported on both 32-bit and 64-bit versions of:
  • Windows 7 Enterprise, Ultimate and Professional
  • Windows Vista Enterprise, Ultimate, and Business
  • Windows XP Professional Service Pack (SP) 2 or SP 3 (recommended)
Download Link
FileTypesMan: Free Alternative to Windows Default File Type Option

FileTypesMan is an alternative to the "File Types" tab in "Folder Options" of Windows. It displays the list of all file extensions and types registered on your computer. FileTypesMan also allows you to easily edit the properties and flags of each file type, as well as it allows you to add, edit, and remove actions in a file type. FileTypesMan doesn't require any installation process or additional DLL files. In order to start using it, simply copy the executable file (FileTypesMan.exe) to any folder you like, and run it.
FileTypesMan.png
This utility works on any version of Windows from Windows 98 to Windows 7. For using this utility under Windows 98/ME, you must download the non-Unicode version. For using this utility under x64 system, you should download the x64 version.
In some Windows 98 machines, an exception with CDFVIEW.DLL is occurred when starting FileTypesMan. To avoid this problem, go to the Options menu, and choose the 'Don't Load Icons' option. After that, FileTypesMan should work properly, but without displaying the icons according to file types.
Download Link
Download Link (64-bit)
Download Link (Windows 98/Me)
Homepage

Default Programs Editor: Yet Another Free Alternative to Windows Default File Type Option

Recently we posted about "FileTypesMan" which is an alternative to the "File Types" tab in "Folder Options" of Windows. Today we are going to share another free tool which is a powerful file association utility for Windows.
"Default Programs Editor" is a context menu editor, an autoplay editor, and default programs association editor; essentially, the settings in the "Default Programs" Control Panel page. It's a replacement for the "File Types" dialog in Windows XP, and brings some key features of TweakUI to Windows Vista/7.
Default_Programs_Editor.png
Features List:
File Type Settings:
  • Add, Edit, and Delete context menu items
  • Edit file type information (such as icon and description)
  • Change an extension's associated file type
Autoplay Settings:
  • Add, Edit, and Delete autoplay handler programs
  • Change which autoplay options are available for any media type
  • Change the default autoplay handler
Default Programs Settings:
  • Add or Remove default associations (possible to check, but not un-check, in Windows)
Additional Features:
  • Disable the "Search web for unknown extension" dialog
  • Standalone utility, or install as a Control Panel applet
  • Make direct changes to the system registry, or export edits as .reg files
  • Designed for Vista and Windows 7 with UAC support
Its a portable app so you don't need to install it. Simply run the EXE file.
Download Link
Homepage
PS: If you are a Windows XP or Vista user, you'll need to install .NET Framework 3.5 to be able to use this app. Windows 7 users don't need to install it as its already included.
Thanks to our reader "André" for suggesting it...

#
### ###