Friends

This is default featured post 1 title

Go to Blogger edit html and find these sentences.Now replace these sentences with your own descriptions.This theme is Bloggerized by Lasantha Bandara - Premiumbloggertemplates.com.

This is default featured post 2 title

Go to Blogger edit html and find these sentences.Now replace these sentences with your own descriptions.This theme is Bloggerized by Lasantha Bandara - Premiumbloggertemplates.com.

This is default featured post 3 title

Go to Blogger edit html and find these sentences.Now replace these sentences with your own descriptions.This theme is Bloggerized by Lasantha Bandara - Premiumbloggertemplates.com.

This is default featured post 4 title

Go to Blogger edit html and find these sentences.Now replace these sentences with your own descriptions.This theme is Bloggerized by Lasantha Bandara - Premiumbloggertemplates.com.

This is default featured post 5 title

Go to Blogger edit html and find these sentences.Now replace these sentences with your own descriptions.This theme is Bloggerized by Lasantha Bandara - Premiumbloggertemplates.com.

Monday, June 20, 2011

Microsoft Releases Hotfix to Fix Poor Printing Performance in Windows 7 and Server 2008 R2


Problem Symptom:
On a computer that is running Windows 7 or Windows Server 2008 R2, the printing performance may be poor compared to the performance on a computer that is running Windows Vista or Windows Server 2008. Additionally, a computer that is running Windows 7 or Windows Server 2008 R2 consumes more CPU resources when you print a document.
For example, CPU usage remains at 100 percent for a long time in Task Manager when you print a document on a computer that is running Windows 7 or Windows Server 2008 R2.
Cause:
This issue occurs because of a performance regression in spooler behavior on single-processor systems that are running Windows 7 or Windows Server 2008 R2.
Solution:
A supported hotfix is available from Microsoft. However, this hotfix is intended to correct only the problem that is described in this article. Apply this hotfix only to systems that are experiencing the problem described in this article.
Download Hotfix

Download FREE CustoPack Tools to Customize Windows XP, Vista and 7

CustoPack Tools is a free software that allows you to easily customize Windows appearance through the installation of packs. It is compatible with Windows XP (32-bit), Windows Vista (32 or 64-bit), and Windows 7 (32 or 64-bit). You can customize your icons, your background, your visual style and many more, all that FOR FREE and in a few clicks thanks to a selection of CustoPacks themes. And if you have the soul of an artist, you can also create your own packs.

The software splits into 3 parts:
Choose a CustoPack: Designed for general public, this part allows you to install a CustoPack (among those you have downloaded and installed) in order to customize the appearance of your Windows.
Create a CustoPack: Designed for a public more informed, this part allows you to create your own CustoPack with elements which you made or selected.
Settings and configuration: This part allows you to set CustoPack Tools options and to configure some system options.
Download Link
Mirror

AeroTuner: Fine Tune Aero Theme Settings in Windows 7

AeroTuner is another excellent tool created by our friend "Happy Bulldozer aka hb860". It allows you to tweak various Aero theme options which can't be customized by default. With the help of this tool:
  • You can enable/disable transparency in windows.
  • You can customize color balance
  • You can customize after glow color balance
  • You can customize blur balance
  • You can customize Aero stripes

In other words, you can customize the whole Aero UI with this tool.
You can download it using following link:
Download Link

Improvement Program” Collecting Information in Windows 7

How to Disallow Secret “Customer ExperienceDid you know Windows 7 contains a hidden secret "Customer Experience Improvement Program" which collects information about your computer hardware and how you use Windows without interrupting you?

The program also periodically downloads a file to collect information about problems you might have with Windows.
In this way, the program helps Microsoft improve Windows.
You would get surprised when you'll know that this program even counts how many times you have clicked on start menu, how many programs you have pinned to Taskbar, etc.
Actually when you install Windows, it asks you to participate in Customer Experience Improvement Program.
If you allowed this program to collect information or don't know whether the program is collecting information or not, here is the way to know or disallow it to collect information:
1. Open Start menu and type Customer Experience Improvement Program in search box.
2. It'll show it in search results. Click on it to launch its Settings.
3. Now select "No, I don't want to participate in the program." option  and click on "Save Changes" button.
Customer_Experience_Improvement_Program_Settings.png
4. That's it. It'll stop collecting your information.
PS: We recommend you to allow this program to collect information as it doesn't harm you in any way and also helps Microsoft to improve Windows.
If you like this, you might also like other similar articles posted in following section: Troubleshooting, Windows 7.
Also check out the most popular articles of our website: Popular Articles.

Stay Away from Fake Microsoft Security Essentials (MSE) Software

Microsoft has warned people about a new trojan that is disguising itself as Microsoft’s no-cost antimalware program Microsoft Security Essentials. This imposter is known in the technical world of antimalware combat as "Win32/FakePAV". FakePAV is a rogue that displays messages that imitate Microsoft Security Essentials threat reports in order to entice the user into downloading and paying for a rogue security scanner. The rogue persistently terminates numerous processes such as Windows Registry Editor, Internet Explorer, Windows Restore and other utilities and applications.
This fake software is distributed by a tactic commonly described as a "drive-by download" and shows up as a hotfix.exe or as an mstsc.exe file. Additionally, after the fake Microsoft Security

Microsoft Releases Update for Windows 7 to Prevent Disk Corruption in Case of Hibernation or Crash


Problem Symptom:
Consider the following scenario:
  • You have a computer that is running Windows 7 or Windows Server 2008 R2.
  • You attach a hard disk drive that has more than 2 terabytes of disk space to the computer.
  • You configure the operating system to save dump files to a volume of the hard disk drive. Some data of the dump file is offset at a disk offset greater than the 2 terabyte address of the hard disk drive.
  • The operating system crashes, generates a Stop code error message, and saves memory data to a dump file.
In this scenario, one or more volumes of the hard disk drive may be corrupted. Additionally, all data on these volumes are lost.
This issue also occurs when the operating system enters into hibernation and generates a Hiberfile.sys file that is at a disk offset greater than the 2 terabyte disk offset of the hard disk drive.
If the corrupted volumes include the system partition, you cannot start the computer
Cause:
This issue occurs because of the crash dump disk driver (Diskdump.sys) cannot address more than 2 terabytes of disk space.
The Diskdump.sys driver can address up to 2 to the power of 32 sectors. If the sector size is 512 bytes, the driver can address up to 2 terabytes of disk space. If the actual offset is larger than this limitation, the driver incorrectly truncates the offset and saves data to a wrong location. Therefore, one or more volumes on the disk are corrupted.
Solution:
Download the update KB2249857 using following links:
Windows 7 (32-bit)
Windows 7 (64-bit)
Windows Server 2008 R2 (64-bit)
Windows Server 2008 R2 (IA-64)
Windows Embedded Standard 7 (32-bit)
Windows Embedded Standard 7 (64-bit)

DeskIntegrator: Portable Utility to Add Program Shortcuts in Windows Vista and 7 Desktop Context Menu


UPDATE: Version 1.03 released which comes with some bug fixes and enhancements.
We have blogged about a detailed tutorial in past which teaches you how to add your favorite program shortcuts in Desktop context menu in Windows Vista and 7:
How to Add Program Shortcuts and Other Useful Shortcuts with Icons in Windows 7 Desktop Context Menu?
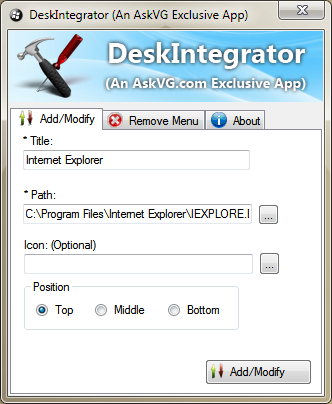
It requires some registry skills. One of our regular reader "Masroor Aijaz aka JX Great" has created an excellent tool called "DeskIntegrator" which allows you to add your favorite program shortcuts in Windows Vista and 7's Desktop context menu quickly and easily.
Its a portable utility so you don't need to install it. Simply download the ZIP file, extract it and run the EXE file.
Download Link

To add program shortcut in Desktop context menu:
Type desired program title in "Title" textbox which you want to show in Desktop context menu. Then either type the path of its EXE file or click on the browse button and select the program's exe file. You can also select a .ico file to show an icon for it but the icon will only show in Windows 7.
At last click on "Add/Modify" button and it'll immediately add the program shortcut in Desktop context menu.
To remove program shortcut in Desktop context menu:
Go to "Remove Menu" tab and select the program shortcut which you want to delete. At last click on "Remove" button.
Download Link
Its very simple and easy to use tool. Thanks to JX Great for creating it and sharing it with all of us. :)

How to Remove Watermark (Build Info) from Desktop in Windows Vista, 7 and Server 2008 (Both 32-bit and 64-bit) Including All Beta Builds and Service Packs


UPDATE: New tool "Remove Watermark" added. Thanks to stavros for mentioning it...
When we install a Beta or RC build of Windows Vista, 7 or Server 2008, or when we install a Beta or RC version of a Service Pack e.g. SP1, SP2, etc, a watermark is shown on Desktop which looks similar to following screenshot:

"Evaluation Copy", "For testing purpose only", "Test Mode", "Safe Mode" or similar text is shown in the watermark on Desktop.
It looks ugly when you use dark wallpapers and becomes irritating sometimes. If you also don't like this watermark and want to get rid of it, here are 2 great tools to remove this watermark:
  • Universal Watermark Remover
  • Remove Watermark
Universal Watermark Remover
"Universal Watermark Remover" is an excellent small and portable utility created by "Orbit30" which can remove the ugly watermark from Windows Vista, 7 and Server 2008 Desktop. It works for both 32 and 64-bit versions of Windows.

Download Link
Just download it using the above link, run the EXE file and follow the instructions. You'll need to restart your system to take affect.
Remove Watermark
"Remove Watermark" is another awesome portable tool created by "deepxw" which can remove watermark from Windows Vista, 7 and Server 2008 Desktop. It works for both 32-bit and 64-bit versions. Even it works for all languages and service packs.
Remove_Watermark.png
Download Link
Download the ZIP file, extract it and run the correct EXE file for your Windows version. It'll ask for confirmation, press Y to confirm and patch the system file to remove watermark.
64-bit version users will also need to rebuild MUI cache. After patching file, run the tool again and press R to rebuild MUI cache.
PS: You can also manually remove the watermark or customize watermark using following tutorial:
Show Your Desired Text on Desktop by Customizing Windows Build Number

How to Get “Shared Folder Icon” Back in Windows Explorer in Windows 7

Problem:
When you use Windows Explorer to view some shared folders on a computer that is running Windows 7 or Windows Server 2008 R2, the shared type icons for these folders do not appear. Actually shared folders are no longer displayed with a distinctive share overlay icon. All folders are presented with a generic folder icon. Therefore, the shared folders cannot be identified quickly when you view many folders at the same time.
Cause:
According to Microsoft, one of the goals for the Windows 7 release is to reduce large cognitive loads on users by simplifying the user interface. With the investment in sharing for the Windows 7 release, and especially with HomeGroup in the consumer space, we believe that a majority of users' content will be shared. The previous overlay model would have resulted in the sharing overlay appearing frequently in typical Explorer views, potentially distracting users with information that they might not use or need on a daily basis. A single sharing overlay can't provide details about how an item is shared (for example, who it's shared with, what privileges are assigned, etc.) and this results in a higher cognitive load for the end user. Prior to Windows 7, there were also scenarios in which the sharing overlay was shown inconsistently, which caused user confusion. As a result, based on the above, the sharing overlay was removed from the items view in Explorer.
The sharing state information that the overlay provides isn't gone but rather has been moved to the Details pane in Windows Explorer. This approach is an improvement over the overlay model, as it helps provide more relevant data related to sharing (for example, who the item is shared with). The Details pane is also where all other relevant properties for an item--such as ratings and author--are displayed, making the overall experience more consistent for end users by providing one location in which they can see all relevant state information for an item.
If you share a folder, then click the folder to select it, at the bottom of the screen in the Details pane, you'll see "State:" and "Shared" with the appropriate "people" icon. It also shows "Shared with" and lists the users/groups.
Solution:
Shared_Folder_Icon_Back_Win_7_Explorer.png
If you want to get the good old "Shared Folder" icon back in Windows 7, here comes our favorite "Classic Shell" to the rescue.
Classic Shell - Topic 1

Classic Shell - Topic 2
"Classic Shell" is an awesome free utility which provides almost all those good old features back in Windows 7 which have been removed by Microsoft for unknown or you can say weird reasons.
Simply download Classic Shell using following link:
Download Classic Shell
After installing it, click on the "Classic Explorer Settings" button present at last of the toolbar in Explorer. If you don't get the Classic toolbar in Explorer after installing the utility, press "ALT" key to show Menubar, right-click on it and select "Classic Explorer Bar" option.
Now enable "Add icon overlay for shared folders" option and Apply it.
Shared_Folder_Icon_Windows_7_Explorer.png
That's it. You'll need to restart or log off and now Windows 7 will start showing Shared folder icon in Explorer.

How to Always Show “More Details” in File Transfer (Cut, Copy, Delete) Dialog Box in Windows Vista and 7

Finally the wait is over! Almost all Windows Vista and 7 users wanted to achieve it. When you cut, copy or delete a file/folder in Windows Vista and 7, it shows a file transfer dialog box. There is a button "More Details" shown in the dialog box which expands the dialog box upon clicking and shows more details like file name, speed, etc.
Copy_Move_Progress_Dialog_Box_More_Details.png
The problem is that even if you click on "More Details" button, Windows forgets your choice and shows the default dialog box with "Fewer Details" activated, next time you perform a file transfer operation.
Copy_Move_Progress_Dialog_Box_Fewer_Details.png
So how to force Windows to always show "More Details" in file transfer dialog box?
Here comes our favorite "Classic Shell" again to the rescue!
Simply download Classic Shell using following link:
Download Classic Shell
After installing it, click on the "Classic Explorer Settings" button present at last of the toolbar in Explorer. If you don't get the Classic toolbar in Explorer after installing the utility, press "ALT" key to show Menubar, right-click on it and select "Classic Explorer Bar" option.
Now enable "Always show more details" option and Apply it.

That's it. Now whenever you perform a file transfer operation, the progress dialog box will be automatically expanded to show More Details.

AutoRun Disabler: Portable Utility to Disable Autorun Functionality in Windows

We have blogged about a detailed tutorial in past which teaches you how to disable Autorun functionality in Windows: How to Disable Autorun Functionality in Windows Using Registry Editor?
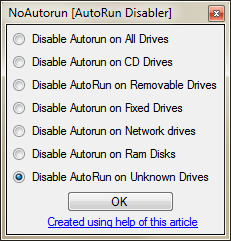
It requires some registry skills. Once again our regular reader "Masroor Aijaz aka JX Great" has created another excellent tool called "AutoRun Disabler" which allows you to disable Autorun functionality for different kind of drives like CD drive, removable drives, etc quickly and easily.

Its a portable utility so you don't need to install it. Simply download the ZIP file, extract it and run the EXE file. Select the desired option from the list and click on OK button to apply it.
Download Link
You'll need Microsoft .NET Framework 3.5 or higher to use this tool.

Windows 7 and Server 2008 R2 Service Pack 1 (SP1) RTM Coming in First Quarter of 2011

Microsoft has announced some important information about the general availability of SP1 for Windows 7 and Server 2008 R2. Windows_7_SP1.png
At Windows Team Blog, Rich Reynolds posted:
Last week, we announced the Windows 7 and Windows Server 2008 R2 Service Pack 1 (SP1) Release Candidate availability, with the final version available in first quarter of calendar year 2011. SP1 will include new virtualization features to Windows Server 2008 R2 (RemoteFX, Dynamic Memory) to provide a richer virtual desktop experience, while helping keeping TCO under control. And while Windows 7 customers will benefit from these enhancements, the Windows 7 SP1 will simply be a roll up of security updates. As we’ve said before, Windows 7 is ready now, so customers should not wait for SP1 to deploy!
So it means SP1 RTM will be available no later than March 2011.

Genuine Windows 7 Became Pirated? Make It Original and Activated Again

Its a common problem which lots of Windows 7 users face. We have received many emails about this problem, so today we are sharing a working solution for it. In fact many Windows 7 SP1 RC users are also facing this problem.
Problem Symptom:
You were using genuine Windows 7 without any problem. It was activated properly. But one day when you logged into Windows, you received following message:
Windows is not genuine
Your computer might not be running a counterfeit copy of Windows.

This_Copy_of_Windows_is_not_Genuine.png
Along with the above mentioned message, you also noticed that the desktop background became black and following error message was shown on the bottom right corner of the screen:
This copy of Windows is not genuine.
Also when you checked System Properties, you got following error message:
You must activate today. Activate Windows now.
Problem Cause:
Actually this problem occurs when there is a lack of permissions on a registry key "HKEY_USERS\S-1-5-20". By default, System, Network Service and Administrator accounts have "Full Control" and "Read" permissions on this registry key. But sometimes "Network Service" doesn't have proper permissions on this registry key and you face this problem. This may be the result of applying a Plug and Play Group Policy object (GPO). The Licensing service uses Plug and Play to obtain your system hardware ID information and binds the license to the computer. By default, it doesn't have proper permissions to access Plug and Play service.
Problem Solution:
There are 2 solutions actually. You can try them one by one:
METHOD 1: Using RSOP

1. Type rsop.msc in RUN or Startmenu search box and press Enter. It'll open RSOP (Resultant Set Of Policy) window.
2. Now go to:
Computer Configuration/Windows Settings/Security Settings/System Services
3. In right-side pane, check "Startup" type of "Plug and Play" service. It should be set to "Not Defined". If its not, double-click on it and set its Startup type to "Automatic".
Resultant_Set_Of_Policy.png
4. Now provide following command in RUN or Command Prompt:
gpupdate /force
5. That's it. Restart your system and your problem should be fixed.
METHOD 2: Using Registry Editor

1. Type regedit in RUN or Startmenu search box and press Enter. It'll open Registry Editor.
2. Now go to following key:
HKEY_USERS\S-1-5-20
3. Right-click on "S-1-5-20" key and select "Permissions...". It'll open a new window.
4. Select "NETWORK SERVICE" in user list and check "Allow" box given for "Full Control" permission. Click on OK button to apply the changes.
Permissions_S-1-5-20_Registry_Key.png
NOTE: If "NETWORK SERVICE" is not present in user list, click on "Add" button. Now type Network Service in "Enter the object names to select type" and click on "Check Names" button. It'll detect and confirm the username. Click on OK button.
5. That's it. Restart your system and your problem should be fixed.
If you like this, you might also like other similar articles posted in following section: Troubleshooting, Windows 7.
Also check out the most popular articles of our website: Popular Articles.
If you want a complete list of all AskVG articles, take a look at our archive.
And don't forget to check out our free and useful software in Downloads section.
You can also subscribe to our RSS feed or sign-up for our free newsletter to get AskVG articles directly in your Inbox.

How to Disable / Remove Annoying Shutdown Event Tracker (Shutdown Reason UI) in Windows Server 2003 / 2008?


UPDATE: Tutorial updated with registry method.
If you are using Windows Server 2003 or 2008, you might have noticed that whenever you click on Shutdown button, it shows a dialog box asking you the reason behind shutting down the system. You have to select an option from drop-down box or write into Comment box to be able to shutdown the system.

Many people find it very annoying and want to disable it but they don't know how to disable it.
Today in this tutorial, we'll tell you a simple way to completely remove this annoying dialog box:
METHOD 1: Using Group Policy Editor
1. Type gpedit.msc in RUN dialog box and press Enter.
2. It'll open Group Policy Editor. Now go to:
Computer Configuration -> Administrative Templates -> System
3. In right-side pane, look for "Display Shutdown Event Tracker" option.

4. Now double-click on "Display Shutdown Event Tracker" and select "Disabled". Apply it and the annoying dialog box will never appear again.
NOTE: You can also use this method to enable Shutdown Event Tracker in Windows client OS like Windows XP, Vista, 7, etc. Just set the option value to "Enabled".
METHOD 2: Using Registry Editor
If you face problems while using Group Policy Editor, you can also use Registry Editor to do the same task.
1. Type regedit in RUN dialog box and press Enter.
2. It'll open Registry Editor. Now go to:
HKEY_LOCAL_MACHINE\SOFTWARE\Policies\Microsoft\Windows NT
3. Under "Windows NT" key, look for a key "Reliability". If its not present, create it.
4. Now select "Reliability" key and in right-side pane, look for following 2 DWORD values:
ShutdownReasonOn
ShutdownReasonUI
If the DWORD values are not present, create them.
5. Now set values of both DWORD to 0

6. That's it. Now you'll not see the reason dialog box while shutting down the system.
Thanks to our readers "Config" and "Dragonsbane777" for sharing registry method.
NOTE: You can also use this method to enable Shutdown Event Tracker in Windows client OS like Windows XP, Vista, 7, etc. Just set the values of both DWORD to 1 using Step 5.

Direct Download Link] Official Links to Download Windows XP Mode and Windows Virtual PC for Windows 7

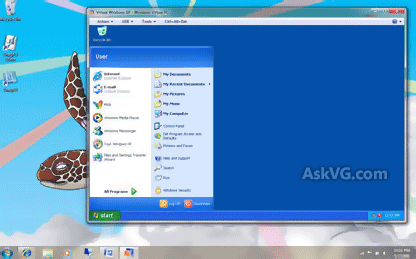
Windows XP Mode and Windows Virtual PC, available on Windows 7 Professional, Enterprise and Ultimate, allow you to run multiple Windows environments, such as Windows XP Mode, from your Windows 7 desktop. Windows XP Mode for Windows 7 makes it easy to install and run many Windows XP productivity applications directly from your Windows 7-based PC. It utilizes virtualization technology, such as Windows Virtual PC, to provide a virtual Windows XP environment for Windows 7.
Windows_7_XP_Mode.png
One interesting thing to note is that if your system doesn't have HAV technology and you try to run XP Mode or Virtual PC, you get an error message similar to following:
Unable to start Windows Virtual PC because hardware-assisted virtualization is disabled.
To solve this issue, Microsoft released a patch KB977206 for Windows 7 systems which removes this prerequisite and the system becomes able to run Windows XP Mode and Virtual PC.
You can download all 3 components: Windows Virtual PC, Windows XP Mode and the patch KB977206 using following link:
Download Link
But if you want direct download links to download standalone offline installers for all 3 components, here we are putting all of them together for your convenience:
Windows Virtual PC Direct Download Links
Windows XP Mode Direct Download Links
Patch KB977206 Direct Download Links

Windows Media Player 12: Bug or Feature?

Something interesting found in Windows Media Player 12: 1. Play a music file in WMP 12. It may be single file or group of files and you can play any format.
2. Now either move the Seek slider (progress bar) or click on "Next" button.
3. As soon as you move the slider or click on Next button, immediately click anywhere inside WMP window and hold it. Now you'll start enjoying the bug.
The songs starts playing in Fast-forward mode.
WMP12_Fast_Forward_Bug.png
Now let us know your opinion about it. Is it a bug or is it supposed to be a feature?
IMO its a bug. Actually when you click and hold the "Next" button, its supposed to fast-forward the music track but in the above mentioned steps, we are not holding the Next button.

How to Show Large Icons in Quick Launch Toolbar in Windows Taskbar?

That's one of the frequently asked questions on this website. Many people who download "SevenVG RTM" theme, always ask how to show large icons in Quick launch toolbar to mimic Windows 7's Superbar. Actually its a very simple task which requires a few easy steps but most of the people are not aware of it.
So today in this tutorial, we'll tell you how to show large icons in Quick launch toolbar in Windows Taskbar. This trick works in all Windows versions including XP, Vista and 7.
1. First of all enable Quick Launch toolbar by right-clicking on Taskbar and selecting "Toolbars -> Quick Launch".
Windows 7 users can take a look at following tutorial to enable it:
How to Get the Good Old “Quick Launch” Toolbar Back in Windows 7?
Small_Quick_Launch_Toolbar_Icons.png
It'll start showing Quick Launch toolbar in Taskbar with small icons by default.
2. Now unlock Taskbar by right-clicking on Taskbar and unchecking "Lock the Taskbar" option.
3. Right-click on Quick launch toolbar drag handle (dotted lines at the beginning of toolbar) and select "View -> Large Icons" option.
Set_Largel_Quick_Launch_Toolbar_Icons.png
4. That's it. It'll make the icons large in the toolbar.
Largel_Quick_Launch_Toolbar_Icons.png

[Manual Method] Get “Classic Start Menu” Back in Windows 7 Without Using 3rd Party Software

We all know that Microsoft has removed good old Classic Start menu from Windows 7. There are lots of free utilities mentioned here which can bring it back. We have also posted a tutorial in past which can be used to get a similar XP styled start menu in Windows Vista and 7:
Get Windows XP Styled Classic All Programs List in Windows Vista and 7
Today we are going to share another interesting method to bring back Classic start menu in Windows 7 and the best part is that it doesn't require any 3rd party utility.
This manual method takes advantage of our Get Quick Launch toolbar back in Windows 7 tutorial.
So without wasting any time, here we start our tutorial:
1. Right-click on Taskbar and select "Toolbars -> New toolbar...".
Creating_new_toolbar.png
2. It'll open Browse dialog box. Now paste following string in the "Folder:" text box:
%ProgramData%\Microsoft\Windows\Start Menu\Programs
Press Enter and click on "Select folder" button.
3. It'll immediately add Programs toolbar to Taskbar.
All_Programs_Toolbar_Windows_7_Taskbar.png
4. It'll add it near the system tray. Right-click on Taskbar and uncheck "Lock the taskbar" option.
Unlocking_taskbar.png
5. You'll see a placeholder to drag the toolbar. Click and hold the drag-handle and drop it just after the Start ORB (Start button).
6. It'll move the Programs toolbar near start ORB (Start button) but you'll notice that the children folders under "Programs" toolbar will become visible and will start taking lots of space of Taskbar. No need to worry! Double-click on drag-handle of Taskbar button toolbar (where you see currently running applications icons). It'll automatically move the Taskbar button toolbar and you'll see only "Programs" text in the newly added toolbar which you wanted actually.
All_Programs_Toolbar_Windows_7_Taskbar2.png
7. As you can see in above screenshot, it looks very close to Classic start menu and we are not using any 3rd party software in this method.
Thanks to our reader "Juan C Walls" for this trick...

Setup from USB: Yet Another Utility to Create Bootable USB Drive to Install Windows Vista and 7

We have covered several free utilities in past like A Bootable USB, WinToFlash and Microsoft's official USB Download Tool which allow you to create bootable USB drive to install Windows. Today we are sharing another freeware which helps you in creating bootable USB drive for Windows Vista and 7.
"Setup from USB" is a free tool created by AskVG reader "Ashish Sharma" to convert your USB flash drive into Windows Vista or Windows 7 bootable setup disk. You can make your USB drive as bootable and setup Windows Vista or Windows 7 on any computer that supports booting from USB.
Its a very easy to use tool. You just need to select the USB drive, mention Windows Vista or 7's source files location and you are ready to create bootable USB drive.
Setup_from_USB.png
You can download it using following link:
Download Link

Microsoft Releases Fix for Random Incorrect Icon Change Problem in Windows XP, Vista and 7

Microsoft has confirmed an issue in Windows XP, Vista and 7 which causes random incorrect icon change problem due to icon cache not updating correctly.
Problem Symptom:
Some icons in the following locations are randomly changed to other icons on a computer that is running Windows XP, Windows Vista, or Windows 7:
  • My Computer
  • Windows Explorer
  • Desktop
  • Quick Launch bar
Problem Cause:
This issue occurs because the icon cache is not updated correctly.
Solution:
To fix this problem, follow these steps:
1. Close all open windows if a Close Open Programs Interaction dialog box is displayed.
2. Verify the Max Cached Icons string value that locates in the following registry subkey equals to 2000:
HKEY_LOCAL_MACHINE\Software\Microsoft\Windows\CurrentVersion\Explorer
3. Delete IconCache.db that locates in the following path:
Windows XP
%userprofile%\Local Settings\Application Data
Windows Vista or Windows 7
%userprofile%\AppData\Local
PS: You can download the "Diagnose and repair Windows File and Folder Problems automatically" troubleshooter to automatically fix the problem. To run this troubleshooter, click the Run now button at following link:
Download Fix

List of Environment Variables in Windows XP, Vista and 7

Environment variables work like placeholder or alias for drives, file/folder names and various paths. We here at AskVG frequently use environment variables reference in our tutorials like %windir%\Resources, %programfiles%\Internet Explorer, etc. Many people don't know about them and get confused how to access the mentioned path.
So today we are going to list some important and frequently used system-defined environment variables in this article which will help you in better understanding them.
Most of these environment variables are same for Windows XP and Windows Vista/7 but some are different. So we are listing them separately for XP and Vista/7.
Windows XP Environment Variables
Environment Variable Path
%ALLUSERSPROFILE% C:\Documents and Settings\All Users
%APPDATA% C:\Documents and Settings\{username}\Application Data
%COMMONPROGRAMFILES% C:\Program Files\Common Files
%COMMONPROGRAMFILES(x86)% C:\Program Files (x86)\Common Files
%COMSPEC% C:\Windows\System32\cmd.exe
%HOMEDRIVE% C:
%HOMEPATH% C:\Documents and Settings\{username}
%PROGRAMFILES% C:\Program Files
%PROGRAMFILES(X86)% C:\Program Files (x86) (only in 64-bit version)
%SystemDrive% C:
%SystemRoot% C:\Windows
%TEMP% and %TMP% C:\Documents and Settings\{username}\Local Settings\Temp
%USERPROFILE% C:\Documents and Settings\{username}
%WINDIR% C:\Windows
Windows Vista and 7 Environment Variables
Environment Variable Path
%ALLUSERSPROFILE% C:\ProgramData
%APPDATA% C:\Users\{username}\AppData\Roaming
%COMMONPROGRAMFILES% C:\Program Files\Common Files
%COMMONPROGRAMFILES(x86)% C:\Program Files (x86)\Common Files
%COMSPEC% C:\Windows\System32\cmd.exe
%HOMEDRIVE% C:
%HOMEPATH% C:\Users\{username}
%LOCALAPPDATA% C:\Users\{username}\AppData\Local
%PROGRAMDATA% C:\ProgramData
%PROGRAMFILES% C:\Program Files
%PROGRAMFILES(X86)% C:\Program Files (x86) (only in 64-bit version)
%PUBLIC% C:\Users\Public
%SystemDrive% C:
%SystemRoot% C:\Windows
%TEMP% and %TMP% C:\Users\{username}\AppData\Local\Temp
%USERPROFILE% C:\Users\{username}
%WINDIR% C:\Windows
NOTE: Here C: is the system drive where Windows is installed in your system. It might differ for you if you installed Windows in a different drive in your system.

A Look at History of Microsoft Windows

Microsoft has put a new article on Windows online website covering the whole history of Windows operating system:
1975–1981: Microsoft boots up
It’s the 1970s. At work, we rely on typewriters. If we need to copy a document, we likely use a mimeograph or carbon paper. Few have heard of microcomputers, but two young computer enthusiasts, Bill Gates and Paul Allen, see that personal computing is a path to the future.
In 1975, Gates and Allen form a partnership called Microsoft. Like most start-ups, Microsoft begins small, but has a huge vision—a computer on every desktop and in every home. During the next years, Microsoft begins to change the ways we work.
The dawn of MS‑DOS
In June 1980, Gates and Allen hire Gates’ former Harvard classmate Steve Ballmer to help run the company. The next month, IBM approaches Microsoft about a project code-named "Chess." In response, Microsoft focuses on a new operating system—the software that manages, or runs, the computer hardware and also serves to bridge the gap between the computer hardware and programs, such as a word processor. It’s the foundation on which computer programs can run. They name their new operating system "MS‑DOS."
When the IBM PC running MS‑DOS ships in 1981, it introduces a whole new language to the general public. Typing “C:” and various cryptic commands gradually becomes part of daily work. People discover the backslash (\) key.
Geek trivia: MS‑DOS stands for Microsoft Disk Operating System.
1982–1985: Introducing Windows 1.0
Microsoft works on the first version of a new operating system. Interface Manager is the code name and is considered as the final name, but Windows prevails because it best describes the boxes or computing “windows” that are fundamental to the new system. Windows is announced in 1983, but it takes a while to develop. Skeptics call it “vaporware.”
On November 20, 1985, two years after the initial announcement, Windows ships Windows 1.0. Now, rather than typing MS‑DOS commands, you just move a mouse to point and click your way through screens, or “windows.” Bill Gates says, “It is unique software designed for the serious PC user…”
There are drop-down menus, scroll bars, icons, and dialog boxes that make programs easier to learn and use. You're able to switch among several programs without having to quit and restart each one. Windows 1.0 ships with several programs, including MS‑DOS file management, Paint, Windows Writer, Notepad, Calculator, and a calendar, card file, and clock to help you manage day-to-day activities. There’s even a game—Reversi.
Geek trivia: Remember floppy disks and kilobytes? Windows 1.0 requires a minimum of 256 kilobytes (KB), two double-sided floppy disk drives, and a graphics adapter card. A hard disk and 512 KB memory is recommended for running multiple programs or when using DOS 3.0 or higher.
1987–1992: Windows 2.0–2.11—More windows, more speed
On December 9, 1987 Microsoft releases Windows 2.0 with desktop icons and expanded memory. With improved graphics support, you can now overlap windows, control the screen layout, and use keyboard shortcuts to speed up your work. Some software developers write their first Windows–based programs for this release.
Windows 2.0 is designed for the Intel 286 processor. When the Intel 386 processor is released, Windows/386 soon follows to take advantage of its extended memory capabilities. Subsequent Windows releases continue to improve the speed, reliability, and usability of the PC.
In 1988, Microsoft becomes the world’s largest PC software company based on sales. Computers are starting to become a part of daily life for some office workers.
Geek trivia: Control Panel makes its first appearance in Windows 2.0.
1990–1994: Windows 3.0–Windows NT—Getting the graphics
On May 22, 1990, Microsoft announces Windows 3.0, followed shortly by Windows 3.1 in 1992, Taken together, they sell 10 million copies in their first 2 years, making this the most widely used Windows operating system yet. The scale of this success causes Microsoft to revise earlier plans. Virtual Memory improves visual graphics. In 1990 Windows starts to look like the versions to come.
Windows now has significantly better performance, advanced graphics with 16 colors, and improved icons. A new wave of 386 PCs helps drive the popularity of Windows 3.0. With full support for the Intel 386 processor, programs run noticeably faster. Program Manager, File Manager, and Print Manager arrive in Windows 3.0.
Windows software is installed with floppy discs bought in large boxes with heavy instruction manuals.
The popularity of Windows 3.0 grows with the release of a new Windows software development kit (SDK), which helps software developers focus more on writing programs and less on writing device drivers.
Windows is increasingly used at work and home and now includes games like Solitaire, Hearts, and Minesweeper. An advertisement: “Now you can use the incredible power of Windows 3.0 to goof off.”
Windows for Workgroups 3.11 adds peer-to-peer workgroup and domain networking support and, for the first time, PCs become an integral part of the emerging client/server computing evolution.
Windows NT
When Windows NT releases on July 27, 1993, Microsoft meets an important milestone: the completion of a project begun in the late 1980s to build an advanced new operating system from scratch. "Windows NT represents nothing less than a fundamental change in the way that companies can address their business computing requirements," Bill Gates says at its release.
Unlike Windows 3.1, however, Windows NT 3.1 is a 32-bit operating system, which makes it a strategic business platform that supports high-end engineering and scientific programs.
Geek trivia: The group that develops Windows NT was originally called the "Portable Systems" team.
1995–2001: Windows 95—the PC comes of age (and don't forget the Internet)
On August 24, 1995, Microsoft releases Windows 95, selling a record-setting 7 million copies in the first five weeks. It’s the most publicized launch Microsoft has ever taken on. Television commercials feature the Rolling Stones singing "Start Me Up" over images of the new Start button. The press release simply begins: “It’s here.”
This is the era of fax/modems, e‑mail, the new online world, and dazzling multimedia games and educational software. Windows 95 has built-in Internet support, dial-up networking, and new Plug and Play capabilities that make it easy to install hardware and software. The 32-bit operating system also offers enhanced multimedia capabilities, more powerful features for mobile computing, and integrated networking.
At the time of the Windows 95 release, the previous Windows and MS‑DOS operating systems are running on about 80 percent of the world’s PCs. Windows 95 is the upgrade to these operating systems. To run Windows 95, you need a PC with a 386DX or higher processor (486 recommended) and at least 4 MB of RAM (8 MB of RAM recommended). Upgrade versions are available for both floppy disk and CD-ROM formats. It’s available in 12 languages.
Windows 95 features the first appearance of the Start menu, taskbar, and minimize, maximize, and close buttons on each window.
Catching the Internet wave
In the early 1990s, tech insiders are talking about the Internet—a network of networks that has the power to connect computers all over the world. In 1995, Bill Gates delivers a memo titled “The Internet Tidal Wave,” and declares the Internet as “the most important development since the advent of the PC.”
In the summer of 1995, the first version of Internet Explorer is released. The browser joins those already vying for space on the World Wide Web.
Geek trivia: In 1996, Microsoft releases Flight Simulator for Windows 95—the first time in its 14-year history that it’s available for Windows.
1998–2000: Windows 98, Windows 2000, Windows Me
Windows 98
Released on June 25, 1998, Windows 98 is the first version of Windows designed specifically for consumers. PCs are common at work and home, and Internet cafes where you can get online are popping up. Windows 98 is described as an operating system that “Works Better, Plays Better.”
With Windows 98, you can find information more easily on your PC as well as the Internet. Other improvements include the ability to open and close programs more quickly, and support for reading DVD discs and universal serial bus (USB) devices. Another first appearance is the Quick Launch bar, which lets you run programs without having to browse the Start menu or look for them on the desktop.
Geek trivia: Windows 98 is the last version based on MS‑DOS.
Windows Me
Designed for home computer use, Windows Me offers numerous music, video, and home networking enhancements and reliability improvements compared to previous versions.
First appearances: System Restore, a feature that can roll back your PC software configuration to a date or time before a problem occurred. Windows Movie Maker provides users with the tools to digitally edit, save, and share home videos. And with Microsoft Windows Media Player 7 technologies, you can find, organize, and play digital media.
Geek trivia: Technically speaking, Windows Me was the last Microsoft operating system to be based on the Windows 95 code base. Microsoft announced that all future operating system products would be based on the Windows NT and Windows 2000 kernel.
Windows 2000 Professional
More than just the upgrade to Windows NT Workstation 4.0, Windows 2000 Professional is designed to replace Windows 95, Windows 98, and Windows NT Workstation 4.0 on all business desktops and laptops. Built on top of the proven Windows NT Workstation 4.0 code base, Windows 2000 adds major improvements in reliability, ease of use, Internet compatibility, and support for mobile computing.
Among other improvements, Windows 2000 Professional simplifies hardware installation by adding support for a wide variety of new Plug and Play hardware, including advanced networking and wireless products, USB devices, IEEE 1394 devices, and infrared devices.
Geek trivia: The nightly stress test performed on Windows 2000 during development is the equivalent of three months of run time on up to 1,500 computers.
2001–2005: Windows XP—Stable, usable, and fast
On October 25, 2001, Windows XP is released with a redesigned look and feel that's centered on usability and a unified Help and Support services center. From the mid-1970s until the release of Windows XP, about 1 billion PCs have been shipped worldwide.
For Microsoft, Windows XP will become one of its best-selling products in the coming years. It’s both fast and stable. Navigating the Start menu, taskbar, and Control Panel are more intuitive. Awareness of computer viruses and hackers increases, but fears are to a certain extent calmed by the online delivery of security updates. Consumers begin to understand warnings about suspicious attachments and viruses. There’s more emphasis on Help and Support.
Windows XP Home Edition offers a clean, simplified visual design that makes frequently used features more accessible. Designed for home use, Windows XP offers such enhancements as the Network Setup Wizard, Windows Media Player, Windows Movie Maker, and enhanced digital photo capabilities.
Windows XP Professional brings the solid foundation of Windows 2000 to the PC desktop, enhancing reliability, security, and performance. With a fresh visual design, Windows XP Professional includes features for business and advanced home computing, including remote desktop support, an encrypting file system, and system restore and advanced networking features. Key enhancements for mobile users include wireless 802.1x networking support, Windows Messenger, and Remote Assistance.
Windows XP has several editions during these years:
Windows XP 64-bit Edition (2001) is the first Microsoft operating system for 64-bit processors designed for working with large amounts of memory and projects such as movie special effects, 3D animations, engineering, and scientific programs.
Windows XP Media Center Edition (2002) is made for home computing and entertainment. You can browse the Internet, watch live television, enjoy digital music and video collections, and watch DVDs.
Windows XP Tablet PC Edition (2002) realizes the vision of pen-based computing. Tablet PCs include a digital pen for handwriting recognition and you can use the mouse or keyboard, too.
Geek trivia: Windows XP is compiled from 45 million lines of code.
2006–2008: Windows Vista—Smart on security
Windows Vista is released in 2006 with the strongest security system yet. User Account Control helps prevent potentially harmful software from making changes to your computer. In Windows Vista Ultimate, BitLocker Drive Encryption provides better data protection for your computer, as laptop sales and security needs increase. Windows Vista also features enhancements to Windows Media Player as more and more people come to see their PCs as central locations for digital media. Here you can watch television, view and send photographs, and edit videos.
Design plays a big role in Windows Vista, and features such as the taskbar and the borders around windows get a brand new look. Search gets new emphasis and helps people find files on their PCs faster. Windows Vista introduces new editions that each have a different mix of features. The redesigned Start button makes its first appearance in Windows Vista.
Geek trivia: More than 1.5 million devices are compatible with Windows Vista at launch.
2009–Today: Windows 7 and counting...
By the late 2000s, the wireless world has arrived. When Windows 7 is released in October 2009, laptops are outselling desktop PCs and it’s common to get online at public wireless hotspots like coffee shops. Wireless networks can be created at the office or at home.
Windows 7 includes many features, such as new ways to work with windows—Snap, Peek, and Shake. Windows Touch makes its debut, enabling you to use your fingers to browse the web, flip through photos, and open files and folders. You can stream music, videos, and photos from your PC to a stereo or TV.
By the fall of 2010, Windows 7 is selling seven copies a second—the fastest-selling operating system in history.
Geek trivia: Windows 7 is evaluated by 8 million beta testers worldwide before it's released.
What's next?
Many laptops no longer have a slot for DVDs and some have solid state drives rather than conventional hard disks. Most everything is streamed, saved on flash drives, or saved in the "Cloud"—an online space for sharing files and storage. Windows Live—free programs and services for photos, movies, instant messaging, e‑mail, and social networking—is seamlessly integrated with Windows so that you can keep in touch from your PC, phone, or the web, extending Windows to the Cloud.
Meanwhile, work is underway for the next version of Windows.
Excellent read! :)

Microsoft Releases System Update Readiness Tool for Windows Vista, Windows 7 and Server 2008

Microsoft has released the System Update Readiness Tool to resolve certain conditions that could cause installing updates, service packs and other software not to work. This tool checks your computer for such inconsistencies and tries to resolve issues if found.
After you download the System Update Readiness Tool, it runs a onetime scan for inconsistencies that might prevent future servicing operations. This scan typically takes less than 15 minutes to run. However, the tool might take significantly longer on some computers. The Windows Update progress bar is not updated during the scan, and progress seems to stop at 60% complete for some time. This behavior is expected. The scan is still running and you should not cancel the update.
You do not have to manually run this tool. This tool is offered automatically through Windows Update to computers that have a condition that the tool could resolve.
You can also manually download the System Update Readiness Tool using following links:
Windows Vista (32-bit or x86)
Windows Vista (64-bit or x64)
Windows Server 2008 (32-bit or x86)
Windows Server 2008 (64-bit or x64)
Windows Server 2008 (IA-64)
Windows 7 (32-bit or x86)
Windows 7 (64-bit or x64)
Windows Server 2008 R2 (64-bit or x64)
Windows Server 2008 R2 (IA-64)

How to Always Show “User Home Folder”, “Control Panel” and “Recycle Bin” Items in Windows Explorer’s Navigation Pane in Windows 7

Windows 7 comes with an advanced and re-designed Windows Explorer. Although it is easy to use but its not very customizable. You can't customize command bar, you can't remove items from navigation pane. Although these things are possible by using registry tricks and 3rd party apps which we have mentioned in past.
One similar issue is that "User Home" folder, "Control Panel" and "Recycle Bin" items are only visible in navigation pane when you select "Show all folders" option. These items are not shown in normal view.
Today in this tutorial, we'll tell you how to show these 3 items always in navigation pane as shown in following screenshot:
User_Home_Control_Panel_Recycle_Bin_Explorer_Navigation_Pane_Windows_7.png
1. Type regedit in RUN or Start menu search box and press Enter. it'll open Registry Editor.
2. Now go to following keys one by one:
To add Control Panel:
HKEY_CLASSES_ROOT\CLSID\{26EE0668-A00A-44D7-9371-BEB064C98683}\ShellFolder
To add User Home Folder:
HKEY_CLASSES_ROOT\CLSID\{59031a47-3f72-44a7-89c5-5595fe6b30ee}\ShellFolder
To add Recycle Bin:
HKEY_CLASSES_ROOT\CLSID\{645FF040-5081-101B-9F08-00AA002F954E}\ShellFolder
3. Now you'll need to create a new String value PinToNameSpaceTree in right-side pane but Windows will not allow you to create it as you won't have proper permissions.
To get permissions, first right-click on "ShellFolder" key and select "Permissions".
Change_Permissions_for_ShellFolder_.png
It'll open a new window. Select "Administrators" in user list and check "Allow" box given for "Full Control" permission.
Permissions_for_ShellFolder_Key_Cha.png
Click on OK button to apply the changes.
4. Now create a new String value "PinToNameSpaceTree" in right-side pane. Leave its value as blank.
5. That's it. Log off or restart your system and you'll get the desired item visible in Windows Explorer's navigation pane.

How to Customize Windows Explorer Command Bar (aka Folder Band or Toolbar) in Windows Vista and 7 – Add Cut, Copy, Paste, Delete, Rename, Undo and Many Other Useful Buttons


NOTE: This tutorial has been featured by Microsoft. AskVG.com was the first website posting this unique trick.
NOTE: After following this tutorial, you'll be able to add Cut, Copy, Paste, Delete, Rename, Select all, Undo, Redo, Properties, Menu bar, Details pane, Preview pane, Navigation pane and Close buttons in Windows Explorer's Command bar aka Folder band or Toolbar in Windows Vista and 7.
PS: If you find the instructions given in this tutorial a bit hard to follow, you can use the ready-made registry script given here.
Windows Vista and 7 come with a new re-designed Explorer which is pretty much different from Windows XP Explorer. Windows XP Explorer comes with Standard toolbar which allows us to easily add/remove buttons. On the other hand, Windows Vista and 7 Explorer come with re-designed Command bar which is not customizable. You can't add/remove buttons from it.
Default_Command_Bar_Windows_Vista_7_Explorer.png
Although Microsoft doesn't provide any option to customize the Command bar in Windows Explorer, you can use a Registry trick to add/remove buttons from it.
In this tutorial, we'll tell you how to add/remove buttons from Windows Explorer's Command bar in Windows Vista and 7 using Windows Registry.
STEP 1. Type regedit in RUN or Start menu search box and press Enter. It'll open Registry Editor.
STEP 2. Now go to following key:
HKEY_LOCAL_MACHINE\SOFTWARE\Microsoft\Windows\CurrentVersion\Explorer\FolderTypes\{5c4f28b5-f869-4e84-8e60-f11db97c5cc7}
We'll use the above mentioned key to add our desired buttons in Command bar.
PS: Before we go further, some IMPORTANT things to KNOW:
a. Windows uses the "FolderTypes" registry key mentioned in Step 2 to show Command bar buttons in each and every folder in Windows Explorer. That's why you see different buttons in command bar for different types of folders.
b. Windows changes these buttons dynamically based upon the user-defined event. For example, it shows different button when you open a folder but dynamically changes those buttons if you select an item in that folder.
c. These dynamic button changes occur based upon 2 Registry keys: TasksItemsSelected and TasksNoItemsSelected.
d. When you open a folder, the button set is shown as defined in TasksNoItemsSelected key and when you select an item, the button set is shown as defined in TasksItemsSelected key.
e. In this tutorial, we'll use the above mentioned 2 registry keys to add our desired buttons in Command bar.
Lets come back to our tutorial!
STEP 3. Under {5c4f28b5-f869-4e84-8e60-f11db97c5cc7} key, create following 2 keys:
TasksItemsSelected
TasksNoItemsSelected
TaskItemsSelected_Registry_Key.png
NOTE: If you get an error message that you don't have permission to write to registry, it means you'll need to take permission on the key. You can use following simple steps to take permission:
  • Right-click on the "{5c4f28b5-f869-4e84-8e60-f11db97c5cc7}" key and select "Permissions...".
  • It'll open a dialog box, Click on "Advanced" button.
  • It'll open another dialog box, Go to "Owner" tab.
  • Select your Username from the list and click on "Apply" button and then OK.
  • Again click on OK button in the first dialog box.
  • Now again right-click on the same key and select "Permissions...".
  • Select your Username in the list and check the "Allow" option for "Full Control".
  • Click on Apply button and then OK.
Now you'll be able to create new keys.
STEP 4: Now last thing to do! You'll need to set value of "(Default)" present in right-side pane to tell Windows which buttons should be shown in Explorer.
As we discussed earlier, we'll use "TasksItemsSelected" key to show buttons when an item is selected in Explorer and "TasksNoItemsSelected" key when no item is selected i.e. we open a folder.
To set the value of "(Default)", we'll use built-in Windows commands which are stored in "CommandStore" in Registry. If you can remember, we used the same key in our Cascading context menu tutorial.
In Registry editor, go to following key to get a list of all built-in commands which can be used to show buttons in Command bar:
HKEY_LOCAL_MACHINE\SOFTWARE\Microsoft\Windows\CurrentVersion\Explorer\CommandStore\shell
CommandStore_Shell_Registry_Key.png
There are many Windows built-in commands listed in above mentioned key like Windows.cut, etc. Following are some useful and interesting commands which you can use in Step 5:
Windows.selectall
Windows.Cut
Windows.Copy
Windows.Delete
Windows.rename
Windows.properties
Windows.Paste
Windows.undo
Windows.redo
Windows.menubar
Windows.previewpane
Windows.readingpane
Windows.navpane
Windows.folderoptions
Windows.layout
Windows.closewindow
All the above mentioned commands do what their names suggest.
STEP 5. You just need to select the new keys created in Step 3 one by one and set value of "(Default)" in right-side pane to any of above mentioned built-in Windows commands.
If you want to add more than one commands, you can separate them using semi-colon (;).
a. Go to following key to add commands when you open a folder and don't select any item:
HKEY_LOCAL_MACHINE\SOFTWARE\Microsoft\Windows\CurrentVersion\Explorer\FolderTypes\{5c4f28b5-f869-4e84-8e60-f11db97c5cc7}\TasksNoItemsSelected
In right-side pane, set value of (Default) to:
Windows.selectall; Windows.Paste; Windows.undo; Windows.redo; Windows.menubar; Windows.previewpane; Windows.readingpane; Windows.navpane; Windows.closewindow
PS: Above are our favorite commands, you can add or remove the desired command according to your requirements.
It'll add "Select all, Paste, Undo, Redo, Menu bar, Details pane, Preview pane, Navigation pane and Close" buttons to Windows Explorer's Command bar. All these new buttons will be visible when you open a folder and don't select any item.
New_Command_Bar_Buttons_Windows_Explorer3.png
b. Now go to following key to add commands when you select an item in a folder:
HKEY_LOCAL_MACHINE\SOFTWARE\Microsoft\Windows\CurrentVersion\Explorer\FolderTypes\{5c4f28b5-f869-4e84-8e60-f11db97c5cc7}\TasksItemsSelected
In right-side pane, set value of (Default) to:
Windows.Cut; Windows.Copy; Windows.Delete; Windows.rename; Windows.properties; Windows.closewindow
PS: Above are our favorite commands, you can add or remove the desired command according to your requirements.
It'll add "Cut, Copy, Delete, Rename, Properties and Close" buttons to Windows Explorer's Command bar. All these new buttons will become visible when you select an item in a folder.
New_Command_Bar_Buttons_Windows_Explorer2.png
That's it. You can add/remove built-in commands from the value of (Default) key to add/remove buttons from Command bar in Windows Explorer.
PS: You might notice that "New folder" button is always displayed at the end of Command bar. If you want to show it before your custom buttons, simply go to "Windows.newfolder" key under "HKEY_LOCAL_MACHINE\...\CommandStore\shell" key mentioned in Step 4 and delete "Position" string from right-side pane. You'll need to take permission on the key before deleting the string value.
NOTE: The above mentioned method will add the new buttons for normal folders in Explorer. If you want to add the buttons in Library folders as well, you'll need to repeat the same method in following keys:
Main Library folder:
HKEY_LOCAL_MACHINE\SOFTWARE\Microsoft\Windows\CurrentVersion\Explorer\FolderTypes\{5f4eab9a-6833-4f61-899d-31cf46979d49}
Documents Library:
HKEY_LOCAL_MACHINE\SOFTWARE\Microsoft\Windows\CurrentVersion\Explorer\FolderTypes\{fbb3477e-c9e4-4b3b-a2ba-d3f5d3cd46f9}
Music Library:
HKEY_LOCAL_MACHINE\SOFTWARE\Microsoft\Windows\CurrentVersion\Explorer\FolderTypes\{3f2a72a7-99fa-4ddb-a5a8-c604edf61d6b}
Pictures Library:
HKEY_LOCAL_MACHINE\SOFTWARE\Microsoft\Windows\CurrentVersion\Explorer\FolderTypes\{0b2baaeb-0042-4dca-aa4d-3ee8648d03e5}
Videos Library:
HKEY_LOCAL_MACHINE\SOFTWARE\Microsoft\Windows\CurrentVersion\Explorer\FolderTypes\{631958a6-ad0f-4035-a745-28ac066dc6ed}

[Ready-Made Registry Script] Add Cut, Copy, Paste, Delete, Rename, Undo and Many Other Useful Buttons in Windows Explorer Command Bar (aka Folder Band or Toolbar) in Windows Vista and 7

Recently we posted a detailed tutorial about customizing Command Bar in Windows Vista and 7 Explorer:
How to Customize Windows Explorer Command Bar in Windows Vista and 7
The above tutorial allows you to add various useful buttons like Cut, Copy, Paste, Delete, Undo, Redo, etc in Command Bar in Windows Explorer.

But some inexperienced Windows users might find the tutorial a bit hard to follow, so today in this tutorial we are going to provide a ready-made registry script which will do the task automatically. But you'll still need to do some task yourself.
So following are the required minimum steps to follow:
STEP 1. Type regedit in RUN or Start menu search box and press Enter. It'll open Registry Editor.
STEP 2. Now go to following key:
HKEY_LOCAL_MACHINE\SOFTWARE\Microsoft\Windows\CurrentVersion\Explorer\FolderTypes\{5c4f28b5-f869-4e84-8e60-f11db97c5cc7}
STEP 3. Take permission on the above mentioned key:
  • Right-click on the "{5c4f28b5-f869-4e84-8e60-f11db97c5cc7}" key and select "Permissions...".
  • It'll open a dialog box, Click on "Advanced" button.
  • It'll open another dialog box, Go to "Owner" tab.
  • Select your Username from the list and click on "Apply" button and then OK.
  • Again click on OK button in the first dialog box.
  • Now again right-click on the same key and select "Permissions...".
  • Select your Username in the list and check the "Allow" option for "Full Control".
  • Click on Apply button and then OK.
STEP 4: Now download following ready-made registry script file:
Download Registry Script
Extract the ZIP file and run "Add New Buttons.reg" file. It'll immediately add the new buttons to Command bar.
An uninstallation registry script has also been included in the ZIP file so that you can remove the buttons.
Following is the result which you'll get after applying the registry script:
New_Command_Bar_Buttons_Windows_Explorer3.png
New_Command_Bar_Buttons_Windows_Explorer2.png

How to Customize “Organize” and “Layout” Menus in Command Bar in Windows Vista and 7 Explorer

Recently we posted a detailed tutorial about customizing Command Bar in Windows Vista and 7 Explorer: How to Customize Windows Explorer Command Bar in Windows Vista and 7
Using the same method, in this tutorial we'll tell you how to customize "Organize" and "Layout" menus present in the Command Bar:
Organize_Layout_Menus_Commandbar.png
1. Type regedit in RUN or Start menu search box and press Enter. It'll open Registry Editor.
2. Now go to following key:
HKEY_LOCAL_MACHINE\SOFTWARE\Microsoft\Windows\CurrentVersion\Explorer\CommandStore\shell
3. Now look for following 2 sub-keys:
Windows.layout
Windows.organize
4. "Windows.layout" key stores command set which is shown in "Layout" menu and "Windows.organize" key contains command set which is shown in "Organize" menu.
You just need to edit "SubCommands" String value present in right-side pane and delete the desired menu item which you don't want to show in the menu.
Customize_Organize_Layout_Menu_Windows_Explorer_Command_Bar.png
You can also add a new command by using semi-colon (;).
NOTE: If you get an error message that you don't have permission to write to registry, it means you'll need to take permission on the key. You can use following simple steps to take permission:
  • Right-click on the registry key and select "Permissions...".
  • It'll open a dialog box, Click on "Advanced" button.
  • It'll open another dialog box, Go to "Owner" tab.
  • Select your Username from the list and click on "Apply" button and then OK.
  • Again click on OK button in the first dialog box.
  • Now again right-click on the same key and select "Permissions...".
  • Select your Username in the list and check the "Allow" option for "Full Control".
  • Click on Apply button and then OK.
Now you'll be able to change the value of "SubCommands" string.
EXAMPLE: you can add all menu items which are shown in "Layout" menu directly into "Organize" menu. To do this, simply change value of "SubCommands" String for "Windows.organize" key as following:
Windows.cut; Windows.copy; Windows.paste; Windows.undo; Windows.redo; |; Windows.selectall; |; Windows.menubar; |; Windows.previewpane; Windows.readingpane; Windows.navpane; Windows.librarypane; Windows.folderoptions; |; Windows.delete; Windows.rename; Windows.removeproperties; Windows.properties; |; Windows.closewindow
It'll remove "Layout" menu completely and insert all its sub-menus directly into "Organize" menu and it'll look as following:
Modified_Organize_Layout_Menus_Commandbar.png
So you can play with the value and give the menus your desired look. ;)

#
### ###