Friends

This is default featured post 1 title

Go to Blogger edit html and find these sentences.Now replace these sentences with your own descriptions.This theme is Bloggerized by Lasantha Bandara - Premiumbloggertemplates.com.

This is default featured post 2 title

Go to Blogger edit html and find these sentences.Now replace these sentences with your own descriptions.This theme is Bloggerized by Lasantha Bandara - Premiumbloggertemplates.com.

This is default featured post 3 title

Go to Blogger edit html and find these sentences.Now replace these sentences with your own descriptions.This theme is Bloggerized by Lasantha Bandara - Premiumbloggertemplates.com.

This is default featured post 4 title

Go to Blogger edit html and find these sentences.Now replace these sentences with your own descriptions.This theme is Bloggerized by Lasantha Bandara - Premiumbloggertemplates.com.

This is default featured post 5 title

Go to Blogger edit html and find these sentences.Now replace these sentences with your own descriptions.This theme is Bloggerized by Lasantha Bandara - Premiumbloggertemplates.com.

Sunday, June 5, 2011

How to Add “Disk Cleanup” Option in Drive Context Menu in Windows XP, Vista and 7

"Disk Cleanup" is a very useful tool in Windows which removes temporary files and a variety of system files and other items that you no longer need. It helps in freeing up disk space. You can access it using Drive Properties or All Programs menu. Wouldn't it be great if you can launch it directly by right-click on a drive?
In this tutorial, we'll tell you how to add "Disk Cleanup" option in Drive context menu so that you can launch it quickly and easily.
Disk_Cleanup_Option_Drive_Context_Menu.png
Simply follow these simple steps:
1. Type regedit in RUN or startmenu search box and press Enter. It'll open Registry Editor.
2. Now go to following key:
HKEY_CLASSES_ROOT\Drive\shell
3. Under "shell" key, create a new key Disk cleanup
4. If you want to show an icon for context menu option, select "Disk cleanup" key and in right-side pane, create a new String icon and set its value to cleanmgr.exe
PS: You can also change its position in context menu using position String. Check this topic for more information.
5. Now create another new key under Disk cleanup key and give it name command
6. Select command key and in right-side pane, change value of default to cleanmgr.exe /d %1
Add_Disk_Cleanup_Option_Drive_Context_Menu.png
That's it. Now you can access the option in drive context menu.
PS: If you want a ready-made registry script to do the task automatically, simply download following ZIP file, extract it and run the extracted REG file. It'll ask for confirmation, accept it:
Download Registry Script

How to Add “Defragment” Option in Drive Context Menu in Windows XP, Vista and 7

Hard disk fragmentation causes your hard disk do extra work which slows down your computer. Disk Defragmenter tool in Windows rearranges fragmented data so that your hard disk drives can work more efficiently. You can access it using Drive Properties or All Programs menu. Wouldn't it be great if you can launch it directly by right-click on a drive?
In this tutorial, we'll tell you how to add "Defragment" option in Drive context menu so that you can launch it quickly and easily.
Defragment_Option_Drive_Context_Menu.png
Simply follow these simple steps:
1. Type regedit in RUN or startmenu search box and press Enter. It'll open Registry Editor.
2. Now go to following key:
HKEY_CLASSES_ROOT\Drive\shell
3. Under "shell" key, create a new key Defragment
4. If you want to show an icon for context menu option, select "Defragment" key and in right-side pane, create a new String icon and set its value to defrag.exe
PS: You can also change its position in context menu using position String. Check this topic for more information.
5. Now create another new key under Defragment key and give it name command
6. Select command key and in right-side pane, change value of default to any of following:
defrag.exe /u /v %1 (for classic command line screen)
dfrgui.exe (for new graphical interface)
Add_Defragment_Option_Drive_Context_Menu.png
That's it. Now you can access the option in drive context menu.
PS: If you want a ready-made registry script to do the task automatically, simply download following ZIP file, extract it and run the extracted REG file. It'll ask for confirmation, accept it:
Download Registry Script

Download Control Panel Sidebar Gadget for Windows Vista and 7

We use many system utilities like Registry editor, MSConfig, Services manager, Programs and features, etc regularly in our Windows OS. Wouldn't it be great to have all these utilities in a single place? "ChekoGB" @ DA has created an awesome sidebar gadget for Windows Vista and 7 users which contains many useful system utilities in a single place:

This gadget shows following system utilities:
  • Registry Editor
  • System Configuration
  • Disk Management
  • Device Manager
  • Services
  • Administrative Tools
  • System Restore
  • Network Connections
  • Programs and Features
  • Windows Features
  • Backup and Restore
  • Devices and Printers
  • Performance Monitor
  • System Information
  • Control Panel
  • CMD Prompt
  • Run
  • Computer Management
  • ODBC Data Source Administrator
  • Windows Firewall with Advanced Security
  • Power Shell
  • Power Shell ISE
You can download it using following link:
Download Link

Add Context Menu Option to Extract / Unpack Files from MSI (Microsoft Installer) Package

A Microsoft Installer (MSI) package contains various files which are extracted and installed in your system once you run the MSI file. If you don't want to run MSI file but want to view its content, this tutorial will help you.
This tutorial will help you in adding "Unpack" option to MSI file context menu so that you can extract / unpack MSI package files quickly and easily.
Unpack_Extract_Option_MSI_Context_Menu.png
Once you select "Unpack" option from an MSI file context menu, it'll extract the MSI package and will put all the files in a new folder with the name "MSI_file_name Content".
So without wasting time, lets start the tutorial:
1. Type regedit in RUN or startmenu search box and press Enter. It'll open Registry Editor.
2. Now go to following key:
HKEY_CURRENT_USER\Software\Classes
3. Under "classes" key, create a new key Msi.Package
4. Under "Msi.Package" key, create a new key shell
5. Under "shell" key, create a new key Unpack
6. Under "Unpack" key, create a new key command
So the final registry path would be:
HKEY_CURRENT_USER\Software\Classes\Msi.Package\shell\Unpack\command
7. Select command key and in right-side pane, change value of default to:
msiexec.exe /a "%1" /qb TARGETDIR="%1 Content"
Add_Unpack_Extract_Option_MSI_Context_Menu.png
That's it. Now you can access the option in MSI file context menu.
PS: If you want a ready-made registry script to do the task automatically, simply download following ZIP file, extract it and run the extracted REG file. It'll ask for confirmation, accept it:
Download Registry Script

Create Direct Shortcut for “Notification Area Icons” in Windows Vista and 7

If we want to customize notification area icons settings in Windows 7, we have to first open Taskbar Properties and then click on Customize button to change them. Windows XP and Vista users also have to follow similar steps to access the Settings page.
Customize_Notification_Area_Icons.png
Wouldn't it be great if you can have a direct shortcut to "Notification Area Icons" window so that you can access it within a click?
Recently one AskVG reader "Macko" asked about via email:
Dear Mr. Vishal Gupta,
Long time I've been reading your blog for tweaking XP issues, and they are quite awesome. Yet, I have a question for you, since I do not know where to look for the answer. I want to create a shortcut for "Customize Notifications" (the same as TaskBar Properties/Notification Area/Customize) and I cannot find the way. I hope you can help me.
Greetings!!!
So today in this tutorial, we are going to tell you how to create a shortcut to "Notification Area Icons" in Windows Vista and 7. We have tested it in Windows 7 but it should also work in Windows XP and Vista:
1. Right-click on Desktop and select "New -> Shortcut":
New_Shortcut.png
2. It'll launch "Create Shortcut" wizard. Now enter any of following strings in location box:
explorer shell:::{05d7b0f4-2121-4eff-bf6b-ed3f69b894d9}
or
%SystemRoot%\System32\rundll32.exe shell32.dll,Options_RunDLL 5
Create_Customize_Notification_Area_Icons_Shortcut.png
3. After entering the location, click on "Next" button. Now type Customize Notification Area Icons in name box and click on "Finish" button. It'll create a new shortcut on Desktop.
4. Now its time to change the icon. Right-click on the shortcut and select "Properties". Click on "Change Icon" button. Type taskbarcpl.dll in text box and press Enter. Select the first icon, click on OK button and then Apply the changes.
5. That's it. You'll get the desired shortcut on Desktop:
Customize_Notification_Area_Icons_Shortcut.png
You can also put it in Quick launch toolbar or pin to Taskbar in Windows 7.
NOTE: If you don't want to create the shortcut manually and want a ready-made shortcut, download following ZIP file, extract it and you'll get the shortcut:
Download Link

Personalization Panel Allows You to Change Desktop Wallpaper, Get Transparency and Much More in Windows 7 Starter and Home Basic Editions

Windows 7 Starter and Home Basic editions are pretty much restricted in customizing GUI. You can't have Aero theme, you can't change Desktop wallpaper. In fact, you don't see "Personalize" menu in Desktop context menu to change theme, wallpaper, screen saver, sounds, etc. Our friend "Happy Bulldozer aka hb860" has created an awesome "Personalization Panel" for Windows 7 Starter and Home Basic editions which brings the Personalization panel of Windows 7 Ultimate edition to these low-end restricted editions.
Personalization_Panel_Windows_7_Starter_Home_Basic.png
It allows you to:
  • Change Desktop wallpaper
  • Theme support
  • Aero glass support
  • Desktop context menu integration
  • Change window and taskbar color
  • Portable version also available
Its a must have program for Windows 7 Starter and Home Basic edition users.
You can download it using following link:
Download Link

Transform Windows 7 into Ubuntu 11.04 Natty Narwhal Using “Ubuntu Skin Pack

If you use Windows but love simple, minimal and clean look of Ubuntu, here is something interesting for you. "Ubuntu Skin Pack" is a customization pack for Windows 7 users which can make our Windows look-like Ubuntu 11.04. The transformation pack has been created by our DA friend "hameddanger".
This pack changes almost everything in Windows 7 to transform it into Ubuntu. It changes login screen, boot screen, wallpaper, theme, start button, icons, etc. It also installs a few utilities to provide Ubuntu functionality.

It can be installed in Windows 7 SP1. It supports both 32-bit and 64-bit versions.
You can download it using following link:
Download Link
NOTE: Please create a system restore point before installing this skin pack so that you can restore default Windows look in case you don't like the new look or face any problem.

Transform Windows 7 into Mac OS X Lion Using “Lion Skin Pack”

There is no doubt Mac OS is awesome. Almost all eye candy lovers appreciate its look. If you are using Windows 7 and want to transform its look into Mac OS X Lion, here is something interesting for you. "Lion Skin Pack" is a customization pack for Windows 7 users which can make our Windows look-like Mac OS X Lion. The transformation pack has been created by our DA friend "hameddanger".
This pack changes almost everything in Windows 7 to transform it into Mac OS X Lion. It changes login screen, boot screen, wallpaper, theme, start button, icons, etc. It also installs a few utilities to provide Mac functionality.

It can be installed in Windows 7 SP1. It supports both 32-bit and 64-bit versions.
You can download it using following link:
Download Link
NOTE: Please create a system restore point before installing this skin pack so that you can restore default Windows look in case you don't like the new look or face any problem.

Microsoft Releases Hotfix to Fix a Bug in Windows 7 SP1 When Some Files in USB Drivers are not Updated

This bug is found in those Windows 7 and Server 2008 R2 systems which were upgraded to SP1 manually, i.e. you installed Windows 7 and Server 2008 R2 without SP1 first and then manually upgraded to your system to SP1 by running its installer.
If you are using a slipstream version of Windows 7 SP1 or Server 2008 R2 SP1, this bug will not occur in your system.
SYMPTOM:
Official words from Microsoft:
After you install Windows 7 Service Pack 1 (SP1) or Windows Server 2008 R2 Service Pack 1 (SP1), binary files in some USB drivers are not updated. For example, the Usbport.sys, Usbehci.sys, and Winusb.sys binary files are not updated.
Information from our reader "Tito":
Of the several USB-related driver files updated by SP1, three files, usbport.sys, usbehci.sys, and winusb.sys (note: not all hardware configurations use winusb.sys, so it is normal for it to be missing) were only partially updated; i.e., the SP1 installer only updated the "repository" copies of these files, i.e., the copies found in WinSxS and DriverStore. The "active" copies, found in System32\Drivers, are not updated (this is a bug with the installer). People who did a new installation using an integrated ISO are not affected (both the "repository" and "active" copies are 7601) (so this only affects a 7600->7601 update), and other USB-related driver files seem to be unaffected (e.g., the SP1 installer updates both the "repository" and "active" copies of usbhub.sys).
Fix:
Just download official Microsoft fix using following links:
Download Update for Windows 7
Download Update for Windows 7 (64-bit)
Download Update for Windows Server 2008 R2 (64-bit)
Download Update for Windows Server 2008 R2 (Itanium based)
Thanks to our reader "Tito" for sharing it...

StarterDesktopSlideShow: Add Desktop Wallpaper Slide Show Feature to Windows 7 Starter Edition

"StarterDesktopSlideShow" is an excellent tool created by our friend "Happy Bulldozer aka hb860" for Windows 7 Starter Edition which provides Desktop Wallpaper Slide Show functionality which is not present in this edition by default. Features List:
  • Change wallpaper on timer
  • Change wallpaper on StarterDesktopSlideShow's start
  • Change wallpaper by global hotkey (defined by user)
  • Autostart after users logon
  • Disable slideshow when on battery mode

You can download it using following link:
Download Link

[FIX] Windows 7 Deletes All System Restore Points Upon Reboot

Recently Microsoft identified a bug in Windows 7 and provided a solution for it. Following are the details:
SYMPTOM:
Upon each reboot, Windows 7 may delete all System Restore Points.
CAUSE:
This issue can occur if the system paging file is highly fragmented.
SOLUTION:
The resolution to this issue is to disable, delete and then recreate the paging file. To do this, carry out the following steps:
1. Right-click on Computer icon on Desktop and select Properties (or press WIN + Pause/Break keys). Now click on Advanced system settings link in left side pane (You can open it directly by giving sysdm.cpl command in RUN or start menu search box). Now click on Settings button in Performance section.
2. Now go to Advanced tab and click on Change... button under Virtual memory section.
3. Uncheck "Automatically manage paging file size for all drives" option if enabled.
4. Now select C: drive from the list and select the radio button labelled 'No paging file', then click the Set button.
5. Click Ok button and reboot your system.
6. After restart, delete 'pagefile.sys' from the root of C: drive. Please note that pagefile.sys is a hidden file and is not visible until you set the folder option to view hidden files.
7. Defragment C: drive by providing defrag /h c: command in Command Prompt.
8. Re-enable the paging file by following steps 1-3 above.
9. After selecting drive C: in the list, select the radio button for 'System managed size' and click Set.
10. Click Ok button and reboot your system.

[FIX] Computer Freeze or Restart to a BSOD having “0xc0000034″ Error Message after Installing Service Pack 1 (SP1) on Windows 7 or Server 2008 R2

Consider the following scenario:
  • You install Windows 7 Service Pack 1 (SP1) or Windows Server 2008 R2 Service Pack 1 (SP1) on a computer.
  • You install some other updates before you restart the computer to complete the installation process. Or, the service pack is installed at the same time as other updates by using Windows Server Update Services (WSUS).
In this scenario, the computer may stop responding or restart. If the computer restarts, you receive an error message that resembles the following on a black screen:
0xC0000034
Note: If the computer stops responding and you restart the computer, you receive the same error message.
CAUSE:
This issue occurs because Windows tries to perform operations in the Primitive Operation Queue (POQ) two times during the service pack installation process. The second attempt to perform these operations fails (because the operations have already been performed). Therefore, Windows generates a "0xc0000034" error.
SOLUTION:
Microsoft has released an update to prevent the issue. You can download it using following link:
Download Link
Download Link (64-bit)

Ultimate Collection of the Best Free Tools to Customize Windows 7 Login Screen

We have shared several free tools to customize Windows 7 login screen in past. Today in this topic, we are going to put them together so that you don't miss any of them and can find the best for you. Custom_Login_Background_in_Win_7.png
Following is a list of all freeware to customize Windows 7 login screen:
If you want to manually customize Windows 7 login screen, check following tutorials:

Ultimate Collection of the Best Free Tools to Get Classic Start Menu Back in Windows 7

We all know that Microsoft has removed Classic start menu from Windows 7 and you are forced to use the new Vista like start menu. Although the new start menu is much better than the classic one, lots of people still prefer the Classic one. We have shared several free tools to get Classic Start Menu back in Windows 7. Today in this topic, we are going to put them together so that you don't miss any of them and can find the best for you.
Classic_Shell_Startmenu.png
Following is a list of all freeware to get Classic start menu back in Windows 7:
If you want to use some cool manual methods to get classic start menu back in Windows 7, check following tutorials:

Transform Windows 7 into Windows 8 Using “8 Skin Pack for 7″

We all know that Windows 8 is under development and many interesting features have been revealed in Windows 8 like new Aero Lite theme,User Picture Tile in System Tray, Aero Auto-Colorization feature, etc. Although Windows 8 UI is not complete and it'll be changed a lot in future builds, our DA friend "hameddanger" has created a cool Windows 8 Skin Pack for Windows 7 users.
This pack changes / adds lots of things in Windows 7:
  • Windows theme
  • User picture tile
  • Aero auto-colorization
  • Wallpaper
  • Login screen

You can download it using following link:
Download Link
NOTE: Remember to create a System Restore point first before installing the skin pack so that you can restore default files and settings in case you face any problem or you don't like the new look.

Download Classic Antique “CPU Meter” Gadget for Windows Vista and 7 Desktop Sidebar

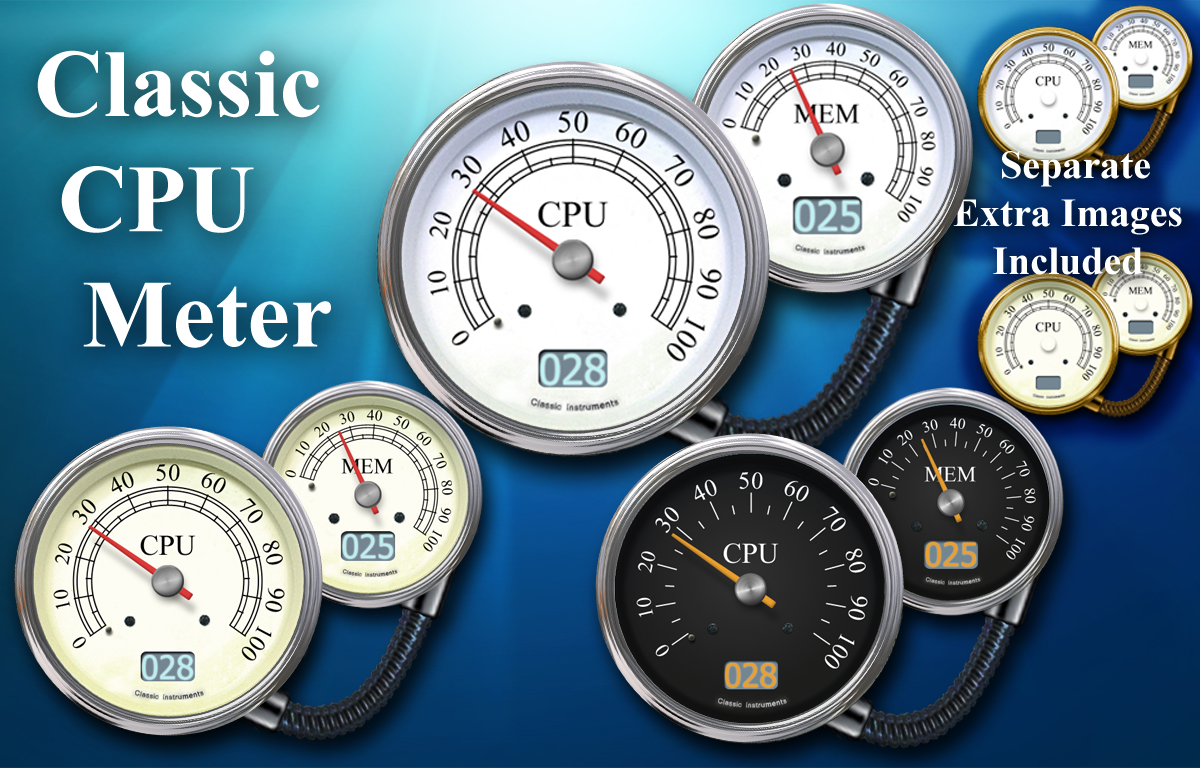
If you use Desktop Sidebar gadgets in Windows Vista or 7, you'll definitely love this new gadget. "Antique CPU Meter" and "Classic CPU Meter" are 2 awesome gadgets created by "Elmer-BeFuddled" @ DA which can be used in Windows Vista and 7.


Simply download the RAR file, extract it using WinRAR or 7-Zip and run the .gadget file. It'll automatically add the gadget at Desktop.
Download Antique CPU Meter Gadget
Download Classic CPU Meter Gadget
Download Super Sized CPU Meter Gadgets

Get Windows 8 Like Date and Time Display on Windows 7 Login Screen

As you know Windows 8 testing builds show date, time and day name at login screen as mentioned here. Now you can get similar feature in Windows 7 as well. "myjuman" @ DA has created a small utility which shows date and time on Windows 7 login screen as shown in following screenshot:

How to Use:
First download following file:
Download Link
Extract it using WinRAR or 7-Zip and run the installer EXE file. It'll install the required file in your Windows. It seems it only works in 32-bit Windows versions.
Now log off or lock your Windows and to show date and time, click on "Ease of access" (Accessibility) button.

Download Yet Another Windows 8 “Aero Lite with Glass” Theme for Windows 7

Recently we shared a cool theme for Windows 7 users which provides Windows 8 look-like Aero Lite interface with Glass. Download Windows 8 “Aero Lite with Glass” Theme for Windows 7
Our reader "Mutz777" shared another similar theme for Windows 7 which does the same job. "Windows 8 Aero" theme created by "Velix94" @ DA is based on "Aero Lite" theme of Windows 8.

You can download the theme using following link:
Download Link
For more information on how to use this theme, please visit following link:
How to Use 3rd Party Themes in Windows 7?

Windows Metro: Windows 8 Metro Style Inspired Theme for Windows 7

We all know that Windows 8 testing builds feature new "Aero Lite" theme and many look like themes have been created for Windows 7: Today we are going to share another cool theme for Windows 7 which is a bit different than the above mentioned themes.
"Windows Metro" is an awesome theme created by "jaycee13" @ DA for Windows 7 which is inspired by Windows 8 Metro style "Aero Lite" theme. It provides Aero glass along with a clean and minimal interface.

You can download the theme using following link:
Download Link
For more information on how to use this theme, please visit following link:
How to Use 3rd Party Themes in Windows 7?
Thanks to "anjo999" @ DA for sharing it...

[FIX] Computer Restarts Instead of Hibernate After Installing Service Pack 1 (SP1) in Windows 7

Many Windows 7 and Server 2008 R2 users have faced a strange problem after installing Service Pack 1. Whenever they try to hibernate their computer, it restarts instead of hibernate. Microsoft has confirmed this issue and has released update to fix it.
Symptom:
Consider the following scenario:
  • You have a computer that is running Windows 7 or Windows Server 2008 R2.
  • You use a SCSI miniport driver as the memory dump file device driver or as the hibernation file device driver on the computer.
  • You install one of the following updates:
    • Hotfix 2320550
    • Windows 7 and Windows Server 2008 R2 Service Pack 1 (SP1)
In this scenario, one of the following issues occurs:
  • When a fatal error causes a Stop condition, the operating system does not generate a memory dump file of the system memory.
  • When you try to hibernate the computer, the computer restarts instead of hibernates.
Cause:
This issue occurs because the operating system cannot use the features that are required to create the memory dump file or the hibernation file on the SCSI miniport device.
Solution:
Download and install following update to fix it:
Download Update for Windows 7 (32-bit)
Download Update for Windows 7 (64-bit)
Download Update for Windows Server 2008 R2 (64-bit)
Download Update for Windows Server 2008 R2 (IA-64)

WinThunder: Get Quick Access to Weather, Favorite Shortcuts, Files, Folders, Apps in Windows 7 System Tray

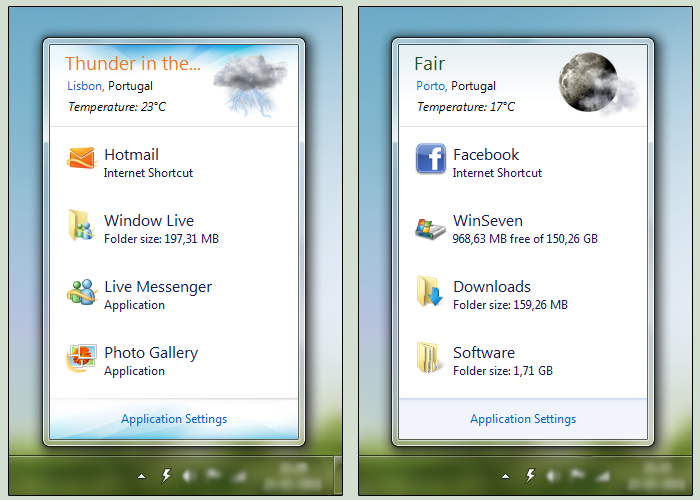
"WinThunder" is an excellent piece of software created by AskVG's DA group member "DanielNET" which adds its icon in Windows 7 system tray and allows you to quickly access your favorite applications, shortcuts, files, folders, websites, etc. Along with providing quick access to the above mentioned items, it also shows weather updates as shown in following screenshot:

Its a portable utility so you don't need to install it. Simply run the EXE file and enjoy it in system tray.
It also allows you to change its theme and many other settings.
You can download it using following link:
Download Link

Download Windows 8 Metro Logon Clock Screensaver

We all know that Windows 8 testing builds show date, time and day name at login screen as mentioned here. Recently we covered a free tool which can show date and time at Windows 7 login screen:
Get Windows 8 Like Date and Time Display on Windows 7 Login Screen
Today we are going to share a screensaver for Windows 7 and earlier which has been created by AskVG's DA group member "dejco" to provide the same Windows 8 Metro logon look.
You just need to download the RAR file, extract it using WinRAR or 7-zip and then copy MetroClock folder and MetroClock.scr file to "%windir%\System32" (i.e. C:\Windows\System32) folder. After that run Metro.reg file which sets the MetroClock.scr screensaver as default for login screen.
Now as soon as the screensaver is activated at login screen, it shows Windows 8 look-like metro logon with clock showing current date and time:

Download Link

Aero Color Show: Yet Another Free Tool to Get Windows 8 Aero Auto-Colorization Feature in Windows 7

We all know about "Aero Auto-Colorization" feature present in Windows 8 testing builds which automatically configures the color of Aero elements, like the Start Menu, Windows Explorer windows, and the taskbar based on the desktop wallpaper. Windows 8 to Feature Aero Automatic Colorization
We have shared a free utility in past called "Aura" which can bring the same functionality in Windows Vista and 7:
Aura: Get Windows 8 Aero Auto-Colorization Feature in Windows Vista and 7
Today we are going to share another freeware which does a similar job.
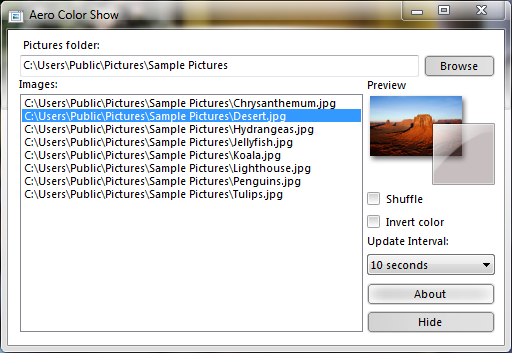
"Aero Color Show" is a small and portable tool created by "dejco" @ DA for Windows 7 which automatically changes Aero glass color based on a set of predefined images.

You can download it using following link:
Download Link

Ultimate Collection of Free Tools to Get Windows 7′s Aero Snap, Aero Shake and Aero Peek Features in XP and Vista

Windows 7 comes with 3 new and useful features: Aero Snap, Aero Shake and Aero Peek. "Aero Snap" features lets you minimize, maximize or resize programs windows by dragging-n-dropping them to the screen corners e.g. you can maximize a window by dragging-n-dropping it to the top of screen.
"Aero Shake" feature lets you minimize all running windows except the one which you are currently working on using a simple mouse shake.
"Aero Peek" features has replaced the old "Show Desktop" button. It can be found as a small rectangle present at the end of Windows 7 taskbar. When you hover the mouse cursor over it, it allows you to peek behind all open windows by hiding all windows and showing only outlines of all windows.
There are several freeware to get these cool features in Windows XP and Vista. Today in this topic, we are going to put them together so that you don't miss any of them and can find the best for you.

Following is a list of all free tools available to get Windows 7's Aero Snap, Aero Shake and Aero Peek features in Windows XP and Vista:

[Official Windows 7 Themes Update] Microsoft Releases 2 New Themes “Beautiful Birds” and “Echoes of the Past”

Microsoft has released 2 new themes for Windows 7 users: Beautiful Birds - Let the grace and gorgeous plumage of swans, flamingoes, peacocks, and other exotic birds brighten your day with this free theme for Windows 7.
Echoes of the Past - Time-travel back to the Age of Steam with a treasure-trove of antique images bathed in a golden Victorian light.
Download Beautiful Birds Theme
Download Echoes of the Past Theme
Download the .themepack file, double-click on it and Windows will automatically install and apply it.
Thanks to our friend "Rob Margel" for the update...
PS: You can also download other official Windows 7 themes, Desktop gadgets and wallpapers from Microsoft using following steps:
1. Right-click on Desktop and select "Personalize". Now click on "Get more themes online" link:
Get_more_windows_7_themes_online.png
2. It'll open following webpage in your browser:
Windows 7 Themes
Alternatively you can directly open the above URL in your browser.
3. From the above webpage, you can download various free themes, gadgets and wallpapers for Windows 7.


This article was posted in Windows 7, Windows 7 Themes. You can also take a look at our popular articles or all articles list. And don't forget to check out lots of useful and free tools created by various AskVG readers in our Downloads section.

7Plus: A Free Tool to Tweak Windows Vista and 7 Explorer, Add Hotkeys, Tabs, Context Menu Entries

7plus is an excellent free tool for Windows Vista and 7 which makes working with Windows as comfortable as possible. The feature set it adds to Windows ranges from interface extensions to the explorer to highly specialized solutions for all common tasks, with the goal of reducing the work load for the user. 7plus allows nearly all features to be fully customized. You can change the hotkeys and other parameters defining a feature and you can also create your own features!
7Plus_for_Windows_Vista_7.png
Here are some of the most important features:
  • Store favorite folders and recall them for very fast navigation
  • Upload files, screenshots and clipboard content directly to an FTP server with just one hotkey
  • Accessor tool that acts as a launcher similar to programs like Launchy or Exekutor
  • Add tabs for Windows Explorer like in browsers
  • Create customizable, context-sensitive hotkeys
  • Create new context menu entries on files and folders
  • Create new folders and textfiles by pressing F8/F7
  • Paste text or image from clipboard as file
  • Show favorite folders in the explorer folder band bar like Web Browser favorite bars
  • Make Backspace go upwards again
  • Set windows to be "Always on top" by right clicking the title bar
  • Activate blinking windows and toggle between current and previous window with Capslock
  • Close windows by middle clicking task buttons
  • Paste previous clipboard text entries by pressing WIN+V
  • Use a Joypad/Gamepad to remote control the mouse, keyboard and zoom
You can download it using following link:
Download Link
Thanks to our reader "NZero" for sharing it...

Taskbar Meters and SuperbarMonitor: 2 Awesome Free Tools to Show System Resource Usage in Windows 7 Taskbar

Windows 7 comes with new Superbar which is a highly enhanced version of classic Taskbar. One of the most impressive feature of this new Superbar is the ability of showing progressbar in program's Taskbar button. Today we are going to share 2 excellent, absolutely free and portable tools for Windows 7 which utilize this ability of Superbar in showing system resource usage so that you can monitor them easily and quickly.
  • Taskbar Meters
  • SuperbarMonitor
Taskbar Meters
Taskbar Meters is a set of 3 executable files which show following information in Windows 7 Superbar:
  • CPU usage
  • RAM usage
  • Disk IO
Taskbar_Meters_Windows_7.png
You can also access Task Manager and Resource Monitor applications using the jumplist.
It allows you to customize the update frequency and other settings.
You can download it using following link:
Download Link

#
### ###