Friends

This is default featured post 1 title

Go to Blogger edit html and find these sentences.Now replace these sentences with your own descriptions.This theme is Bloggerized by Lasantha Bandara - Premiumbloggertemplates.com.

This is default featured post 2 title

Go to Blogger edit html and find these sentences.Now replace these sentences with your own descriptions.This theme is Bloggerized by Lasantha Bandara - Premiumbloggertemplates.com.

This is default featured post 3 title

Go to Blogger edit html and find these sentences.Now replace these sentences with your own descriptions.This theme is Bloggerized by Lasantha Bandara - Premiumbloggertemplates.com.

This is default featured post 4 title

Go to Blogger edit html and find these sentences.Now replace these sentences with your own descriptions.This theme is Bloggerized by Lasantha Bandara - Premiumbloggertemplates.com.

This is default featured post 5 title

Go to Blogger edit html and find these sentences.Now replace these sentences with your own descriptions.This theme is Bloggerized by Lasantha Bandara - Premiumbloggertemplates.com.

Monday, April 18, 2011

Moo0 RightClicker: Enhance Context Menu in Windows

"Moo0 RightClicker" is a freeware which can enhance the context menu (right click menu) in Windows. It adds lots of new options in the context menu like Duplicate Window, Open, Move To, Bookmark Here, etc. Right_Clicker.jpg
You can customize it as well. You can hide unwanted items or add new items which are disabled by default. Its an excellent enhancer for Windows context menu.
It can be installed in Windows XP, 2003 and Vista.
You can download it from following link:
Download Moo0 RightClicker
Homepage

Norton Labs Announces New Vista User Account Control (UAC) Tool

User Account Control (UAC) is a new security feature in Microsoft Windows Vista that changes the architecture of the access token creation process and prevents users from logging on with full administrative rights. While the intent of this feature may have been enhanced security, all too often users need administrative rights for tasks like installing/updating programs, and many software applications need access to run properly.
The User Account Control tool has been designed to replace the Vista UAC, to simultaneously make your system more secure while significantly improving user-friendliness.
By default, any application launched by an administrator is running with a filtered, standard user access token. When the administrator attempts to perform a task, the UAC prompts the user to approve the action. This can lead to poor user experiences because the prompts can be slow to display, and appear frequently and without warning. What’s more, because the UAC may give a false sense of security since other processes can still access the desktop, it actually raises security concerns.
The net effect is that many users find the UAC security clearance and prompting process annoying, especially those who are a computer’s only user and have all the latest Norton Internet Security software installed and updated.
The User Account Control tool will collect user input as well as information on applications causing prompts. The data will be processed to improve the comprehensiveness and robustness of the white list, which will be updatable while running the tool online.
Download Link

Show Your Desired Text on Desktop by Customizing Windows Vista & 7 Build Number Vista_Buil_Number_Change.png

Vista_Buil_Number_Change.png Each Windows OS has its own build number which is shown in its Beta builds but not shown in RTM versions. Like Windows Vista SP1 has its build number as "Build 6001".
In this tutorial, we'll change this build number to our custom string and will show that custom string on Desktop. You can put your name, your website URL or anything which you want to show.
It might also become very useful to customization pack creators who can show their customized text like any beta build number or their pack version/name on Desktop.
So here we start our tutorial:
1. First thing is to enable "Build Number" on Desktop. There is a simple registry trick to show it.
Type regedit in RUN or Startmenu Search box and press Enter. It'll open Registry Editor. Now go to following key:
HKEY_CURRENT_USER\Control Panel\Desktop
In right-side pane, change value of "PaintDesktopVersion" DWORD to 1 (Create the DWORD value if its not present).

Enabling_Paint_Desktop_Version_Opti.jpg
Now log off or restart your system and you'll see the Build number on Desktop:
Default_Vista_Build_Version.jpg
2. We have completed first step. Now we have to customize this Build number. For this task we'll need to edit a system file "user32.dll.mui" in Resource Hacker.
If you don't know about Resource Hacker, you can read following tutorial:
All About Resource Hacker in a brief Tutorial
To edit the file, we'll need to take ownership of this file otherwise we'll not be able to save our changes. Taking ownership is very easy. First follow the instructions given in following topic:
Add Take Ownership Option in File / Folder Context Menu in Windows XP, Vista and 7
Now open My Computer and go to following folder:
%windir%\System32\en-US
You can paste the above string in addressbar and press Enter. It'll open the folder. Now look for the "user32.dll.mui" file. When you find it, right-click on it and select "Take Ownership":
Taking_Ownership_of_User32_dll_MUI_.jpg
NOTE: If your Windows language is different, then replace en-US in the above path with your language code.
3. Now open "user32.dll.mui" file in Resource Hacker. You can simply drag-n-drop the file in Resource Hacker window.
Once you open the file, go to "String Table -> 45". In right-side pane, look at the 715 and 716 entries. The 715 entry contains the first line of Build number i.e. "Windows Vista (TM)" and the 716 entry contains the second line i.e. "Build 6001".
Default_Build_Version_Location.jpg
We need to change their text so that we can show our own desired text. That's very simple. Simply delete the text within double-quotes "" and type your own desired text in both entries as shown in following screenshot:
Changing_Default_Build_Version.jpg
After changing the text, click on "Compile Script" button and at last save the file.
4. That's it. Now restart your system and your desired text will be displayed on Desktop:
Custom_Vista_Build_Version.jpg
PS: Please be very careful while editing any file in Resource Hacker. Changing Build number is completely safe and it'll not cause any problem.

How to Prevent Users from Changing Desktop Wallpaper in Windows?

If you run a company, you might want to set your company logo or any particular wallpaper on all of your users' desktops. On the other hand, if you use a single system you might still want to have your desired wallpaper on Desktop and it really annoys when someone changes the wallpaper. So if you are tired from people changing the wallpaper and want to prevent users from changing it everyday, then this tutorial will help you.
In this tutorial, you'll learn a way to set your desired wallpaper on Desktop and no one will be able to change it neither from Desktop Properties nor by right-clicking on an image and select "Set as Desktop Background".
So here we start our tutorial:
1. Type regedit in RUN dialog box or Startmenu Search box and press Enter. It'll open registry Editor.
2. Now go to following key:
HKEY_CURRENT_USER\Software\Microsoft\Windows\CurrentVersion\Policies
3. Under "Policies" key, create a new key "System". It might already exist in some systems.
4. Now select "System" key and in right-side pane, create a new STRING value Wallpaper and set its value to the exact path of your desired wallpaper. You can use .JPG and .BMP files in this method.
e.g. if your wallpaper exists in "E:\Wallpapers\Wall1.JPG", then set the same path as value of "Wallpaper".
5. You can also set the wallpaper style e.g. Centered, Tiled or Stretched. Create a new STRING value WallpaperStyle and set its value to as following:
  • 0 (Centered)
  • 1 (Tiled)
  • 2 (Stretched)
Prevent_Change_of_Wallpaper.jpg
6. That's it. Now restart or log off your system and no one will be able to change the wallpaper.
PS: If you also want to disable the "Desktop" tab in Desktop Properties, then you can visit following tutorial:
How to Enable / Disable Changing Themes, Wallpapers, Screen Savers and Other Desktop Settings?
And if you want to prevent Registry Editor so that no one can delete those new STRING values, then visit following tutorial:
All Kinds of Restrictions for Windows 2000, XP, 2003 and Vista

How to Fix “Task Manager has been Disabled by Your Administrator”?

That's a very common problem for Windows users. Many times when you try to open Task Manager, you find that "Task Manager" option has been grayed out: Task_Manager_Disabled_1.jpg
Also when you try to run it by typing "taskmgr" in RUN dialog box, Windows shows following error message:
Task Manager has been disabled by your administrator.
Task_Manager_Disabled_2.jpg
There might be 2 possible reasons behind this problem:
  • Your system administrator applied the restriction using Registry Editor or Group Policy Editor.
  • Your system has been infected with virus and it has disabled the Task Manager.
If you are already the Administrator of the system, then your system is most probably infected. You should follow the instructions given in following topic first:
Is Your System Infected with a Virus / Spyware / Adware / Trojan?
Now if your system in not infected or you have successfully removed the virus, then you can follow these simple steps to enable Task Manager again:
1. Type regedit in RUN dialog box or Startmenu Search box and press Enter. It'll open Registry Editor. If Registry editor is also disabled, then follow instructions given in following tutorial:
How to Enable Tools -> Folder Options and Registry Editor in Windows
2. Now go to following keys one by one:
HKEY_CURRENT_USER\Software\Microsoft\Windows\CurrentVersion\Policies\System
HKEY_LOCAL_MACHINE\Software\Microsoft\Windows\CurrentVersion\Policies\System
HKEY_USERS\.default\Software\Microsoft\Windows\CurrentVersion\Policies\System
and look for a DWORD value "DisableTaskMgr" in right-side pane. If you find it, delete it.
Enable_Task_Manager.jpg
3. That's it. Now Task Manager will be enabled.
PS: If you are not familiar with editing the registry, then you can use ready-made registry script to do the task automatically. Download following ZIP file, extract it and then run the extracted .REG file. It'll ask for confirmation, accept it:
Enable Task Manager

[Fix] Links from Yahoo! Messenger, FDM and avast! Open in IE Even When Firefox is Default Browser

If you use Yahoo! Messenger or avast! or Free Download Manager (FDM), you might have noticed that whenever you click on any link in these software, it opens in Internet Explorer even when Mozilla Firefox is set as Default browser in your system. Most of the times this problem occurs in Windows Vista. If you are facing this problem, then follow these simple steps to fix this problem:
1. Click on "Default Programs" shortcut in Start menu. Now click on the last option in the list "Set program access and computer defaults":
Choose_Default_Program.png
2. Now click on "Custom" section and select "Mozilla Firefox" in "Choose a default web browser" section:
Select_Firefox_as_default_browser.png
3. That's it. Click on OK button and now all links will open in Firefox instead of IE.

How to Remove An Item from RUN Dialog Box History / MRU List?

All of us use Start menu RUN dialog box to enter frequent commands in Windows. It stores the entered commands in its history and suggests them whenever we enter them next time. RUN_Dialog_Box_History.jpg
Although its a good feature but sometimes we might want to remove a particular item from the history list because of some obvious reasons.
Here is a simple and safe method to remove any desired item from RUN history / MRU (Most Recently Used) list:
1. Type regedit in RUN dialog box and press Enter. It'll open Registry Editor.
2. Now go to following key:
HKEY_CURRENT_USER\Software\Microsoft\Windows\CurrentVersion\Explorer\RunMRU
In right-side pane, you'll see various String values with the name a, b, c, etc and their value will be set to the command which you entered in RUN dialog box:
RunMRU_List_in_Registry.jpg
3. You just need to delete the String value which contains the command which you want to remove from RUN history list. e.g. if you want to remove "msconfig" command from RUN history, then delete the "b" String value.
4. That's it. Now the deleted command will no longer appear in RUN MRU list.

Add AskVG.com Link in Desktop Context Menu in Windows Vista, Server 2008 and 7

Do you visit AskVG.com frequently and tired of opening the browser and typing the URL each time? Then here is a special trick for you. You can add AskVG.com in your Desktop context menu and whenever you want to open the site, just right-click on Desktop and select the option to open AskVG:
AskVG_in_Desktop_Context_Menu.jpg
Interesting, huh? You just need to follow very simple steps to get this option. This trick will only work for Windows Vista users, XP doesn't support this method.
Also you can use this method to add any other website URL in Desktop context menu. It'll work for all websites.
So here we start our tutorial:
1. Type regedit in RUN or Startmenu Search box and press Enter. It'll open Registry Editor.
2. Now go to following key:
HKEY_CLASSES_ROOT\Directory\Background\shell
3. Now we'll need to create a new key under "Shell" key. Right-click on "Shell" key and select "New -> Key". Give the new key name of "Open AskVG.com" (without quotes). You can give any other name, the name you set here will be shown as the option label in Desktop context menu.
4. Now we'll need to create another new key. Right-click on the new key which we created in the last step e.g. Open AskVG.com and select "New -> Key". Give the new key name of command.
5. Now select "command" key and in right-side pane, you'll see "Default" String value. We'll need to set its value to the command to open AskVG.com. You can set the browser as well which you want to open while selecting the option in Desktop context menu.
Following are the commands for each browser which are needed to be set as the value of "Default":
Internet Explorer: iexplore AskVG.com
Mozilla Firefox: firefox AskVG.com
Google Chrome: full_path_of_Chrome_EXE_file AskVG.com
Opera: full_path_of_Opera_EXE_file AskVG.com
You can find the full path of Google Chrome and Opera browsers by right-clicking on their shortcuts on Desktop or Programs menu and select "Properties". Now copy the complete path from "Target" text box and use that as described above.
Unlike IE and Firefox, only giving Chrome or Opera doesn't work in this method.
Google Chrome and Opera paths would be as following:
Google Chrome: C:\Users\User_Name\AppData\Local\Google\Chrome\Application\chrome.exe
Opera: C:\Program Files\Opera\opera.exe
If your Windows Vista is installed in a partition other than C:, then replace the drive letter in above mentioned paths.
Adding_AskVG_in_Registry_Editor.jpg
6. That's it. Once you set the value of "Default", you have done. Now right-click on Desktop and you'll set a new option "Open AskVG.com" which will open the website upon selection.
PS: If you want a ready-made script to do the task automatically, then download following ZIP file, extract it and then run the extracted REG file. It'll ask for confirmation, accept it:
Ready-made Script for IE Users
Ready-made Script for Firefox Users

Download Emergency Security Patch for Windows NOW

Microsoft has released an emergency security patch for almost all Windows versions from Windows 2000 to Windows Server 2008. This security update resolves a privately reported vulnerability in the Server service. The vulnerability could allow remote code execution if an affected system received a specially crafted RPC request.
On Microsoft Windows 2000, Windows XP, and Windows Server 2003 systems, an attacker could exploit this vulnerability without authentication to run arbitrary code. It is possible that this vulnerability could be used in the crafting of a wormable exploit. Firewall best practices and standard default firewall configurations can help protect network resources from attacks that originate outside the enterprise perimeter.
This security update is rated Critical for all supported editions of Microsoft Windows 2000, Windows XP, Windows Server 2003, and rated Important for all supported editions of Windows Vista and Windows Server 2008.
The security update addresses the vulnerability by correcting the way that the Server service handles RPC requests.
This patch is available via Automatic Updates but if you have missed it by any chance then you can manually download and install it using following link:
Vulnerability in Server Service Could Allow Remote Code Execution (958644)

Add “Open in New Window” Option in Folders and Drives Context Menu in Windows

Recently one of our readers "CytoxX" asked us how can he add an option "Open in New Window" in folders context menu, so that whenever he right-clicks on a folder, he can get the option in the list. In this tutorial, I'll tell you how to add "Open in New Window" option in folders as well as Drives context menu.
Open_in_New_Window_Option.jpg
Although you can open a folder or drive in new window by pressing "Ctrl" or "Shift" key while double-clicking on it but this trick no longer works in Windows Vista, Server 2008 and Seven.
In Windows Vista, Server 2008 and Seven, you can open a folder or drive in new window by right-clicking on it and selecting "Open" option. "Explore" option opens the folder or drive in same window but "Open" option opens them in a new window.
Now to add a separate option "Open in New Window" in folders and drives context menu, follow these simple steps:
1. Type regedit in RUN or Startmenu Search box and press Enter. It'll open Registry Editor.
2. Now go to following key:
HKEY_CLASSES_ROOT\Directory\shell
3. We'll need to create a new key under "Shell" key. Right-click on "Shell" key and select "New -> Key". Give the new key name of "Open in New Window" (without quotes). You can give any other name, the name you set here will be shown as the option label in context menu.
4. Now we'll need to create another new key. Right-click on the new key which we created in the last step e.g. Open in New Window and select "New -> Key". Give the new key name of command.
5. Now select "command" key and in right-side pane, you'll see "Default" String value. Change its value to:
explorer %1
6. Now go to following key:
HKEY_CLASSES_ROOT\Drive\shell
and follow steps 3-5 again for this key.
7. That's it. Once you set the value of "Default", you have done. Now right-click on any folder or drive and you'll get a new option "Open in New Window" which will open the selected folder or drive in a new window.
PS: If you want a ready-made script to do the task automatically, then download following ZIP file, extract it and then run the extracted REG file. It'll ask for confirmation, accept it:
Download Registry Script

Get Windows 7 Iconized (Icon Only) Taskbar Feature in Windows XP and Vista

Windows 7 taskbar doesn't show text in application buttons, it only show their icons. On the other hand previous Windows versions used to show icon as well as text in all application's taskbar buttons. Actually Windows 7 new iconized taskbar feature looks good and it also saves space in taskbar area. If you want to have the same feature in Windows XP, Vista, Server 2003, 2008, etc, then you can get it after following a few simple and easy steps.
Before applying this tutorial:
Default_Taskbar.jpg
After applying this tutorial:
Iconized_Taskbar.jpg
So here are the steps to follow:
1. Type regedit in RUN dialog box and press Enter. It'll open Registry Editor. Now go to following key:
HKEY_CURRENT_USER\Control Panel\Desktop\WindowMetrics
2. In right-side pane, create a new String value MinWidth and set its value to -255
Adding_MinWidth_Value_in_Registry.jpg
3. That's it. Log off or restart your system and get ready to have iconized taskbar in your system.
4. To restore default taskbar behavior, delete the MinWidth String value and log off or restart your system.
PS: If you want a ready-made registry script which can do the task automatically, then download following ZIP file, extract it and then run the Install.reg file. It'll ask for confirmation, accept it:
Download Registry Script

Download “Broken Vista” Wallpapers, Who Broke My Vista?

So you like Windows Vista default "Aurora" wallpaper, then what will you do if someone break your Vista? Didn't get my point? OK, then take a look at following wallpapers:


Got it? Above are 3 wallpapers created by "somrat". He has tried to make the wallpapers using default Aurora wallpaper and now they look like someone broke the screen.
Definitely excellent artwork. You can download all 3 wallpapers using following links:
Download Broken Vista 1
Download Broken Vista 2
Download Broken Vista 3 with Text

“Broken Vista” Wallpaper Available in All Possible Resolutions

Recently we blogged about "Broken Vista" wallpaper which is an excellent art work:
“Broken Vista” Wallpapers, Who Broke My Vista?
It was available only in "1440x900" resolution. So you had to resize/crop it for other screen resolutions.
But now the wallpaper is available in almost all possible screen resolutions:
  • 1024x768
  • 1280x960
  • 1600x1200
  • 1440x900
  • 1680x1050
  • 1920x1200
So download the wallpaper pack and enjoy it:
Download "Broken Vista" Wallpaper Pack

Get Windows 7 “Aero Snap” Feature in Windows XP and Vista

Windows 7 provides a new feature which is called "Aero Snap". You can minimize, maximize, resize window by just dragging-dropping it to the screen corners. Its a very useful and interesting feature in Windows 7. Now you can enjoy this feature in Windows XP and Vista as well.
"AeroSnap" is a simple but powerful tool that provides the same functionality in XP and Vista.
Simple drag a window to a side of your desktop to snap it or drag it to the top to maximize. When you drag it back to the last position, the last window size will be restored.
It also works with multiple monitors.
Please keep in mind, that this software is still in beta process. It's stable enough to use, but it's possible that you'll get some errors.
Download Link

Taskbar Iconizer: Get Windows 7 Look-like Iconized Taskbar Buttons in Windows XP and Vista

Recently we posted a small tutorial on how to get Windows 7 Iconized Taskbar feature in Windows XP and Vista: Get Windows 7 Iconized (Icon Only) Taskbar Feature in Windows XP and Vista
The above tutorial shows how you can get the iconized taskbar easily by modifying Windows registry.
And now we are very pleased to announce that our very close friend "Solo-Dev" aka "Villain" has created a very small standalone utility exclusively for AskVG.com readers which can do the same task automatically.
"Taskbar Iconizer" is a small portable tool which uses the same registry trick to provide iconized taskbar feature in XP and Vista. You just need to download the file, run it and it'll show following window:

Simply click on the right-side image which shows "Windows 7 Type Iconized" and you have done. You'll need to log off or restart the system to take affect. To restore default settings, click on the left-side image.
Download Link

Get Windows 7 Calculator Working in Windows Vista

As you know Windows 7 contains a new redesigned Calculator which has new GUI and new options. You can get more information about it in following topic: What’s New in Windows 7: A Small Review with Screenshots
If you can't use Windows 7 but like the new Calculator, then you can get the same calculator working in Windows Vista.
"Anoop" @ Daily Gyan has posted about a ported version of Windows 7 calculator which works in Windows Vista without any problem, so you can enjoy the fully functional Windows 7 calculator in your Vista.
Download the ZIP file from following link:
Download Link
Now extract the ZIP file and run the "calc.exe" file.
If you want to replace the default calculator with this new one, then replace following existing files with the new ones:
%windir%\System32\calc.exe
%windir%\System32\en-US\calc.exe.mui
That's it. Now you can enjoy the new Windows 7 calculator in Vista.

Get Windows 7 “Aero Shake” Feature in Windows XP and Vista

To continue our Windows 7 features coming to pre-7 computers tour, here we are sharing a very small and great utility which provides the "Aero Shake" feature of Windows 7 in Windows XP, Vista and other pre-7 versions. "Aero Shake" is a new feature in Windows 7 which is quite useful. Suppose you have more than one windows opened and you want to minimize all other windows except the window which you are working on, then you have to simply shake the current window with your mouse and all other windows will be minimized automatically. Shake it again and all minimized windows will be maximized again.
To get this feature in Windows XP and Vista, download following EXE file:
Download Aero Shake for Windows XP and Vista
Run it and enjoy the new feature.
Thanks to Lifehacker...

Windows Sysinternals Updated with ZoomIt v2.2 and AccessChk v4.22

Windows Sysinternals team has updated 2 of its components: ZoomIt v2.2: This ZoomIt update makes it easier to see the drawing cursor when it's small relative to the zoomed region by representing it as a cross hair, allows you to position the text cursor when you enter text mode, supports changing the text color for the break timer and while you're placing the text cursor, and includes a number of other minor improvements.
Download ZoomIt v2.2
AccessChk v4.22: This update fixes a bug that sometimes caused AccessChk to not show the full list of rights and privileges assigned to a user account.
Download AccessChk v4.22
[via]

Add “Change Sound”, “Change Cursor”, “System Properties”, “Task Manager” and Many Other Useful Shortcuts in Windows Vista and 7 Desktop Context Menu

Yesterday we posted a tutorial which helps you in adding many useful shortcuts like "Change Wallpaper", "Change Theme", "Change Screen Saver", etc in Windows Vista, Server 2008 and Windows 7 Desktop context menu: Add “Change Wallpaper”, “Change Theme”, “Change Screen Saver” and Many Other Useful Shortcuts in Windows Vista and 7 Desktop Context Menu
Now continuing it, we are posting about a few more useful shortcuts which you can add in Desktop context menu. After following this tutorial, you can get following Desktop context menu under Windows Vista, Server 2008 and Windows 7:

You can add all or any of the above shown options in Desktop context menu and can access them by simply right-click on Desktop. It would be very easy and useful.
Its only possible in Windows Vista, Server 2008 and Windows 7.
We would be using 2 tricks in this tutorial which we posted about long time back in following tutorials:
Add Your Favorite Application Shortcut in Desktop Context Menu in Windows Vista
Create Shortcuts to Themes, Desktop Background, Screen Saver, Display Settings and More
Windows Vista, Server 2008 and Windows 7 have a built-in feature which we revealed long time back. We can put our desired application shortcut in Desktop context menu which was not possible in Windows XP and other older versions.
So in this tutorial, we'll use the same trick to add shortcut in Desktop context menu and will use the shortcut commands to open various tabs present in Desktop Properties window like Theme, Wallpaper, Screen Saver, etc.
So here we start our tutorial:
1. Type regedit in RUN or Startmenu Search box and press Enter. It'll open Registry Editor.
2. Now go to following key:
HKEY_CLASSES_ROOT\Directory\Background\shell
3. Now we'll need to create a new key under "Shell" key. Right-click on "Shell" key and select "New -> Key". Give the new key any desired name e.g. "Change Sound" (without quotes).
4. Now we'll need to create another new key. Right-click on the new key which we created in the last step e.g. Change Sound and select "New -> Key". Give the new key name of command.
5. Now select "command" key and in right-side pane, you'll see "Default" String value. Double-click on it and set its value to as following:
control mmsys.cpl,,2

6. That's it. Now you'll have a new option "Change Sound" in Desktop context menu.
7. You can use the same steps 3-5 to add other options. Simply give the desired option label in Step 3 and set the required command in Step 5. Following are the required codes which you'll need to provide as "command" in step 5:
Administrative Tools: control admintools
Change Cursor: control main.cpl,,1
Change Date / Time: control timedate.cpl
Change Regional Settings: control intl.cpl
Folder Options: control folders
Fonts: control fonts
Internet Options: control inetcpl.cpl
Network Connections:control ncpa.cpl
Power Options: control powercfg.cpl
Printers: control printers
Programs and Features: control appwiz.cpl
Registry Editor: regedit
Security Center: control wscui.cpl
Security Configuration: msconfig
System Properties: control sysdm.cpl
Task Manager: taskmgr
Task Scheduler: Control schedtasks
Turn Firewall On / Off: control firewall.cpl
User Accounts: Control userpasswords
User Accounts Classic: Control userpasswords2
8. That's it.
9. You can add any other desired control panel applet using the same way.
10. To remove any option, simply delete its key.
PS: If you want ready-made registry scripts to add the shortcuts automatically in Desktop context menu, then download following ZIP file, extract it and you'll get several .REG files for adding each shortcut. Just double-click on the desired .REG file, it'll ask for confirmation, accept it and you have done:
Download Registry Script

The Best WindowBlinds Skin for Windows Vista Ever!!!

So here is the best WindowBlinds skin for Vista we have ever seen and we bet you'll also agree with us. This WB skin "Glass for Vista" has been created by "fediaFedia" which can provide the maximum transparency and glass effect which you can't even imagine. Following is a preview of this skin:

As you can see the Windows Explorer has glass everywhere which looks excellent. You'll definitely like this skin.
You can download this WindowBlinds skin from following link:
Download Glass for Vista WB Skin for Vista
You'll need WindowBlinds 6.1 or newer version to use this skin.

Ultimate Windows Tweaker

Our friend WinVistaClub has released a Windows Vista tweaking utility "Ultimate Windows Tweaker". This utility contains 130+ registry tweaks which can enhance the performance and functionality of Windows Vista. It has been developed by our fellow MVP Ramesh Kumar. Its only 368 KB EXE file which even doesn't need any installation. You can directly run it after downloading so you can also carry it on your USB drive.
It contains 7 sections which helps in identifying which tweaks you want to apply:
  • Personalization
  • User Accounts and UAC
  • System and Performance
  • Security
  • Internet Explorer
  • Network Optimization
  • Additional Options
You can download it using following link:
Download Link

Get Windows 7 Like Large Taskbar Buttons in Windows Vista

As you all know, Windows 7 taskbar doesn't show the program name in their buttons instead it only shows their icons. Also the taskbar buttons are a bit large in height compared to previous Windows versions. If you want to have the same thing in Windows Vista, then there is a good news for you. Our friend "flarejune" has created a very small standalone utility for Vista users which he wants to share with AskVG readers. It allows you to increase the taskbar buttons size. So you can make them look-a-like Windows 7 taskbar buttons. Thanks to "flarejune" for creating this utility and sharing with AskVG readers.

First download and install "Microsoft Visual C++ 2008 Redistributable Package" from here. Its required to run Taskbar Resize tool.
Now download the tool from following link:
Download Taskbar Resize Tool
Alternative Link
Extract the RAR file and you'll get 2 folders:
  • en-us
  • zh-cn
If you are using English version of Windows, then open the "en-us" folder and run the EXE file. If you are using a Chinese version, then use the second folder "zh-cn".
Run the EXE file and drag the slider according to your requirements and click on "Apply" button. That's it. You can see the instant affect. You can play with the slider settings until it satisfies your needs.
You can add it to startup using "auto startup" checkbox.
If you want to iconize taskbar buttons so that it doesn't show program text, then you can follow the simple steps given in following tutorial:
Get Windows 7 Iconized (Icon Only) Taskbar Feature in Windows XP and Vista
Or you can use our small utility which can do the task automatically:
Taskbar Iconizer: Utility to Iconize Taskbar in Windows XP and Vista

Download Windows 7 Theme for Windows Vista

As you all know Windows 7 looks quite different from Vista. It contains an improved start menu, taskbar and also totally revamped Shellstyle in Windows Explorer. The most impressive thing in Windows 7 is the redesigned taskbar. It shows a bit large program buttons which shows only program icons and not their names.
If you are impressed with Windows 7 theme and want to use it in Windows Vista, then you have come to right place. "DJ Gx" has released a new updated theme for Windows Vista which can provide the same Windows 7 interface. Following is a screenshot which was taken from Windows Vista while using this theme:

You can download the theme using following link:
Download Windows 7 Theme for Windows Vista
How to Install & Use?
Download Wallpaper

Transform Windows Vista into Windows 7 without using Customization Pack

Windows 7 provides lots of new features along with a newly designed interface. It looks very similar to Windows Vista but there are many GUI changes like redesigned taskbar, Explorer, new boot screen and login screen, etc. If you are still using Windows Vista but want to enjoy the new Windows 7 look, then this tutorial will definitely help you.
After following this tutorial, you'll get the same Windows 7 look in your Windows Vista. Following is a list of things which are going to be changed after following this tutorial:
  • Windows Theme or Visual Style
  • Boot Screen
  • Login Screen or Welcome Screen
  • Taskbar
  • Wallpaper
  • About Windows Box
  • Extras like "Aero Shake", "Aero Snap", "Aero Peek", "Calculator" and "Paint"
  • A Few Other Mods...
NOTE 1: Please create a Restore point using "System Restore" before applying anything mentioned in this tutorial so that you can restore your system back to default if you don't like the changes.
Also take a backup of system files before modifying them, so that you can restore them if anything goes wrong or you don't like the new change.
NOTE 2: If you are getting error "Can't create file...", that means you have edited and saved the same file in past and there is a backup file which need to be deleted before saving this file again. Go to the folder containing this file and you'll see a similar file having "_original" in its name. Delete it and try to save the file in resource hacker.
So here we start our transformation tour:
1. Windows Theme or Visual Style:
Windows 7 provides a new refreshing look which includes redesigned taskbar and start menu, Windows Explorer and a few other small changes.
You can get the same look by using an excellent theme created by our friend "DJ Gx".

Download Windows 7 Theme for Windows Vista
2. Boot Screen:
Windows 7 contains a new animated boot screen which shows animated items/balls that come together to form Windows logo.
You can get a similar boot screen in Windows Vista:

Download Windows 7 Boot Screen for Windows Vista
3. Login Screen or Welcome Screen:
Windows 7 login screen looks similar to Vista login screen except the new background image and the text displayed at bottom.

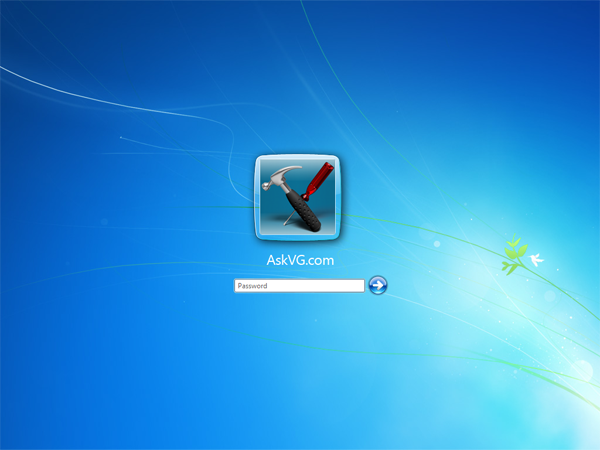
Download Windows 7 Login Screen for Windows Vista
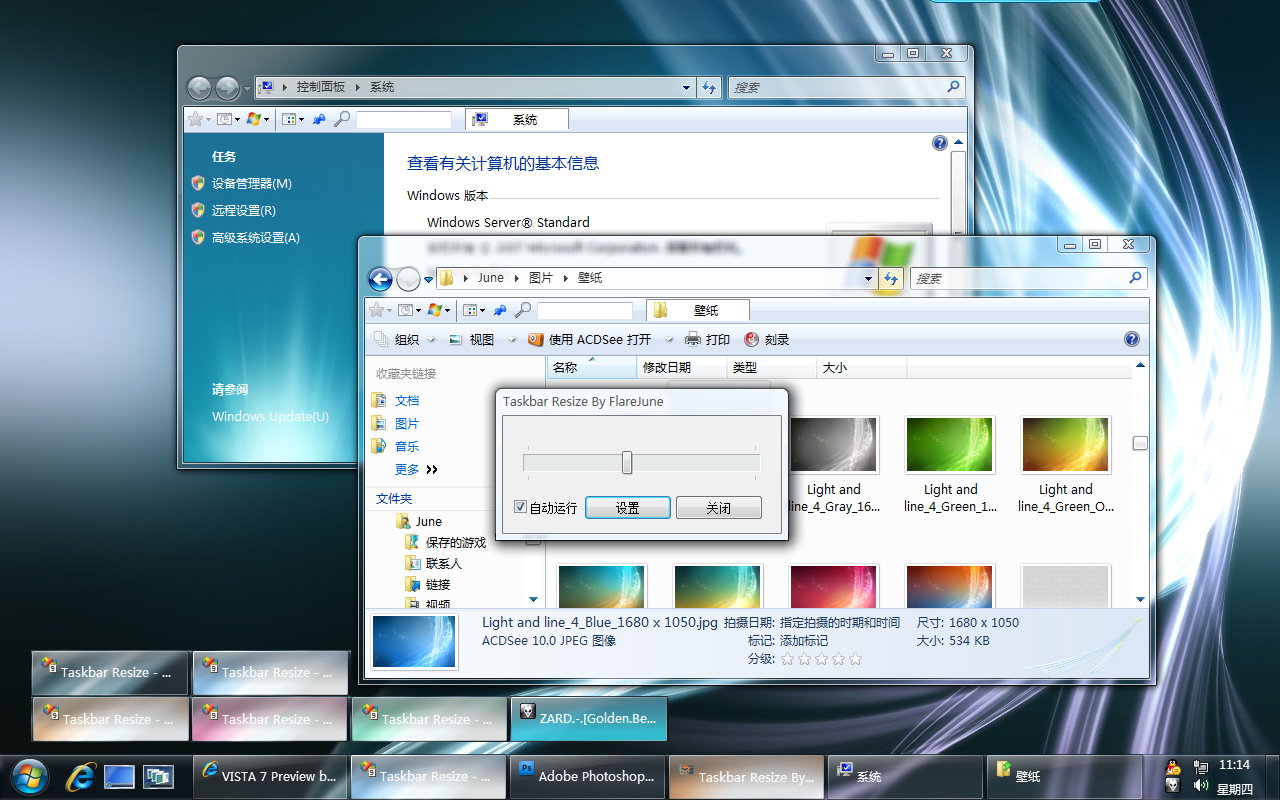
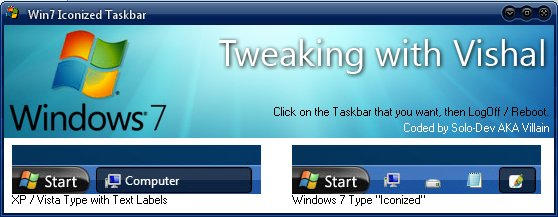
4. Taskbar:
Windows 7 taskbar has been highly redesigned. It doesn't show opened program's name in their taskbar buttons, instead it only shows their icons. Also the taskbar buttons are a bit large in their size.
Default_Win_7_Taskbar_Buttons.png
You can get the same behavior in Vista by using following tutorial:
Get Windows 7 Iconized (Icon Only) Taskbar Feature in Windows Vista
Or you can use following small utility which can do the task automatically:

Taskbar Iconizer: Utility to Iconize Taskbar in Windows Vista
To increase the taskbar buttons size:
Get Windows 7 Like Large Taskbar Buttons in Windows Vista
You can also use following tool to get Windows 7 look-like Superbar in Vista:
ViGlance: Get Windows 7 Look-Like Superbar in Windows Vista
Windows 7 taskbar also allows you to move taskbar buttons to change their positions, you can get the same feature in Windows Vista by using "Taskbar Shuffle" utility:
Taskbar Shuffle: Move Taskbar and System Tray Buttons in Windows
And if you want to get the small "Show Desktop" rectangle at the end of Taskbar just like Windows 7, please visit following topic:
Get Windows 7 “Show Desktop” Taskbar Icon in Windows XP & Vista
5. Wallpaper:
You can get Windows 7 Desktop wallpaper using following link:
Download Wallpaper (via TheVista.Ru)
6. About Windows Box:
You'll need to change the top logo in the About Windows dialog box so that it can look like Windows 7:

Download the required BITMAP files from here:
Download About BMPs
Now go to "%windir%\Branding\Basebrd\" folder and look for a file "basebrd.dll".
Once you find the file, take its ownership using following tutorial:
Add Take Ownership Option in File / Folder Context Menu in Windows Vista
Now open this "basebrd.dll" file in Resource Hacker and then replace following BITMAPs with the downloaded BMP files:
Bitmap -> 100 -> 1033 (replace with About_Windows.bmp)
Bitmap -> 101 -> 1033 (replace with About_Windows.bmp)
Bitmap -> 110 -> 1033 (replace with About_Windows_Separator.bmp)
Bitmap -> 111 -> 1033 (replace with About_Windows_Separator.bmp)
Save the file and you have done.
7. A Few Extras:
Windows 7 provides 3 new features which are called "Aero Shake", "Aero Snap" and "Aero Peek".
"Aero Shake" is quite useful. Suppose you have more than one windows opened and you want to minimize all other windows except the window which you are working on, then you have to simply shake the current window with your mouse and all other windows will be minimized automatically. Shake it again and all minimized windows will be maximized again.
Using "Aero Snap", you can minimize, maximize, resize windows by just dragging-dropping them to the screen corners.
"Aero Peek" has replaced the old "Show Desktop" feature in Windows 7. It can be found as a small rectangle present at last in Windows 7 taskbar. When you hover the mouse cursor over it, it allows you to peek behind all open windows by hiding all windows and showing only outlines of all windows.
There are several 3rd party software available to provide these features in Windows Vista. Some of them are AeroSnap, AquaSnap, Aero Shake, Acer Gridvista, WinShake, TrueTransparency, WinSplit Revolution and WindowSpace.
Windows 7 also contains a new redesigned Calculator which has new GUI and new options.

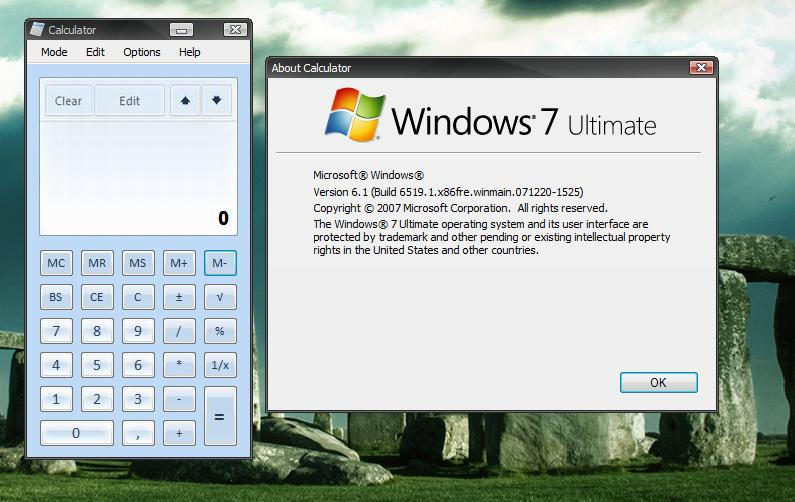
You can get the same calculator in Windows Vista using following link:
Get Windows 7 Calculator Working in Windows Vista
Windows 7 contains re-designed "MSPaint" program which provides Ribbons interface. You can get a similar MSPaint program in Windows Vista:

Get Windows 7 Look Like Paint in Windows XP and Vista
8. A Few Other Mods:
1. Windows 7 shows 2 extra options in Desktop context menu ( i.e. when you right-click on Desktop). The 2 extra options are:
  • Screen resolution
  • Gadgets
"Screen resolution" shows the graphics card settings page where you can change the monitor and resolution settings.
"Gadgets" opens the Add gadgets window so that you can add new gadgets to your sidebar.
You can get both these options in Vista desktop context menu:

Get Windows 7 Desktop Context Menu in Windows Vista
2. One of new redesigned features in Windows 7 is new "Window Color and Appearance" tab in Desktop Properties. When you right-click on Desktop and select "Personalize" and then go to "Window Color and Appearance" tab.

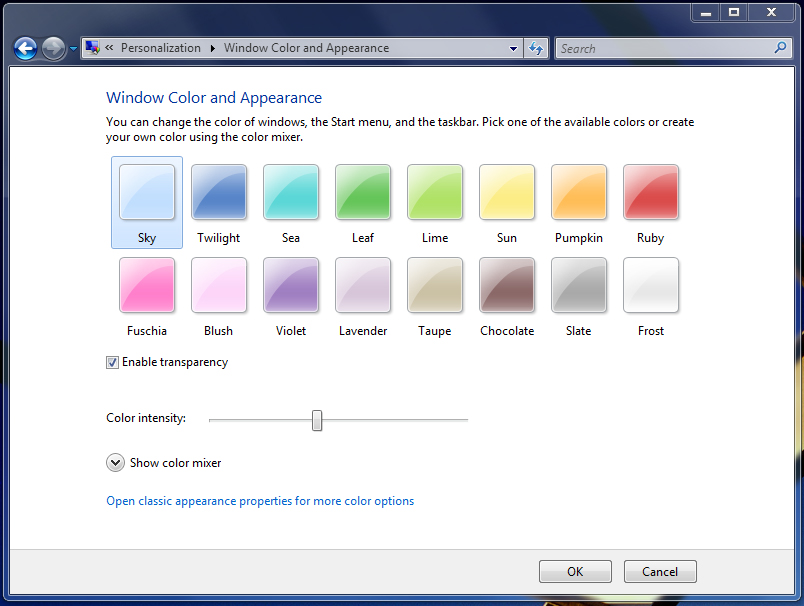
You can get the same Windows 7 "Window Color and Appearance" tab  in Vista using following tutorial:
Get Windows 7 Like “Color and Appearance” Tab in Windows Vista
That's all for now. After following all the above mentioned steps, you'll get Windows 7 look-n-feel in Windows Vista.
NOTE: If you have any problem with Resource Hacker and want to know about it, then please go through following tutorials:
All About Resource Hacker in a Brief Tutorial
List of VISTA System Files to be hacked using Resource Hacker
PS: If you are a Windows XP user and want to transform your XP into 7, then following link will help you:
Transform Windows XP into Windows 7 without using Customization Pack

Update Your Windows Using Mozilla Firefox, Opera or Any Other Web Browser

If you use Microsoft Windows, you might know about its "Automatic Updates" feature. It automatically downloads and installs (based upon its settings) Microsoft updates which fix many security and compatibility issues and sometimes add new functionality. You can also manually update Windows using Microsoft Updates website. But the website only works in Internet Explorer. If you try to open the website in any other web browser like Firefox, Opera, you get following message:
Thank you for your interest in obtaining updates from our site.
To use this site, you must be running Microsoft Internet Explorer 5 or later.
To upgrade to the latest version of the browser, go to the Internet Explorer Downloads website.
If you prefer to use a different web browser, you can obtain updates from the Microsoft Download Center or you can stay up to date with the latest critical and security updates by using Automatic Updates. To turn on Automatic Updates:
  1. Click Start, click Control Panel, and then click Security.
  2. Click Security Center, and then make sure Automatic updating is turned on.
To enhance the security and performance of your computer, make sure Windows automatic updating is not turned off.
So you need to use IE in case of manually updating Windows. But now you can download and install updates using any other web browser like Mozilla Firefox, Opera, Netscape or K-Meleon.
"WindizUpdate" is a plugin which allows users of Mozilla Firefox, Firebird, Opera, Netscape and K-Meleon to update their Windows using Microsoft Updates. You simply need to install the plug-in and then open "WindizUpdate.com" in your browser. Now you can scan for new updates and install them without IE.
It lists just the updates you need. If an update has been superseded by a newer one, it will not ask you to install the older one.
Also it is not restricted to just Microsoft products. Software from other vendors can also be updated.
So just head over to following website and enjoy Microsoft Updates in your favorite browser:
WindizUpdate.com
NOTE: If you face any problem while installing the plug-in, then download its installer from following link:
WindizUpdate installation program

Get Windows XP Styled Classic All Programs List in Windows Vista and 7

Many people complain about Windows Vista and 7 start menu. They want Windows XP styled "All Programs" list. Windows Vista and 7 show the All Programs list within startmenu on the other hand XP shows it in a new expanded column outside the startmenu. Recently we received an email from "James Phillips":
Dear Vishal, I am contacting you as a last resort (I have already stated my problem in various forums and blogs with no success whatsoever).
My problem is with Vista's start menu, specifically the way it displays the All Programs list. Instead of showing the list within the start menu itself, i would like it to expand out into a new column, just like in XP.
I know this function is available using the classic menu, but i actually like all of the other features in the normal menu (search etc...) so I would prefer not to use classic.
thanks for any suggestions you may have.
Actually there is a way to enable XP styled All Programs list in Vista, 7 and Server 2008.
Long time back, we posted a tutorial to customize Windows XP start menu:
Change Look-n-Feel of Windows XP Start Menu
We'll use the Step 5 mentioned in above tutorial to implement XP styled Programs list in Vista and 7. We'll replace "Favorites" menu with "All Programs" menu.
1. Open regedit and go to following keys one by one:
HKEY_CURRENT_USER\Software\Microsoft\Windows\CurrentVersion\Explorer\Shell Folders
HKEY_CURRENT_USER\Software\Microsoft\Windows\CurrentVersion\Explorer\User Shell Folders
2. Now you'll need to change the value of Favorites string value in right-side pane to:
C:\ProgramData\Microsoft\Windows\Start Menu\Programs
Change C: to your system drive, where windows is installed in your system.
3. That's it. Log off or restart your system and now "Favorites" link in start menu will change to "Programs" and will show all program shortcuts installed in your system just like XP start menu does.
NOTE: If you can't see the new menu in startmenu, you'll need to enable "Favorites Menu" from Taskbar Properties -> Start Menu -> Customize.
4. You can also disable the All Programs button in start menu. Open regedit and goto:
HKEY_CURRENT_USER\Software\Microsoft\Windows\CurrentVersion\Policies\Explorer
In right-side pane, create a new DWORD value NoStartMenuMorePrograms and set its value to 1
Now log off or restart your system and the final output will look as following:
XP_Styled_Programs_List_in_Vista.png
As you can see, the new Programs menu shows the program shortcuts very similar to XP and "All Programs" button is no longer there.
PS: If you want a ready-made registry script to do the task automatically, then download following ZIP file, extract it and run the extracted REG file. It'll ask for confirmation, accept it. Restart your system to take affects:
Download Registry Script
NOTE: If you want to restore the default settings, Open regedit and go to following keys:
HKEY_CURRENT_USER\Software\Microsoft\Windows\CurrentVersion\Explorer\Shell Folders
HKEY_CURRENT_USER\Software\Microsoft\Windows\CurrentVersion\Explorer\User Shell Folders
In right-side pane, change value of "Favorites" to:
%USERPROFILE%\Favorites

Download Official Microsoft Brilliant Black Skin for Windows Media Player

Here is an official Microsoft skin for Windows Media Player. Its called "Brilliant Black". Actually this skin is a part of Microsoft Touch Pack for UMPC OEM (Ultra Mobile Personal Computer, Codenamed Origami). Our friend, a regular AskVG reader and porting expert "Amirz" got a chance to extract this skin and now you can use it in almost all Windows Media Player versions.
Official_MS_WMP_Skin.jpg
It works in Windows XP and Vista and Windows 7 too. You can use it in WMP 9 and higher versions.
Just download the ZIP file, extract it and double click on "Brilliant Black.wmz" file. It'll automatically install and apply the skin.
Download Link

Download “Broken Vista Black” Wallpapers, Who Broke My Vista Again???

Here are 2 new additions to "Broken Vista" wallpaper series. Broken Vista wallpapers have been created by "somrat". These wallpapers look like someone broke your computer screen:
Download Broken Vista Black Wallpaper (without warning message)
Download Broken Vista Black Wallpaper (with warning message)
Other Broken Vista Wallpapers

Get Windows 7 Desktop Context Menu in Vista, Add “Screen Resolution” and “Gadgets” Options

Windows 7 shows 2 extra options in Desktop context menu ( i.e. when you right-click on Desktop). The 2 extra options are:
  • Screen resolution
  • Gadgets
"Screen resolution" shows the graphics card settings page where you can change the monitor and resolution settings.
"Gadgets" opens the Add gadgets window so that you can add new gadgets to your sidebar.
Both options are quite useful and if you want to add them in Windows Vista, then you can follow this simple and easy tutorial.
After following this tutorial, you'll get following desktop context menu in Vista:

So here are the steps:
To Add "Screen Resolution" Option:
1. Type regedit in RUN or Startmenu Search box and press Enter. It'll open Registry Editor.
2. Now go to following key:
HKEY_CLASSES_ROOT\Directory\Background\shell
3. Now we'll need to create a new key under "Shell" key. Right-click on "Shell" key and select "New -> Key". Give the new key name of "Screen resolution" (without quotes).
4. Now we'll need to create another new key. Right-click on the new key which we created in the last step e.g. Screen resolution and select "New -> Key". Give the new key name of command.
5. Now select "command" key and in right-side pane, you'll see "Default" String value. Double-click on it and set its value to as following:
control desk.cpl,,@display
6. That's it.
To Add "Gadgets" Option:
1. Type regedit in RUN or Startmenu Search box and press Enter. It'll open Registry Editor.
2. Now go to following key:
HKEY_CLASSES_ROOT\Directory\Background\shell
3. Now we'll need to create a new key under "Shell" key. Right-click on "Shell" key and select "New -> Key". Give the new key name of "Gadgets" (without quotes).
4. Now we'll need to create another new key. Right-click on the new key which we created in the last step e.g. Gadgets and select "New -> Key". Give the new key name of command.
5. Now select "command" key and in right-side pane, you'll see "Default" String value. Double-click on it and set its value to as following:
C:\program files\windows sidebar\sidebar.exe /showgadgets
NOTE: If your Windows is installed in any other drive, then change C: to that drive letter.
6. That's it.
PS: If you want a ready-made script to do the task automatically, then download following ZIP file, extract it and then run the extracted REG file. It'll ask for confirmation, accept it:
Download Registry Script

List of Windows Vista BUGs Which Have Been Fixed in Windows 7

Here is another interesting reason why Windows 7 is better than Vista. Do you remember we found lots of bugs in Windows Vista and also reported them to Microsoft? We also asked Microsoft to release SP2 to fix all those bugs: SP1 Failed to Fix Several Windows Vista Bugs, Do We Need SP2?
And today we are very pleased to say that Microsoft listened to us and fixed almost all the reported bugs in Windows 7.
Following are the bugs which have been fixed in Windows 7 but are still there in Windows Vista SP2:
So it proves that Microsoft has really worked hard in the development of Windows 7 and now you are not supposed to say that Microsoft never listens. ;)

Get Windows 7 Like “Color and Appearance” Tab in Windows Vista

As you know Windows 7 contains lots of new features along with redesigned existing Vista features. You can get more information about all Windows 7 features in following topic: What’s New in Windows 7: A Small Review with Screenshots
One of such redesigned features in Windows 7 is new "Window Color and Appearance" tab in Desktop Properties. When you right-click on Desktop and select "Personalize" and then go to "Window Color and Appearance" tab.
By following this tutorial, you'll get the same Windows 7 "Window Color and Appearance" tab  in Vista.

1. First download following ZIP file and extract it:
Download Link (32-bit)
Download Link (64-bit)
2. Now go to "%windir%\System32" folder and look for a file "themecpl.dll".
3. Once you find the file, take its ownership using following tutorial:
Add Take Ownership Option in File / Folder Context Menu in Windows Vista and 7
4. Now rename the file to some other name like "themecpl_backup.dll".
5. Copy the "themecpl.dll" file from downloaded ZIP file to "System32" folder.
6. Now go to "%windir%\System32\en-US" folder and look for a file "themecpl.dll.mui".
7. Once you find the file, take its ownership.
8. Now rename the file to some other name like "themecpl_backup.dll.mui".
9. Copy the "themecpl.dll.mui" file from downloaded ZIP file to "System32\en-US" folder.
10. At last run the "SOFTWARE_Glass Colorization.reg" file present in downloaded ZIP file.
11. That's it. Now restart your system and get ready to see the new Windows 7 "Color and Appearance" tab in Vista.
Thanks to "AUDI-1980"..

[FIX] WinRAR Causes Wide Context Menu Bug in Windows Vista, Server 2008 and 7

Its a known issue in Windows Vista, Server 2008 and Seven. I received lots of mails about this problem. Sometimes people called it a bug in Windows and sometimes a virus problem. But the truth is, its a compatibility issue between WinRAR and Windows. Recently a visitor "Blu" contacted me about the same issue. He is using Windows 7. Whenever he right-clicks on a file/folder in Explorer, he gets a very wide context menu as shown in following screenshot:

If you are also facing this problem, follow these simple steps to fix the problem:
1. Open WinRAR and go to "Options -> Settings...".
2. Now click on "Integration" tab.
3. In "Shell integration" section, try following things to fix the problem:
  • Disable "Icons in context menu" option and click on OK button.
  • If the above trick doesn't work, then enable "Cascaded context menus" option.
  • If none of the above 2 options works, then remove the context menu entry by disabling "Integrate WinRAR into shell" option.
WinRAR_Bug_in_Win_Vista_and_7.png
4. After following 3rd step, your problem will be solved.

#
### ###