Friends

This is default featured post 1 title

Go to Blogger edit html and find these sentences.Now replace these sentences with your own descriptions.This theme is Bloggerized by Lasantha Bandara - Premiumbloggertemplates.com.

This is default featured post 2 title

Go to Blogger edit html and find these sentences.Now replace these sentences with your own descriptions.This theme is Bloggerized by Lasantha Bandara - Premiumbloggertemplates.com.

This is default featured post 3 title

Go to Blogger edit html and find these sentences.Now replace these sentences with your own descriptions.This theme is Bloggerized by Lasantha Bandara - Premiumbloggertemplates.com.

This is default featured post 4 title

Go to Blogger edit html and find these sentences.Now replace these sentences with your own descriptions.This theme is Bloggerized by Lasantha Bandara - Premiumbloggertemplates.com.

This is default featured post 5 title

Go to Blogger edit html and find these sentences.Now replace these sentences with your own descriptions.This theme is Bloggerized by Lasantha Bandara - Premiumbloggertemplates.com.

Saturday, April 9, 2011

How to Change Windows XP Login Screen Text Entries?

In this tutorial, we'll tell you about the files which contains the text, which is displayed on XP Login Screen, like, Welcome, Type your password, To begin, click your user name, etc. This tutorial is not for changing the Login screen look (like images, etc.) but for changing the Text of Login screen. So, You'll have to edit following 2 files:
LogonUI.exe
Winlogon.exe

LogonUI.exe file contains most of the text entries of the login screen and Winlogon.exe file contains the text, which is displayed when you login/logout the windows, like Windows is shutting down..., etc.
So first we'll edit LogonUI.exe file:
1.) Open %windir%\System32\LogonUI.exe file in Resource Hacker and navigate to String Table section.
2.) Here you'll find sub-directories, 1,2,3,4,7, in which only first 3 directories 1,2,3 are of our use.
3.) Following are the locations of some interesting text entries, which you will like to change:
Type your password : String Table -> 1 -> 1033 -> 6
Please type your password again. \nBe sure to use the correct uppercase and lowercase letters. : String Table -> 1 -> 1033 -> 8
You can click the \"?\" button to see your password hint.\n\nPlease type your password again. \nBe sure to use the correct uppercase and lowercase letters. : String Table -> 1 -> 1033 -> 9
Did you forget your password? : String Table -> 1 -> 1033 -> 10
Turn off computer : String Table -> 1 -> 1033 -> 11 & 12
Password Hint : String Table -> 1 -> 1033 -> 13
To begin, click your user name : String Table -> 2 -> 1033 -> 22
After you log on, you can add or change accounts.\nJust go to Control Panel and click User Accounts. : String Table -> 2 -> 1033 -> 25
PS: "\n" is used to give line break. You can also use it in your customized text. Also there are many other text entries, that you might like to change.
Now its turn of Winlogon.exe file:
1.) Open %windir%\System32\Winlogon.exe file in Resource Hacker and navigate to String Table section.
2.) Here only 105, 106, 110 and 111 are of our use.
3.) Actually String Table -> 106 -> 1033 is only of our use, but if you have enabled "Extended Shutdown messages" option, then other sections (105, 110, 111) will also be of our use.
4.) In 106 section, 1682, 1684, 1687, 1690 and 1691 are the interesting ones. You can change their text with your desired one. These entries contains the text, like Loading your personal settings..., Saving your settings..., Windows is starting up..., etc.
NOTE: If you are facing problems while saving a file after editing in resource hacker, then make sure you have disabled WFP (Windows File Protection) service using WFP Patcher, it can be found in our "Download" section.
Also if you are getting error "Can't create file...", that means you have edited and saved the same file in past and there is a backup file which need to be deleted before saving this file again. Go to the folder containing this file and you'll see a similar file having "_original" in its name. Delete it and try to save the file in resource hacker.

Enable HIBERNATE Button in Shutdown Dialog Box in Windows XP

In Windows XP "Hibernate" button is not visible in Shutdown dialog box but when we press <SHIFT> key, it appears in place of "Stand By" button. Its strange and many people want to show it always in shutdown dialog box. So here I'll tell you a way to always show Hibernate button in shutdown dialog box: 1.) Open %windir%\system32\msgina.dll file into Resource Hacker.
2.) Go to Dialog -> 20100 -> 1033.
3.) If you want the following look (Hibernate button at bottom) :

Replace existing code with the following code:
20100 DIALOGEX 0, 0, 208, 122
STYLE DS_SYSMODAL | DS_SETFOREGROUND | WS_POPUP | WS_BORDER
CAPTION ""
LANGUAGE LANG_ENGLISH, SUBLANG_ENGLISH_US
FONT 8, "MS Shell Dlg"
{
CONTROL "Flag", 20101, STATIC, SS_OWNERDRAW | WS_CHILD | WS_VISIBLE, 176, 0, 32, 26
CONTROL "Good Bye", 20102, STATIC, SS_OWNERDRAW | WS_CHILD | WS_VISIBLE, 7, 0, 162, 26
CONTROL "&Stand By", 20104, BUTTON, BS_OWNERDRAW | BS_NOTIFY | WS_CHILD | WS_VISIBLE | WS_TABSTOP, 45, 47, 22, 20
CONTROL "Switch &Off", 20103, BUTTON, BS_OWNERDRAW | BS_NOTIFY | WS_CHILD | WS_VISIBLE | WS_TABSTOP, 91, 47, 22, 20
CONTROL "&Reboot", 20105, BUTTON, BS_OWNERDRAW | BS_NOTIFY | WS_CHILD | WS_VISIBLE | WS_TABSTOP, 140, 47, 22, 20
CONTROL "&Hibernate", 20106, BUTTON, BS_PUSHBUTTON | BS_NOTIFY | WS_CHILD | WS_VISIBLE | WS_TABSTOP, 79, 94, 48, 20
CONTROL "", 20108, STATIC, SS_OWNERDRAW | WS_CHILD | WS_VISIBLE | WS_DISABLED, 22, 73, 50, 8
CONTROL "", 20107, STATIC, SS_OWNERDRAW | WS_CHILD | WS_VISIBLE | WS_DISABLED, 79, 73, 50, 8
CONTROL "", 20109, STATIC, SS_OWNERDRAW | WS_CHILD | WS_VISIBLE | WS_DISABLED, 136, 73, 50, 8
}
4.) OR if you want to show Hibernate button in the same row of other items, then replace existing code with the following code:
20100 DIALOGEX 0, 0, 208, 122
STYLE DS_SYSMODAL | DS_SETFOREGROUND | WS_POPUP | WS_BORDER
CAPTION ""
LANGUAGE LANG_ENGLISH, SUBLANG_ENGLISH_US
FONT 8, "MS Shell Dlg"
{
CONTROL "Flag", 20101, STATIC, SS_OWNERDRAW | WS_CHILD | WS_VISIBLE, 176, 0, 32, 26
CONTROL "Good Bye", 20102, STATIC, SS_OWNERDRAW | WS_CHILD | WS_VISIBLE, 7, 0, 162, 26
CONTROL "&Stand By", 20104, BUTTON, BS_OWNERDRAW | BS_NOTIFY | WS_CHILD | WS_VISIBLE | WS_TABSTOP, 68, 49, 22, 20
CONTROL "Switch &Off", 20103, BUTTON, BS_OWNERDRAW | BS_NOTIFY | WS_CHILD | WS_VISIBLE | WS_TABSTOP, 117, 49, 22, 20
CONTROL "&Reboot", 20105, BUTTON, BS_OWNERDRAW | BS_NOTIFY | WS_CHILD | WS_VISIBLE | WS_TABSTOP, 169, 49, 22, 20
CONTROL "&Hibernate", 20106, BUTTON, BS_PUSHBUTTON | BS_NOTIFY | WS_CHILD | WS_VISIBLE | WS_TABSTOP, 9, 49, 39, 20
CONTROL "", 20108, STATIC, SS_OWNERDRAW | WS_CHILD | WS_VISIBLE | WS_DISABLED, 55, 73, 50, 8
CONTROL "", 20107, STATIC, SS_OWNERDRAW | WS_CHILD | WS_VISIBLE | WS_DISABLED, 105, 73, 50, 8
CONTROL "", 20109, STATIC, SS_OWNERDRAW | WS_CHILD | WS_VISIBLE | WS_DISABLED, 155, 73, 50, 8
CONTROL "Hibernate", 0, STATIC, SS_CENTER | WS_CHILD | WS_VISIBLE | WS_CLIPSIBLINGS, 14, 73, 32, 8
}
PS: Pressing <SHIFT> key to reveal Hibernate button will still work.

Add an Image in Desktop and Explorer Context Menu in Windows XP

This tutorial will help you in adding an image in Desktop and Explorer context menu in Windows XP:
1. First download following ZIP file and extract the DLL file from it:
Download Link
2. Now register the DLL file by giving following command:
regsvr32 DLL_File_Location
i.e., if you saved the DLL file in D:\Image.dll, then give following command:
regsvr32 d:\Image.dll
3. That's it. You'll get the image in context menu.
4. To remove the image simply un-register the DLL file by giving following command:
regsvr32 DLL_File_Location /u
NOTE: If you want to change the image, edit the file using Resource Hacker and change the image in the file. You can add any BMP file (max size 96x96).

[FIX] Optical Drives (CD/DVD) Not Showing in My Computer Window

If you can't see your optical drives (CD/DVD Drives/Writers) in My Computer, then this tutorial will help you: 1. Open regedit and goto:
HKEY_LOCAL_MACHINE\SYSTEM\CurrentControlSet\Control\Class\ {4D36E965-E325-11CE-BFC1-08002BE10318}
2. Delete "UpperFilters" and "LowerFilters"keys in right-side pane.
3. Restart the system and now you should  have access to your optical drives.

How to Get Blue Toolbar Back in Microsoft Office 2003 While Using 3rd Party Themes in Windows XP

If you are using Windows XP and have applied a custom theme, then you might have noticed that Office 2003 shows an ugly classic toolbar instead of the default blue toolbar. Office_2003_Color_Change.jpg
Actually Office 2003 checks whether you are using default "Luna" theme or not. If it finds that you are using any other theme, it starts showing the ugly classic toolbar.
The only work around for this problem is to rename your 3rd party windows theme's msstyles file to "luna.msstyles", e.g., if you are using our "VistaVG" theme, then just rename the "VistaVG.msstyles" to "luna.msstyles". That's it.
For WindowBlinds users, open "%windir%\wb.ini" file and add MakeOfficeBlue=1 in [global] section. You can change 1 to 2 or 3 to change the color to Green and Silver respectively.

FlyakiteOSX: Transform Your Windows XP, 2003, MCE into Mac OS X


FlyakiteOSX is a transformation pack for Windows XP. It will transform the look of an ordinary Windows XP+ system to resemble the look of Mac OS X. The installer simply automates the process of replacing critical system files, setting registry tweaks, and installing extras such as cursors, sounds, visual styles, etc.
FlyakiteOSX DOES NOT contain any spyware or ad-ware of any kind. All files needed for FlyakiteOSX are stored in the Windows directory in a folder named 'FlyakiteOSX' that is hidden by default. All registry values for FlyakiteOSX are written to HKEY_LOCAL_MACHINE\Software\FlyakiteOSX.
FlyakiteOSX.jpg
Download Here

QT Addressbar: Windows Vista Addressbar Clone for Windows XP

Windows Vista Explorer provides new breadcrumbs for easy navigation. You can get similar breadcrumbs address bar in Windows XP using "QT Addressbar".
Download Link

QT Tabbar: Add Tab Feature to Windows Explorer

"QT Tabbar" adds Tab feature to Windows Explorer so you can work on more than one folder within a single Explorer window just like a web browser. Features List:
  • Tab bar for Windows Explorer
  • QT TabBar allows you to operates files and folders like tab browser
  • Folder grouping, histories, etc.

Download Link

Add “Take Ownership” Option in File / Folder Context Menu in Windows XP, Vista and 7

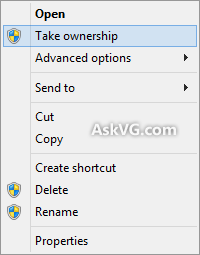
Many times you need to take ownership of a file or folder in Windows. You have to follow no. of steps to do this task. But now you can do it in a single step. Download following zip file and extract it. You'll get a .REG file. Run the file and accept the confirmation:
Download Link
It'll add an extra option "Take ownership" in file/folder context menu:

Now you can right-click on any file/folder and select “Take ownership”. It’ll make you the owner of the file/folder.

[Solution] Orkut.com, Youtube.com and Firefox is Banned in System

Many people are facing a common problem, where Orkut.com, Youtube.com and Firefox are blocked in their systems and they get following error with a scary laugh:
Orkut IS BANNED, orkut is banned you fool The administrators didnt write this program guess who did?? r r MUHAHAHA!!
So here I'm posting a detailed procedure to solve this problem.
It happens because of "Heap41a / win32.USBworm" which spreads through USB pen drives and removable storage devices. I'll tell you a simple method to remove the virus:
1. Open "Task Manager" and goto "Processes" tab.
2. Look for services with name "svchost.exe". There will be many services with the same name. Most of them will have "SYSTEM", "LOCAL SERVICE" OR "NETWORK SERVICE" as User Name but you have to look for "svchost.exe" service which has your currently logged in username as User Name.
3. You'll get approx. 2 services with the name "svchost.exe" which has your Windows username. End Task them by pressing <Delete> key or by selecting them and clicking on "End Process" button. It'll confirm the action, accept it.
4. Now open "regedit" from RUN and goto following keys:
HKEY_LOCAL_MACHINE\SOFTWARE\Microsoft\Windows\Current Version\Run
HKEY_LOCAL_MACHINE\SOFTWARE\Microsoft\Windows\Current Version\Policies\Explorer\Run
And look for a key in right-side pane with the name "Winlogon" which will have "heap41a\svchost.exe" in its value field. If you find this key, delete it.
5. Now goto following key:
HKEY_LOCAL_MACHINE\SOFTWARE\Microsoft\Windows\Current Version\explorer\Advanced\Folder\Hidden\SHOWALL
And in right-side pane, change value of "CheckedValue" to 1
6. Now enable "Show Hidden Files/Folders" option in "Tools -> Folder Options" in My Computer.
7. Right-click on Start button and select "Open". Now open "Programs" folder, here you'll see a folder "Startup". Open it and if you get a hidden file there, delete it. If its not there, then close it.
8. At last open "My Computer" and open C: drive. Disable "Hide Protected System files" option in "Tools -> Folder Options". You'll see a folder "heap41a" in C: drive. Delete it.
Thats it. After doing all this, restart your system and you'll get rid of the virus.
PS: Don't forget to format your pen drive or removable storage media which caused this virus infection because it would still contain the virus. If you don't want to format it, then delete following 2 files from pen drive:
microsoftpowerpoint.exe
autorun.inf

XdN Tweaker: Free Tweaking Program for Windows XP, Vista, 7, Server 2003 and 2008

"XdN Tweaker" is a free tweaking program for Windows XP, Windows Server 2003, Windows Vista, Windows Server 2008, and Windows 7. Features List:
  • Changes the number of Folder views Windows saves.
  • Resets the folder views Windows has saved.
  • Add/Remove classic Windows 2000 user control panel icon.
  • Disable/Enable ATI Catalyst Control Center right click on Desktop
    (only for use if you have an ATI video card and have the Catalyst Control Center installed).
  • Disable/Enable ‘SendTo’ right-click menu.
  • Allows you to adjust and tweak TCP/IP settings.
  • Disable/Enable ZipFolders.
  • Disable/Enable the Outlook Express/Windows Mail splash screen.
  • Put the File menu above the Back/Forward buttons in IE7.
  • Remove or Replace the Search box in IE7.
  • Disable/Enable User Account Control prompts under Vista.
  • Disable/Enable the “- Shortcut” text under Vista.
  • Attempt to force Vista to better save folder views.
  • Disable/Enable Windows Media Player Explorer context menus.
  • Add/Remove “Take Ownership” to right-click menus under Vista.
  • Disable/Enable the Documents item on the Classic Start Menu.
  • Changes “Delete” to “Search…” on Recycle Bin.
  • Turn off the annoying full screen “black” UAC prompt.
  • Add/Remove the Network Connections icon to Control Panel
  • Enable Classic Search in Explorer and Internet Explorer.
  • Disable/Enable Shutdown Reason dialog under Server 2003.
  • Disable/Enable Windows scanning AVI files for thumbnails.
  • Remove/Restore hidden ASPNET user that prevents auto login.
  • Add “Tweak UI” icon to Control Panel (if installed).
Download Link

IconTweaker: A Free Software to Change All Windows Icons

IconTweaker is a freeware application that allows you to customize all your Windows icons. Icons are one of main parts of the Windows interface. Customizing them can make your desktop look better and can also improve the usability, because you can make it easier to recognize items.
Using the IconTweaker theme system, designers can share their icons with other people. IconTweaker has an open XML-based theme format that can be extended using plug-ins. If you created an IconTweaker theme for your icons, you can be sure they can be used by everyone.
Many themes with beautiful icons are already included and ready to use.
Download Link

The Best Method to Hide Files / Folders in Windows Without Using 3rd Party Utilities

Following is a 100% safe and free of cost method to hide files/folders in Windows without using any 3rd party software: STEP 1: First of course, hide the file or folder from its "Properties".
STEP 2: Now disable "Show Hidden files/folders" option from "Tools -> Folder Options".
Hmm. Now you can say "What's so special? Anyone can enable the option again."

STEP 3: Ok. No problem. Disable "Folder Options" using Registry Editor. Please take a look at Point 3 in following topic:
All Kind of Restrictions for Windows 2000, XP, 2003, Vista and 7
Again you'll ask "So what? Anyone who knows about "regedit" can re-enable Folder Options. Then?"
STEP 4: Simple. Disable Registry Editor also. Again take a look at Point 13 in following topic:
All Kind of Restrictions for Windows 2000, XP, 2003, Vista and 7
Now we have almost done and our hidden files are safe but not really. Why? Because "regedit" can be enabled again using "gpedit.msc".
Goto:
User Configuration -> Administrative Templates -> System
In right-side pane, set “Prevent access to Registry editing tools” to either Not Configured or Disabled and it'll re-enable Registry Editor.
So to make our method 100% safe and working, just follow this last step:
STEP 5: Rename gpedit.msc to some other name like "AskVG.msc" and then hide it. You can find it in "Windows\System32" folder.
Now whenever anyone tries to run "gpedit.msc", Windows will show an error message "file not found". But you can always run it using the new name "AskVG.msc".
So its an easy to follow and absolutely free method to hide your private data from others.

How to Reset / Recover / Change Forgotten Administrator Password in Windows?

Many times we face this problem when we or our friends forget Windows password and can't log into Windows. So here we are posting a few methods / utilities which can be used to recover Windows password:
DISCLAIMER: Following information should be used only if its your system and you have forgotten account password. Don't use this information to access a system which is not yours without permission.
1st Method:
The first thing which you check if you forget login password. When we install Windows, it automatically creates an account "Administrator" and sets its password to blank. So if you have forget your user account password then try this:
Start system and when you see Windows Welcome screen / Login screen, press <ctrl>+<alt>+<del> keys twice and it'll show Classic Login box. Now type "Administrator" (without quotes) in Username and leave Password field blank. Now press Enter and you should be able to log in Windows.
Now you can reset your account password from "Control Panel -> User Accounts".
Same thing can be done using Safe Mode. In Safe Mode Windows will show this in-built Administrator account in Login screen.
2nd Method:
Windows XP and further versions also provide another method to recover forgotten password by using "Reset Disk". If you created a Password Reset Disk in past, you can use that disk to reset the password. To know more about it, please visit following links:
How to create and use a password reset disk for a computer in a domain in Windows XP
How to Log On to Windows XP If You Forget Your Password or Your Password Expires
3rd Method:
If the above mentioned tricks don't work, then try following trick which is actually a loophole in Windows XP Setup and a big security hole:
A. Boot using Windows XP Setup CD and follow the instruction like Accepting EULA, etc.
B. When it asks to repair your existing Windows installation, accept it and press "R" to run the repair.
C. Setup will start repairing your Windows and will start copying files, etc.
D. After a few minutes setup will restart your system and when it restarts don't press any key when it shows "Press any key to continue..." otherwise Setup will start from the beginning. Don't press any key and setup will resume where it left.
E. Now it'll start doing other tasks and will show a small progressbar with a few details in left side.
F. Look carefully at the details and when it shows "Installing devices", press <Shift>+F10 keys in your keyboard.
G. It'll open a Command Prompt window. Now type nusrmgr.cpl and press <Enter>.
H. It'll open the same "User Accounts" window which you see in Control Panel.
I. Now you can remove or reset any account password without any problem.
4th Method:
You can use various bootable rescue CDs as mentioned in following link:
Download FREE Bootable Rescue CDs from Kaspersky, BitDefender, Avira, F-Secure and Others
There are also a few 3rd party utilities and rescue discs to help you recover your Windows password:
UBCD for Windows:
UBCD4Win is a bootable recovery CD that contains software used for repairing, restoring, or diagnosing almost any computer problem. UBCD4Win is based on Bart's PE. Bart's PE builds a Windows "pre-install" environment CD, basically a simple Windows XP booted from CD. UBCD4Win includes network support and allows you the ability to modify NTFS volumes, recover deleted files, create new NTFS volumes, scan hard drives for viruses, etc.
Download Link
Ultimate Boot CD (UBCD):
Ultimate Boot CD runs independently of any operating system. It will boot from any Intel-compatible machine, regardless of whether DOS/Windows/Linux/BeOS is installed on the machine. However, you do need an operating system and a ISO-capable CD writer software to create the Ultimate Boot CD from the downloaded ISO image file.
Download Link
Offline NT Password & Registry Editor:
This is a utility to reset the password of any user that has a valid (local) account on your NT system. You do not need to know the old password to set a new one. It works offline, that is, you have to shutdown your computer and boot off a floppydisk or CD. It'll detect and offer to unlock locked or disabled out user accounts. It is also an almost fully functional registry editor.
Download Link
Windows Geeks Lost Forgotten Password Service:
Windows Geeks have a program that works instantly to remove any lost or forgotten password. With this program you can get back in very quickly:
Windows Geeks Service
5th Method:
If all fails, then simply reinstall Windows and create new accounts. To recover lost data, you can use Data recovery tools available on net but the chances will be very low to get data back.
That's all we can suggest. If you have any other method / tool, feel free to post here.

Glass Toast: Get Longhorn 4xxx Style Glassy notification balloons in Windows XP, 2003 and Vista

In Windows Vista, the balloon popups look like the ones from XP. However, at some point in the longhorn beta's, they actually looked like this:
If you want to recreate that effect for XP and vista, use a small application GlassToast created by “Andreas Verhoeven”.
Download Link

nLite: Customize Windows XP Setup and Remove Unwanted Components

Lite is a tool for permanent Windows components removal and pre-installation Windows configuration. After removal there is an option to make bootable image ready for burning on cd or testing in virtual machines. With nLite you will be able to have Windows installation which on install does not include, or even contain on cd, the unwanted components.
Features
  • Service Pack Integration
  • Component Removal
  • Unattended Setup
  • Driver Integration
  • Hotfixes Integration
  • Tweaks
  • Services Configuration
  • Patches
  • Bootable ISO creation
nLite supports Windows 2000, XP x86/x64 and 2003 x86/x64 in all languages. It needs Microsoft .NET Framework 2.0 in order to run.
Download Link

How to Set Your Desired Wallpaper as Folder Background Image in Windows XP

Do you remember the good old Windows 98? In Windows 98, we could change the background color, image, fonts, etc in any folder but this facility was removed from Windows XP. It was a good feature and many people still miss that feature in Windows XP. So here we are posting 3 methods to have any desired wallpaper as background image in any folder in Windows XP:
A. Using Desktop.ini Hack to Set a Wallpaper as Folder Background Image:
1. Open Command Prompt and set folder attribute to "system". Suppose there is a folder "Setup" in "D:\" drive, in which you want to set a wallpaper as background image. So give following command in Command Prompt:
attrib +s D:\Setup
It'll change the attribute to "system".
2. Now open Notepad and paste following code:
[ExtShellFolderViews]
{BE098140-A513-11D0-A3A4-00C04FD706EC} = {BE098140-A513-11D0-A3A4-00C04FD706EC}
[{BE098140-A513-11D0-A3A4-00C04FD706EC}]
Attributes=1
IconArea_Image=path_of_the_wallpaper
IconArea_Text=0x00000000
Now change "path_of_the_wallpaper" to the exact path of the wallpaper which you want to set as background. Suppose the wallpaper is stored in "D:\Wallpaper\Image1.jpg", then the code will be as following:
[ExtShellFolderViews]
{BE098140-A513-11D0-A3A4-00C04FD706EC} = {BE098140-A513-11D0-A3A4-00C04FD706EC}
[{BE098140-A513-11D0-A3A4-00C04FD706EC}]
Attributes=1
IconArea_Image=D:\Wallpaper\Image1.jpg
IconArea_Text=0x00000000
NOTE: If you copy the wallpaper in the same folder which you are editing, then you can simply put the wallpaper name in the file. e.g. if you copy the "Image1.jpg" file in "Setup" folder, then the code will be as following:
[ExtShellFolderViews]
{BE098140-A513-11D0-A3A4-00C04FD706EC} = {BE098140-A513-11D0-A3A4-00C04FD706EC}
[{BE098140-A513-11D0-A3A4-00C04FD706EC}]
Attributes=1
IconArea_Image=Image1.jpg
IconArea_Text=0x00000000
"IconArea_Text" stands for the text color, you can change it to white, yellow, blue, black or any other color. You just need to know the hexa-decimal number of the color and then replace the code in "IconArea_Text" section. A few most used color codes are as follows:
Black - 0x00000000
White - 0x00FFFFFF
Green - 0x0000FF00
Blue - 0x00FF0000
Purple - 0x00C000C0
Red - 0x000000FF
Yellow - 0x0000FFFF
Indigo - 0x00FFFF00
3. Now save the file with name "Desktop.ini" (including quotes) and copy the file in the desired folder which is "Setup" in our example.
4. Thats it. Close the folder and re-open it. Now it should show the wallpaper as background.
B. Using the Same Method of "IEShwiz.exe" file used in Windows 9x/NT/2000:
1. Copy "IEShwiz.exe" file from Windows 98/Me/NT/2000 and paste in "%windir%" directory (C:\Windows, if your Windows is installed in C:\ drive).
2. Now open regedit and goto:
HKEY_LOCAL_MACHINE\SOFTWARE\Classes\Directory\shell\
Now under this key, create a new key "Customize This Folder". Now select this newly created key and create another key under it with the name "Command". Select this new key "Command" and change the value of "Default" in right side pane to IESHWIZ.EXE %1
3. That's it. Now open any folder and right-click, you'll get an option "Customize This Folder". Click on it and follow the wizard and you'll be able to set a wallpaper as the background and to change font color.
C. Using 3rd party software "Windowpaper XP" to do the task easily:

1. Download "Windowpaper XP" from following link:
Download Link

How to Include Your Edited System Files in Windows Setup?


Many times we edit system files like Shell32.dll, Explorer.exe, msgina.dll, ntoskrnl.exe, logonui.exe, etc to change the look-n-feel of Windows. But sometimes we want to include our edited files in Windows Setup, so that whenever we make a fresh installation of Windows, we don't loose our changed files and we don't need to make those changes again.
Here is a step-by-step tutorial on how to include your own edited files in Windows Setup:
1. Download following .Zip file and extract it:
Download File
2. You'll get "modifype.exe" file after extracting the .zip file.
3. Now copy this "modifype.exe" file to the same folder where you have your edited files which you want to include in Windows setup. Lets suppose you have copied all edited files in "D:\Setup" folder, so copy "modifype.exe" file to "D:\Setup" folder.
4. Open Command Prompt and navigate to the same folder where your files are stored, which is "D:\Setup" in our example.
5. Now provide following command:
modifype file_name.extension -c
Replace "file_name.extension" with the name of the file which you want to include in setup. e.g.
modifype shell32.dll -c
modifype explorer.exe -c
modifype msgina.dll -c
6. It'll fix the checksum of the file and Windows will accept the file without any problem at installation time.
7. Now the last step. We have to compress the file using "makecab" command. As you can see all files in Windows Setup folder "I386" are in compressed format like shell32.dl_, explorer.ex_, msgina.dl_, etc. So provide following command to compress the file:
makecab file_name.extension
Replace "file_name.extension" with the name of the file which you want to include in setup. e.g.
makecab shell32.dll
makecab explorer.exe
makecab msgina.dll
8. Thats it. You'll get a compressed file, which you can safely copy to "I386" folder of your Windows setup.
NOTE: If you want to extract any existing file from the Setup, you can use "expand" command.
expand -r file_name.extension
Replace "file_name.extension" with the name of the file which you want to extract. e.g.
expand -r shell32.dl_
expand -r explorer.ex_
expand -r msgina.dl_

How to Remove the Annoying Focus Rectangle in Windows?

In Windows, whenever we select any item, an annoying focus rectangle is shown around it. The rectangle is also shown on buttons, etc in dialog boxes which doesnt look good and many people want to get rid of it. Thanks to our friend "localhost" who made a small program to remove the annoying focus rectangle which works in every version of Windows.

Just download following ZIP file, extract it and run the setup file:
Download Link
Both 32-bit and 64-bit versions are supported.
NOTE: Windows Vista and 7 users should follow these steps with Admin privileges.

Taskbar Shuffle: Move Taskbar and System Tray Buttons in Windows

Now-a-days every browser comes with tab feature and we can easily drag-n-drop tabs to anywhere on the tab bar using our mouse. Its quite handy feature. Did you ever wish the same facility in Windows taskbar? Did you want to have the facility in taskbar to move application buttons anywhere on the taskbar using your mouse? Imagine how interesting would it be to move the buttons on taskbar. Just move them anywhere you want. "Taskbar Shuffle" is a utility which you need. Following are a few interesting features which you get in Taskbar Shuffle:
  • Move running application buttons anywhere on the taskbar.
  • Group similar application buttons at single place.
  • Move System tray buttons.
  • Close applications from the taskbar simply by middle-click on it.
Above are only a few selected features of Taskbar Shuffle. Just give it a try.
Download Link

How to Add Your Name in Desktop Context Menu in Windows XP?

As you all know about my "How to enable “VIEW” Menu on Desktop in Windows XP" tutorial which teaches you how to enable View menu in Windows XP Desktop context menu just like Windows Vista:
Many people have asked me how did I add my name on top in Desktop context menu as shown in above screenshot? So today I decided to write a small tutorial about it.
So here is a step-by-step tutorial on how to add any desired string in Desktop context menu:
1. Open “%windir%\System32\Shell32.dll” file in resource hacker and go to:
Menu -> 215 -> 1033
2. Now add following line:
MENUITEM "xyz", 33333, MFT_STRING, MFS_GRAYED | MFS_DEFAULT
Just after the:
215 MENUEX
LANGUAGE LANG_ENGLISH, SUBLANG_ENGLISH_US
{
POPUP "", 0, MFT_STRING, MFS_ENABLED, 0
{
3. Replace "xyz" with any string which you want to add, e.g.
MENUITEM "!*~.VISHAL.~*!", 33333, MFT_STRING, MFS_GRAYED | MFS_DEFAULT
4. Click on "Compile Script" button.
5. Save the file and restart your Windows to see the affect.
BONUS TIP: You can remove "MFS_GRAYED" or "MFS_DEFAULT" or both to have some different look. "MFS_GRAYED" is used to disable the text, if you'll remove it, your name will look like an enabled item. "MFS_DEFAULT" is used to show the text in Bold, if you'll remove it, your name will be shown as normal text instead of Bold.

How to Change Start Button Text in Windows Using Resource Hacker?

We're getting lots of mails regularly asking same question - How can I change Start button text in Windows? Although we have mentioned it in following tutorial:
List of a few Locations in Windows XP to be Hacked Using Resource Hacker
But many times people miss this article. So today we decided to write a small separate tutorial about it:
Before:
Default_XP_Start_Button.jpg
After:
Hacked_XP_Start_Button.jpg
1. Open "%windir%\Explorer.exe" file in Resource Hacker.
2. Go to:
"String Table -> 37 -> 1033 -> 578" (If you are using Luna theme)
"String Table -> 38 -> 1033 -> 595" (If you are using Windows Classic theme)
3. You'll get a string "start". Just change it with whatever text you want to show. Make sure you put quotes.
4. Compile the script and save the file. That's it. You have done.
NOTE 1: To know more about Resource Hacker, visit following link:
All About Resource Hacker in a brief Tutorial
NOTE 2: If you are facing problems while saving a file after editing in resource hacker, then make sure you have disabled WFP (Windows File Protection) service using WFP Patcher, it can be found in our "Download" section.
Also if you are getting error "Can't create file...", that means you have edited and saved the same file in past and there is a backup file which need to be deleted before saving this file again. Go to the folder containing this file and you'll see a similar file having "_original" in its name. Delete it and try to save the file in resource hacker.

How to Remove Annoying Common Tasks from Desktop in Windows XP?

Many times Windows XP starts showing common tasks at Desktop and it becomes quite irritating because it overlaps the desktop wallpaper and doesnt look good. Its a known bug in Windows XP and it happens when the desktop.htt file entry in registry get corrupted. Windows XP considers Desktop as a normal folder and shows common tasks on Desktop just like other folders.

But don't worry here I'm posting a solution which can fix this problem:
1st METHOD:
1. Open regedit and goto:
HKEY_CLASSES_ROOT\CLSID\{00021400-0000-0000-C000-000000000046} \shellex\ExtShellFolderViews\{5984FFE0-28D4-11CF-AE66-08002B2E1262}
2. In right-side pane, set value of "PersistMoniker" to:
file://%userappdata%\Microsoft\Internet Explorer\Desktop.htt
3. Thats it. Log off and log on again. It'll fix the problem.
2nd METHOD:
1. Download following ZIP file, extract it and run the extracted .REG file:
Download ZIP File
2. Log off and log on again. It'll fix the problem.

How to Restrict Users from Changing Internet Explorer Homepage Settings?

In many organizations, administrator wants to set a permanent Homepage in Internet Explorer like their Intranet address and they also want to restrict users from changing it. Some spyware also change IE Homepage to some other URLs. So I'll tell here the tricks for both "Setting your desired page as homepage" as well as "Restricting users to change the homepage":
A. To Set the Homepage:
1. Open regedit and goto:
HKEY_CURRENT_USER\Software\Microsoft\Internet Explorer\Main
2. In right-side pane, change value of Start Page to your desired URL, like http://www.AskVG.com/
B. To restrict users from changing homepage:
1. Open regedit and goto:
HKEY_CURRENT_USER\Software\Policies\Microsoft\Internet Explorer
2. Under this key create new key "Control Panel". Now in right-side pane, create a new DWORD value HomePage and set its value to 1. It'll disable all 3 buttons "Use current", "Use default" and "Use blank" in Internet Options.
TIP: If these buttons have been disabled in your system by spyware and you want to enable them, then simply change value to 0.
If you want a ready made .REG file to automate the task, then download following ZIP file, extract it and then run the extracted .REG file:
askvg_ie_homepage_restrict.zip
NOTE: in the above .REG file, I have set "Start Page" to "http://www.AskVG.com/", change this URL with your desired URL and then save the file.

Clear Type Tuner: Microsoft Powertoy for Windows

Clear Type Tuner is a Microsoft Powertoy for Windows XP but also works in Windows Vista & 7. You can use this powertoy to change the fonts settings which makes the fonts looking smooth and easy to read on screen. Download Link

How to Add / Remove Items from New Menu in Windows?

In Windows, whenever we right-click on Desktop or Explorer, we get "New" menu which contains shortcuts for various known file types. We can easily create new files using this handy "New" menu.
Sometimes we may want to remove a few unwanted items from "New" menu or we may want to add a few necessary items to "New" menu which are not present. So in this tutorial, I'll tell you how can you add / remove items to / from "New" menu:
A. To Add an Item in "New" menu:
1. Open regedit and expand "HKEY_CLASSES_ROOT" key.
2. Now look for the file type which you want to add in "New" menu, e.g. for adding MP3 file type look for .MP3 key.
3. Right-click on it and select "New -> Key" and give it name "ShellNew".
4. In right-side pane, right-click and select "New -> String Value". Give it name "NullFile" and press Enter.
5. Thats it. You'll immediately get the file type entry in "New" menu.
B. To Remove an Item from "New" menu:
1. Open regedit and expand "HKEY_CLASSES_ROOT" key.
2. Now look for the file type which you want to remove from "New" menu, e.g. for removing MP3 file type look for .MP3 key.
3. Expand it and delete the "ShellNew" key.
4. Thats it. The file type will be removed from "New" menu.

Extra Desktops: An Utility To have Multiple Desktops in Windows XP and Vista

Extra Desktops is an application that allows to use extra desktops, besides the normal desktop. Use a desktop for storing your downloads, use one filled with your regularly played MP3, use another one for the files of that project you are currently working on. With ExtraDesktops, there is no need anymore to browse to all these folders you regularly use: simply hit a key, and the files are right there on your desktop!

It works on both Windows XP and Vista. Make sure you have the following package installed:
Visual Studio 2005 SP1 Runtime Files
You can download it using following link:
Download Link

How to Remove Nokia PC Suite Folder, Web Folders, My Sharing Folders or Other Unwanted Items from My Computer?

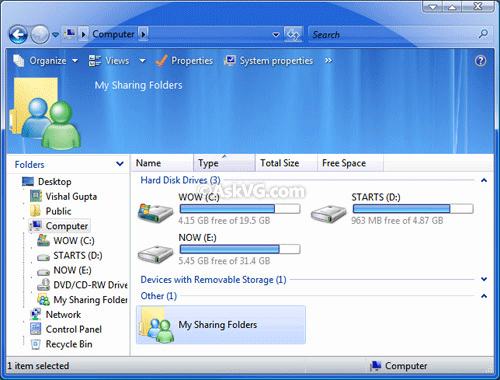
Whenever you open My Computer in Windows, you see a few extra items like Web Folders, My Sharing Folders, Nokia PC Suite folder, etc. Actually they are installed by some software like Nokia PC Suite, Windows Live Messenger, Microsoft Forntpage, etc.
Sometimes we want to remove them to make the My Computer window clean but we can't find any way to remove them.
So here I'll tell you a very simple way to remove them easily and permanently:
1. Open regedit and goto:
HKEY_LOCAL_MACHINE\SOFTWARE\Microsoft\Windows\Current Version\explorer\MyComputer\NameSpace
2. Under this key, you'll see a few keys having name in following format:
{xxxxxxxx-xxxx-xxxx-xxxx-xxxxxxxxxxxx}

3. These keys represents those My Computer items. If you select any key, you can see its description in right-side pane.
4. So delete your desired key and it'll remove the unwanted item from My Computer window.
5. Following are the keys for My Sharing Folders and Web Folders:
My Sharing Folders - {FC9FB64A-1EB2-4CCF-AF5E-1A497A9B5C2D}
Web Folders - {BDEADF00-C265-11D0-BCED-00A0C90AB50F}
Printers & Faxes - {2227A280-3AEA-1069-A2DE-08002B30309D}
Network Connections - {7007ACC7-3202-11D1-AAD2-00805FC1270E}
Administrative Tools - {D20EA4E1-3957-11D2-A40B-0C5020524153}
Fonts - {D20EA4E1-3957-11D2-A40B-0C5020524152}
Scheduled Tasks - {D6277990-4C6A-11CF-8D87-00AA0060F5BF}
Recycle Bin - {645FF040-5081-101B-9F08-00AA002F954E}

How to Remove Default Searchbox from Internet Explorer 7?

If you are using Internet Explorer and want to get rid of the default search box which is placed after the IE addressbar, this tutorial can help you in removing the search box as shown in following screenshot:
Just download following Zip file, extract it and then run the extracted .REG file:
remove_searchbox.zip
If you want to restore the searchbox, then use following file:
restore_searchbox.zip

How to Restore Missing New Menuitem in Desktop and Explorer Context Menu?

If you can't find "New" menu item in the context menu in your Windows like shown in following screenshot:
Then just download following Zip file, extract it and then run the extracted .REG file:
Download Link
It'll restore the missing "New" menu item in any Windows version you are using.

#
### ###