Friends

This is default featured post 1 title

Go to Blogger edit html and find these sentences.Now replace these sentences with your own descriptions.This theme is Bloggerized by Lasantha Bandara - Premiumbloggertemplates.com.

This is default featured post 2 title

Go to Blogger edit html and find these sentences.Now replace these sentences with your own descriptions.This theme is Bloggerized by Lasantha Bandara - Premiumbloggertemplates.com.

This is default featured post 3 title

Go to Blogger edit html and find these sentences.Now replace these sentences with your own descriptions.This theme is Bloggerized by Lasantha Bandara - Premiumbloggertemplates.com.

This is default featured post 4 title

Go to Blogger edit html and find these sentences.Now replace these sentences with your own descriptions.This theme is Bloggerized by Lasantha Bandara - Premiumbloggertemplates.com.

This is default featured post 5 title

Go to Blogger edit html and find these sentences.Now replace these sentences with your own descriptions.This theme is Bloggerized by Lasantha Bandara - Premiumbloggertemplates.com.

Wednesday, June 22, 2011

FluentNotepad: Simple Notepad for Windows with Office 2010 Ribbon UI

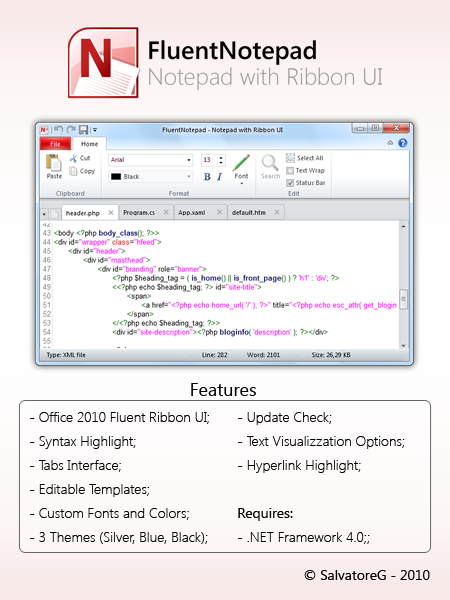
If you love the new ribbon UI available in Microsoft Office and other MS products, you'll definitely love this small but excellent Notepad for Windows. "SalvoG92" @ DA has developed a cool Notepad "FluentNotepad" for Windows which comes with Office 2010 look-like ribbon UI.

It supports all basic Notepad functions and also allows you to minimize ribbons and put Quick Access toolbar below the ribbons similar to Office applications.
Its a wonderful work IMO. Its also portable so you don't need to install it. Simply extract the ZIP file and run the EXE file to launch it.
You can download it using following link:
Download Link

Taskbar Drop Shadow: Add Cool Drop Shadow Effect to Windows Taskbar

If you use Windows and love to customize its look or add extra eye candy features, here is an interesting utility for you. "Taskbar Drop Shadow" is a small portable tool developed by "sweatyfish" @ DA which adds a drop shadow effect to Windows Taskbar:
Taskbar_Drop_Shadow.png
Its very simple to use. Download the ZIP file and extract it. You'll get 2 EXE files:
  • Top TB Shadow.exe
  • Bottom TB Shadow.exe
If you have Taskbar on Top, run "Top TB Shadow.exe" and if you have it at bottom, run "Bottom TB Shadow.exe" file.
Download Link
You can customize its settings by right-click on the Taskbar shadow and select "Preferences". Sometimes it might close if you change some settings, you'll need to re-run the EXE file in that case.

The Best FREE Alternatives to Notepad

If you use Windows and use the default "Notepad" a lot for various tasks like writing notes, coding, etc, this topic might be useful for you. Today in this topic, we are going to cover a few FREE applications which look and work similar to Notepad but provide lots of useful features which are missing in Notepad.
So without wasting any time, lets take a look at the free alternatives to Notepad:
Above are the best free alternatives to Notepad. Give them a try and choose whichever fits to your requirements. Our favorite is "Notepad2". Its very light-weighted and provides lots of useful features. "Notepad++" is also a good one.

Download Theme to Transform Windows 7 into Mac OS X Snow Leopard


Also check: Transform Windows 7 into Mac OS X Lion Using “Lion Skin Pack”
If you are a Windows 7 user but love Mac OS X Leopard look, here is something interesting for you.
Our friend "giannisgx89" @ DA has created an excellent theme for Windows 7 which makes your Windows look like Mac OS X Snow Leopard as you can see in following screenshot:

Its an excellent theme which can be downloaded using following link:
Download Link
For more information on how to use this theme, please visit following link:
How to Use 3rd Party Themes in Windows 7?
If you like this, you might also like other similar articles posted in following section: Windows 7, Windows 7 Themes.
Also check out the most popular articles of our website: Popular Articles.

[Fix] “Item Not Found” Error Message While Moving Files and Folders in Windows 7 Explorer After Installing Service Pack 1 (SP1)

Problem Symptom:
If you installed SP1 (Service Pack 1) in Windows 7 and try to move a file or folder in Windows Explorer, you get "Item Not Found" error message:
Windows_7_SP1_Item_Not_Found.png
Reason:
This problem might occur if you disabled "Libraries" feature in Windows 7 using Registry trick as mentioned here.
Please note that we are also using the same trick to disable Libraries feature in Windows 7 but we didn't face any problem while moving/copying file and folders even after installing SP1.
Solution:
Simply run the "Restore Default Settings.reg" file stored in the ZIP file given in following tutorial:
How to Disable “Libraries” Feature in Windows 7?
Once you restore the settings, your problem will get fixed.
Thanks to our reader "veegertx" for bringing this issue to our attention...

The Best FREE Alternatives to Microsoft Paint and Adobe Photoshop

Recently we shared some free alternatives to Notepad: The Best FREE Alternatives to Notepad
Today in this topic, we are going to share best FREE alternatives to Windows Paint. Paint is a good tool included in Windows for editing images but it lacks lots of image editing features.
You can also these freeware as alternative to Adobe Photoshop.
Paint.NET
Paint.NET is free image and photo editing software for computers that run Windows. It features an intuitive and innovative user interface with support for layers, unlimited undo, special effects, and a wide variety of useful and powerful tools.
Paint.NET also depends on Microsoft's .NET Framework 3.5 SP1, which is automatically installed if it isn't already on the system.
Download Link
GIMP
GIMP is an acronym for GNU Image Manipulation Program. It is a freely distributed program for such tasks as photo retouching, image composition and image authoring.
It has many capabilities. It can be used as a simple paint program, an expert quality photo retouching program, an online batch processing system, a mass production image renderer, an image format converter, etc.
Download Link
PhotoFiltre
PhotoFiltre is a complete image retouching program. It allows you to do simple or advanced adjustments to an image and apply a vast range of filters on it. It is simple and intuitive to use, and has an easy learning curve. The toolbar, giving you access to the standard filters with just a few clicks, gives PhotoFiltre a robust look.
Download Link
Helios Paint
HeliosPaint is a feature-rich, easy-to-use and powerful paint program for editing photos, drawings and icons. It runs on Microsoft Windows, Apple Mac OS X, Linux and Unix.
Download Link
Photo Pos Pro
Photo Pos Pro Photo Editor is a free photo editor offers users a wide variety of possibilities in the fields of Image Enhancing and Image Editing and in the field of Computer Graphics Design. Using the editor you can perform various tasks, from simple basic tasks to complex tasks; you can edit existing images, create new works based on existing images, create new works from scratch and more.
Thank to our reader "Shahnawaz" for mentioning it.
Download Link
Photoscape
Photoscape is another fun and easy photo editing software that enables you to fix and enhance photos. Thanks to our readers "Chris" and "Prateek" for mentioning it.
Download Link

Microsoft Releases Out-of-Band Security Update to Address Windows Shortcut Exploit aka CPLINK

indows Shortcut Exploit, also known as CPLINK, is a zero-day vulnerability in all versions of Windows that allows a Windows shortcut link, known as an .lnk file, to run a malicious DLL file. The dangerous shortcut links can also be embedded on a website or hidden within documents. The exploit works when you open a device, network share or WebDav point carrying an infection—you don't need to click on anything for the exploit to work, even if you have AutoPlay and AutoRun disabled.
There was no patch from Microsoft to fix this exploit but now Microsoft has released an out-of-band security update to address this exploit.
According to Microsoft Security Bulletin, this security update resolves the vulnerability in Windows Shell. The vulnerability could allow remote code execution if the icon of a specially crafted shortcut is displayed. An attacker who successfully exploited this vulnerability could gain the same user rights as the local user. Users whose accounts are configured to have fewer user rights on the system could be less impacted than users who operate with administrative user rights.
For users using automatic updates, this update will automatically be applied once it is released. Users not using automatic updates should download, test and deploy this update as quickly as possible.
Download Links:

Microsoft Releases Windows Intune Beta, Manage and Secure PCs using Cloud Services

Windows Intune simplifies how businesses manage and secure PCs using Windows cloud services and Windows 7—so your computers and users can operate at peak performance, from virtually anywhere. Windows Intune is a comprehensive solution that includes PC management, malware protection, Windows upgrades, and more.
Use the Windows Intune cloud service beta to:
  • Manage updates
  • Protect PCs from malware
  • Proactively monitor PCs
  • Provide remote assistance
  • Track hardware & software inventory
  • Set security policies
The Windows Intune client software is supported on both 32-bit and 64-bit versions of:
  • Windows 7 Enterprise, Ultimate and Professional
  • Windows Vista Enterprise, Ultimate, and Business
  • Windows XP Professional Service Pack (SP) 2 or SP 3 (recommended)
Download Link

Windows 7 Logon Reworked: Get Longhorn Styled Aurora Welcome Screen in Windows 7

We all know about Longhorn (codename for Windows Vista testing builds). Longhorn provided awesome UI elements in Vista testing builds but due to performance issues, Microsoft decided to ditch Longhorn code and we didn't get what we expected in Vista. If you also love Longhorn look and can't forget the awesome Aurora Welcome Screen which was featured in Longhorn, here is an excellent news for you.
"alexandru-r-ghinea" @ DA has created a new Welcome Screen for Windows 7 users which brings Longhorn look-like Login screen to 7.

As you can see in above screenshot, it comes in 3 variations:
  • Welcome Screen with Default Windows Logo at Top
  • Welcome Screen with Embedded Windows Logo
  • Welcome Screen without Windows Logo
The welcome screen is available for both 32-bit and 64-bit users of Windows 7.
You just need to replace "authui.dll" file present in "Windows\System32" folder with the downloaded one. You can follow following tutorial to replace the system file:
Add Take Ownership Option in File / Folder Context Menu in Windows Vista and 7
Also to change the login screen background, you can use any of following login screen changer utility:
You can download the required files using following links:
32-bit (x86) Version:
Welcome Screen with Windows Logo on Top
Welcome Screen with Embedded Windows Logo
Welcome Screen without Windows Logo
Download Welcome Screen Background Image
64-bit (x64) Version:
Welcome Screen with Windows Logo on Top
Welcome Screen with Embedded Windows Logo
Welcome Screen without Windows Logo
Download Welcome Screen Background Image

Logon Editor: Advanced Login Screen Editor for Windows 7

Today we are going to share an advanced login screen editor which not only allows you to change the background but also allows you to change text and button set transparency and shadow effects. "Logon Editor" is an advanced login screen editor for Windows 7 users which allows you to:
  • Change Login screen background image
  • Change Login screen text and button set transparency and shadow
  • Save login screen to distribute
  • Take screenshot of the login screen

This excellent tool has been created by "PacMani" @ DA.
You can download it using following link:
Download Link
NOTE: You can also check other free tools to customize Windows 7 login screen at following link:
Ultimate Collection of the Best Free Tools to Customize Windows 7 Login Screen

Microsoft Releases Hotfix to Fix Hibernation Issue in Windows 7

Microsoft has released a hotfix to fix a weird hibernation issue found in Windows 7.
Problem Symptom:
Consider the following scenario:
  • You have a computer that is running Windows 7.
  • You configure the power button to be used for hibernation on the computer.
  • You change the setting of the Password protection on wake up setting to the Require a password (recommended) option.
  • The computer is put into hibernation.
  • You press the power button to resume the computer from hibernation. You are prompted to enter your user account credentials.
  • The computer is put into hibernation again while you try to log on to the computer.For example, the computer is put into hibernation because of low power or because the power button is pressed by mistake.
  • You press the power button to resume the computer from hibernation again.
In this scenario, the computer screen dims after you log on to resume from hibernation.
Cause:
This issue occurs because two threads try to fade out the monitor at the same time.
Solution:
Download the required hotfix using following link:
Download Link

How to Rename “Favorites”, “Libraries”, “Homegroup”, “Computer” and “Network” Items in Windows 7 Explorer’s Navigation Pane?

We have posted a few tutorials in past about removing "Favorites", "Libraries", "Homegroup", "Computer" and "Network" Items from Windows 7 Explorer’s Navigation Pane: Today in this tutorial, we'll tell you how to rename these items present in Navigation pane. By default, Windows only allows you to rename "Computer" item. You can right-click on it and select "Rename" and type whatever name you want to give.
But what about other items? You can rename them too using a simple registry trick which is mentioned in the coming steps.
Rename_Favorites_Libraries_Homegroup_Win_7.png
We'll modify the same registry keys which we modified in the above mentioned tutorials to remove the items. We'll just edit a String value "LocalizedString" for each Navigation pane item and give it our desired name.
So without wasting any time, lets start the tutorial:
1. Type regedit in RUN or startmenu search box and press Enter. It'll open Registry Editor.
2. Now go to any of following keys according to your requirements:
Favorites - HKEY_CLASSES_ROOT\CLSID\{323CA680-C24D-4099-B94D-446DD2D7249E}
Libraries - HKEY_CLASSES_ROOT\CLSID\{031E4825-7B94-4dc3-B131-E946B44C8DD5}
Homegroup - HKEY_CLASSES_ROOT\CLSID\{B4FB3F98-C1EA-428d-A78A-D1F5659CBA93}
Network - HKEY_CLASSES_ROOT\CLSID\{F02C1A0D-BE21-4350-88B0-7367FC96EF3C}
3. Now you'll need to change value of "LocalizedString" String value present in the right-side section. But Windows will not allow you to change its value as you won't have proper permissions.
You can use following simple steps to take permission:
  • Right-click on the key mentioned in Step 2 and select "Permissions...".
  • It'll open a dialog box, Click on "Advanced" button.
  • It'll open another dialog box, Go to "Owner" tab.
  • Select your Username from the list and click on "Apply" button and then OK.
  • Again click on OK button in the first dialog box.
  • Now again right-click on the same key and select "Permissions...".
  • Select your Username in the list and check the "Allow" option for "Full Control".
  • Click on Apply button and then OK.
4. Now double-click on "LocalizedString" String value given in right-side section and change its value to any desired name like "PC Favorites", "My Libraries", "Home Network", etc.
5. That's it. Now open My Computer and you'll see the new names for each item.
NOTE: If you want to restore the default names, you can use following default values of "LocalizedString" String value:
Favorites - @%SystemRoot%\system32\shell32.dll,-21796
Libraries - @%SystemRoot%\system32\shell32.dll,-50691
Homegroup - @%SystemRoot%\system32\shell32.dll,-50688
Network - @%systemroot%\system32\NetworkExplorer.dll,-1

Microsoft Releases Hotfix to Fix Randomly Stop Responding Problem in Windows 7


Problem Symptom:
A computer that is running Windows Server 2008 R2 or Windows 7 stops responding randomly. Applications or services that are running on the computer stop working correctly. Additionally, you cannot log on to the computer by using the remote desktop connection utility.
Cause:
This issue occurs because of a deadlock condition between the Lsass.exe process, the Redirected Drive Buffering Subsystem (Rdbss.sys) driver, and the Winsock kernel.
Solution:
A supported hotfix is available from Microsoft. Apply this hotfix only to systems that are experiencing the problem.
Download Link

Microsoft Releases Hotfix to Fix Windows 7 Backup Utility Issue


Problem Symptom:
Consider the following scenario:
  • You use the Windows Backup utility to perform a backup on a computer that is running Windows 7. The backed up files are saved on a hard disk drive.
  • You use the Windows Backup utility again to perform a backup for a group of files that are larger than the first group of backed up files.
In this scenario, the backup process requires significantly more time than the backup process for the first group of backed up files.
For example, the backup process requires 2 hours for 100 gigabytes (GB) of files and 16 hours for 400 GB of files.
Solution:
A supported hotfix is available from Microsoft. However, this hotfix is intended to correct only the problem that is described in this article. Apply this hotfix only to systems that are experiencing the problem described in this article.
Download Hotfix

FileTypesMan: Free Alternative to Windows Default File Type Option

FileTypesMan is an alternative to the "File Types" tab in "Folder Options" of Windows. It displays the list of all file extensions and types registered on your computer. FileTypesMan also allows you to easily edit the properties and flags of each file type, as well as it allows you to add, edit, and remove actions in a file type. FileTypesMan doesn't require any installation process or additional DLL files. In order to start using it, simply copy the executable file (FileTypesMan.exe) to any folder you like, and run it.
FileTypesMan.png
This utility works on any version of Windows from Windows 98 to Windows 7. For using this utility under Windows 98/ME, you must download the non-Unicode version. For using this utility under x64 system, you should download the x64 version.
In some Windows 98 machines, an exception with CDFVIEW.DLL is occurred when starting FileTypesMan. To avoid this problem, go to the Options menu, and choose the 'Don't Load Icons' option. After that, FileTypesMan should work properly, but without displaying the icons according to file types.
Download Link
Download Link (64-bit)
Download Link (Windows 98/Me)
Homepage

Default Programs Editor: Yet Another Free Alternative to Windows Default File Type Option

Recently we posted about "FileTypesMan" which is an alternative to the "File Types" tab in "Folder Options" of Windows. Today we are going to share another free tool which is a powerful file association utility for Windows.
"Default Programs Editor" is a context menu editor, an autoplay editor, and default programs association editor; essentially, the settings in the "Default Programs" Control Panel page. It's a replacement for the "File Types" dialog in Windows XP, and brings some key features of TweakUI to Windows Vista/7.
Default_Programs_Editor.png
Features List:
File Type Settings:
  • Add, Edit, and Delete context menu items
  • Edit file type information (such as icon and description)
  • Change an extension's associated file type
Autoplay Settings:
  • Add, Edit, and Delete autoplay handler programs
  • Change which autoplay options are available for any media type
  • Change the default autoplay handler
Default Programs Settings:
  • Add or Remove default associations (possible to check, but not un-check, in Windows)
Additional Features:
  • Disable the "Search web for unknown extension" dialog
  • Standalone utility, or install as a Control Panel applet
  • Make direct changes to the system registry, or export edits as .reg files
  • Designed for Vista and Windows 7 with UAC support
Its a portable app so you don't need to install it. Simply run the EXE file.
Download Link
Homepage
PS: If you are a Windows XP or Vista user, you'll need to install .NET Framework 3.5 to be able to use this app. Windows 7 users don't need to install it as its already included.
Thanks to our reader "André" for suggesting it...

Download Free Language Interface Packs (LIPs) for Windows XP, Vista and 7

Language Interface Packs (LIPs) provide a translated version of the most widely used dialog boxes, menu items, and help content in Windows. LIPs can be installed over any edition of Windows XP, Vista and 7. To install one, you will need to have the required parent language installed on your PC. Please note that additional languages will work only with a genuine copy of Windows.
You can download Language Interface Packs from the Microsoft Download Center by using the links given below:
Download LIPs for Windows XP
Download LIPs for Windows Vista and 7

Microsoft Releases Update for Windows 7 to Improve Graphics Platform Performance and to Support Features in Upcoming IE9 PP Build

Microsoft has released a new update for Windows 7 and Server 2008 R2 users which provides new functionality and performance improvements for the graphics platform. This update will also be required to support features in an upcoming release of Internet Explorer 9 platform preview build.
This update is a separate package of changes that must be installed in addition to Windows 7 or Windows Server 2008 R2.
Install this update if you have installed the Windows Internet Explorer 9 Tech Preview 3 build, and are experiencing crashes and hangs while running Windows Live applications.
You can download it using following links:
Download Link
Download Link (64-bit)
You must restart the computer after you apply this update.

Add Shutdown, Restart, Sleep, Switch User, Lock and Log Off Options to Windows 7 Taskbar Using JumpControl

We all know Windows 7 allows you to pin any item to Taskbar to access it quickly and easily. Using this cool feature, "ProtoSphere" @ DA has created an awesome utility called "JumpControl". "JumpControl" is a portable application so you don't need to install it. Simply pin it to your Windows 7 Taskbar and you'll get all desired Shutdown, restart and other options there.

You can download it using following link:
Download Link
Extract the downloaded ZIP file and drag-n-drop the EXE file to Taskbar. You can also right-click on EXE file and select "Pin to Taskbar" option.
Thanks to our reader "Fred" for sharing it...

How to Get Classic XP Style Network Activity Indicator Back in Windows 7?

There are many Windows 7 users who miss the good old Windows XP style Network activity indicator in System Tray. Windows XP indicator used to show network activity with a blinking icon, on the other hand Windows 7 indicator doesn't blink. If you miss the classic indicator in Windows 7 and want to get it back, here is an awesome piece of software to use.
"Network Activity Indicator" is a small portable utility which adds the classic XP style Network activity indicator to Windows 7 System Tray as shown in following screenshot:
Network_Activity_Indicator_for_Windows_7.png
You just need to download the ZIP file using following link:
Download Link (ZIP) (Portable)
Download Link (EXE) (Setup)
Extract the ZIP file or run setup file and then run program's EXE file. It'll immediately add the classic indicator to Windows 7 System Tray. You can hide the default network indicator icon using Taskbar Properties.

[Fix] Windows 7 Shows Blurry Thumbnails for Aero Themes in Desktop Personalization Window

Sometimes when you open Desktop Personalization window in Windows 7, you might get presented with blurry thumbnails for all Aero themes as shown in following screenshot: Blurry_Aero_Themes_Thumbnails.png
It seems a bug in Windows 7 and occurs randomly. It happens due to corrupt thumbnails cache in system.
To fix this problem, you just need to follow these simple steps:
1. Open "Disk Cleanup" from "Start -> All Programs -> Accessories -> System Tools". You can also open it directly by giving cleanmgr.exe command in RUN or start menu search.
2. Select system drive from the list where Windows 7 is installed in your system.
3. Now check the option "Thumbnails" and click on OK button.
Clear_Thumbnails_Windows_7_Disk_Cleanup.png
4. It'll clear the corrupt thumbnails cache and your problem should get fixed.

RecycleBinEx: Freeware to Extend and Enhance the Functionality of Recycle Bin in Windows

RecycleBinEx is a powerful and easy to use recycle bin manager for Windows. It extends and enhances the Windows recycle bin, and let you use many extra features in it. With RecycleBinEx, you can sort the items in recycle bin; group them according to the deleted time, the logical disk, etc. You can select and remove the deleted items which were deleted one day ago, two days ago, 7 days ago, ..., 3 months ago by just one click. Or remove the deleted items of such as C disk only by one click, too.
RecycleBinEx can manage all your Windows recycle bins under different Windows Operating Systems together. For example, you have installed Windows XP and Windows 7 on one hard disk and now you are log into Windows XP, with the system default recycle bin, you cannot clean the files you have deleted in Windows 7 system. That is you cannot manage the deleted items in the recycle bin of Windows 7 system if you are in Windows XP system. But with the help of RecycleBinEx, you can now. You can manage the deleted items in all Windows recycle bins under one Windows Operating System.
RecycleBinEx can be merged to the context menu of system recycle bin easily. So you no need to run RecycleBinEx every time if you just want to clean up the items which you deleted 3 days ago from the system recycle bin. Just right click the mouse on the icon of Windows recycle bin and click the related menus of RecycleBinEx to do this work.
RecycleBinEx.png
Features List:
  • Group deleted items by deleted time, logical disk etc.
  • Manage all Windows recycle bins together
  • Merge to the context menu of system recycle bin
  • Jump list support in Windows 7
  • Filter deleted data quickly
  • Command line mode support
  • Task scheme support
Download Link
Homepage

Microsoft Releases Update to Fix Thumbnail Controls Display in Windows 7 Taskbar

icrosoft has released a new update to fix an issue in which thumbnail controls are not displayed for some applications in Taskbar under Windows 7 and Server 2008 R2. This update is available for both 32-bit and 64-bit versions of Windows.
SP1 Beta users should also install this update.
You can download and install the update using following links:
Download Update for Windows 7
Download Update for Windows 7 64-bit
Download Update for Windows 7 SP1 Beta
Download Update for Windows 7 SP1 Beta 64-bit
Download Update for Windows Server 2008 R2 64-bit
Download Update for Windows Server 2008 R2 for Itanium-based Systems
Download Update for Windows Server 2008 R2 SP1 Beta 64-bit
Download Update for Windows Server 2008 R2 SP1 Beta for Itanium-based Systems

How to Import / Export (Backup / Restore) Tasks Using Task Scheduler in Windows?

Task Scheduler is a very useful components in Windows. It can be used to create a reminder for an important meeting or to schedule any particular task which you perform regularly. I always use Task Scheduler to schedule my important tasks. At the moment I have 24 scheduled tasks in Task Scheduler.
Creating a task is very easy in Task Scheduler. Simply click on Create Task link, follow instructions and enter required details like Task name, scheduled date/time, message, etc and your new task is ready to launch on the scheduled date/time.
Once you create a task, you should take a backup of the task so that you can restore it whenever required. Suppose you get a new computer or format your existing computer, you'll not need to create the task again. Just restore the task and you are done.
In this tutorial, we'll tell you how to take a backup of the task and how to restore the task using Task Scheduler.
How to Take Backup (Export) Tasks in Task Scheduler:
1. Go to Start -> All Programs -> Accessories -> System Tools and click on "Task Scheduler".
You can also open it directly using taskschd.msc command in RUN or Start menu Search box.
2. Once Task Scheduler is launched, select any desired task and click on "Export" link given in Actions pane at right-side of the window.
Or you can right-click on the task and select "Export" option.
Export_Backup_Task_Scheduler.png
3. Browse to the location where you want to save the task backup and click on Save button.
4. That's it. It'll save a XML file containing all the details about your task.
PS: Windows XP users will need to copy the task and paste it at your desired location where you want to save the backup.
How to Restore (Import) Tasks in Task Scheduler:
1. Again open Task Scheduler and click on "Import Task" link given in Actions pane at right-side of the window.
Import_Backup_Task_Scheduler.png
2. Now browse to the location where you have the backup of the task and select the XML file. At last click on Open button.
3. Task Scheduler will show a dialog box showing details of your task, click on OK button.
4. That's it. It'll restore your task.
PS: Windows XP users will only need to copy the backup task into Task Scheduler window.
How to Import (Restore) All Tasks in Bulk Using Task Scheduler in Windows?

Recently we posted a tutorial about importing and exporting tasks using Task Scheduler in Windows: How to Import / Export (Backup / Restore) Tasks Using Task Scheduler in Windows?
But there is one limitation in importing and exporting tasks using Task Scheduler. You can import/export only a single task at a time. Task Scheduler doesn't allow import/export of tasks in bulk.
So if you have lots of scheduled tasks say 20 in Task Scheduler, you'll need to perform the same step again and again for all 20 tasks.
Wouldn't it be great if you can import and export all tasks in a single step?
Actually you can import (restore) all tasks in bulk using "schtasks" command but there is no way to export all tasks in bulk.
In this tutorial, we'll tell you how to use "schtasks" command to restore all tasks in bulk:
1. First take backup of all tasks using the above mentioned tutorial.
2. Now create a new text file using Notepad and paste following code in it:
@echo off
echo Importing All Tasks
echo.
schtasks.exe /create /TN "Task 1 Name" /XML "Full_Path_of_Backup_XML_File"
schtasks.exe /create /TN "Task 2 Name" /XML "Full_Path_of_Backup_XML_File"
schtasks.exe /create /TN "Task 3 Name" /XML "Full_Path_of_Backup_XML_File"
echo.
echo Importing Done
echo.
pause
3. Replace "Task 1 Name", "Task 2 Name", etc entries with the name of your actual tasks. e.g. "Mother Birthday".
4. Replace "Full_Path_of_Backup_XML_File" with the location where you saved the backup tasks. e.g. "D:\Tasks Backup\Mother Birthday.xml".
5. Save the file with any name but the extension must be .BAT. e.g. you can save the file as "Restore Tasks.Bat". Make sure to use double quotes "" otherwise Notepad will save the file as a text file.
6. That's it. Once you create the file, run it and it'll start restoring all the tasks in Task Scheduler.
Now you'll never need to create all your important tasks each time you install a fresh Windows or work on a new computer. Just import all the tasks on the fly using the above mentioned batch file. ;)
PS: You can use the same Batch file for restoring any number of tasks. Simply add an entry for the desired task mentioning its name and location.

How to Move / Show Details Pane At Top in Windows Vista and 7 Explorer?


NOTE: This tutorial has been featured by Microsoft. AskVG.com was the first website posting this unique trick.
If you can remember the good old Longhorn days when Windows Vista was under Beta testing, the Details Pane in Windows Explorer used to show at top just below the Command Bar. But in Windows Vista RTM (Final version), the Details Pane was moved to bottom. Same thing applies to Windows 7 as well.
There are many people who still want to get the Details Pane at top as shown in our AeroVG theme preview picture:

You can also change the "Details Pane" position from Bottom to Top in Windows Vista and 7 Explorer using following simple steps:
1. We'll have to edit "%windir%\System32\Shell32.dll" file. So first take ownership of this file using following tutorial:
Add Take Ownership Option in File / Folder Context Menu in Windows Vista and 7
2. Now open the file in Resource Hacker.
3. Goto "View -> Find Text" (or press Ctrl + F). It'll open Find box.
4. Now type following String in textbox:
layoutpos="bottom"
5. Click on "Find Next" button and it'll show the line containing this text. It should be in UIFILE section.
6. You have to just replace "bottom" word with "top".
7. When you have done, click on "Compile Script" button.
8. Now press "F3" key and it'll show the next line containing the same text. Again do the same mentioned in 6th step.
9. Remember! You have to replace "bottom" word with "top" only in following locations (i.e. keys under UIFILE section):
3, 4, 5, 6, 19, 20, 21
10. If you also want to show the Details Pane at Top in Browse/Save/Open dialog boxes, then replace "bottom" word with "top" in 27 and 28 keys too.
11. That's it. You have done. Now save the file at some other location, for example in D: drive.
12. Rename original "Shell32.dll" file present in "System32" folder to "shell32_backup.dll".
13. Now copy your new modified "shell32.dll" file to "System32" folder.
14. Restart your system and after restart Windows will start using your new modified file and you'll get details pane at Top.

Microsoft Releases Update to Fix Unexpected Shutdown or Blue Screens While Using USB Video Device in Windows 7

Microsoft has released a new update for Windows 7 and Server 2008 R2 users. You should install this update to prevent unexpected shutdowns or bluescreens when you are using a USB video device. After you install this item, you may have to restart your computer.
Symptom:
On a computer that is running Windows 7 or Windows Server 2008 R2, you may receive one of the following Stop error messages:
Stop 0x0000007E (parameter1, parameter2, parameter3, parameter 4)
SYSTEM_THREAD_EXCEPTION_NOT_HANDLED
Stop 0x00000050 (parameter1, 0 or 1, parameter 3, 0)
PAGE_FAULT_IN_NONPAGED_AREA
This behavior occurs when you unload a USB video device or when you shutdown the computer.
Cause:
This issue occurs because of a race condition in the USB Video driver when a USB video device is unloaded.
Solution:
Download and install the required update using following link:
Download Update

7Conifier: Change Default Taskbar and Start Menu Icons in Windows 7

7Conifier is a portable tool created by "wronex" @ DA to change all default Taskbar and Start Menu icons in Windows 7 in a single click. All you need to do is start the app, select the desired pre-loaded package and hit the "Apply" button.
7Conifier comes bundled with three packages (Eclipse 2, Token Light and Token Dark). You can also add more packages by downloading a package and place it in the folder "Packages".

If you don't like the new icons, you can restore the default icons using default package which you created at first launch of the app.
Features List:
  • One click (and key press) to change your systems appearance
  • One click (and key press) to change it back
  • Comes pre-loaded with three packages
  • Supports future package releases
  • Built-in editor that allows you to edit or create you own packages
  • Works on both big and small (xp-style) icons
Download Link

Download Yet Another Windows XP “Zune” Theme for Windows 7

In past we have shared lots of Windows XP themes which have been successfully ported to Windows 7 for people who still love good old XP look: Today we are sharing another Zune theme port for Windows 7 users.
"Satukoro" @ DA has ported Windows XP "Zune" theme to Windows 7 and it looks as following:

You can download this theme using following link:
Download Windows XP "Zune" Theme for Windows 7
To apply this theme, first extract the downloaded RAR file using WinRAR or 7-Zip, then copy the "Zune" folder and .theme files to "Windows\Resources\Themes" folder. Now you can apply the theme using Desktop Personalization window.
For more information on how to use this theme, please visit following link:
How to Use 3rd Party Themes in Windows 7?

Microsoft Releases Hotfix to Fix Poor Printing Performance in Windows 7 and Server 2008 R2


Problem Symptom:
On a computer that is running Windows 7 or Windows Server 2008 R2, the printing performance may be poor compared to the performance on a computer that is running Windows Vista or Windows Server 2008. Additionally, a computer that is running Windows 7 or Windows Server 2008 R2 consumes more CPU resources when you print a document.
For example, CPU usage remains at 100 percent for a long time in Task Manager when you print a document on a computer that is running Windows 7 or Windows Server 2008 R2.
Cause:
This issue occurs because of a performance regression in spooler behavior on single-processor systems that are running Windows 7 or Windows Server 2008 R2.
Solution:
A supported hotfix is available from Microsoft. However, this hotfix is intended to correct only the problem that is described in this article. Apply this hotfix only to systems that are experiencing the problem described in this article.
Download Hotfix

#
### ###