Friends

This is default featured post 1 title

Go to Blogger edit html and find these sentences.Now replace these sentences with your own descriptions.This theme is Bloggerized by Lasantha Bandara - Premiumbloggertemplates.com.

This is default featured post 2 title

Go to Blogger edit html and find these sentences.Now replace these sentences with your own descriptions.This theme is Bloggerized by Lasantha Bandara - Premiumbloggertemplates.com.

This is default featured post 3 title

Go to Blogger edit html and find these sentences.Now replace these sentences with your own descriptions.This theme is Bloggerized by Lasantha Bandara - Premiumbloggertemplates.com.

This is default featured post 4 title

Go to Blogger edit html and find these sentences.Now replace these sentences with your own descriptions.This theme is Bloggerized by Lasantha Bandara - Premiumbloggertemplates.com.

This is default featured post 5 title

Go to Blogger edit html and find these sentences.Now replace these sentences with your own descriptions.This theme is Bloggerized by Lasantha Bandara - Premiumbloggertemplates.com.

Saturday, July 9, 2011

All About Resource Hacker in a Brief Tutorial

NOTE: This tutorial has been featured by Microsoft, Wikipedia and official Resource Hacker website. AskVG.com was the first website posting this tutorial.
Resource Hacker is a small but excellent tool to modify system files like DLL, EXE, CPL, etc. You can even change Windows look by editing various Windows files and replacing their resources using Resource Hacker.
You can download it using following links:
Download Link | Mirror | New 3.5.2 Beta Version
Its a portable application, so you don't need to install it. Simply extract the ZIP file and run the extracted EXE file.
This tutorial will help you in understanding this tool and will teach you how to use it. For your convenience, we have divided this tutorial in 2 parts:
  • PART 1: BASIC INFORMATION
  • PART 2: ADVANCED INFORMATION
Part 1 provides basic details like viewing or replacing existing resources in a file, etc. Part 2 covers some advance information for geeks, like adding new resources, using scripts, etc.

PART1 : BASIC INFORMATION
[Using Resource Hacker]
When you open a file in Resource Hacker, it shows various directories in left-side pane, like:
  • AVI - Contains AVI files
  • Cursor - Contains Cursor files
  • Bitmap - Contains BMP files
  • Icon - Contains Icons
  • Menu - Contains Menus
  • Dialog - Contains Dialog boxes
  • String Table - Contains Strings
  • Accelerators - Contains Shortcut keys
  • Version Info - Contains Version information of the file

[Viewing Resources]
You can view resource present in the file by expanding the directory given in left-side pane and clicking on the name of the resource. Each resource contains 3 important attributes:
  • Resource Type
  • Resource Name
  • Resource Language
[Changing Resources]

How to Add / Remove Entries in Context Menus in Windows

In this tutorial, I'll tell you how to add your own customized entries in context menus and how to remove unwanted entries from context menu: A. Type regedit in RUN dialog box and press Enter. Now go to:
HKEY_CLASSES_ROOT\* (for adding an option in All files context menu)
HKEY_CLASSES_ROOT\Directory (for adding an option in folders context menu only)
HKEY_CLASSES_ROOT\Drive (for adding an option in Drives context menu only)
HKEY_CLASSES_ROOT\Unknown (for adding an option in unknown files context menu)
B. Now under the above mentioned keys, u'll find "Shell" and "Shellex" keys. Both keys contain various entries, which are displayed when you right-click on a file, folder or drive. We'll use "Shell" key in this tutorial:
1. Right-click on the "Shell" key and select "New -> Key".
2. Give it any name. suppose we gave it name "vishal".
3. Now in right-side pane, double-click on "Default" String value and set its value to the Label which you want to display in context menu. Like if you want to add "Winamp" in context menu, then you can give it name "Open with Winamp" or similar.
4. Now create another key under this newly created key "vishal" with the name "command" and in right-side pane set value of "Default" to the path of application. For ex, for winamp you can set its value "%programfiles%\Winamp\winamp.exe".
That's it. Now you'll get in the context menu.

A few Important points:
1. If you add just the path in "Command", then it'll open the application but if you append "%1" (without quotes) in the path, then it'll open the selected file with the application. So in case of setting the value to "%programfiles%\Winamp\winamp.exe", set it "%programfiles%\Winamp\winamp.exe %1" and now it'll open the file in winamp.
2. Step 3 can be omitted and you can assign the application name directly to the new key. i.e., either set "Default" String value to the name of application or directly set the key name to application name. e.g. instead of setting the key name to "vishal", you can directly set its name to "Winamp", in this case leave the "Default" as it is.
3. With the help of this tut, you can add application shortcuts in any filetype context menu. e.g., if you like to play with "*.txt" file context menu, then go to:
HKEY_CLASSES_ROOT\txtfile
so you can follow this tutorial for any filetype.
C. Same methods applies for removing entries from context menu. Just goto "Shell" or "Shellex\ContextMenuHandlers" and delete the unwanted key under these keys.

How to Get Extra FREE Space in Windows?

Most of us face lower disk space problem in Windows. Many times Windows notifies us about the lower disk space and we are forced to delete some useless files or to resize the partition to get some free space. We are posting this tutorial to share some simple methods to get as mush FREE space as we can. Following are some ways to get free space in Windows:
1. First thing is to use windows built-in "Disk Cleanup" application. You can right-click on a drive in My Computer and select "Properties" now click on "Disk Cleanup" button. Now select all given options, like "Downloaded Program Files", "Temporary Internet Files", "Compress old files", etc. Sometimes you can get more than 1GB FREE space after using Disk Cleanup.
Alternatively you can run "Disk Cleanup" directly from RUN dialog box by giving "cleanmgr.exe" command.
2. Now open Windows Search and copy paste following code in Search box and perform a search:
*.tmp;*.log;*log.txt;*readme.txt;file_id.diz;*.bak;*.old;*.syd;*.prv;*.grp;*.gid;*.fts;*.cnt;*.~mp
You should check all files before deleting. You'll get 100's of files after searching, simply select all and press and delete them.

PS: Please check the files before deletion! It'll delete all Readme files, Backup files, Log files, etc. So deselect the files first, which you don't want to delete.
3. You can also disable WFP (Windows File Protection) service in Windows XP using WFP Switcher. This service runs in background and checks for system files status, and whenever it finds a system file has been changed/modified, it replaces the file with the original file stored in "DLLcache" folder. So we can disable this service and can get lots of FREE space.
After disabling the service, open "%windir%\System32\DLLCache" folder (it'll be HIDDEN & System Folder, so copy paste the path in address bar and press <ENTER>). Now you can safely delete all files present in this folder. It'll make aprrox. 1GB FREE space.
4. Open "System Properties" by right-click on "My Computer" icon on Desktop and select "Properties", now go to "System Restore" tab and select "Turn Off System Restore on all drives" option and apply it. Don’t use this trick if you use System Restore.
5. You can also delete several BMP files present in %windir% (Windows) folder, which are used as wallpapers in Desktop Properties. You can also delete all files in %windir%\Web\Wallpaper folder, all files in this folder are also used as wallpapers.
6. You can also empty TEMP (just type "TEMP" and "%TEMP%" one by one in RUN dialog box), Prefetch (in %windir% folder) folders to get free space.
7. Disable Hibernation from "Power Settings" (powercfg.cpl), if you don't use this feature.
8. Empty Temporary Internet files of your web browser to get some free space.
9. You can also delete all video files present in %windir%\system32\oobe\images folder, these files are used when windows runs for the first time after installation.
10. You can also delete all updates Uninstall Folders, which can be found in %windir% folder and all these folders' names will start from $NtUninstall (or something like that. Also all folders would be HIDDEN). But keep in mind that after deleting these folders you'll not be able to uninstall any windows update!
You can apply all above mention methods to get lots of FREE space without any problem.
You can also use 3rd party Utilities, like Tuneup Utility, System Mechanic, etc to FREE some space but these utilities also use most of the above mentioned techniques.

Small Processor Trick to Improve System Performance in Windows Vista and 7

If you are a Windows Vista or 7 user, following trick might help you in boosting system performance: 1. Type msconfig in Startmenu search box or RUN dialog box and press Enter.

2. Now go to "Boot" tab and click on "Advanced options..." button.
3. Enable "Number of processors:" option and select the correct no. of processors from drop-down list.
Select_No_of_Processors_msc.png
4. Click on "OK" button and then "Apply" it.
5. It'll require a restart and after reboot you'll notice improvement in system performance.
Please let us know your feedback in your comment. Did this trick work for you?

Add “Hide File Names” Option in “View” Menu in Windows Vista and 7

In this tutorial, we'll tell you how to add an extra option "Hide File Names" in "View" menu of Windows Vista and 7. After following this tutorial, you'll get "View -> Hide File Names" option in any particular folder or all folders depending upon the method:
1. Open a folder, in which you want to add this option. If you want to add this option in all folders, then open the parent folder. e.g. if you want to add the option in every folder of E: drive, then open E: drive.
2. Right-click on a blank area in the folder and select "Customize This Folder...". You can also get this option from "View -> Customize This Folder...".
3. It'll open "Customize" tab. Now select "Pictures and Videos" option from "Template" drop-down box. In Windows 7, Pictures and Videos options are given separately. You can select any of them.
NOTE: If you want to add the option "Hide File Names" to a particular folder then make sure to un-check the option "Also apply this template to all subfolders", otherwise enable this option.

4. Now Apply it and see the magic.
Now you'll get an extra option "Hide File Names" in "View". Which can hide file/folder names in that particular folder.

Actually in Windows XP we can hide file/folder names by pressing <SHIFT> key and selecting "View -> Thumbnails". Since they have removed "Thumbnails" option from "View" menu, that's why this option was added to folders having their templates as "Pictures and Videos".

Add Customized Strings (OEM Information) in System Properties Dialog Box of Windows Vista and 7

NOTE: This tutorial has been featured by Microsoft. AskVG.com was the first website posting this unique trick.
With the help of this hack, you can get some extra information and a personalized logo in Vista and 7 System Properties dialog box. Its very much same as the good old "OEMLogo.bmp" and "OEMInfo.ini" files in windows XP but sadly this trick no longer works in Vista and 7.
Here is a screenshot of Windows 7 System Properties dialog box with customized strings:

So here we go:
1. Type regedit in RUN dialog box and press Enter. Now goto:
HKEY_LOCAL_MACHINE\SOFTWARE\Microsoft\Windows\CurrentVersion
Under this key, look for a key OEMInformation. If it doesn't exist, create it.
2. Now select OEMInformation key and in right-side pane, create following String values and set their values as shown below:
Logo - path_of_OEMlogo.bmp_file
Manufacturer - Any_desired_name
Model - Any_desired_name
SupportHours - Any_desired_time_amount_like_24x7
SupportPhone - Any_desired_phone_number
SupportURL - Any_desired_URL
NOTE: OEMlogo.bmp file should be 96x96 in size and can be placed at any location.
3. Now open System Properties by right-clicking on My Computer icon on desktop and select Properties, you'll see your desired entries in "System" section and another section will also be created with the same name as you entered in Manufacturer String value. The OEMlogo.bmp file will be shown in right-side of "System" section.
NOTE: Windows 98, Me, 2000, XP or Server 2003 users, visit this tutorial.

Add Your Favorite Program Shortcut in Desktop Context Menu in Windows Vista and 7

NOTE: This tutorial has been featured by Microsoft. AskVG.com was the first website posting this unique trick.
UPDATE: Windows 7 users visit this tutorial.
Here is a tutorial to add any application shortcut in desktop context menu of Windows Vista and 7:

1. Type regedit in RUN dialog box and press Enter. Now goto:
HKEY_CLASSES_ROOT\Directory\Background\shell
now under this key create another key with any name and in right-side pane set its value to the label, which you want to show in desktop context menu, like Media Player, Winamp, Firefox, anything else.
2. Now create another key under this newly created key with name command. and in right-side pane set its value to the exact path of application, like:
C:\Program Files\Windows Media Player\wmplayer.exe
C:\Program Files\Winamp\winamp.exe
etc...

3. Thats it. Now you can check your favorite application shortcut in desktop context menu.
4. You can create as many shortcut as you want. Simply create a separate key for all the applications.
5. Following is a ready-made code:
Windows Registry Editor Version 5.00
[HKEY_CLASSES_ROOT\Directory\Background\shell\WMP]
@="Windows Media Player"
[HKEY_CLASSES_ROOT\Directory\Background\shell\WMP\command]
@="C:\\Program Files\\Windows Media Player\\wmplayer.exe"
Just change the label and path to your desired application and save with the name "vishal.reg" (including the quotes) and run it.
U can also set the application shortcut to show only when you press <SHIFT> key by adding "Extended" String value in right-side pane of the newly created key:
Windows Registry Editor Version 5.00
[HKEY_CLASSES_ROOT\Directory\Background\shell\WMP]
@="Windows Media Player"
"Extended"=""
[HKEY_CLASSES_ROOT\Directory\Background\shell\WMP\command]
@="C:\\Program Files\\Windows Media Player\\wmplayer.exe"
Now thats another benefit to use Vista and 7. I have checked this in XP but it was not working.
Windows XP users can visit following tutorial:
Add Your Favorite Program Shortcut in Desktop Context Menu in Windows XP

Enable Open Command Window Here Option in Context Menu in Windows Vista and 7

In Windows Vista and 7, if you press <SHIFT> key and right-click on any folder, you get some extra options like "Open Command Window Here", etc. In this tutorial, I'll tell you how to enable "Open Command Window here" option as default in context menu in without having the <SHIFT> key pressed. 1. Type regedit in RUN dialog box and press Enter. Now goto:
HKEY_CLASSES_ROOT\Directory\shell\cmd
HKEY_CLASSES_ROOT\Drive\shell\cmd
2. Now in right-side pane, you'll get a String value Extended. Delete it and this option will be enabled in Directories as well as Drives context menus.
PS: If you also want to enable this option at desktop, then do the same for following key too:
HKEY_CLASSES_ROOT\Directory\Background\shell\cmd

Give Browse Dialog Box More Space in Windows Vista and 7

Its time for sharing an interesting thing, which I found today. As we all know "Dialog boxes" don't contain Maximize, Minimize buttons. They only have "Close" button and we can't maximize them. If we right-click on the titlebar of a dialog box, we get only 2 options in context menu:
Move
Close

But for my surprise, when I opened "Browse" dialog box in RUN, I found that it can be maximized even its a dialog box. If you double-click on its titlebar, it'll be maximized. (But not fully maximized, the border will still be visible). Also you'll get an option "Maximize" in context menu of titlebar.
Maximize_Option_Dialog_Box.png
So its an interesting thing in Vista and 7. I think since Browse dialog box looks similar to Windows Explorer and has same properties, that's why it can be maximized irrespective of other dialog boxes.
PS: It happens for all Browse/Save/Open dialog boxes in all windows applications, like Notepad, etc.

Complete Guide for Windows Customization

Q. 1. What is a Theme/Visual Style? Are both same or is there any difference between them? => Visual Style & Theme are not same. But many people use these words in same manner. Actually Visual Style has extension .msstyles, while a theme has extension .theme.
Visual Style is the main file, which skins all parts of windows, like border, titlebar, buttons, etc. A theme file stores all settings, like icons, wallpaper, etc along with the visual style.
Q. 2. When I opened Display Properties, I got only 3 Visual Styles, Blue, Olive Green and silver. How can I get more?
=> You can download themes for Windows XP and Vista from following sections:
Windows XP Themes
Windows Vista Themes
Windows 7 Themes
Q. 3. I downloaded some Visual Styles, but none of them are working on my computer. Am I missing something?
=> By default, Windows doesn't allow 3rd party themes. So you'll need to patch a file uxtheme.dll to allow 3rd party themes. Take a look at following article:
How to Install & Use Custom 3rd Party Themes in Windows XP, Vista & 7
Q. 4. Can I edit my downloaded .msstyles file?
=> Yes, You can use Resource Hacker to edit themes, but it requires some expertise.

How to Enable Tools -> Folder Options and Registry Editor in Windows

Many times Windows users face a common problem. The "Folder Options" in "Tools" menu is not visible. Even It can't be accessed from Control Panel. Also "Registry Editor" is disabled. If you are also facing this problem, then you have come to right place. Follow the simple steps mentioned in this tutorial and your problem will be solved:
1. If Folder Options is disabled but Registry Editor is still working in your system, then you can enable Folder Options by editing Windows Registry. Type regedit in RUN dialog box and press Enter. it'll open Registry Editor, now go to following keys:
HKEY_CURRENT_USER\Software\Microsoft\Windows\Current Version\Policies\Explorer
HKEY_LOCAL_MACHINE\Software\Microsoft\Windows\Current Version\Policies\Explorer
In right-side pane, check whether a DWORD value named NoFolderOptions exists or not? If it exists, delete it.
2. If you are not familiar with editing the registry, then you can simply download following file, extract it and then run the .REG file:
Download Registry Script
3. But sometimes Registry Editor is also disabled. Whenever you try to open regedit, Windows will show following error message:
Registry Editor has been disabled by administrator.
Its a symptom of “RONTOKBRO” Trojan. To remove this trojan, follow the instructions given in following topic:
Is Your System Infected with a Virus / Spyware / Adware / Trojan?
4. If its not a trojan problem and someone intentionally has disabled it in your system, then you can enable it again by following any of these methods:
a. Type gpedit.msc in RUN dialog box and goto:
User Configuration -> Administrative Templates -> System
in right-side pane, set "Prevent access to Registry editing tools" to either Not Configured or Disabled.
b. Just type following in RUN dialog box and press <ENTER>:
REG add HKCU\Software\Microsoft\Windows\CurrentVersion\Policies\System /v DisableRegistryTools /t REG_DWORD /d 0 /f

[Help & Support] Frequently Asked Problems with Solutions

NOTE: Comments in this topic are deleted on regular basis to reduce database overhead. So don't think too much if your comment gets deleted.
Have a question? Please post it in your comment!
Before posting your problem, we advise you to go through following FAQ list:
All problems covered in this topic:
1. Task Manager/Registry Editor/Tools -> Folder Options disabled.
2. Search window opens while double-clicking on drives.
3. "Cannot find copy.exe" Error while double-clicking on drives.
4. Folder opens in a new window?
5. A sub-folder with the same name is created under parent folder.
6. My Documents/My Computer opens automatically at windows startup.
7. "NTLDR missing" Error at system startup.
8. "Hal.dll is corrupt or missing" Error at system startup.
9. "Windows\System32\config\system file missing or corrupt" Error at system startup.
10. Not able to boot into Windows 2000/XP/2003 after installing Windows 98.
11. Windows XP Boot loader related problems, like adding/removing entries.
12. ScanDisk starts running at windows startup.
13. "CMOS checksum error. Defaults loaded." Error at system startup.
14. I can't see any message in chat window of Yahoo! Messenger.
15. "Stand By" option is greyed out in shutdown dialog box and I can't use it.
16. Windows Login Screen has changed to "Classic Logon Box" automatically.
17. A strange process "ctfmon.exe" running in background.
18. How to recover lost Firefox bookmarks?
19. How to reset the corrupted windows icons?
20. How to make Desktop icons text background transparent?
21. How to get Windows XP Common tasks (Left-side pane in explorer) back?
22. "Copy To"/"Move To" dialog box opens automatically while right-clicking on Start -> Open.
23. Can't set "Show Hidden files/folders" option in "Tools -> Folder Options".
24. Accidentally deleted "mspaint.exe"/"notepad.exe"/etc. file, how to get it back?
25. Thumbnail view is not working in Windows Explorer.
26. Search companion window opens blank in Windows XP Search.
Here are the solutions:
--------------------------------------------------
Q. 1. In my windows Task Manager / Registry Editor / Tools -> Folder Options has been disabled. I'm getting warning message that "It has been disabled by Administrator". How can I enable it again?
Sol: Please visit following articles:
How to Fix "Task Manager has been Disabled by Your Administrator"?
How to Enable Tools -> Folder Options and Registry Editor in Windows
If any other Windows component like RUN, Desktop Properties, System Properties, etc has been disabled, then you can check following link:
List of All Kinds of Restrictions for Windows 2000, XP, Server 2003, Vista, Server 2008 and 7
--------------------------------------------------
Q. 2. Whenever I double-click on any drive/folder in My Computer, a Search window opens.
Sol: Type regedit in RUN dialog box and press Enter. Now goto following keys one by one:
HKEY_CLASSES_ROOT\Directory\shell

Bug in Windows Notepad Statusbar

1. Open Notepad and enable "Status Bar" from "View -> Status Bar". If this option is disabled, then first uncheck "Format -> Word Wrap" option and now enable Status Bar again. Actually Notepad doesnt allow to have Status Bar along with Word Wrap feature. You can have one of them enabled at a time. But there is a registry hack, using it you can have both of them at the same time. Type regedit in RUN dialog box and press Enter. Now goto:
HKEY_CURRENT_USER\Software\Microsoft\Notepad
In right-side pane, change value of StatusBar to 1.
2. Now open any existing text file (Yeah, you have to open an already saved file to check this BUG) and put your cursor to any line, you'll see its location in Status Bar.
e.g. we assume that you put the cursor at column 3 of Line 3, then it'll show "Ln 3, Col 3" in Status Bar.
OK, fine then whats the BUG? Now press <Ctrl>+S or Choose "File -> Save" and look at the Status Bar. VOILLA, it'll show "Ln 1, Col 1" irrespective of the actual Line and column Number, that was "Ln 3, Col 22" in our case.
Notepad_Bug.png
Sometimes you may have to press <Ctrl>+S twice to re-create this BUG.
So the BUG is whenever you save an existing file, Notepad will show "Ln 1, Col 1" in Status Bar and it'll be corrected when you'll move the cursor.

How to Remove nVidia, Intel and Other Display Driver Entries from Desktop Context Menu in Windows XP, Vista and 7

Whenever we install Intel, nVidia or other graphics card drivers in Windows, some extra entries like Save Schemes, etc are added in Desktop Context menu (Menu which appears, when we right-click on desktop). It causes the context menu to take a little bit extra time in loading. nVidia_Intel_Desktop_Context_Menu_E.png
Here is a registry trick to remove those extra entries from Desktop context menu:
1. Goto Start -> Run and type regedit and navigate to:
HKEY_CLASSES_ROOT\Directory\Background\shellex\ContextMenuHandlers
2. Delete the key igfxui (for Intel), NvCplDesktopContext (for nVidia) or other similar keys for your graphics card.
3. Now, your desktop context menu will look nice and minimal and will not take any extra time in loading.

[FIX] Optical Drives (CD/DVD) Not Showing in My Computer Window

Many times users face strange problem when they can't the optical drives in My Computer window even if the drive is fine and works in other computers. If you also facing this problem and can't see your optical drives (CD/DVD Drives/Writers) in My Computer, then this tutorial will help you.
Simply follow these simple steps:
1. Type regedit in RUN dialog box and press Enter. It'll open Registry Editor.
2. Now goto following key:
HKEY_LOCAL_MACHINE\SYSTEM\CurrentControlSet\Control\Class\ {4D36E965-E325-11CE-BFC1-08002BE10318}
3. Delete "UpperFilters" and "LowerFilters"keys in right-side pane.
4. Restart the system and now you should  have access to your optical drives.

QTTabBar: Add Tab Feature to Windows Explorer

"QTTabBar" adds Tab feature to Windows Explorer so you can work on more than one folder within a single Explorer window just like a web browser. Features List:
  • Tab bar for Windows Explorer
  • QTTabBar allows you to operates files and folders like tab browser
  • Folder grouping, histories, etc.

Download Link

Add “Take Ownership” Option in File / Folder Context Menu in Windows XP, Vista and 7

NOTE: This article has been featured by Microsoft. AskVG.com was the first website posting this unique trick.
Many times you need to take ownership of a file or folder in Windows. You have to follow no. of steps to do this task. But now you can do it in a single step.
Download following zip file and extract it. You'll get a .REG file. Run the file and accept the confirmation:
Download Link
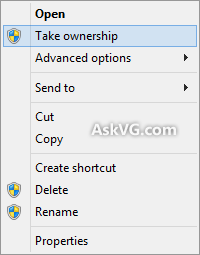
It'll add an extra option "Take ownership" in file/folder context menu:

Now you can right-click on any file/folder and select “Take ownership”. It’ll make you the owner of the file/folder.

[Solution] Orkut.com, Youtube.com and Firefox is Banned in System

Many people are facing a common problem, where Orkut.com, Youtube.com and Firefox are blocked in their systems and they get following error with a scary laugh:
Orkut IS BANNED, orkut is banned you fool The administrators didnt write this program guess who did?? r r MUHAHAHA!!
So here I'm posting a detailed procedure to solve this problem.
It happens because of "Heap41a / win32.USBworm" which spreads through USB pen drives and removable storage devices. I'll tell you a simple method to remove the virus:
1. Open "Task Manager" and goto "Processes" tab.
2. Look for services with name "svchost.exe". There will be many services with the same name. Most of them will have "SYSTEM", "LOCAL SERVICE" OR "NETWORK SERVICE" as User Name but you have to look for "svchost.exe" service which has your currently logged in username as User Name.
3. You'll get approx. 2 services with the name "svchost.exe" which has your Windows username. End Task them by pressing <Delete> key or by selecting them and clicking on "End Process" button. It'll confirm the action, accept it.
4. Now open "regedit" from RUN and goto following keys:
HKEY_LOCAL_MACHINE\SOFTWARE\Microsoft\Windows\Current Version\Run
HKEY_LOCAL_MACHINE\SOFTWARE\Microsoft\Windows\Current Version\Policies\Explorer\Run
And look for a key in right-side pane with the name "Winlogon" which will have "heap41a\svchost.exe" in its value field. If you find this key, delete it.
5. Now goto following key:
HKEY_LOCAL_MACHINE\SOFTWARE\Microsoft\Windows\Current Version\explorer\Advanced\Folder\Hidden\SHOWALL
And in right-side pane, change value of "CheckedValue" to 1
6. Now enable "Show Hidden Files/Folders" option in "Tools -> Folder Options" in My Computer.
7. Right-click on Start button and select "Open". Now open "Programs" folder, here you'll see a folder "Startup". Open it and if you get a hidden file there, delete it. If its not there, then close it.
8. At last open "My Computer" and open C: drive. Disable "Hide Protected System files" option in "Tools -> Folder Options". You'll see a folder "heap41a" in C: drive. Delete it.
Thats it. After doing all this, restart your system and you'll get rid of the virus.
PS: Don't forget to format your pen drive or removable storage media which caused this virus infection because it would still contain the virus. If you don't want to format it, then delete following 2 files from pen drive:
microsoftpowerpoint.exe
autorun.inf

XdN Tweaker: Free Tweaking Program for Windows XP, Vista, 7, Server 2003 and 2008

"XdN Tweaker" is a free tweaking program for Windows XP, Windows Server 2003, Windows Vista, Windows Server 2008, and Windows 7. Features List:
  • Changes the number of Folder views Windows saves.
  • Resets the folder views Windows has saved.
  • Add/Remove classic Windows 2000 user control panel icon.
  • Disable/Enable ATI Catalyst Control Center right click on Desktop
    (only for use if you have an ATI video card and have the Catalyst Control Center installed).
  • Disable/Enable ‘SendTo’ right-click menu.
  • Allows you to adjust and tweak TCP/IP settings.
  • Disable/Enable ZipFolders.
  • Disable/Enable the Outlook Express/Windows Mail splash screen.
  • Put the File menu above the Back/Forward buttons in IE7.
  • Remove or Replace the Search box in IE7.
  • Disable/Enable User Account Control prompts under Vista.
  • Disable/Enable the “- Shortcut” text under Vista.
  • Attempt to force Vista to better save folder views.
  • Disable/Enable Windows Media Player Explorer context menus.
  • Add/Remove “Take Ownership” to right-click menus under Vista.
  • Disable/Enable the Documents item on the Classic Start Menu.
  • Changes “Delete” to “Search…” on Recycle Bin.
  • Turn off the annoying full screen “black” UAC prompt.
  • Add/Remove the Network Connections icon to Control Panel
  • Enable Classic Search in Explorer and Internet Explorer.
  • Disable/Enable Shutdown Reason dialog under Server 2003.
  • Disable/Enable Windows scanning AVI files for thumbnails.
  • Remove/Restore hidden ASPNET user that prevents auto login.
  • Add “Tweak UI” icon to Control Panel (if installed).
Download Link

The Best Method to Hide Files / Folders in Windows Without Using 3rd Party Utilities

Following is a 100% safe and free of cost method to hide files/folders in Windows without using any 3rd party software: STEP 1: First of course, hide the file or folder from its "Properties".
STEP 2: Now disable "Show Hidden files/folders" option from "Tools -> Folder Options".
Hmm. Now you can say "What's so special? Anyone can enable the option again."

STEP 3: OK. No problem. Disable "Folder Options" using Registry Editor. Please take a look at Point 4 in following topic:
All Kind of Restrictions for Windows
Again you'll ask "So what? Anyone who knows about "regedit" can re-enable Folder Options. Then?"
STEP 4: Simple. Disable Registry Editor also. Again take a look at Point 5 in following topic:
All Kind of Restrictions for Windows
Now we have almost done and our hidden files are safe but not really. Why? Because "regedit" can be enabled again using "gpedit.msc".
Goto:
User Configuration -> Administrative Templates -> System
In right-side pane, set "Prevent access to Registry editing tools" to either Not Configured or Disabled and it'll re-enable Registry Editor.
So to make our method 100% safe and working, just follow this last step:
STEP 5: Rename gpedit.msc to some other name like "AskVG.msc" and then hide it. You can find it in "Windows\System32" folder.
Now whenever anyone tries to run "gpedit.msc", Windows will show an error message "file not found". But you can always run it using the new name "AskVG.msc".

How to Reset / Recover / Change Forgotten Administrator Password in Windows?

Many times we face this problem when we or our friends forget Windows password and can't log into Windows. So here we are posting a few methods / utilities which can be used to recover Windows password:
DISCLAIMER: Following information should be used only if its your system and you have forgotten account password. Don't use this information to access a system which is not yours without permission.
1st Method:
The first thing which you check if you forget login password. When we install Windows, it automatically creates an account "Administrator" and sets its password to blank. So if you have forget your user account password then try this:
Start system and when you see Windows Welcome screen / Login screen, press <ctrl>+<alt>+<del> keys twice and it'll show Classic Login box. Now type "Administrator" (without quotes) in Username and leave Password field blank. Now press Enter and you should be able to log in Windows.
Now you can reset your account password from "Control Panel -> User Accounts".
Same thing can be done using Safe Mode. In Safe Mode Windows will show this in-built Administrator account in Login screen.
2nd Method:
If the above mentioned trick doesn't work, try following trick which is actually a loophole in Windows XP Setup and a big security hole:
A. Boot using Windows XP Setup CD and follow the instruction like Accepting EULA, etc.
B. When it asks to repair your existing Windows installation, accept it and press "R" to run the repair.
C. Setup will start repairing your Windows and will start copying files, etc.
D. After a few minutes setup will restart your system and when it restarts don't press any key when it shows "Press any key to continue..." otherwise Setup will start from the beginning. Don't press any key and setup will resume where it left.
E. Now it'll start doing other tasks and will show a small progressbar with a few details in left side.
F. Look carefully at the details and when it shows "Installing devices", press <Shift>+F10 keys in your keyboard.
G. It'll open a Command Prompt window. Now type nusrmgr.cpl and press <Enter>.
H. It'll open the same "User Accounts" window which you see in Control Panel.
I. Now you can remove or reset any account password without any problem.
3rd Method:
You can use various bootable rescue CDs as mentioned in following link:
Download FREE Bootable Rescue CDs from Kaspersky, BitDefender, Avira, F-Secure and Others
There are also a few 3rd party utilities and rescue discs to help you recover your Windows password:
UBCD for Windows:
UBCD4Win is a bootable recovery CD that contains software used for repairing, restoring, or diagnosing almost any computer problem. UBCD4Win is based on Bart's PE. Bart's PE builds a Windows "pre-install" environment CD, basically a simple Windows XP booted from CD. UBCD4Win includes network support and allows you the ability to modify NTFS volumes, recover deleted files, create new NTFS volumes, scan hard drives for viruses, etc.
Download Link
Ultimate Boot CD (UBCD):
Ultimate Boot CD runs independently of any operating system. It will boot from any Intel-compatible machine, regardless of whether DOS/Windows/Linux/BeOS is installed on the machine. However, you do need an operating system and a ISO-capable CD writer software to create the Ultimate Boot CD from the downloaded ISO image file.
Download Link
Offline NT Password & Registry Editor:
This is a utility to reset the password of any user that has a valid (local) account on your NT system. You do not need to know the old password to set a new one. It works offline, that is, you have to shutdown your computer and boot off a floppydisk or CD. It'll detect and offer to unlock locked or disabled out user accounts. It is also an almost fully functional registry editor.
Download Link
4th Method:
Windows XP and further versions also provide another method to recover forgotten password by using "Reset Disk". If you created a Password Reset Disk in past, you can use that disk to reset the password.
5th Method:
If all fails, then simply reinstall Windows and create new accounts. To recover lost data, you can use Data recovery tools available on net but the chances will be very low to get data back.
That's all we can suggest. If you have any other method / tool, feel free to post here.

How to Add Aero ON / OFF Shortcuts in Desktop and My Computer Context Menu Under Windows Vista and 7

Whenever you want to turn Aero ON or OFF, you have to do it either from Desktop Properties or from System properties. But did you know there is a very easy shortcut to do it within seconds? Here are 2 commands to turn Aero ON / OFF which are used by Windows Vista and 7:
Command to Turn Aero ON: Rundll32 dwmApi #102
Command to Turn Aero OFF: Rundll32 dwmApi #104
You can give the commands in RUN dialog box or Startmenu Searchbox. You can also create their shortcuts on Desktop or Quick Launch or wherever you want. It can become quite handy in lots of situations like a software has disabled Aero because it was not compatible with Aero or if you are running out of battery in your laptop, etc.
You can also add these commands in Desktop context menu or My Computer context menu. e.g. when you'll right-click on Desktop or My Computer icon, you'll find the shortcuts of "Aero ON" and "Aero OFF" there.
Following is a step-by-step tutorial to Add "Aero ON" and "Aero OFF" options in Desktop and My Computer Context Menu:
Add "Aero ON" and "Aero OFF" in Desktop Context Menu:

1. Type regedit in RUN dialog box and press Enter. Now goto:
HKEY_CLASSES_ROOT\Directory\Background\shell
2. Right-click on the "Shell" key and select "New -> Key".
3. Give it name Aero ON.
4. Now create another key under "Aero ON" with the name “command” and in right-side pane set value of “Default” to:
Rundll32 dwmApi #102
5. Now repeat steps 2-4 to add "Aero OFF" option, i.e. Right-click on the "Shell" key and select "New -> Key".
6. Give it name Aero OFF.
7. Now create another key under "Aero OFF" with the name “command” and in right-side pane set value of “Default” to:
Rundll32 dwmApi #104
8. That's it. Now you'll get both "Aero ON" and "Aero OFF" options in Desktop Context Menu.
Add "Aero ON" and "Aero OFF" in My Computer Context Menu:

1. Type regedit in RUN dialog box and press Enter. Now goto:
HKEY_CLASSES_ROOT\CLSID\{20D04FE0-3AEA-1069-A2D8-08002B30309D} \shell
2. Right-click on the "Shell" key and select "New -> Key".
3. Give it name Aero ON.
4. Now create another key under "Aero ON" with the name “command” and in right-side pane set value of “Default” to:
Rundll32 dwmApi #102
5. Now repeat steps 2-4 to add "Aero OFF" option, i.e. Right-click on the "Shell" key and select "New -> Key".
6. Give it name Aero OFF.
7. Now create another key under "Aero OFF" with the name “command” and in right-side pane set value of “Default” to:
Rundll32 dwmApi #104
8. That's it. Now you'll get both "Aero ON" and "Aero OFF" options in My Computer Context Menu.
NOTE: There is also another similar command "Rundll32 dwmApi #105" which is used to run "Flip 3D". You can also add it in My Computer or desktop Context Menu by following the above mentioned steps.

WinBubble: Customize and Tweak Your Windows Vista and 7 Easily

WinBubble is a nice and small in size utility to tweak lots of hidden settings in Windows Vista and 7. The best thing is, you don't need to install it. Its a portable app. Just download it and run the EXE file. Thats it.
You'll get lots of cool tweaks there, which might come handy most of the time. A must have software for Vista and 7 users.
WinBubble.png
You can download it using following link:
Download Link
Also check following free tweaking utilities:

How to Remove the Annoying Focus Rectangle in Windows?

In Windows, whenever we select any item, an annoying focus rectangle is shown around it. The rectangle is also shown on buttons, etc in dialog boxes which doesnt look good and many people want to get rid of it. Thanks to our friend "localhost" who made a small program to remove the annoying focus rectangle which works in every version of Windows.

Just download following ZIP file, extract it and run the setup file:
Download Link
Both 32-bit and 64-bit versions are supported.
NOTE: Windows Vista and 7 users should follow these steps with Admin privileges.

How to Enable / Activate Hidden Administrator Account in Windows Vista and 7

Many people ask me why there is no built-in Administrator account available in Windows Vista and 7 like previous Windows versions? Why can't we use the default Administrator account? The answer is "Yes! The default Administrator account is created in Vista and 7 but its disabled by default for security purposes." You might want to enable it for troubleshooting or to get rid of the annoying UAC prompts while tweaking your system. So here I'll describe a few methods to enable / activate the hidden Administrator account in Windows Vista and 7:
Method A:
1. Right-click on My Computer icon on Desktop and select "Manage", it'll open "Computer Management" window. ( You can also open it by giving "compmgmt.msc" command in RUN dialog box or Startmenu Search box).
2. Goto "Local Users and Groups -> Users". In right-side pane double-click on "Administrator" account. It'll open its Properties. Deselect "Account is disabled" option and Apply it.
Method B:
1. Type "secpol.msc" in RUN dialog box or Startmenu search box, it'll open "Local Security Policy" window.
2. Goto "Local Policies -> Security Options".
3. Double-click on first option "Accounts: Administrator account status" and select "Enabled" and apply it.
Method C:
1. Click on “Start button -> All Programs -> Accessories“. Right-click on “Command Prompt” and select “Run As Administrator“. If you are prompted to enter password, enter the password and continue. You can also open Command Prompt in Administrator mode by typing “cmd” in Startmenu Search box and press “Ctrl+Shift+Enter“.
2. Now provide following command:
net user administrator /active:yes
3. Thats it. The Administrator account will be enabled. If you want to disable it again, simply replace "yes" with "no" in above command.
NOTE: Never activate the hidden Administrator account until required. Its better to use other general accounts for better security. Also the Administrator account has no password, so if you enable it then don't forget to set a strong password for it.

Extend Windows Vista and 7 Trial Period from 30 Days to 120 Days

As we all know Windows Vista and 7 can be used for 30 days trial period without activating or entering Product key. But do you know that there is a trick to extend this 30 days trial period to 120 days?.
To extend Windows Vista and 7 trial period follow these simple steps:
1. Click on “Start button -> All Programs -> Accessories“. Right-click on “Command Prompt” and select “Run As Administrator“. If you are prompted to enter password, enter the password and continue. You can also open Command Prompt in Administrator mode by typing “cmd” in Startmenu Search box and press “Ctrl+Shift+Enter“.
2. Now provide following command:
slmgr -rearm
3. You'll be prompted to restart Windows, restart it and the trial period will be reset to 30 days again.
NOTE: So if you want to enjoy exact 120 days, then give above mentioned command on the 30th day when your trial period is going to end. The command works only 3 times, that's why its limited to only 120 days. You can check the Trial period by going to System Properties.

How to Change Menu Position from Left to Right in Windows Vista and 7

I have received many mails from people regarding Menu position in Windows Vista and 7. In previous Windows versions, menus used to appear at right-side of the mouse cursor but in Windows Vista and 7, menus appear at left side of the cursor. It doesnt happen for everyone but majority of people is facing this issue even I have faced it in my Windows.
So here I'm posting a small tutorial on how to change menus position in Windows Vista and 7. Actually its not a bug, you can set the menu position according to your requirements.
1. Open Control Panel and double-click on "Tablet PC Settings":
2. It'll open a new window where you can select any of following 2 options:
  • Right-handed
  • Left-handed

3. That's it. Apply it and you have done.
Also check:
Add Cascading Menus for Your Favorite Programs in Windows 7 Desktop and My Computer

#
### ###