Friends

This is default featured post 1 title

Go to Blogger edit html and find these sentences.Now replace these sentences with your own descriptions.This theme is Bloggerized by Lasantha Bandara - Premiumbloggertemplates.com.

This is default featured post 2 title

Go to Blogger edit html and find these sentences.Now replace these sentences with your own descriptions.This theme is Bloggerized by Lasantha Bandara - Premiumbloggertemplates.com.

This is default featured post 3 title

Go to Blogger edit html and find these sentences.Now replace these sentences with your own descriptions.This theme is Bloggerized by Lasantha Bandara - Premiumbloggertemplates.com.

This is default featured post 4 title

Go to Blogger edit html and find these sentences.Now replace these sentences with your own descriptions.This theme is Bloggerized by Lasantha Bandara - Premiumbloggertemplates.com.

This is default featured post 5 title

Go to Blogger edit html and find these sentences.Now replace these sentences with your own descriptions.This theme is Bloggerized by Lasantha Bandara - Premiumbloggertemplates.com.

Sunday, December 12, 2010

Instalasi linux di laptop axioo

Berkali-kali saya nyoba untuk instalasi linux di laptop axioo pinjaman dari kantor saya, hasilnya gagal maning gagal maning soonn (tongue) dari mulai nyoba distro satu ke distro yang lainnya, hasilnya pun sama, gagal lagi! (duh) Saya pun ngga menyerah sampe sini, pada waktu kopdar pun saya gunakan untuk bertanya kepada yang lebih ahli, alhamdulillah mendapatkan sedikit pencerahan, beliau pernah punya pengalaman berhasil instalasi linux di laptop axioo, plooong banget rasanya waktu denger kalimat pertama, akan tetapi ada “tapi”nya yaitu menggunakan dvd recovery bawaan laptop axioo, yup linux bawaan axio berdistro Mandriva yang udah di modifikasi dan beliau pun menyarankan kepada saya kalau ingin install linux di axioo ya bisa pake dvd bawaan axioo itu, wadoh bingung aq (bingung) lha masalahnya dvd bawaannya pun saya ga punya, saya cari dan tanya sama si bos ga ada (hammer) piye iki jal(doh)
Saya sampe putus asa karena harus melakukan instalasi linux di laptop axioo berulangkali dengan berbagai macam distro dan hasilnya selalu GAGAL dengan sukses! hore… (party) (lol) sampe akhirnya saya pun diajak bergabung ke slovewithit oleh mas Andy, nah dari sini akhirnya saya menemukan postingan yang membahas tentang instalasi linux di laptop axioo yang ditulis oleh babeh, terima kasih ya, berkat panjenengan akhirnya saya berhasil men-linux-kan axioo pinjaman dari kantor saya (salaman)
Laptop axioo yang saya gunakan untuk instalasi linux kali ini adalah Axioo TVW 8162, processor Core2Duo T5550 1.83GHz, 1 GB RAM dengan chipset SiS M672 dan VGA SiS 671. Berikut ini beberapa trik supaya axioo bisa bermain linux, untuk mencoba linux di axioo saya memakai linux sejuta umat, ubuntu (lol) ternyata solusi install linux di axioo adalah dengan menonaktifkan fungsi acpi “acpi=off noapic“.
Berikut langkah-langkah untuk mengatasi masalah instalasi linux axioo :
  1. Booting linux anda, monggoh… bisa melalui flashdisk atau dari CDROM
  2. Pilih bahasa yang akan menjadi bahasa default sistem Anda

Posedur Perbaikan Komputer Yang Mati Total

prosedur perbaikan komputer 
Artikel ini adalah kelanjutan dari Persiapan Menjadi Maintenance Komputer. Dalam banyak kasus kerusakan komputer ketika komputer tidak mau nyala seseorang yang berniat memperbaiki sendiri komputernya justru membuat kerusakan lebih parah dari kerusakan yang sudah ada. Sertiap perbaikan salah satu perangkat komputer selalu ada prosedurnya dan itulah yang sering jadi masalah. Calon teknisi mencari kerusakan pada memory misalnya, pada hal kerusakan pada power suply. Inilah yang disebut kesalahan diagnosa dan kesalahan prosedur perbaikan komputer. Kalau begitu jika komputer mati sama sekali, bagaimana prosedur perbaikannya?
KASUS : Komputer mati sama sekali, semua lampu indikator tak satupun yang menyala. Dimana kerusakannya? Logika pertama yang harus dimiliki adalah bahwa komputer hanya bisa nyala jika ada suply listrik.
Solusi :
  1. Prosedur 1. Apakah listrik di rumah Anda nyala alias tidak mati lampu? Ketika menyalakan komputer di siang hari dan komputer tidak mau hidup, jangan dulu langsung mengutak-atik kabel power suply. Pastikan terlebih dahulu bahwa listrik di rumah Anda tidak sedang bermasalah.
  2. Prosedur 2. Jika prosedur 1 diatas sudah dipastikan tidak bermasalah maka berarti penyebab komputer tidak mau nyala bukan karena listrik tidak ada. Langkah selanjutnya, yang bertanggungjawab adalah kabel listrik power suply dan power suply itu sendiri. Periksa kabel listrik power suply dan kalau perlu dites dengan multimeter untuk memastikan bahwa kabel tersebut tidak putus.
  3. Prosedur 3. Tes Power suply. Jika kabel power suply sudah dipastikan baik, maka yang harusdi perksa selanjutnya adalah power suply itu sendiri. Pastikan bahwa power suply tidak masalah misalnya apakah kabelnya pada Mainboard terpasang dengan tepat, jangan sampai longgar dll. CATATAN : Jika kipas power suply tidak jalan dalam pengetesan biasa, tidak berarti bahwa power suply pasti rusak. Cara mengetes power suply yang lengkap akan saya terbitkan pada artikel tersendiri.
  4. Prosedur 4. Periksa tombol power pada komputer. Jika sudah dipastikan power suply masih baik, maka langkah selanjutnya adalah periksa semua tombol yang bertugas menylut listrik pada CPU antara lain; * Tombol Power utama (model lama). * Power switch penyulut power suply (biasanya dibagian depan komputer). * Power mengaktifkan strip daya, gelombang pelindung, atau UPS (jika Anda memilikinya).
  5. Prosedur 5. Periksa mainboard. Jika langkah 1-4 diatas tidak juga menyelesaikan masalah, barulah kita memasuki Mainboard untuk diperiksa. Pastikan bahwa semua kabel perangkat keras lain terpasang secara tepat pada mainboard terutama kabel output dari power suply. Jika ada yang Anda curigai, sebaiknya dicabut dulu lalu dipasang kembali dengan meyakinkan.
  6. Prosedur 6. Periksa Processor. Jika Anda sangat yakin bahwa Mainboard sudah tidak ada masalah dan komputer masih mogok, yang paling pertama Anda periksa selanjutnya adalah Processor. Dalam seluruh kasus yang sudah saya temukan (power suply dan mainboard masih baik) satu-satunya perangkat yang membuat komputer tidak bereaksi sama sekali ketika tombol power ditekan adalah Processor. Perangkat keras lain yang sering rusak misalnya memory dan vga tidak menyebabkan komputer tidak bereaksi sama sekali. Jika memory atau vga rusak, tetap ada reaksi pada komputer tetapi tidak sempurna.
  7. Prosedur 7. Maiboard rusak. Jika pada poin 6 diatas Anda sangat yakin bahwa processor masih baik (tentu melalui uji tes) dan komputer tidak juga ada tanggapan maka sayapun sangat yakin bahwa mainboard. Jika ini terjadi Anda pasti sudah tahu jalan keluarnya.
  8. Prosedur 8. Periksa monitor. Setelah melewati 7 tahap diatas, sudah ada tanggapan dan lampu indikator CPU sudah nyala, kipas power suply sudah jalan dan tidak ada tampilan sama sekali maka berarti masalah ada pada seputar monitor. Pastikan listrik monitor tersambung baik. Pastikan kabel vga menuju monitor masih baik dan terpasang baik.
  9. Prosedur 9. Kerusakan lain. Setelah 8 langkah diatas dan komputer Anda sudah nyala dan sistem operasi jalan normal maka masalah Anda selesai.
CATATAN LAGI : Jika dalam 8 langkah pertama diatas komputer sudah nyala namun tidak normal misalnya hanya muncul layar biru dengan tulisan yang Anda tidak mengerti, maka berarti masih ada kerusakan lain, namun itu di luar jangkauan artikel ini. Pembahasan kita disini hanyalah pada komputer mati sama sekali dan tidak menanggapi perintah tombol power. Kerusakan lain akan saya bahas pada kesempatan lain. masalah.

Mengatasi Runtime Error Pada Komputer

Belajar komputer pada kasus Runtime Error. Ketika kita sedang mengoperasikan komputer, menjalankan suatu program lalu terjadi masalah komputer alias komputer “mogok” lalu muncul peringatan. Inilah saatnya anda mengalami salah satu dari runtime error. Ada banyak sekali runtime error dan kodenya masing-masing. Apa penyebab dan solusinya?
Runtime atau run-time error adalah pesan kesalahan dapat disebabkan oleh:
  1. Konflik Terminate-and-stay-resident (TSR) atau program yang sedang berjalan dan melakukan beberapa fungsi tertentu.
  2. Masalah software
  3. Virus komputer
  4. Masalah memori
Solusi:
Sebelum mengikuti rekomendasi untuk pemecahan masalah pada runtime error Anda jika Anda mendapatkan runtime error dengan kode kesalahan runtime dan pesan kesalahan seperti ” Runtime error 75 path/file access error”, lihat kode runtime error untuk melihat penjelasan kode kesalahan dan informasi tambahan dan penyebab kesalahan tersebut.
Konflik Terminate-and-stay-resident
Jika Anda mengalami pesan kesalahan runtime sedangkan Anda memastikan bahwa masalah tidak disebabkan oleh program pihak ketiga atau TSR seperti daftar dibawah, dan anda tetap mengalami masalah yang sama, pastikan bahwa tidak ada utilitas atau program yang sedang dibuka di autoexec.bat /config.sys dengan cara penggantian nama file temporal. Untuk melakukannya, ikuti petunjuk di bawah ini.
Boot ke MS-DOS prompt. Klik [start] lalu ketik [cmd] pada kotak search. Setelah masuk MS-DOS prompt, ketik: cd lalu tekan enter. Selanjutnya ketik lagi : [ren autoexec.bat autoexec.ch] lalu tekan enter. Ketik lagi : [ren config.sys config.ch] lalu tekan enter. Catatan ketika mengetik jangan memasukkan tanda ini []
Setelah selesai, reboot komputer.
Masalah software
Jika masalah tetap ada kemungkinan bahwa program, utilitas atau permainan yang menyebabkan runtime error. Verifikasi melalui situs web pengembang bahwa semua update atau patch yang mungkin tersedia yang telah Anda download dan install.
Jika tidak ada patch atau update yang tersedia, upaya untuk menghapus dan / atau instal ulang program yang menyebabkan masalah. Jika Anda memiliki runtime error pada sistem operasi Anda, instal ulang sistem operasi.
Add-on, plug-in, atau perangkat lunak tambahan
Banyak error runtime juga disebabkan oleh Pengaya lain, plug-in, atau perangkat lunak tambahan lain yang telah diinstal ke komputer dan berhubungan dengan program. Jika Anda memiliki perangkat lunak tambahan yang terinstal dan berhubungan dengan program yang menghasilkan kesalahan pastikan tidak ada tersedia update untuk program-program dan/atau mencoba menguninstall masing-masing untuk memastikan mereka tidak menyebabkan masalah anda.
Virus komputer
Karena virus komputer yang mampu merusak sistem pengaturan/memori maka adalah mungkin bagi virus komputer untuk menghasilkan runtime error. Jika Anda saat ini menjalankan program perlindungan virus pada komputer Anda pastikan Anda memiliki patch atau update terbaru. Jika Anda tidak memiliki program perlindungan virus komputer disarankan membeli salah satunya. Pastikan tidak ada lagi virus di komputer Anda.
Masalah memori
Akhirnya, jika anda telah mengikuti semua rekomendasi di atas, adalah mungkin bahwa Anda mungkin menghadapi hardware memori. Kami sarankan Anda menghubungi dulu pengembang dari program yang menyebabkan masalah untuk setiap kemungkinan solusi. Jika tidak ada solusi yang ditemukan, kami sarankan Anda menghubungi produsen motherboard komputer atau rekomendasi tambahan dan/atau jasa layanan terkait.

Mengatasi Kersakan Master Boot Record perbaikan master boot record

perbaikan master boot recordSalah satu bagian dari sistem operasi Windows XP yang sering bermasalah adalah rusak atau hilangnya master boot record. Tetapi sebelum kita lanjutkan, pertanyaannya adalah apakah yang dimaksud master boot record ? Sebuah master boot record adalah jenis sektor boot dan merupakan sektor pertama yang disimpan pada hard disk drive atau perangkat penyimpanan lainnya. Sebuah master boot record biasanya berisi kode komputer yang diperlukan untuk memulai proses boot.
Perbaikan master boot record pada sistem Windows XP dapat Anda lakukan menggunakan perintah fixmbr yang tersedia dalam Recovery Console. Hal ini diperlukan ketika master boot record rusak karena virus atau beberapa jenis penyebab kerusakan. Kerusakan master boot record bisa juga disebabkan oleh karena terinfeksi oleh virus lalu kita buang dengan antivirus
Ikuti langkah-langkah mudah untuk memperbaiki master boot record yang rusak pada Windows XP. Diperlukan waktu sekitar 15-20 untuk memperbaiki kerusakan ini.  Inilah langkah-langkahnya:
  1. Jalankan proses Recovery Console sesuai pedoman pada artikel; Melakukan Recovery Console Dengan CD Windows XP
  2. Ketika Anda mencapai command prompt (Langkah 7 di link di atas), ketik perintah “fixmbr” tanpa tanda petik dan kemudian tekan Enter.
  3. Utilitas fixmbr akan menulis master boot record ke hard drive yang saat ini Anda gunakan untuk boot ke Windows XP. Proses ini akan memperbaiki segala kemungkinan kerusakan atau korup pada master boot record.
  4. Setelah proses perbaikan selesai, keluarkan CD Windows XP, ketik “Exit” kemudian tekan Enter untuk restart PC Anda.
Dengan asumsi bahwa masalah Anda adalah hanya korup master boot record, sekarang harusnya Windows XP sudah berjalan normal.

Kerusakan Hardware Komputer

  • Periksa hubungan kabel power pada monitor, perhatikan apakah lampu indikafornya menyala. Setelah itu periksa hubungan kabel data pada port video out apakah sudah terhubung dengan benar. Matikan komputer dan amati, apakah ada kilatan cahaya pada monitor yang menandakan adanya kesalahan pada main unit komputer. Sedangkan jika tidak terdapat kilatan tersebut, maka kemungkinan kerusakan memang pada monitor.
  • Satu lagi kemungkinan untuk memastikan bahwa kerusakan ada pada monitor yaitu dengan cara monitor dihidupkan, dan kemudian atur posisi brightness dan contrast posisi maksimum. Jika layar monitor tampak putih terang, kemungkinan monitor tidak rusak.
  • Selanjutnya periksa display adapter, beberapa komputer atau mainboard akan memberi tanda berupa bunyi bip pada speaker, yaitu biiip….bippp…bip…bip…bip (satu kali panjang diikuti tiga kali pendek) jika terdapat kerusakan pada kartu display adapter dan bip… (satu kali pendek) yang menunjukkan display adapter berfungsi normal.
  • Pastikan kerusakan pada monitor atau display adapter untuk melakukan perbaikan dengan benar. Untuk kerusakan pada monitor, gunakan jasa teknisi. Sedangkan perbaikan display adapter dapat dilakukan dengan mencoba membetulkan pemasangan display adapter pada slot ekspansi atau menggantinya jika display adapter rusak.
Tampilan mengecil.
  • Cari tombol pengatur vertical size untuk mengatur lebar tampilan secara vertikal dan tombol horizontal size untuk mengatur secara horizontal, jika tidak ada perubahan maka terdapat kerusakan pada rangkaian elektronik pada mointor tersebut.
Tampilan berjalan atau menggulung.
  • Coba hentikan dengan menggunakan tombol V-hold (Vertical hold) dan H-hold (Horizontal hold) pada monitor.
Tampilan semakin terang atau semakin kabur.
  • Biasanya timbul karena komponen flyback trafo pada monitor rusak. Jika hal ini yang terjadi, gunakan jasa teknisi untuk melakukan perbaikan atau penggantian.
Warna tertentu menghilang.
  • Untuk memperbaiki kerusakan ini, membutukan jasa teknisi elektronik.

Kerusakan Hardware Komputer-5

Keyboard dan Mouse
Dua komponen utama sebagai media masukan komputer adalah keyboard dan mouse. Beberapa masalah sering timbul mengganggu kinerja kedua komponen tersebut, antara lain :
Keyboard Error or No Keyboard.
Pesan ini tampil saat komputer start karena pada proses POST, komputer memeriksa seluruh perangkat yang ada. Beberapa kemungkinan yang menyebabkan timbulnya masalah ini, yaitu :
  • Keyboard belum terpasang dengan benar pada konektornya. Cobalah periksa dan betulkan kembali konektornya.
  • Salah satu kabel keyboard ada yan putus. Cobalah menggunakan keyboard yang lain.
  • Salah satu atau beberapa tombol keyboard ada yang tertekan saat proses POST berlangsung, biasanya diikuti bunyi bip pendek yang terus menerus. Periksa tombol-tombol keyboard.
  • Kemungkinan lain adalah kerusakan pada rangkaian elektronik atau rangkaian kontroler keyboard pada mainboard. Cobalah dahulu dengan menggunakan keyboard yang normal, jika masih bermasalah dapat dipastikan kontroler keyboard pada mainboard yang mengalami kerusakan.
Ketikan rangkap (respon keyboard terlalu cepat)
Keyboard yang terlalu peka atau terlalu cepat merespon penekanan tombol akan menghasilkan cetakan rangkap (berulang). misalnya a menjadi aaa walaupun hanya menyentuh tombol a sekali. Sering hal ini akibat keyboard sudah lemah atau kotor, dapat dicoba membersihkan bagian dalam keyboard. Hal lain yang mungkin menjadi penyebab terjadinya masalah ini adalah setup typematic rate pada BIOS yang terlalu pendek. Cobalah mengatur ulang setting pada setup BIOS dengan typematic rate yang lebih panjang atau set ke default-nya.
Mouse tidak dikenali.
Jika pada saat menghidupkan komputer temyata mouse tidak dikenali.beberapa hal di bawah ini kemungkinan penyebabnya, yaitu :
  • Kabel mouse temubung kurang sempurna pada konektor port mouse. Periksa nubungan kabel tersebut, perhatikan pula kemungkinan adanya kabel mouse yang terputus.
  • Device driver untuk mouse tidak terinstal dengan benar. Pada komputer dengan sistem operasi DOS, device driver mouse biasa ditempatkan pada file CONFIG.SYS atau AUTOEXEC.BAT, periksa kedua file tersebut dan lokasi tempat file tersebut berada.
  • Sedangkan pada sistem operasi Windows, bisa memeriksanya pada System Properties melalui menu [Start], [Setting], [Control Panel], [System], [Device Manager].
Mouse atau port mouse rusak.
Untuk memastikannya bisa mencoba menukar dengan mouse yang lain. Masalah lain yang sering terjadi adalah tidak berfungsinya mouse sebagaimana mestinya. Ketidak-normalan tersebut adalah :
  • Mouse dikenali namun tidak bisa berfungsi. Ini dialami oleh mereka yang menggunakan sistem operasi Windows. Mouse hanya tampil bempa kursor, tanda panah atau tanda lain di tengah-tengah layar monitor, dan tidak bisa digerakkan. Hal ini bisa disebabkan oleh karena mouse yang msak atau device driver yang ada tidak sesuai. Atasi dengan me-remove device driver dari Device Manager, kemudian deteksi lagi keberadaan mouse. Jika mouse terdeteksi tetapi tetap tidak berfungsi dengan baik, maka kemungkinan mousenya yang msak.
  • Mouse berjalan tersendat-sendat atau kursor melompat-lompat. Cobalah perbaiki device drive rmouse atau atur kecepatan mouse pada item mouse dari [Control Panel], yaitu pada tab [Motion], dari [Mouse properties]. Jika belum bemasil. cobalah buka dan bersihkan tempat bola mouse.
  • Jika tombol mouse tidak merespon dengan baik, cobalah atur melalui fasilitas pengaturan kecepatan klik mouse pada item mouse dari [Control Panel], pada tab [Button] dari [Mouse Properties]. Selain itu coba bersihkan tombol mouse dengan bantuan cairan contact cleaner.

Lupa Password Windows

lupa password 
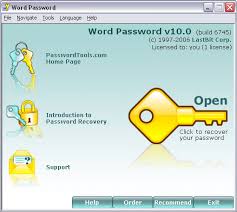
Setelah saya mengamati kata kunci yang membawa visitor masuk blog ini, Lupa Password Windows. Saya tahu mereka pastilah kecewa karena saya belum pernah membahasnya secara khusus. Yang pernah saya bahas baru sebatas reset password BIOS dan Recovery Pasword Windows menggunakan flasdisk. Masalah utamanya adalah bagaimana jika tidak ada recovery password dan Anda sama sekali lupa passwordnya dan Anda tidak bisa masuk desktop?
Jangan stress dulu ya, pastilah ada jalan keluarnya dan lumayan mudah diterapkan. Tetapi sebelumnya, logika Anda harus tepat mengenai struktur user dalam versi Window XP, Windows Vista, Windows 7. Perhatikan gambar dibawah ini yang saya ambil dari windows Vista.
account
Pada gambar diatas terlihat bahwa pada Windows (yang sedang dioperasikan) terdapat tiga user yaitu CUMK, Q-BONK dan YUMI semua diproteksi dengan password.
  1. CUMK Administrator merupakan user acount bawaan windows dengan hak akses tertinggi bagi semua level user windows.
  2. Q-BONK merupakan user ciptaan tetapi memiliki hak setara administrator CUMK. Pihak yang berhak membuat user setingkat ini adalah Administrator CUMK.
  3. YUMI adalah user dengan level pengguna yang sangat rendah, hanya bisa sebagai pengguna komputer dan tidak berhak menginstall dan mengubah bagian vital dari sistem operasi. Pihak yang bisa membuat user setingkat ini adalah CUMK dan Q-BONK.
User dengan level Administrator CUMK memiliki hak untuk melakukan akses dan perubahan terhadap sistem Windows seperti mengakses msconfig, regedit, dan sebagainya. User Administrator Q-BONK juga memiliki hak akses yang sama. Sedangkan user YUMI, hanya bisa melakukan pengoperasian Windows tanpa memiliki hak akses yang besar terhadap konfigurasi sistemnya.
Berkaitan dengan lupas password windows, inilah kemungkinannya;
  1. Jika saya lupa password account YUMI maka saya bisa mengatasinya dengan login sebagai CMUK atau Q-BONK lalu membuang password user YUMI dari Control Panel.
  2. Jika saya lupa password administrator CUMK maka saya bisa mengatasinya dengan login sebagai Q-BONK lalu membuang password administrator CMUK dari Control Panel. Demikian juga sebaliknya.
  3. Kalau saya lupa pasword administrator CMUK dan Q-BONK? Inilah malapetakanya karena saya tidak bisa masuk desktop, dan itulah yang akan kita bahas pada artikel ini
Singkatnya masalah kita kali ini adalah; lupa password administrator Windows, tidak punya disk reset password, tidak bisa masuk desktop. Ada beberapa cara untuk mengatasi masalah ini misalnya;
  1. Bisa mengunakan windows XP recovery console secara manual utk membuka folder C:WindowsSystem32Config. Hapuslah file SAM di dlmnya. Langkah ini akan menghapus semua user account di dlm PC, termasuk administrator account, sehingga ketika kamu login lagi admin password akan kosong. CATATAN : Bagi Anda yang termasuk pemula reparasi komputer saya tidak menganjurkan cara ini karena ada resiko-resiko lain yang bisa muncul jika salah menghapus file.
  2. Cara kedua yang saya anjurkan adalah menggunakan software Ophcrack. Mengenai penggunaan software ini telah saya bahas pada artikel ini;  Mengatasi Lupa Password Windows Dengan Ophcrack

Mengatasi pesan kesalahan STOP 0x0000007B error

Mengatasi pesan kesalahan STOP 0x0000007B error bukanlah hal sangat mudah menurut saya. Jenis kerusakan komputer ini sering muncul dalam 2 pesan dan itu bisa terjadi mulai dari windows 2000, XP, Vista dan windows 7 sekalipun. Jika pesan kesalahan ini muncul maka yang terjadi adalah Blue Screen of Death (BSOD). Pesan itu akan muncul dalam salah satu atau juga kombinasi dari pesan berikut ini;
  • STOP: 0x0000007B
  • INACCESSIBLE_BOOT_DEVICE

Penyebab STOP 0x0000007B Errors
  1. STOP 0x0000007B errors dapat diwbabkan oleh masalah device driver (khususnya yang berhubungan dengan hard drive dan storage controllers yang lain), bisa juga karena virus, data corruption, dan kadang-kadang karena hardware failures.
  2. Jika pesan yang muncul tidak tepat sebagai STOP 0x0000007B atau INACCESSIBLE_BOOT_DEVICE, mohon mengecek pada alamat ini ; http://pcsupport.about.com/od/findbyerrormessage/tp/stop_error_list.htm untuk mengecek daftar selengkapnya. Penyelesaian kerusakan komputer atas pesan ini. CATATAN; Proses penyelesaian berikut ini secara khusus akan berjalan baik jika Anda sudah termasuk teknisi kelas menengah keatas.
Jika Anda benar-benar pemula, mungkin masih agak sulit bagi Anda, tetapi silakan dicermati dengan baik. Beberapa dari langkah penyelesaian mungkin meminta Anda untuk masuk ke safe mode komputer. Inilah langkah penyelesaian yang dapat Anda tempuh;
  1. Restart komputer Anda, mungkin STOP 0x0000007B blue screen error hanya kebetulan saja, dan restart komputer dapat mengatasinya.
  2. Apakah Anda menginstall atau baru saja melakukan perubahan pada hard drive controller? Jika ya, bisa jadi itulah penyebab STOP 0x0000007B error. Kembalikan ke posisi secepatnya. Tergantung perubahan yang Anda buat, tetapi beberapa dibawah ini mungkin dapat menyelesaikan masalah;
    1. Kembalikan konfigurasi yang baru Anda lakukan pada hard drive controller.
    2. Startup komputer dengan masuk safe mode dan memilih Last Known Good Configuration untuk mengembalikan registry dan perubahan driver.
    3. Gunakan sistem restore untuk mengembalikan perubahan.
    4. Gunakan Rollback hard drive controller device driver ke versi sebelum update.
  3. Pastikan bahwa hard disk terpasang dengan benar. Periksa kabelnya terutama kabel bus data hard disk.
  4. Pastikan bahwa konfigurasi BIOS untuk hard disk adalah sudah tepat dan tidak ada perubahan. STOP 0x0000007B error bisa disebabkan setting BIOS yang tidak tepat tentang hard disk.
  5. Scan computer Anda dari virus. Banyak virus dapat meng-infect master boot record (MBR) atau boot sector sehingga kasus STOP 0x0000007B errors terjadi.
  6. Update drivers hard drive controller Anda. Jika drivers hard drive controller sudah outdated, atau tidak benar, itu bisa jadi penyebabnya.
  7. Ubah mode SATA dalam BIOS ke mode IDE. Disable beberapa advanced features dari disk SATA drives dalam BIOS dapat menyelesaikan STOP 0x0000007B error.
  8. Jalankan chkdsk pada ard drive Anda. Jika boot volume dalam keadaan corrupted, menggunakan fasilitas chkdsk pada command prompt dapat memperbaiki masalah corrupt file.
  9. Jika Anda curiga bahwa hard disk Anda mengalami kerusakan fisik, gunakan software tambahan untuk mengetes masalah ini. Diantara beberapa software tes hard drive misalnya; Seagate SeaTools, Hitachi Drive Fitness Test atau Microsoft Windows Built-In Error Checking
  10. Buka dan pasang kembali hard drive jika diagnostic menunjukkan ada masalah dengan ada hardware problem dengan hard drive.
  11. Jalankan fixmbr command untuk membuat master boot record yang baru. Jika master boot record corrupted maka itu dapat menyebabkan masalah.
  12. Clear the CMOS. Kadang-kadang STOP 0x0000007B error diebabkan oleh masalah BIOS memory issue. Clear CMOS dapat menyelesaikan masalah.
  13. Update BIOS. Dalam situasi tertentu, outdated BIOS dapat menjadi masalah. Silakan update jika memang dianggap mencurigakan dan Anda mampu melakukannya. CATATAN; hati-hati dengan update BIOS, jika salah komputer Anda akan masuk tempat sampah.
  14. Lakukan Repair Windows installation. Jika semua langkah diatas sudah Anda jalankan dan tidak juga menyelesaikan masalah Anda, lakukan repair instalasi dan pilihan paling terakhir adalah install total dengan mem-format hard disk.
Sesuai pesan saya pada bagian awal bahwa ini tidak mudah, namun dengan 14 langkah pemecahan diatas salah satunya pasti dapat menyelesaikan masalah Anda.

Kerusakan Software Komputer 13

Masalah : Muncul pesan error: MISSING ATAU [CORRUPT NTOSKRNL]
Gejala : Ketika proses booting, muncul pesan “Missing or corrupt NTOSKRNL” yang artinya tedapat masalah pada OS sehingga file NTOSKRNL tidak ditemukan atau corrupt.
Solusi :
Langkah-langkah untuk memperbaikinya sebagai berikut.
  1. Lakukan proses seperti instalasi Windows XP
  2. Masukkan dan boot dari CD Windows XP Anda.
  3. Pada saat muncul pilihan Install atau Repair, tekan [R] pada pilihan [R=Repair].
  4. Tekan angka atau lokasi yang benar untuk instalasi windows yang ingin diperbaiki, misalnya [Windows = 1].
  5. Masuk ke drive CD ROM mis [D: > Enter]
  6. Ketik [CD i386].
  7. Kembangkan ke folder: [C:WindowsSystem32ntoskrnl.exe].
  8. Windows XP telah diinstalasi di tempat yang berbeda hanya dengan membuat C:Windows.
  9. Keluarkan CD ROM dan ketik [Exit].
Masalah: MISSING ATAU [CORRUPT HAL. DLL]
Gejala : Ketika proses booting, muncul pesan “MISSING OR CORRUPT HAL. DLL
Solusi : Pesan error: “missing or corrupt file hal.dll”, dapat diperbai’ki dengan cara mengubah file [Boot.ini].
  1. Lakukan proses seperti instalasi Windows XP
  2. Masukkan dan boot dari CD Windows XP Anda.
  3. Pada saat muncul pilihan Install atau Repair, tekan [R] pada pilihan [R=Repair].
  4. Tekan angka atau lokasi yang benar untuk instalasi windows yang ingin diperbaiki, misalnya [Windows = 1].
  5. Ketik [bootcfg /list] untuk menampilkan isi di file [BOOT.INI]
  6. Ketik [bootcfg /rebuild] untuk memperbaikinya.
  7. Keluarkan CD Rom dan ketik [Exit].

Mengcopy Data Dari CD atau DVD Yang Rusak.

recovery data cdDalam kasus sistem operasi crash atau mungkin sistem operasi rusak sama sekali, Anda pasti perlu untuk menginstal ulang sebagian besar perangkat lunak Anda. Umumnya dalam komputer, selain dari sistem operasi, pasti banyak aplikasi juga. Jika Anda cukup beruntung memiliki cadangan CD-nya, Anda juga dapat mengembalikan file data pribadi Anda. Tetapi bagaimana jika CD Driver rusak? Bagaimana mengambil data dari CD yang rusak?. Rusak yang saya maksud adalah CD yang sudah tidak bisa dibaca komputer secara normal, bukan CD yang pecah dan rusak total secara fisik.

Mungkin Anda memiliki hard drive kedua untuk menyimpan semua backup pada, atau mungkin Anda menggunakan fasilitas backup online yang ditawarkan di internet. Tapi jika Anda tidak memiliki atau tidak menggunakan salah satu, kemungkinan Anda memiliki backup Anda pada CD-ROM atau DVD. Dalam kebanyakan kasus jika CD atau DVD sudah sedikit lebih tua, atau telah digunakan begitu sering sehingga banyak goresan dan hampir tidak terbaca. Itulah masalahnya.
Jika Anda menjalankan MS Windows, Anda memiliki masalah mengembalikan file dari CD atau DVD yang rusak. Sistem operasi akan mencoba untuk mengakses disk dan membaca file sistem didalamnya. Jika gagal, Anda tidak dapat mengakses salah satu file di dalamnya. Dan bahkan jika dapat membaca daftar folder dan file, masih ada kemungkinan file rusak. Setelah komputer mulai menyalin, Windows akan berhenti beroperasi bila gagal membaca atau mengcopy file.
Gunakan Software Unstoppable Copier
Kebanyakan dari folder dan file informasi, serta data file sebenarnya masih dapat diakses pada CD atau DVD yang rusak. Hanya saja Windows susah membaca disk yang kabur. Jadi diperlukan sebuah program yang memberi cara pendekatan kepada Windows dan mengabaikan bagian yang buruk dari disk. Di sinilah gunanya Unstoppable Copier.
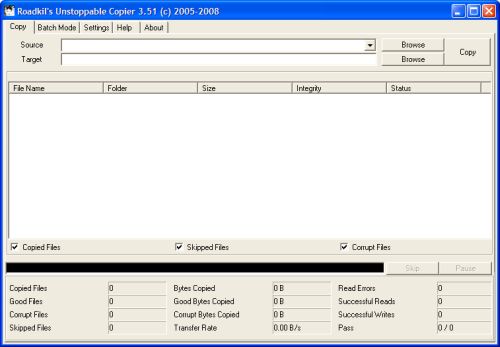
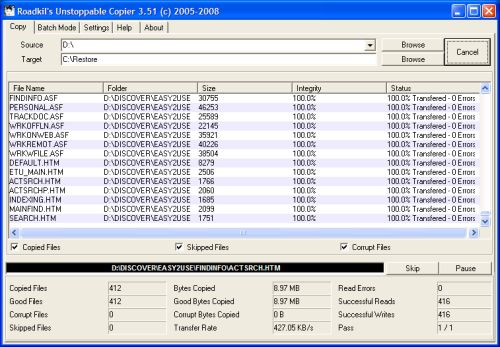
Program ini dapat didownload dari roadkil (http://roadkil.net/program.php?ProgramID=29). Bentuknya adalah file ZIP kecil jadi ringan didownload. Silakan Anda pilih sesuai spesifikasi sistem operasi. Setelah download, silakan install ke komputer. Ketika mulai, Anda akan disajikan dengan jendela utama.
unstoppable-copier
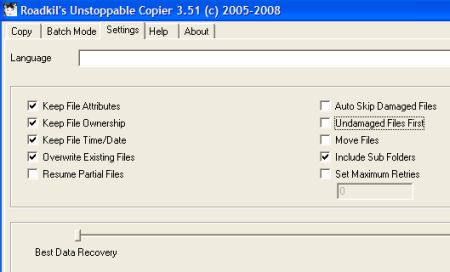
Hal pertama yang harus dilakukan adalah melihat tab [Settings] untuk melihat konfigurasi aplikasi.
unstoppable-copier2
Program ini memiliki pilihan yang luas untuk data recovery. Pilihan dapat digunakan untuk berpindah dari [Best Data Recovery] ke [Fastest Data Recovery], tetapi pilihan kedua ini jelas mengurangi upaya yang dilakukan untuk merestore file. Demikian pula, Anda dapat menetapkan jumlah maksimum retries untuk operasi menyalin file. Jika Anda tidak ingin merestore file dari kawasan yang rusak dari CD atau DVD, pilih [Auto Skip Damaged Files] untuk mempercepat operasi copy.
Sebagai pilihan yang bermanfaat adalah [Undamaged Files First], karena pertama akan menyalin semua file yang tidak memiliki masalah dan kemudian berfokus pada file yang rusak. Jika waktunya terlalu lama, Anda dapat memutuskan operasi copy dengan anggapan bahwa semua file yang masih baik telah disalin.
Kembali ke jendela tab [Copy] di bagian atas, Anda dapat memulai pemulihan data dari CD atau DVD. Klik tombol [Browse] di sebelah kanan bidang [Source] dan pilih drive CD / DVD. Berikutnya klik tombol [Browse] untuk [Target] dan pilih lokasi disk di mana Anda ingin menyimpan file restore. Semua yang tersisa sekarang adalah dengan menekan tombol Copy dan duduk sambil minum kopi manis. Tunggu hingga proses selesai.
data-recovery
Lain kali Anda hati-hati memperlakukan CD-ROM atau DVD, agar tidak sakit kepala gara-gara CD-ROM atau DVD tidak dapat dibaca komputer.

Using Mozilla Firefox

Firefox is an excellent web browser and I think it is a must have for anyone who is serious about web development. This tutorial will walk you through the process of installing Firefox, basic usage, and the installation of extensions and themes.
"Firefox is a free, open-source web browser for Windows, Linux and MacOS X and is based on the Mozilla codebase. It is small, fast and easy to use, and offers many advantages over Internet Explorer, such as the ability to block pop-up windows." Firefox help: Firefox FAQ

Downloading and Installing Firefox

You can download Firefox by visiting the Mozilla web site. It's a free download and the file is only 4.7 mb. The software installation is straightforward, once you have downloaded the software locate the file called Firefox Setup 1.0.exe. Double click the Firefox Setup 1.0.exe installer file to start the install. Once the installation process has begun, follow these eight easy steps:
  1. At the opening screen close any other opened applications and click next
  2. Accept the terms of the License Agreement and click next
  3. Select Custom install and click next (if you do not want to change the installation directory select standard)
  4. Keep the default file location and click next
  5. Check the Developer Tools and click next (if you only plan to use Firefox to surf the web you can bypass this step)
  6. Select the shortcut locations that you would like installed and click next
  7. Click next at the summary screen
  8. Click Finish to complete the installation and launch Firefox
Once Firefox starts you will be prompted to import your bookmarks from Internet Explorer; I would recommend importing so your bookmarks are available in Firefox. You can import your bookmarks at a later date by select File > Import.

Using Firefox

The first time you use Firefox you will be prompted to make Firefox your default browser. I would recommend saying no to this prompt until you decide whether you like the program enough that you want to use it as your primary web browser. You can always make Firefox your default browser by clicking Tools > Options > General and then clicking the Check Now button in the Default Browser section of the General Options.
Firefox will launch and the Firefox/Google Start page will display. This is the default start page; you can change this page to any start page you like by clicking Tools > Options > General > Home Page. In the classroom, please keep the Firefox/Google Start page as the default.

The Interface

You will find that using Firefox is very easy. The interface has a few icons that you are probably already familiar with.
Firefox Toolbar
You can turn on text labels on the toolbars by right-clicking a toolbar and selecting Customize. At the bottom of the dialog box you should see a drop down list next to the word Show. Click the drop down list select Icons and Text. The default display is Icons.

Searching with Firefox

Search Box ImageOne of the really cool Firefox built-in features is the search box. Notice the small arrow next to the Google Search in Search Menu the search box. Click the arrow Search Arrowand you can select different search engines. You can even lookup a word at dictionary.com. To use the search box, select the search engine you want to use. Type the term that you want to search for and press enter. From this menu you can also add your favorite search engine by selecting Add Engines from the drop down list.

Blocking Popups

Firefox also has built in ad blocker software. Periodically you may see this bar appear as you're browsing the web:
Popup blocker Sample
Popup Blocker MenuIf you click anywhere on the bar when it appears, a menu will appear. You can then customize the pop-up blocker to meet your needs.

Tabbed Browsing

Firefox Right Click Context MenuFrom the Google/Firefox start page, right-click the Firefox Help and Add-ons link. A menu will appear. This menu contains several options. You can open the link in a new window or open the link in a new tab. Tabbed browsing saves space on the taskbar. Instead of having multiple browser icons on the taskbar only one will appear. You can also bookmark links, save links, send links via e-mail, copy the link location and check the properties of a link from this menu. Lets take a look at tabbed browsing, select Open Link in New Tab from the menu.
After selecting Open Link in New Tab it may seem as if nothing has happened. Notice that you now have two tabs (Mozilla Firefox Start Page and Firefox Central) just above the Mozilla logo (these tabs are below the program toolbars).
Firefox Tabbed Browsing
You can switch to the Firefox Central page by clicking the Firefox Central tab. After clicking the tab the Firefox Central page should now open.
If you look at the taskbar you should only have one Firefox icon Firefox icon on the taskbar. When you use Internet Explorer (IE) you will have multiple occurrences of IE icons on your taskbar. Here is a screen capture of my taskbar with several web pages open in IE.
Multiple Internet Explorer icons on the taskbar
Multiple IE icons can become rather annoying if you're working with a lot of programs. Notice that Firefox only has one icon displaying even though I have multiple web pages open.
Right Click Menu for Tabbed BrowsingIf you right click any tab you will have a variety of menu options including the option to close the current tab or close all other tabs. Pretty cool!
You can find out more about tabbed browsing at "An introduction to Mozilla Firefox, part 2"

Accessing Additional Help

I don't think I need to spend too much time on the basics; the software is very intuitive. Start using the program and exploring the menus and you will be experts in no time. You can also visit the Tips and Tricks, Mouse Shortcuts, and Keyboard Shortcuts pages to learn more about Firefox features. You can press F1 while in Firefox to access the Help System.

Downloading and Installing Extensions

One of the great things about Firefox is the ability to customize and extend the browser to suit your needs. Extensions are being developed to add features to the program regularly. Some of these extensions are real time savers for web developers.
"Extensions are small add-ons that add new functionality to Firefox. They can add anything from a toolbar button to a completely new feature. They allow the browser to be customized to fit the personal needs of each user if they need additional features, while keeping Firefox small to download." Mozilla Update Page
Extensions are easy to install, here is the process for installing extensions:
Make sure that you have the Firefox Central tab selected (we opened this page earlier in the tutorial). In the upper left-hand corner of the webEnhancing Firefox page you should see the Enhancing Firefox section. Click the link that says Make it even better with extensions. After clicking this link you may receive a security warning, click OK to the security warning. The Mozilla update page will display. Oh the goodies that are available on this page!
Categories List at Mozilla Updates Page
On the left-hand side of the page you should see a categories list. Extensions are categorized so they can be found easily. In the middle of the page you should also see the Top Rated and Most Recently Added extensions.
For the purpose of this tutorial we are going to download and install a Developer Tool. Click the Developer Tools link under Categories.
This will display the Firefox Developer Extensions section. Scroll down until you locate the Web Developer 0.8extension (note: there may be new version number by the time you read this tutorial). The Web Developer extension, created by Chris Pederick, is a fantastic set of tools for testing and editing web pages. I've only had this toolbar for a couple of weeks and it's already saved me hours.
You should notice three iconsWorks with, Home Page, Install. Most extensions work with the latest version of Firefox (1.0 at the time of this writing), but a few do not. Check the works with version number to make sure that the extension will work with your version of Firefox. There is also a link to the extension author's home page. Usually the home page will include detailed instructions on how to use the extension. I also found that this particular extension has an update on the author's home page. Finally, click Install to actually install the extension.
Software Insatallation Dialog Box
The Software Installation dialog box will appear. It takes a couple of seconds on a high speed connection for most extensions to download.
Once the extension has downloaded and it's ready to be installed you can click the Install Now button at the bottom of the dialog box. The Install Now button will not be available until the extension has finished installing.


Extensions Dialog BoxAfter clicking Install Now a new dialog box will appear. The Extensions dialog box displays all of the installed extensions. The image to the right is my Extensions dialog box. Notice that the second item is the Web Developer 0.8 extension and it indicates that Firefox must be restarted to complete the installation.
To complete the installation, close all open Firefox windows and restart FireFox (you should have an icon on your desktop or in the start menu).
When Firefox restarts the web developer toolbar should be available.

An Overview of the Web Developer Toolbar

I have included a screen capture of the web developer toolbar below. This is the greatest browser add-on program I have ever seen. It's absolutely fantastic!
Web Developer Toolbar
Here is a quick overview of some of the tools. A link to the complete list of the extension features is at the end of this section.
Disable
Disable cookies, images, java applets, javascripts, styles (CSS), and more.
CSS
Try clicking CSS > Edit Styles. Your browser window will split vertically and the style sheet(s) used on the page you are currently viewing will display. This is so convenient!
Forms
Enable auto completion, display form details, and other useful tools.
Images
Turn on and off images, highlight images that don't have ALT tags or empty tags, display image paths, display image dimensions, find broken images, and more. This is terrific!
Information
Here you can display all kinds of valuable information about a web page. ID and class information and speed reports are just a couple of the available items.
Miscellaneous
Allows you to quickly clear your cache, mark links as visited or unvisited (great for checking link colors), show comments, and zoom in and out on a page.
Outline
Outline features are awesome. Here you can outline block elements (<p><div><h1> and other block elements), frames and table cells. This is great for trying to figure out why a div won't position properly!
Resize
Allows you to quickly resize your browser so you can check your web page at different resolutions. You can add your own dimensions to this menu.
Validation
What a savior! Quickly validate HTML/XHTML, CSS, links, and accessibility. This is fabulous!
View Source
Allows you to quickly view the source code for a web page. If you download the HTML Validator extension (also available in the developer tools) the page source code will include HTML errors and warnings with highlights. Go get the HTML Validator with Tidy!
Options
Here you can reset the web page and set different options for the toolbar. The toolbar is fully customizable.
You can view a full list of features at Chris Pederick's web site.
If you do not like the toolbar taking up browser space you can turn it off by clicking View > Toolbars > Web Developer Toolbar. You can still access the web developer extension features from the Tools menu, click Tools > Web Developer. All installed extensions can be accessed from the Tools menu.
As I'm sure you can see this is a great tool. You can download the updated version of this extension at http://www.chrispederick.com/work/firefox/webdeveloper/.

Updating Extensions

You can check to see if there is an update to your favorite extension by clicking Tools > Extensions. Click the extension you want to check for updates and click Update and click Finish when prompted.

Additional Extensions

You may download and install additional extensions in the classroom from Mozilla's web site. Many of these extensions are found in the Web Developer Tools section. You can also use the search box at the top of the Extensions page to find the extension you want to install. Search Box on the Firefox Home Page
Here are a few extensions that I would recommend:
Colorzilla
Adds a color picker Colorzilla icon to the Firefox status bar (lower left-hand corner above the Start button). This color picker allows you to determine hex and rgb values for a color used on a web page.
HTML Validator with Tidy
Turns the View Page Source option into an HTML validator. Great!
JavaScript Debugger
Adds a JavaScript debugger to Firefox.
Edit CSS
Edit CSS code in the Firefox sidebar.
View Source With
Allows you to select an external editor to view your source code with.
Sage
Sage is an RSS/Atom feed aggregator. If you have a lot of sites/blogs that you like to visit often, a feed reader allows you to quickly see which sites have new content. You can learn more about Sage and how to use it in this short Sage tutorial.
 
Google Preview
Inserts web site previews in Google and Yahoo search results.
Google Toolbar
Adds a Google Toolbar much like the Google toolbar for Internet Explorer.
 
Paste and Go
Copy a URL and then you can right click the address bar and select Paste and Go instead of just paste.
Dictionary Search
Looks up the definition of a selected word.
Web Developer Tools
This is the extension mentioned above. This is a direct link to Chris' site so you can download the current version.
Open Link in Internet Explorer
Allows the surfer to right click on a link and open the page in Internet Explorer.
FireFTP
Adds a free FTP program to Firefox. I have added more detailed information on FTP since I seem to be getting a lot of visitors looking for info on FTP and Firefox. First, you can download and install it from this page.
 
Once you have installed FireFTP and restarted FireFox you can access it from the Tools menu. Click Tools > FireFTP. A new FireFTP tab will open. site information input your host address, login name and password. Click Connect.

Once you connect, you can select the folder that you want to upload from (left-hand side of the ftp screen). Then select the folder that you want to upload to (right-hand side of the ftp screen).
download and uploadYou can then either drag and drop your files from your local drive (left-hand side) to the remote server (right-hand side) or you can use the download and upload buttons in the center of the screen.
This FTP program works just like most of the common FTP programs. If you have never used an FTP program, you may want to review one of my more detailed FTP tutorials. I have written one for WS_FTP and Dreamweaver. Either of these tutorials should give you a better foundation in using an FTP program since these three programs are very similar. You may also want to visit the developer's page.
These are just a few of the extensions that I have been using. There are a lot more extensions available at the Mozilla web site. Take some time to browse around the Mozilla Update page.

Themes

In addition to extensions, you may also install themes. Themes allow you to change the appearance (buttons and icons) of Firefox. Theme installation works the same as extension installation.

Installing Plug-ins and Extensions from 3rd Party Web Sites

You will probably need to install some plug-ins such as Flash, RealPlayer, and QuickTime. These plug-ins are not installed automatically. Instead, when you visit a web page that needs a plug-in a light yellow bar will appear just below the page tabs. Here is an example:
Firefox Plug-in Installation
Allowed Sites Dialog BoxYou have probably noticed that the yellow bar appears when Firefox blocks software installation or pop-up windows. I find this warning box far more friendly and easier to understand than the typical Internet Explorer error message. If you would prefer to disable these features you can click Tools > Options > Web Features. In the Web Features section you can disable Pop-up blocking and allow software to be installed automatically. For more information on these features press F1 to access the Firefox help system.
Back to installing. In order to install the plug-in or a 3rd party extension you must click the Edit Options button on the Security Warning. The Allowed Sites dialog box will appear. Click Allow and then click OK. You may need to click the link again or refresh the page to actually install your plug-in or third party extension.
Visit the Firefox help site to learn more about these features.
Integrating Firefox with Dreamweaver
You will probably want to check pages that you create with Dreamweaver in Firefox. To do this open Dreamweaver and select File > Preview in Browser > Edit Browser List. In the Browser Preferences dialog box, click the + (plus) button next to browsers Add Browsers Button. Type Firefox in the Name box and then click Browse. You need to locate the file that starts Firefox so double click the Mozilla Firefox folder and then click once on the firefox.exe icon Firefox Executable Icon and click Open. Select the Secondary browser check box. By selecting the secondary browser box you will be able to press the shortcut CTRL+F12 in Dreamweaver when you want to view your pages in Firefox.
The screen capture below shows what the Add Browser dialog box should look like when you have completed the Add Browser setup dialog box. if your screen matches the screen below click OK and then click OK again to exit the preferences.
Add Browser Dialog Box
I will periodically add tips to this page as I discover cool new Firefox features. If you come across extensions, themes, or tips and tricks that I should add to the page please let me know. If you are looking for more detailed information on operating Firefox, visit their web site or you can order the Guide Book that they have written. Nidelven IT's step-by-step tutorial is also an excellent resource. Firefox also has a very active forum where you might be able to pick up some very handy tips and tricks.

How-to Setup a WordPress Blog with f2o.org Tutorial - Updated for WordPress 1.5

This WordPress tutorial was specifically written for the students in the Contra Costa ROP Web Page Design Class. This tutorial will outline the process of creating a blog or weblog using a publishing platform called WordPress. Before beginning this WordPress tutorial you will need the following:
  1. Dreamweaver (MX 2004) - another text editor and an FTP program may be used, but you will have to modify the directions to suit your needs.
  2. A zip utility to unzip files - Windows XP has a built in zip utility
  3. Knowledge of HTML/XHTML and CSS (knowledge of PHP/MySQL is a plus, but not necessary).
  4. A web hosting account with FTP access. This hosting account must support PHP and MySQL. You will need your hosting account ftp address, your username and password and the name of your MySQL database and password.
  5. You should know how to FTP files to your web host. If you do not know how to FTP you can review one of these tutorials:
    1. FTP and Dreamweaver
    2. Using WS_FTP
    3. Using Firefox (includes information on FireFTP a free FTP extension for Firefox)
  6. If you do not have access to these requirements, you may want to use one of the hosted blogging tools mentioned in Blog Publishing Background.
  7. While this tutorial is specifically written for people with an f2o.org hosting account, I have tried to include alternative directions for people who are using other hosting companies.

What is a Blog

Creating a Simple Web Page in Macromedia Dreamweaver MX 2004

This tutorial was written for a two hour workshop that I will be conducting at the WBITE Conference in Reno Nevada. The tutorial is brief and designed to give the participants an overview of Dreamweaver MX 2004. Participants were also given the book Macromedia Studio MX 2004 Training from the Source as a reference. The book was compliments of Carolyn Anderson at Prentice Hall/DDC Publishing. If you do not have the Macromedia Studio, you can download a free 30 day trial version at Macromedia's web site. Teachers are eligible for great pricing on Macromdia Studio 2004 at Academic Superstore.
Before we begin, let's take a look at the finished product. You can see another possibility of this tutorial here.
Launch Dreamweaver - Start > All Programs > Macromedia > Macromedia Dreamweaver MX 2004

Defining a Web Site

The first step in creating a web site in Dreamweaver is to Define a site. I have detailed information on defining Dreamweaver web sites in my tutorial Defining Sites and File Management in Dreamweaver MX 2004.
Click Site > Manage Sites > New > Site.
Site Definition
Click the Advanced tab and type Simple Dreamweaver in the Site name box.
Click the Browse button Browsenext to the Local root folder. Navigate to My Documents. Inside My Documents you should have a folder called My Webs, select the My Webs folder. Inside the My Webs folder, use the Create New Folder Create New Folder icon icon to create a folder called simpledrm. Select the simpledrm folder and click Select.
Click the Browse button next to Default images folder, navigate to the simpledrm folder and create a new folder called images and select it.
Click OK and click Done.
This process tells Dreamweaver where you will be storing all of your site content. Dreamweaver will then keep track of your content and update files as needed. It will fix broken links when you move or rename a file and it will know which files need to be uploaded when you make changes to your web site. This is a very important step in the web development process with Dreamweaver.

Creating an Easy to Update Web Site with Blogger in Five Minutes

What is a Blog

A blog or weblog is essentially a journal or diary that is available on the web. Updating or writing in a web journal is called "blogging". Blogs have become very popular over the last couple of years; it is estimated that over 8 million U.S adults now have weblogs. To learn more about the blog craze you may want to ready this Time article 10 Things We Learned About Blogs.
Once a blog has been setup it is very easy to update on a daily or regular basis because it requires little technical knowledge. Simply type the text that you want to add to your blog into a web form and click a button. Your new content is published immediately to the web. I have several blogs that I maintain including: a photography blog, a recipe blog, a hermit crab blog, and Rob's baseball blog. I have recently converted a portion of this instructional site over to blog format; the new blog is a resource for my students and it contains my daily lecture notes, tips, and other resources.

Blog Publishing Platform Background

There are many blog publishing platforms available. Some are hosted on third party web sites like Blogger, TypePad, SquareSpace, ModBlog, Multiply, LiveJournal, and BlogEasy. The benefit of these hosted blogs is that setup is very easy; it usually only requires the user to complete a web form. Maintenance is also simple; a few mouse clicks and you can change the look of your entire blog. The possible downside of these blogging platforms is that their features may be limited and the blog is not usually hosted on your own domain. If you decide that a hosted blog is the best option, Stephanie Booth has great information about hosted blogs on her blog, Climb to the Stairs. She tested 13 different hosted blog solutions and provides her readers with feedback on her blogging journey.
More robust publishing platforms require the installation of files on your web host. These publishing systems include: b2, Movable Type, Drupal, Greymatter, and WordPress. For these programs your web host must have PHP/MySQL and possibly CGI capabilities. You will need to have some experience with HTML, FTP, CSS, and PHP. You can sign up with livingdot.com and for $9.95 per month you can have your blog hosted on its own domain name. Movable Type installation is free and it is $5.95 to register the domain name.
Regardless of the publishing platform you use, once the blog is up and running it's very easy to add new content or a "post" to your blog. Blogging software uses a web form interface to add content to your site.
For this workshop we will use Blogger. Blogger only requires Internet access and a basic knowledge of how to surf the web. An instructional web site is yours in a matter of minutes, so lets get started!

Creating a Blogger Site

Open up the Blogger home page in your web browser, the address is http://www.blogger.com.
Create Blog
At the Blogger home page click Create Your Blog Now. Read More.........

#
### ###