Friends

This is default featured post 1 title

Go to Blogger edit html and find these sentences.Now replace these sentences with your own descriptions.This theme is Bloggerized by Lasantha Bandara - Premiumbloggertemplates.com.

This is default featured post 2 title

Go to Blogger edit html and find these sentences.Now replace these sentences with your own descriptions.This theme is Bloggerized by Lasantha Bandara - Premiumbloggertemplates.com.

This is default featured post 3 title

Go to Blogger edit html and find these sentences.Now replace these sentences with your own descriptions.This theme is Bloggerized by Lasantha Bandara - Premiumbloggertemplates.com.

This is default featured post 4 title

Go to Blogger edit html and find these sentences.Now replace these sentences with your own descriptions.This theme is Bloggerized by Lasantha Bandara - Premiumbloggertemplates.com.

This is default featured post 5 title

Go to Blogger edit html and find these sentences.Now replace these sentences with your own descriptions.This theme is Bloggerized by Lasantha Bandara - Premiumbloggertemplates.com.

Friday, April 15, 2011

Download Windows 7 Boot Screen for XP and Vista

As we all know that Windows 7 contains a new animated boot screen which shows animated items/balls that come together to form Windows logo. If you want to enjoy the same boot screen in Windows XP or Vista, then here is a good news for you. Windows 7 look-like boot screens are available for Windows XP and Vista:

You can download the boot screens using following links:
Download Windows 7 Boot Screen for Windows XP
Download Windows 7 Boot Screen for Windows Vista
You'll need "Tuneup Utilities" to apply these boot screens.
NOTE: The above boot screens are not animated.

Start Killer: Remove Start Button from Windows Taskbar

Do you also think that the Start button in taskbar should be removed to gain some extra free space? Actually many people use WIN key in keyboard to access the startmenu and find the start button useless for them. If you also want to remove the start button, here is a good app for you. "Start Killer" is a very small program which can remove the start button from the taskbar.
Before:
Default_Start_Button.png
After:
Start_Button_Killer.png
As you can see in the above screenshot, start button is not present in the taskbar. You can access the start menu by pressing WIN key or Ctrl+Esc keys.
To show the start button again, simply close the app by right-clicking on its icon in system tray and select Exit.
You can download it using following link:
Download Start Killer
Homepage

How to Disable Annoying Caps Lock Key in Windows?

So what was the last time when you used "Caps Lock" key in your keyboard? Can't remember? Actually Caps Lock key is one of the most unused keys in the keyboard. Its also one of the most annoying keys. Tell us honestly how many times did you face that annoying situation when you pressed this key accidentally and typed a line or full paragraph without even knowing that Caps Lock is ON? Your answer would be many times.
So here is a simple solution for this annoying problem. You can either permanently disable "Caps Lock" key or change it to some other useful keys like "Shift" or "Control" using the built-in "Keyboard Scancode Mapping" feature of Windows.
To use this keyboard scancode mapping feature, we'll need to edit Windows registry and add a new Binary value "Scancode Map" in following key:
HKEY_LOCAL_MACHINE\SYSTEM\CurrentControlSet\Control\Keyboard Layout
Then we'll need to set the value of "Scancode Map" to disable Caps Lock key or change it to some other key.
Doing this task manually will be a bit complicated, that's why we have created a ZIP file which contains ready-made registry scripts for:
  • Disable Caps Lock key
  • Change Caps Lock to Control
  • Change Caps Lock to Shift
  • Restore Caps Lock key
So download following ZIP file, extract it and run the desired REG file. It'll ask for confirmation, accept it and restart your system to take affect.
Download Registry Script

Customize or Disable Any Key in Your Keyboard Using SharpKeys

Recently I got my new laptop "Dell XPS M1530". Its great but I faced one problem. My previous laptop was a Toshiba one and it had the "Delete" key placed between right Ctrl key and left arrow key. This new Dell laptop has the Delete key at top-right corner. I found it very uncomfortable and pressed a wrong key quite frequently. Have you faced such kind of problem? Do you also want to change one or more keys in your keboard? Or do you want to completely disable any key in your keyboard like Caps Lock? If yes, then "SharpKeys" will definitely help you.
"SharpKeys" is a very small application which does an excellent job in remapping the keys. You can disable any unwanted key or you can convert any key into any other key. The bottomline is you can customize almost all keys in your keyboard according to your requirement.
You can download this application using following link:
MSI | ZIP
Run it and you'll see following interface:
SharpKeys_Interface.png
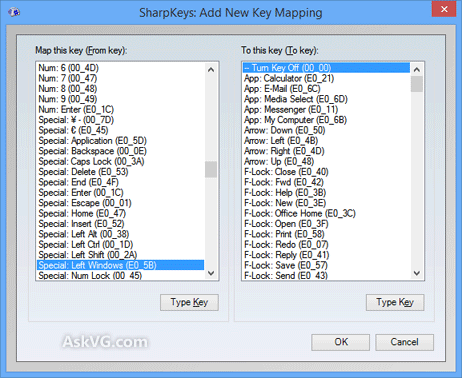
Now click on "Add" button to change any key's function or disable it. You'll get following window:
SharpKeys_New_Key_mapping.png
You can either select the key from the given list or can manually type the key using "Type Key" button. Using "Type Key" button is the best and easiest way. First click on "Type Key" button in "From Key" section and press the key which you want to change. Then click on "Type Key" button in "To Key" section and now press the key which you want to assign to the previous key. If you want to disable a key, simply select "Turn Key Off" option present at top in the "To Key" section.
Once you complete, click on "OK" button and it'll show the conversion in the list:
SharpKeys_Setting_New_Key_mapping.png
At last click on "Write to Registry" button. It'll show a message that you'll need to restart or log off your system to take affect. Once you restart the system, your desired key will be changed or disabled as per your requirements.
Its a very easy to use application and works in almost all Windows versions.
Download Link (MSI)
Download Link (ZIP)
Homepage

Get Windows 7 Desktop Context Menu in Vista, Add “Screen Resolution” and “Gadgets” Options

Windows 7 shows 2 extra options in Desktop context menu ( i.e. when you right-click on Desktop). The 2 extra options are:
  • Screen resolution
  • Gadgets
"Screen resolution" shows the graphics card settings page where you can change the monitor and resolution settings.
"Gadgets" opens the Add gadgets window so that you can add new gadgets to your sidebar.
Both options are quite useful and if you want to add them in Windows Vista, then you can follow this simple and easy tutorial.
After following this tutorial, you'll get following desktop context menu in Vista:

So here are the steps:
To Add "Screen Resolution" Option:
1. Type regedit in RUN or Startmenu Search box and press Enter. It'll open Registry Editor.
2. Now go to following key:
HKEY_CLASSES_ROOT\Directory\Background\shell
3. Now we'll need to create a new key under "Shell" key. Right-click on "Shell" key and select "New -> Key". Give the new key name of "Screen resolution" (without quotes).
4. Now we'll need to create another new key. Right-click on the new key which we created in the last step e.g. Screen resolution and select "New -> Key". Give the new key name of command.
5. Now select "command" key and in right-side pane, you'll see "Default" String value. Double-click on it and set its value to as following:
control desk.cpl,,@display
6. That's it.
To Add "Gadgets" Option:
1. Type regedit in RUN or Startmenu Search box and press Enter. It'll open Registry Editor.
2. Now go to following key:
HKEY_CLASSES_ROOT\Directory\Background\shell
3. Now we'll need to create a new key under "Shell" key. Right-click on "Shell" key and select "New -> Key". Give the new key name of "Gadgets" (without quotes).
4. Now we'll need to create another new key. Right-click on the new key which we created in the last step e.g. Gadgets and select "New -> Key". Give the new key name of command.
5. Now select "command" key and in right-side pane, you'll see "Default" String value. Double-click on it and set its value to as following:
C:\program files\windows sidebar\sidebar.exe /showgadgets
NOTE: If your Windows is installed in any other drive, then change C: to that drive letter.
6. That's it.
PS: If you want a ready-made script to do the task automatically, then download following ZIP file, extract it and then run the extracted REG file. It'll ask for confirmation, accept it:
Download Registry Script

List of Windows Vista BUGs Which Have Been Fixed in Windows 7 Windows_Vista_and_Seven_Bugs.png

Windows_Vista_and_Seven_Bugs.png Here is another interesting reason why Windows 7 is better than Vista. Do you remember we found lots of bugs in Windows Vista and also reported them to Microsoft? We also asked Microsoft to release SP2 to fix all those bugs:
SP1 Failed to Fix Several Windows Vista Bugs, Do We Need SP2?
And today we are very pleased to say that Microsoft listened to us and fixed almost all the reported bugs in Windows 7.
Following are the bugs which have been fixed in Windows 7 but are still there in Windows Vista SP2:
So it proves that Microsoft has really worked hard in the development of Windows 7 and now you are not supposed to say that Microsoft never listens. ;)

Get Windows 7 Like “Color and Appearance” Tab in Windows Vista

As you know Windows 7 contains lots of new features along with redesigned existing Vista features. You can get more information about all Windows 7 features in following topic: What’s New in Windows 7: A Small Review with Screenshots
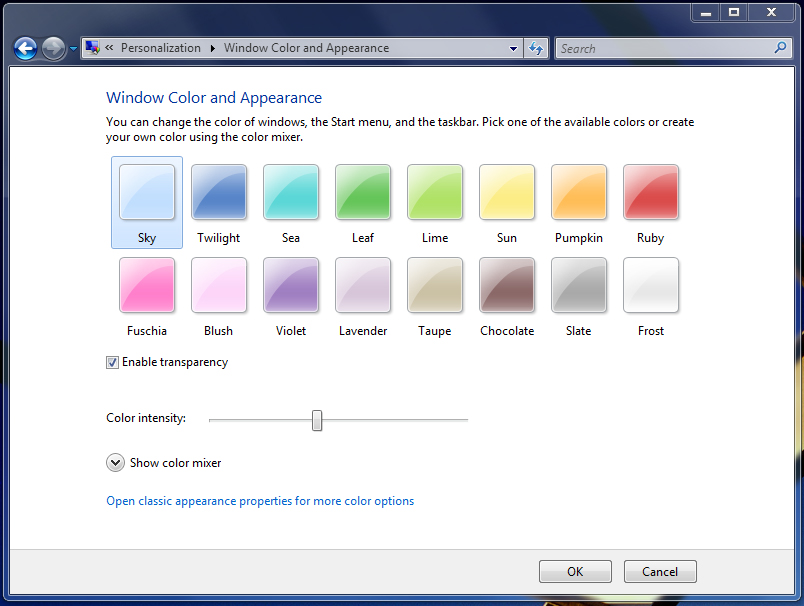
One of such redesigned features in Windows 7 is new "Window Color and Appearance" tab in Desktop Properties. When you right-click on Desktop and select "Personalize" and then go to "Window Color and Appearance" tab.
By following this tutorial, you'll get the same Windows 7 "Window Color and Appearance" tab  in Vista.

1. First download following ZIP file and extract it:
Download Link (32-bit)
Download Link (64-bit)
2. Now go to "%windir%\System32" folder and look for a file "themecpl.dll".
3. Once you find the file, take its ownership using following tutorial:
Add Take Ownership Option in File / Folder Context Menu in Windows Vista and 7
4. Now rename the file to some other name like "themecpl_backup.dll".
5. Copy the "themecpl.dll" file from downloaded ZIP file to "System32" folder.
6. Now go to "%windir%\System32\en-US" folder and look for a file "themecpl.dll.mui".
7. Once you find the file, take its ownership.
8. Now rename the file to some other name like "themecpl_backup.dll.mui".
9. Copy the "themecpl.dll.mui" file from downloaded ZIP file to "System32\en-US" folder.
10. At last run the "SOFTWARE_Glass Colorization.reg" file present in downloaded ZIP file.
11. That's it. Now restart your system and get ready to see the new Windows 7 "Color and Appearance" tab in Vista.
Thanks to "AUDI-1980"...

[FIX] WinRAR Causes Wide Context Menu Bug in Windows Vista, Server 2008 and 7

Its a known issue in Windows Vista, Server 2008 and Seven. I received lots of mails about this problem. Sometimes people called it a bug in Windows and sometimes a virus problem. But the truth is, its a compatibility issue between WinRAR and Windows. Recently a visitor "Blu" contacted me about the same issue. He is using Windows 7. Whenever he right-clicks on a file/folder in Explorer, he gets a very wide context menu as shown in following screenshot:

If you are also facing this problem, follow these simple steps to fix the problem:
1. Open WinRAR and go to "Options -> Settings...".
2. Now click on "Integration" tab.
3. In "Shell integration" section, try following things to fix the problem:
  • Disable "Icons in context menu" option and click on OK button.
  • If the above trick doesn't work, then enable "Cascaded context menus" option.
  • If none of the above 2 options works, then remove the context menu entry by disabling "Integrate WinRAR into shell" option.
WinRAR_Bug_in_Win_Vista_and_7.png
4. After following 3rd step, your problem will be solved.

Organize Your Windows Desktop Icons in a New Way Using Stardock Fences

Do you have lots of unused icons on your Desktop but can't get sufficient time to organize them? Do you want to make your Desktop clutter-free? If your answer is YES, here is a new great tool for you to make your task easier. "Stardock Fences" is a new free utility from Stardock which allows you to draw labeled shaded areas on your desktop, which become movable & resizable containers for your desktop icons. These groups can help bring organization and consistency to your computer's desktop, solving the "constant mess" problem that has plagued the desktop since its inception.
Fences also helps you finally appreciate the wallpaper you have hiding behind all that clutter. In addition to its organizing features, Fences offers a novel quick-hide feature (in-patenting-process). Double click your desktop, and all your icons will fade out. Double click again, and they'll return.

This tool is available for Windows XP, Vista and 7. You can download it using following link:
Download Stardock Fences
Homepage

Get the Good Old Movie Maker 2.6 in Windows Vista and 7

The new Windows Live pack includes "Movie Maker Beta" version which provides the new ribbon interface but many advanced users are not happy with this new version. Lots of essential features like timelines, adding text on videos, audio edits, etc have been removed from this new version to make the application simple and easy to use. But IMO these removed features were the most important and essential features in Movie Maker and now the stripped beta version is a bit useless for lots of people.
If you also feel the same and want to get the good old Movie Maker with all the required features, then here is a good news for you. Microsoft has released Movie Maker 2.6 for Windows Vista which also works in Windows 7.
Movie_Maker.png
So download it from following link and install in your Windows if you miss the old Movie Maker:
Download Movie Maker 2.6

Force CapsLock, NumLock and ScrollLock Keys Behavior Using Windows Registry


Its a very common problem among Windows users. Whenever Windows starts, it automatically turns "CapsLock", "NumLock" or "ScrollLock" keys On at login screen even if you turned the keys off before the login or boot screen. If you want to permanently change their behavior, then you can use following steps to do so:
1. Type regedit in RUN dialog box and press Enter. It'll open Registry Editor.
2. Now go to following key:
To change the behavior for currently logged in user:
HKEY_CURRENT_USER\Control Panel\Keyboard
To change the behavior for all users:
HKEY_USERS\.DEFAULT\Control Panel\Keyboard
3. Now in right-side pane, change value of "InitialKeyboardIndicators" string value to any of following:
0 - Turn all indicators Off (NumLock, CapsLock, ScrollLock)
1 - Turn CapsLock On
2 - Turn NumLock On
3 - Turn CapsLock and NumLock On
4 - Turn ScrollLock On
5 - Turn CapsLock and ScrollLock On
6 - Turn NumLock and ScrollLock On
7 - Turn all indicators On (NumLock, CapsLock, ScrollLock)
Num_Lock_on_Login_Screen.png
4. That's it. Exit registry editor and restart your system to take effect.

Download Windows 7 Login Screen for Windows Vista


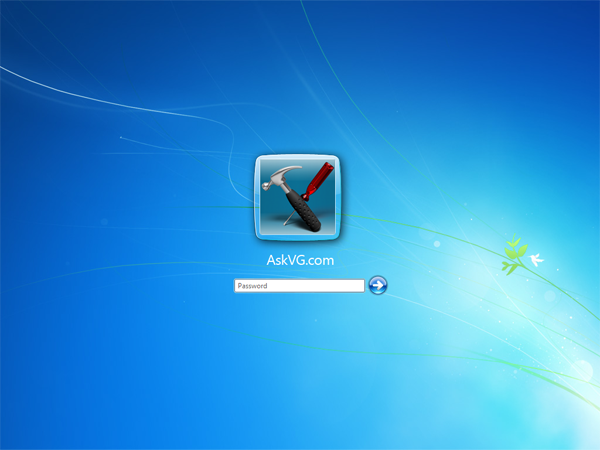
Windows 7 contains a new login screen which looks awesome. Now you can get the same login screen in Windows Vista and all previous Windows 7 beta builds.

You can download the login screen from following link:
Download Windows 7 Login Screen for Vista

More Info
After downloading the ZIP file, extract it using WinRAR or 7-zip. Now install "Stardock LogonStudio for Vista" which is FREE and included in the pack.
After installing LogonStudio, double-click on the "SevenVG Login Screen.logonvista" file. It'll open in LogonStudio, apply the login screen and you have done.
NOTE: If you are a Windows XP user, you can get this new login screen using following link:
Download Windows 7 Login Screen for Windows XP

Nimi Visuals: Add Various Eye Candy Effects to Windows

Nimi (formerly known as Tophaz) is a small program that adds various window effects that can be adjusted by user. Currently, those are: Transparency effects, with fading
  • Desktop shadows - turn all windows transparent and click-through when desktop is selected. Holding mouse with button pressed over transparent window activates it again.
  • Window fading in on creation - fade in window on it's creation
  • Contrast screen - creates contrast between active and non-active windows
  • Taskbar and start menu transparency(no fading)
  • Ttransparency on window move and resize
Jelly effects
  • Window kinetics - window will its momentum during move
  • Jelly windows - deform window shape depending on direction of its move in wobbly style
  • Jelly bounce - Makes window bounce on activation
Illusion effects
  • Creation sparkle - creates sparkle on titlebar at window creation
  • Contrastful windows - decrease saturation of non-active windows.
Other
  • Window quiver - minimizes or restore non-active windows on active window quiver movement
  • Window snap - maximizes window to half-width of screen when it's left more than half outside screen
  • Picture wallpaper-board - generate wallpaper filled with random images from User picture folder or Nimi folder in application data folder
  • Picture highlight - generate wallpaper containing one image from User picture folder, highlighted on adapted background
  • Screen frost - cover wallpaper under ice.
It supports Windows XP and Vista and should also work in Windows 2000.
Download Link
More Info

How to Fix Old Classic Context Menu Problem in Windows Vista and 7

Sometimes Windows Vista and 7 users face a strange problem. Whenever they right-click on an item or in free space, they get the old classic context menu instead of the new WPF enabled context menu as shown in following screenshot: Classic_Context_Menu_Problem.png
This problem occurs because of Norton products. Actually Norton installs its own entry in context menu which breaks whole context menu and Windows starts showing the classic context menu. As you can see in the above screenshot, there is an entry for "Norton AntiVirus".
To solve this problem, you just need to either disable Norton context menu entry from its Settings or uninstall Norton completely. It'll fix the problem and you'll get the new WPF enabled context menu back:
Classic_Context_Menu_Problem_Fixed.png

RunMe: Application Launcher for Windows

"RunMe" is a simple and portable application launcher for Windows which can be used as a dock as well. It supports almost all Windows versions including Windows XP, Vista and 7. RunMe.png
You can add any desired program by just dragging and dropping the shortcut to the launcher. If you want to delete any existing item, then simply drag n drop the item outside of the launcher.
Its highly customizable and you can change its position, effects, skins using its Settings which can be accessed by right-clicking on the launcher and selecting the "Settings" option.
RunMe_Settings.png
There are skins available which can change its look to match with Windows Vista and 7:
RunMe_Skins.png
So if you are a dock lover and want to use something new, then you should give it a try.
Download Link
Alternate Link
Homepage

Taskbar Eliminator: Hide / Remove Windows Taskbar

Did you ever want to hide / remove Windows taskbar so that you can use a dock and can get more space on Desktop? Although you can set the taskbar to "Auto-hide" but it also hides the Start button. "Taskbar Eliminator" is a great portable application which can hide the Taskbar but shows the start button so that you can access your programs.

Its very handy if you use a dock. Just run the EXE file and it'll hide the taskbar. If you want to show the taskbar again, press the "Ctrl + Alt + T" keys and it'll show the main window where you can easily unhide the taskbar again. Also you can set the program to start automatically with Windows.
It works on almost all Windows versions including Windows 98, 2000, XP, Vista and 7.
Download Link
Homepage

iCalcy: An iPhone Look-a-like Calculator for Windows

If you are an iPhone lover, then you'll definitely love this new portable calculator. "iCalcy" is a portable calculator for Windows which looks like iPhone.
It can perform all standard calculator operations. You can also rotate it into either portrait or landscape orientation, just like an iPhone.
All functions in portrait orientation are supported, including + - X and ÷, as well as memory and sign capabilities.
As we earlier mentioned, iCalcy is a stand-alone application, so it doesn't need any installation and you can directly run it or carry on your USB drive.
You can download it using following link:
Download iCalcy

TClock: Show Windows 7 Look-like Date & Time in System Tray in Windows XP and Vista

As we all know "Windows 7" comes with new Superbar (redesigned Taskbar) which shows Date along with Time in system tray. Windows_7_Date_Time_in_System_Tray.png
We earlier mentioned that you can even customize the date and time format and can show AM/PM symbols, Day and Month names:
Custom_Win_7_Date_Format.png
How to Show AM / PM Symbols in System Tray Clock in Windows 7
How to Show Day and Month Names in System Tray Date in Windows 7
But it was only applicable in Windows 7, then what about Windows XP and Vista users?
No need to worry. Thanks to "nemesiscult" for mentioning "TClock".
"TClock" is a very small and portable utility which can be customized to show the Windows 7 look-a-like Date and Time in Windows XP and Vista.
Actually its an application to customize system tray clock format. You can show whatever you want. You can customize AM/PM symbols, date and time format.
Following are some screenshots taken from Windows XP, Vista and 7 showing TClock in action:
Windows XP:
Windows_XP_Clock.png
Windows Vista:
Windows_Vista_Clock.png
Windows 7:
Windows_7_Clock.png
As you can see, we can show both Date and Time (even Day and Month names) using TClock.
You can download TClock using following link:
Download TClock

ViGlance: Get Windows 7 Look-Like Superbar in Windows XP and Vista

The most interesting and useful feature of Windows 7 is the new "Superbar". Superbar is a redesigned form of the old Taskbar. It shows only icons of running programs (Iconized Taskbar buttons), it allows to re-arrange taskbar buttons, its height is a bit larger than the old Taskbar. We have already posted a small tutorial to get the iconized Taskbar buttons in Windows XP and Vista:
Get Windows 7 Iconized (Icon Only) Taskbar Feature in Windows XP & Vista
You can also use a small utility to get iconized taskbar buttons:
Taskbar Iconizer: Utility to Iconize Taskbar in Windows XP & Vista
Even though you can get the iconized taskbar buttons but you can't get big program icons like Windows 7. No need to worry, now its possible with the help of "ViGlance".
Our friend "Lee" has created an excellent utility "ViGlance" which provides a Windows 7 look-a-like Superbar in Windows XP and Vista. Its a portable application so you don't need to install it. Just run it and you have done.
Following is a screenshot of "ViGlance" in action:

As you can see, it shows big icons in taskbar buttons. Following are a few features of ViGlance:
  • True 48x48 Vista Icon Support
  • Dynamic Process Grouping
  • Dynamic Thumbnails
  • Pin Items and Move Items
  • Fading Start Orb
  • Glide transitional effects
  • Resource PNG skin support
  • Native Right-Click support
  • Dynamic taskbar transparency
  • x64 and x86 Windows Support
You can download it using following link:
Download Link

WindowSpace: Get Windows 7 Aero Snap Feature in XP and Vista

WindowSpace is a powerful desktop enhancement utility for Windows OS. Once installed, it allows you to manipulate windows in many new amazing ways – snap windows to the screen edges and other windows, move and resize them with keyboard shortcuts, maximize vertically or horizontally, pin on top of the other windows, hide from view, minimize to tray, and it’s just the beginning! Here is the list of the most noticeable improvements in WindowSpace 2 beta:
Snap-To-Side (similar to the new Aero Snap feature in Windows 7)
Resizing to the edge:
Unsnapping window from the edge, restores its original size. As in the previous version of WindowSpace, you can also right-click the Maximize button to do this.
Roll Up / Unroll windows
Updated menu commands
20+ hotkeys to manage windows
Snap windows to grid lines
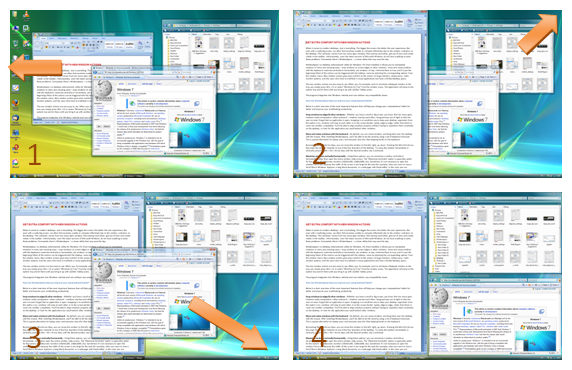
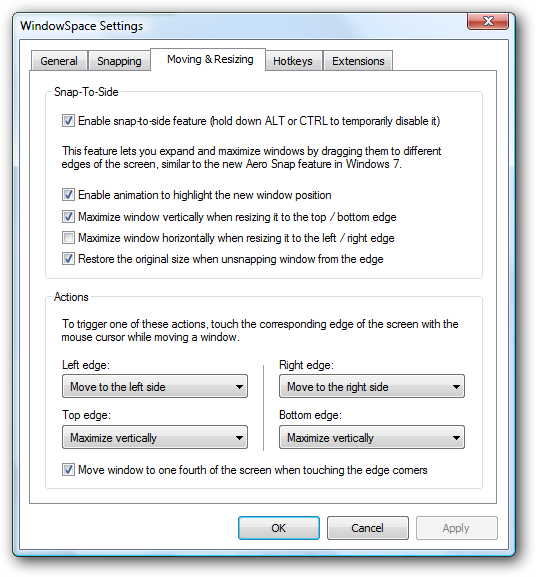
Snap-To-Corners: (currently it is called "Move window to one fourth of the screen when touching the edge corners", Settings -> Moving & Resizing page)

As for "Snap-To-Side" and "Maximize Vertically", unsnapping window from the edge restores its original size.

WindowSpace v2.0 Beta works under Windows 2000/XP/Vista, 32-bit and 64-bit.
Download Link

Get Glass CMD (Command Prompt) in Windows Vista and 7

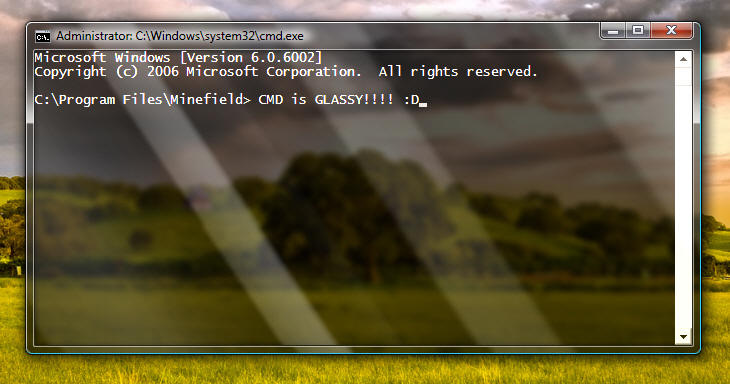
If you are using Windows Vista or 7 and your graphics card supports Aero, then you must be enjoying the transparent windows having glass in their borders. The one and only thing which doesn't match with the new Aero interface is "Command Prompt" window. Microsoft has not changed anything in the Command Prompt window. Its same since ages. Many people use Command Prompt regularly. Wouldn't it be great if we can somehow make the Command Prompt window transparent and have glass in it?
Here your wish comes true. Our friend "komalo" has developed a very small AutoIt script which runs in background and enables glass in all command prompt windows.
Following is a screenshot of Command Prompt window having glass:

As you can see it looks awesome. You can download the script using following link:
Download Glass CMD

Microsoft Cooking Windows Vista SP3

It seems that Microsoft has already started working on SP3 for Windows Vista. Recently SP2 RTM for Vista was released and now its turn of SP3. A new hotfix "KB957414" is available which is set to release for Vista SP3.
Its quite interesting to see that Microsoft is going to release another service pack for Vista even though Windows 7 is almost ready to release.
KB957414 Update for Vista SP3

#
### ###