Friends

This is default featured post 1 title

Go to Blogger edit html and find these sentences.Now replace these sentences with your own descriptions.This theme is Bloggerized by Lasantha Bandara - Premiumbloggertemplates.com.

This is default featured post 2 title

Go to Blogger edit html and find these sentences.Now replace these sentences with your own descriptions.This theme is Bloggerized by Lasantha Bandara - Premiumbloggertemplates.com.

This is default featured post 3 title

Go to Blogger edit html and find these sentences.Now replace these sentences with your own descriptions.This theme is Bloggerized by Lasantha Bandara - Premiumbloggertemplates.com.

This is default featured post 4 title

Go to Blogger edit html and find these sentences.Now replace these sentences with your own descriptions.This theme is Bloggerized by Lasantha Bandara - Premiumbloggertemplates.com.

This is default featured post 5 title

Go to Blogger edit html and find these sentences.Now replace these sentences with your own descriptions.This theme is Bloggerized by Lasantha Bandara - Premiumbloggertemplates.com.

Wednesday, January 19, 2011

Quickly Change Proxy Setting with Proxy Switcher

Most of the offices today are equipped with firewall and proxy server and you need to enter the proxy setting to ensure that your laptop have access to Internet. But if you are using direct internet connection at home, then you have to manually change it back using the browser settings. With Proxy Switcher, your tasks are simplified. It is a simple freeware tool which runs from system tray and enables users to quickly change the proxy settings. Proxy Switcher
Proxy Switcher disables proxy server settings when you click on the Home button, similarly when you select office, proxy is enabled. Proxy Switcher even informs your Windows environment of the changes so you don’t need to restart applications such as Internet Explorer or MSN Messenger when the proxy settings change.
System Tray Options
There is also an Auto option, which automatically check and change to proxy server when needed. The application works well on Windows 7 as well.
Download Proxy Switcher

Add Digital Signature to PDF Documents

JSignPdf is a freeware tool written in Java which enables users to add digital signatures to PDF documents. It can be used as a standalone application or as an Add-On in OpenOffice.org. The application is open source and require Java Runtime to run. You can add visible signatures to PDF files in the form of image or description location anywhere in the document and specified. It comes with pretty good features for the signatures. JSignPDF
Using the Visible signature settings, you can specify the location of your digital signature in the PDF file.
Features;
  • Visible signatures – image and/or description located visually in a PDF file (page and position can be specified)
  • Several different keystore types (as provided by Java)
  • Timestamps from authority in signature (TSA)
  • Certificate validation through CRL and/or OCSP
  • Setting certification level
  • Setting hash algorithm
  • PDF encryption and setting rights
  • Comprehensive Swing GUI
  • Support for batch processing (controlled by command line arguments, without GUI)
JSignPDF is very simple and yet a powerful tool to add digital signatures to PDF files.
Download JSignPDF

Merge HTML, CSS or Text Files with Net.FilesJoiner

Net.FilesJoiner is a handy freeware application which allows users to join html, CSS or txt or XML files. The application is portable and can easily do the job of merging files. For Html files, it can be merged with or without Styles (CSS) or images. The interface is very simple, just select the type of file you want to merge (HTML, CSS, txt or XML) and then select the files using the browse button. Once selected, you can easily sort files in the order you want it to appear. Merge 
HTML Files
Right mouse Click to open the menu for opening or saving files for specified formation, selecting all items, deleting selected items from the List and options.
Join 
options
In the options we can define a text line as separator between the merged files or header / footer Tags for html files.
The application is compatible with Windows XP, Vista and Windows 7.
Download  Net.FilesJoiner

Listen and Record any Radio Station Online

TapinRadio is a simple and reliable freeware application that allows you to listen to your favorite radio stations on the Internet. Apart from listening to radio stations all over the world, you can also record them. The interface of the application is very simple and easy to use, you can either search for a station or pick from the huge list of stations based on genre or location. Once you select a station, double click on the station to start streaming. TapinRadio
Once you start playing a radio station, the application automatically displays specific information on it: genre, stream link, sound quality, name of the playing song and its duration. You can start taping the song at any time by hitting the “Record” button available.
The list of presets is quite large and lots of new stations are added every day. Although not all stations work perfectly, there are lots to choose from. You can increase their number by adding your own radio URLs.
Features;
  • Plenty of stations to choose from
  • Supports most of the internet radio formats – mp3, wma, ogg vorbis, aac+ and so on
  • Quick and reliable search
  • Smooth switching between stations
  • Record what you are listening to – including separate song files
  • Automatic checking for software and stations
  • Runs on Windows XP, Vista, Windows 7 (32 and 64 bit)
  • Show your favorites in groups
  • Sleep timer to shutdown TapinRadio or even your computer!
The best feature of TapinRadio is its ease of use and its vast collection of radio stations that gets increased with new presets every day and its recording feature. The application also comes in portable flavour which makes it even more better.
Download TapinRadio

Set Different Mouse Speeds for Touchpad and Mouse- Autosensitivity

AutoSensitivity is a freeware tool for laptop users which allows you to define different mouse sensitivities (speeds) for your touchpad and mouse. Apart from defining mouse speeds, it can also automatically switch between them (based on mouse connect / disconnect). You simply define two different speeds and the utility automatically switches between them according to you plugging or unplugging your mouse. Auto 
Sensitivity
  • Microsoft Windows XP / Vista / 7
  • Microsoft .NET Framework 3.5 / 4.0
You can get the current mouse speed set using the options. Once you have selected the speed, click the apply button and then minimize the tool. You can also run the program at Windows startup.
Download AutoSensitivity

GrooveShark and Last.fm Desktop Player for Windows- GrooveWalrus

GrooveWalrus is a freeware tool for Windows which allows users to listen to songs from Grooveshark and Last.fm service from their desktop. Grooveshark and Last.fm are two popular online music streaming sites and GrooveWalrus brings them to desktop. You can search for any artist and easily stream the songs using this player. You can also created your own playlist using the search. The player comes with lots of options. GrooveWalrus
The interface is very neat and easy to use. Another great feature is the support for Plug-ins, there is some nice plugins to make the listening experience better. The player comes with support for lyrics and you can view the lyrics of the song playing.
Lyrics
Another nice feature is web remote, you can control the desktop player using any remote PC connected to Internet.
Remote
WebRemote
GrooveWalrus works perfectly on Windows 7 as well. It is a nice player to have especially if you are a Grooveshark or Last.fm user.

Scan Files with Multiple Antivirus Scanners using JottiQ

We have covered services like Virus Total and Filterbit to scan files online with multiple antivirus engines. JottiQ is another freeware desktop application which allows you to scan your files online with multiple antivirus scanners. The application comes with scanner service which includes a pile of 18 AV engines inlcuding the popular ones like Kaspersky, Avast, AVG, NOD32, Panda, AntiVir, Bitdefender etc. You just need to drag and drop the files for scanning. Scan 
Files
There is also an option to add all the exe files of the current running application on your Windows for scanning, by this way you can easily detect if there are any malwares running on your PC. The option window allows you to customize the scan options.
Options

Tweetings is a Simple and Useful Twitter Client

Twitter desktop clients is an area which is already overcrowded with lots of applications offering offering various features. Tweetings is another desktop application for Twitter for Windows. Unlike normal Twitter clients, this application is not Adobe Air based and runs on .Net framework. It’s fully compatible with Windows XP, Vista and Windows 7 and works from the system tray. The application also comes with a host of features making it very useful one. Tweetings Search
One of the good features of Tweetings is the size of window, it occupies very less features and can also be used on top of other applications, which means you can carry on with your work and still see the latest tweets.
The preferences window allows you to set the default short URL and image upload service. You can also set the way you want to sent the retweets.
Prefernces
Tweetings is a simple and easy to use Twitter client for Windows using .Net Framework. Complete list of features can be viewed here.

Download All Attachments in your Email with Mail Attachment Downloader

Ever wanted to download multiple attachments in multiple emails in your account? Mail Attachment Downloader is a simple freeware tool which allows users to download all the attachments in email in one click without having to open your email account. You just need to provide the username and password and the application downloads all the attachments in your email account after doing a scan of your account. The tool is supported on Gmail, Yahoo Mail, Hotmail, AOL and Others.
Mail Attachment Downloader
All your mail is left on the mail servers for you to later read and its left as unread. The program can automatically download your email attachments based on a schedule you specify when the program is running. The attachments are downloaded using encrypted channels and your password is not shared anywhere.
You can filter email attachments by size or by file type. With advanced search capabilities, you can filter attachments based on who the mail is from, with a certain subject, based on when the mail was sent (in a date/time range) and more.
Filters
Advanced filters

Download All Attachments in your Email with Mail Attachment Downloader

Ever wanted to download multiple attachments in multiple emails in your account? Mail Attachment Downloader is a simple freeware tool which allows users to download all the attachments in email in one click without having to open your email account. You just need to provide the username and password and the application downloads all the attachments in your email account after doing a scan of your account. The tool is supported on Gmail, Yahoo Mail, Hotmail, AOL and Others. Mail Attachment Downloader
All your mail is left on the mail servers for you to later read and its left as unread. The program can automatically download your email attachments based on a schedule you specify when the program is running. The attachments are downloaded using encrypted channels and your password is not shared anywhere.
You can filter email attachments by size or by file type. With advanced search capabilities, you can filter attachments based on who the mail is from, with a certain subject, based on when the mail was sent (in a date/time range) and more.
Filters
Advanced filters

How to Repair Windows 7 Installation

Windows 7 is by far the best OS to be released by Microsoft till date. When you install any software or drivers on Windows 7 or if any installation fails, it might cause issues with Windows 7 start up and this might effect Windows 7 booting. In case you encountered any such situation, best way is to repair Windows 7 using the DVD. Windows 7 DVD has system recovery tools to repair and recover issues with Windows 7. Windows 7
To start repair, insert the Windows 7 DVD and restart your PC. Press any key to boot from the CD and Windows 7 will load the set up files. In the first step select the language and country and then click next.
Windows 7 Repair_1
In this screen select the option “Repair your Computer” as shown in the image. This will open up the system recovery options. You can either use the recovery tool to fix problems starting Windows or else restore the computer using a system image you have created previously without repairing.
System Recovery
Select the partition where your Windows 7 is installed and then click Next.
Recovery tool
Here you can see the recovery options available. Startup Repair tool should be able to solve any issues causing Windows startup. There is also system restore or system image recovery if you have enabled these options previously. Once you have repaired Windows 7, you can restart the PC and login.

Multi Boot with more than One Operating System

1. Turn on or restart the computer.

2. If you Multi Boot with more than One Operating System
A) At the Windows Boot Manager screen, select the OS you want to use the Advanced Boot Options for, then press F8. (see screenshot below)
Advanced Boot Options-boot_manager.jpg
3. If you Only Boot with One Operating System (ex: Windows 7)
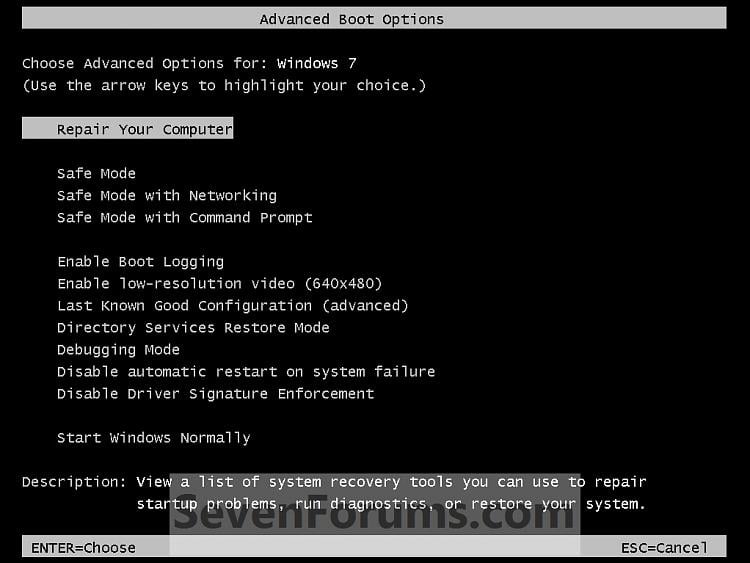
A) Press and tap the F8 key about every second until you see the screenshot below.
NOTE: If the Windows startup logo appears, you will need to repeat steps 1 and 3 again. If you dual boot, then you will need to select the OS you want to use the Advanced Boot Option for and then press F8.
Advanced Boot Options-advanced_boot_options.jpg
4. Use the arrow keys to select an advanced option to start Windows 7 into and press Enter. (See screenshot above)
NOTE: See the table below for a description of each option.
Advanced Option Description
Repair Your Computer
Shows a list of system recovery options that you can use to repair startup problems, run diagnostics, or restore your system. This option is only available if you have the 100 MB System Reserved partition created during the installation of Windows 7, or if you have a OEM factory recovery partition instead of a Windows 7 installation disc. If you have a Windows 7 installation disc, the System Recovery Options are located on the installation disc as well.
 
Safe Mode
This starts Windows 7 with a minimal set of drivers and services.
 
Safe Mode with Networking
This starts Windows 7 in safe mode and includes the network drivers and services needed to access the Internet or other computers on your network.
 
Safe Mode with Command Prompt
This starts Windows 7 in safe mode with a command prompt window instead of the usual Windows interface. To exit from here, press Ctrl+Alt+Delete or type Exit and press Enter.
 
Enable Boot Logging
Creates a file named ntbtlog.txt, that lists all the drivers that are installed during startup and that might be useful for advanced troubleshooting.
 
Enable Low Resolution Video (640 X 480)
Starts Windows 7 using your current video driver and using low resolution and refresh rate settings. You can use this mode to reset your display settings, or to use a television monitor with your computer if needed.
 
Last Know Good Configuration (advanced)
Starts Windows 7 with the most recent registry and driver configurations that worked successfully. Every time you turn your computer off and Windows 7 shuts down successfully, important system settings are saved in the registry. You can use those settings to start your computer if a problem occurs. For example, if a new driver for your video card is causing problems, or an incorrect registry setting is preventing Windows 7 from starting correctly, you can restart your computer using Last Known Good Configuration.
 
Directory Services Restore Mode
Starts Windows 7 domain controller running Active Directory so that the directory service can be restored. This option is intended for IT professionals and administrators.
 
Debugging Mode
Starts Windows 7 in an advanced troubleshooting mode intended for IT professionals and system administrators.
 
Disable Automatic Restart on System Failure
Prevents Windows 7 from automatically restarting if an error causes Windows 7 to fail. Choose this option only if Windows 7 is stuck in a loop where Windows 7 fails, attempts to restart, and fails again repeatedly.
 
Disable Driver Signature Enforcement
Allows drivers containing improper signatures to be temporarily installed.
 
Start Windows Normally
Starts Windows 7 in its normal mode to the logon screen or user desktop. This can be helpful after a improper shutdown.

Using a OEM Recovery Partition

NOTE: This is if your computer did not come with a Windows 7 installation DVD, and has pre-installed recovery options (recovery partition) instead.1. Start or Restart the computer.

2. Boot into the Advanced Boot Options screen.
A) Select Repair your computer and press Enter.
3. Select your keyboard language preferences and click on Next. (See screeshot below).
System Recovery Options-step6.jpg
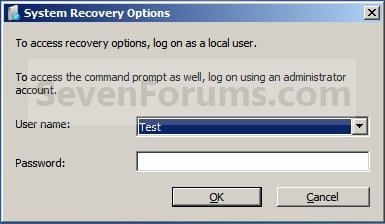
4. Select your user name and type in the password, and then click on OK.
System Recovery Options-step6a.jpg
5. Go to step 6 in METHOD TWO below.

To Manually Create a "System Repair Disc" in Windows 7

NOTE: If you have a OEM Windows 7 instead of a retail Windows 7, then you may need to use OPTION TWO below to create a System Repair Disc with instead.1. Open the Start Menu.
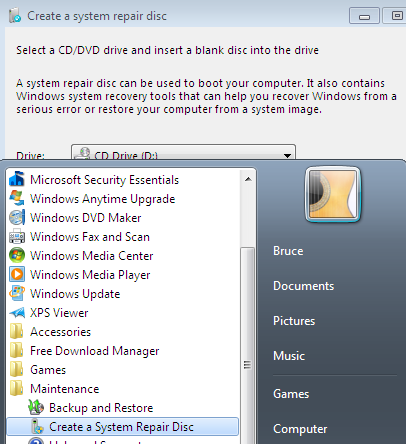
A) In the search line, type recdisc.exe and press Enter. (See screenshot below)
System Repair Disc - Create-start_-menu.jpg
B) Go to step 3.
OR

2. Open the Control Panel (All Items view), and click on the Backup and Restore icon.
A) Click on the Create a System recovery disc link in the left blue pane. (See screenshot below)
System Repair Disc - 
Create-backup_and_restore.jpg
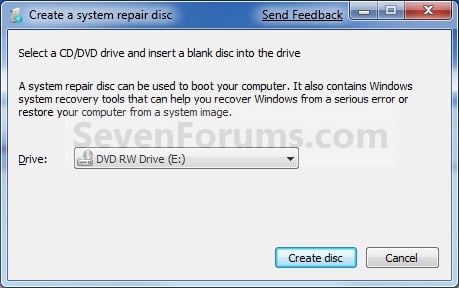
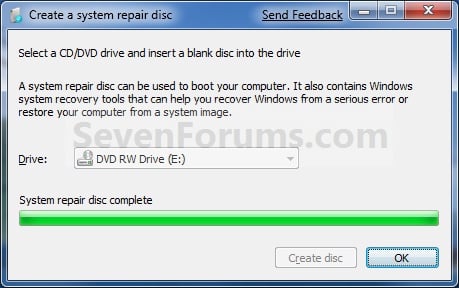
3. Insert a blank CD or DVD into your CD/DVD drive and click on the Create disc button. (See screenshot below)
NOTE: If you are prompted to insert a Windows installation disc, it means that the files needed to create the system repair disc cannot be found on your computer. Insert a Windows 7 installation disc.
System Repair Disc - Create-step1.jpg
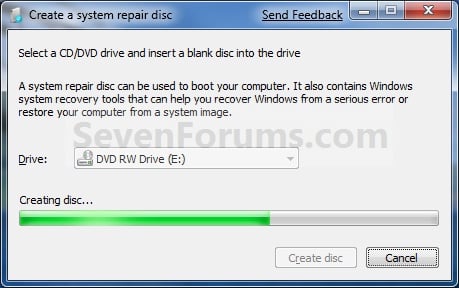
4. It will now start creating the System Repair Disc. (See screenshot below)
NOTE: If a AutoPlay window pops up, just close it.
System Repair Disc - Create-step2.jpg
5. When it's finished, click on the Close button. (See screenshot below)
System Repair Disc - Create-step3.jpg
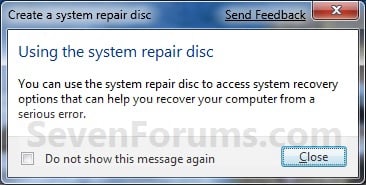
6. Click on OK. (See screenshot below)
System Repair Disc - Create-step4.jpg
7. Remove and label your new Windows 7 System Repair Disc from the CD/DVD drive.

Windows 7 - Repair CD - System Repair Disk

Recently questions were raised as to what functions are available on the System Repair CD - Create that Windows 7 will create and burn to a CD.

Repair CD - System Repair 
Disk-create_repair_cd.png

These clips are are from a 32 bit CD I made:
Insert the CD in the CD / DVD drive and reboot the computer.
When requested, "Hit any key to boot from CD."

Select the Language and click next.

Repair CD - System Repair Disk-repair_cd_01.png

Windows will search for an Operating System to repair.

Repair CD - System Repair Disk-repair_cd_02.png

You can choose to restore a System Image you created,
or go the Recovery Tools screen.

Repair CD - System Repair Disk-repair_cd_03.png

These are the same utilities available through the Install DVD,
or via the function of the 100 MB System Partition (if installed).

Repair CD - System Repair Disk-repair_cd_04.png

Tapping the F8 key before Windows loads (Safe Mode) opens this menu:

Repair CD - System Repair 
Disk-reserved_sys_01.png

Selecting "Repair Your Computer" also opens the "System Recovery Options" menu,
but requires a password to proceed.

Repair CD - System Repair 
Disk-reserved_sys_02.png

Why it's Sometimes Necessary to Run a Startup Repair 3 Times to Create Windows Boot Files to Another, New Location

When a Windows Operating System (OS) is installed it becomes the system volume or commonly referred to as "System, Active" partition and by default it will contain all the files needed to boot Windows. When a second OS is installed to the same PC (a dual or multi boot) the files needed to boot that OS will be added to the existing "system volume" containing boot files from the previous install and the 2 OSs will 'share' the boot files and if either of the 2 is removed or damaged so as to not boot, that may directly affect the other OS's ability to boot.
There is another situation that is common now, when Windows 7 is installed to an un-partitioned or "unallocated space" on a Hard Disk Drive (HDD) it creates one partition (the first) labeled "System Reserved" that becomes the "system volume" and a second partition that Windows 7 installs to, both "Primary" partitions; the "System Reserved" partition is where the boot files are created and has a link to the recovery options console built into Windows 7, it serves a very useful purpose but there may be times when removing or repairing the "System Reserved" partition becomes necessary.
click any image to enlarge
Startup Repair - Run 3 Separate Times-dm.jpg
The simplest way to make these changes is to do what is referred to as a startup repair it's a process that will write new boot files to the selected OS and it will then be able to boot independently; or in other cases you may want to rearrange / change the partition structure, you can use a startup repair to correct this also.

The trick is that sometime and in certain situations it becomes absolutely necessary to do as many as 3 separate startup repairs with a system restart between each repair to completely write boot files to the "new" location and if the process is interrupted or not completed you will be right back where you started, with a PC that will not start-up at all.
warning   Warning

As with anything that makes changes to the Windows structure there is always the chance for an error to occur, it would be advisable to make reliable backups to the media of your choice of any important data, i.e. pictures, music or documents, that you would not want to lose before you make any changes to your system, it is always better to be safe than sorry.

Let's get started!

Note   Note

If you can't boot into (start) Windows have a look at Option Two below.

If there is more than 1 partition marked "Active" that will cause WinRE to not be able to complete the repairs properly as the active flag is the designation of where the new boot files are to be created, if so the other partitions will have to be marked as "Inactive" for the repairs to be completed.
See Option Two #2 below for the process.


The first step in the process is to mark the desired volume/partition as "Active" so that WinRE (Windows Recovery Environment) will know which volume you want to become "System" when the startup repairs are run.

The second step in this process is to run at least 3 separate startup repairs to create a new set of boot files to the new "Active" volume/partition, be sure to complete all 3 steps of Option One below to complete this entire process.


Option One

Using Disk Management


1) In the Windows start menu search box type diskmgmt.msc right click the entry and click "Run as Administrator" if you get a User Account Control (UAC) prompt enter your user credentials and click Yes; in Disk Management right click the partition you want to be the "system volume" and click "Mark Partition as Active".
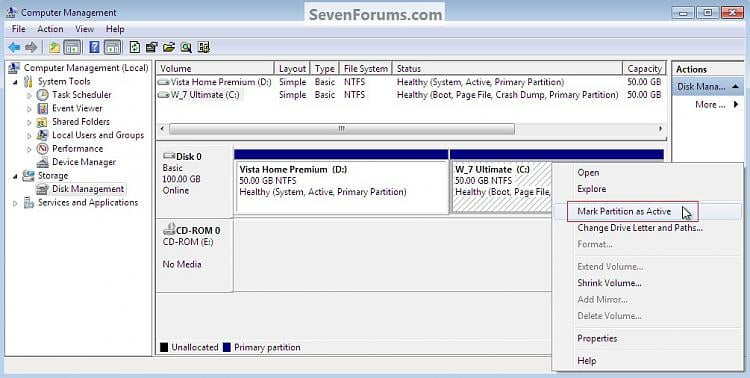
Startup Repair - Run 3 Separate 
Times-dm_markasactive.jpg
2) Now click yes for the dialog box that opens; the second snip down is what you will have after that.
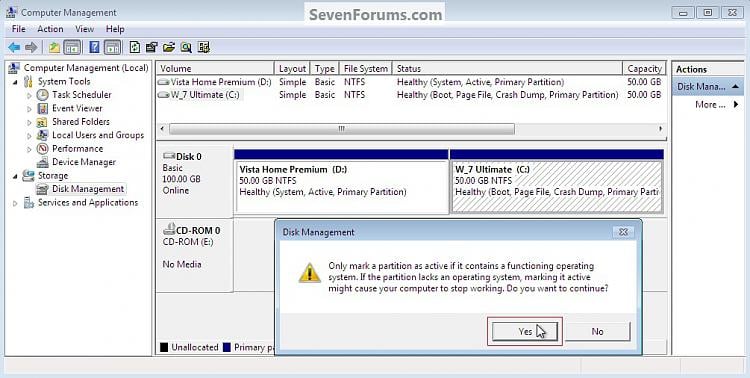
Startup Repair - Run 3 Separate 
Times-dm_markasactive2.jpg
Startup Repair - Run 3 Separate 
Times-dm_markasactive8.jpg
3) Now put the Windows full installer DVD or a windows repair disk into the Optical Disk Drive (ODD) and restart the PC, at the BIOS select the ODD as first boot device and when the PC boots run the 3 startup repairs with restarts discussed above to write the new boot files to the selected volume.

This is what you will have after the repairs.
Startup Repair - Run 3 Separate 
Times-dm_markasactive5.jpg


Option Two

Using DISKPART


If you have a Windows 7 full installer DVD, have a look at Method One in this tutorial at the link below to see how to boot to diskpart so you can mark the desired partition as "Active" so that WinRE (Windows Recovery Environment) will know where to write the new boot files.

How to Boot to DISKPART at PC Startup

If you are using a created windows repair disk have a look at Method Two and if you are using a Vista full installer view Method Three.

Once in diskpart of course you would substitute your disk / partition information in-place of that listed in the snips for demonstration purposes.

1) To mark the selected partition as "Active" click to see this snip below.
Startup Repair - Run 3 Separate 
Times-active.jpg
2) To mark the selected partition as "Inactive" click to see this snip below.

If there is more than 1 partition marked "Active" that will cause WinRE to not be able to complete the repairs properly as the active flag is the designation of where the new boot files are to be created / repaired, if so the other partitions will have to be marked as "Inactive" for the repairs to be completed.

To see how to mark the selected partition as "Inactive" click this snip below.

This can also be done from an elevated command window.
Startup Repair - Run 3 Separate 
Times-inactive.jpg
3) How to check if a partition is marked "Active" click to see the snip below.
Startup Repair - Run 3 Separate 
Times-detailpartition.jpg
Enjoy!
#
### ###