Friends

This is default featured post 1 title

Go to Blogger edit html and find these sentences.Now replace these sentences with your own descriptions.This theme is Bloggerized by Lasantha Bandara - Premiumbloggertemplates.com.

This is default featured post 2 title

Go to Blogger edit html and find these sentences.Now replace these sentences with your own descriptions.This theme is Bloggerized by Lasantha Bandara - Premiumbloggertemplates.com.

This is default featured post 3 title

Go to Blogger edit html and find these sentences.Now replace these sentences with your own descriptions.This theme is Bloggerized by Lasantha Bandara - Premiumbloggertemplates.com.

This is default featured post 4 title

Go to Blogger edit html and find these sentences.Now replace these sentences with your own descriptions.This theme is Bloggerized by Lasantha Bandara - Premiumbloggertemplates.com.

This is default featured post 5 title

Go to Blogger edit html and find these sentences.Now replace these sentences with your own descriptions.This theme is Bloggerized by Lasantha Bandara - Premiumbloggertemplates.com.

Thursday, April 14, 2011

Mozilla Updates Firefox Update Channels: Nightly, Aurora, Beta and Release

Many people who are using Firefox's nightly build called "Minefield" might have noticed that its now officially labeled as "Nightly". The orange Firefox button is also labeled as Nightly. Actually Mozilla has redesigned Firefox's update channel list. In past Firefox had following 3 update channels:
  • Nightly – builds created out of the mozilla-central repository every night. These are not qualified by QA.
  • Beta – builds created out of the mozilla-central repository, qualified by QA as being of sufficient quality to release to beta users.
  • Release – builds created out of the mozilla-central repository, qualified by QA as being of sufficient quality to release to hundreds of millions of people.
But there were some issues inherent in the above structure:
1. The quality expectation for updates on the Beta channel was vastly higher than the updates on the Nightly channel.
2. Users on the Beta channel may not even know they are running pre-release (but hopefully decent) versions of Firefox.
3. Due to #1 above, development on the mozilla-central repository is frozen while Mozilla stabilizes for an update to the Beta channel. This causes a huge backlog of patches and adds additional risk for the next beta.
4. 3rd parties must track Firefox development closely to know when a milestone they care about (such as feature complete, API freeze, or string freeze) is reached.
5. For developers, the tree rules are constantly changing on mozilla-central depending on when Mozilla last shipped an update from it.
Now Mozilla has redesigned these update channels and has added a new update channel to the list. Mozilla is confident that it'll enable Mozilla to ship quality Firefox releases to users at a faster cadence.
  • Nightly – builds created out of the mozilla-central repository every night. These are not qualified by QA.
  • Aurora – builds created out of the mozilla-aurora repository, which is synced from mozilla-central every 6 weeks. There is a small amount of QA at the start of the 6 week period before the updates are offered.
  • Beta – builds created out of the mozilla-beta repository, qualified by QA as being of sufficient quality to release to beta users.
  • Release – builds created out of the mozilla-release repository, qualified by QA as being of sufficient quality to release to hundreds of millions of people.

With the new structure, all these issues go away. The new "Aurora" channel has higher expectations of quality than the Nightly channel but lower expectations than Beta. The new icons should allow users to know at a glance what channel they are on and set stability expectations accordingly.
What do you think about this new updated plan?

Taskbaric: Get Windows 7 Iconized Taskbar Buttons in Windows XP and Vista

As you all know about Windows 7 iconized taskbar buttons which show only the program icon and not the program name. It looks nice and also saves space. You can get the same iconized buttons in Windows XP and Vista using a very simple registry hack which was posted in following tutorial: Get Windows 7 Iconized (Icon Only) Taskbar Feature in Windows XP and Vista
We also posted about a standalone application which does the same job automatically so you don't need to edit the registry:
Taskbar Iconizer: Utility to Iconize Taskbar in Windows XP and Vista
Now we are sharing another tool to get iconized taskbar buttons in XP and Vista. Thanks to our reader "DEE" for sharing it.
"Taskbaric" is a very small and portable tool which brings the iconized buttons functionality in Windows XP and Vista. You just need to run the EXE file and it'll do its job. If you want to revert back to default settings, run the EXE again.

It also have a special version for XP users. The registry hack makes Windows XP taskbar buttons iconized but some themes including default Luna theme (but not SevenVG theme) show the first character of program name. But "Taskbaric"'s alternative version does the job perfectly so you don't see the first character any more in taskbar buttons.
You can download it using following link:
Download Link

WinSplit Revolution: Another Freeware to Get Windows 7 “Aero Snap” Feature in XP and Vista

WinSplit Revolution is a small utility which allows you to easily organize your open windows by tiling, resizing and positioning them to make the best use of your desktop real estate. WinSplit is especially useful for high-end LCD screens with high resolutions because it helps you to efficiently manage many active windows. The advantages of using WinSplit is that it saves you from having to drag and drop windows by allowing you to snap windows into specific tiled configurations using simple keyboard hotkeys.

Features List:
  • Automated window handling (resize, move, reorganize, close tasks)
  • Shape - process association
  • Global hotkeys and clickable virtual numpad
  • Automatic startup
  • Automatic update
  • Moving a window with mouse (drag'n'go)
  • Hotkey configure
  • Layout configure
  • Fusion between 2 windows
  • Minimize/Restore by hotkey
  • Mosaic mode
It supports Windows 2000, XP and Vista 32 and 64-bit versions. You can download it using following link:
Download WinSplit Revolution

Transparent Notepad for Windows Users

Here is another eye candy application for customization lovers. Recently we blogged about "Glass CMD" which puts glass in Command Prompt. Now its turn of Notepad. "Transparent Notepad" is a small application developed in C# which can be used as an alternative for default Notepad. It provides all basic options along with some advanced features like:
  • Rich text support
  • Undo, Redo
  • Insert Images
  • Paragraph, Bullets
It also provides a small toolbar containing useful buttons for basic tasks.
The most impressive thing which it is all about is the transparency. Its completely transparent:
Transparent_Notepad.png
It can be used in Windows NT, 2000, XP, Vista and 7.
You can give it a try using following link:
Download Link

Download Windows XP SP3, Vista SP1 and 7 Features Comparison Chart

If you are wondering which features are new in Windows 7 or which features have been improved in Windows 7, then you should take a look at following comparison chart which can be downloaded from Microsoft Download Center. This chart compares various features like File organization and Search, Security, etc across Windows XP SP3, Windows Vista SP1 and Windows 7.
Download Link (PDF File)

All-Glass Firefox: Extension to Enable Aero Glass in Mozilla Firefox in Windows Vista and 7

Attention customization lovers! Here is another nice add-on for Mozilla Firefox which enables Aero Glass under Windows Vista and 7. Following is a preview of the final result which you are going to get after installing this small add-on:
All_Glass_Firefox.png
The add-on is called "All-Glass Firefox" created by our friend Ambroos. This add-on adds Aero Glass in Firefox menubar, addressbar, statusbar, Navigation and Bookmarks toolbar.
It also adds a text shadow effect for the text which looks great with the glass.
You can download it using following link:
Download Link
The add-on has been discontinued. You can try a similar add-on Glasser.

Download Windows Vista SP2 and Server 2008 SP2 NOW

Today Microsoft has released Service Pack 2 (SP2) for Windows Vista and Server 2008. Its a standalone installer and available for both 32-bit and 64-bit versions. You can download SP2 using following links:
Download SP2 Standalone Installer(32-bit)
Download SP2 Standalone Installer(64-bit)
Download SP2 DVD ISO
Things to Know about SP2

SBar: Windows 7 Taskbar Clone for Windows XP and Vista

As we all know Windows 7 comes with new Superbar which is a redesigned form of the old Taskbar. The main features of this new Superbar are as follows:
  • A little increased height for better view and usablity
  • Iconized Taskbar buttons to save space
  • Live Taskbar thumbnails for easier navigation
There are many other small features in the new Superbar which make it far better than the old Taskbar.
Now if you are not using Windows 7 but like the Superbar look, you can get it in your Windows XP or Vista.
"SBar" is a Taskbar replacement for Windows XP and Vista which brings the same Superbar functionality. Thanks to "DimitarCC" for creating this nice application.
SBar.png
As you can see in the above screenshot which was taken from Windows XP but looks almost same as Windows 7.
If you want to give it a try, you can download it using following link:
Download SBar

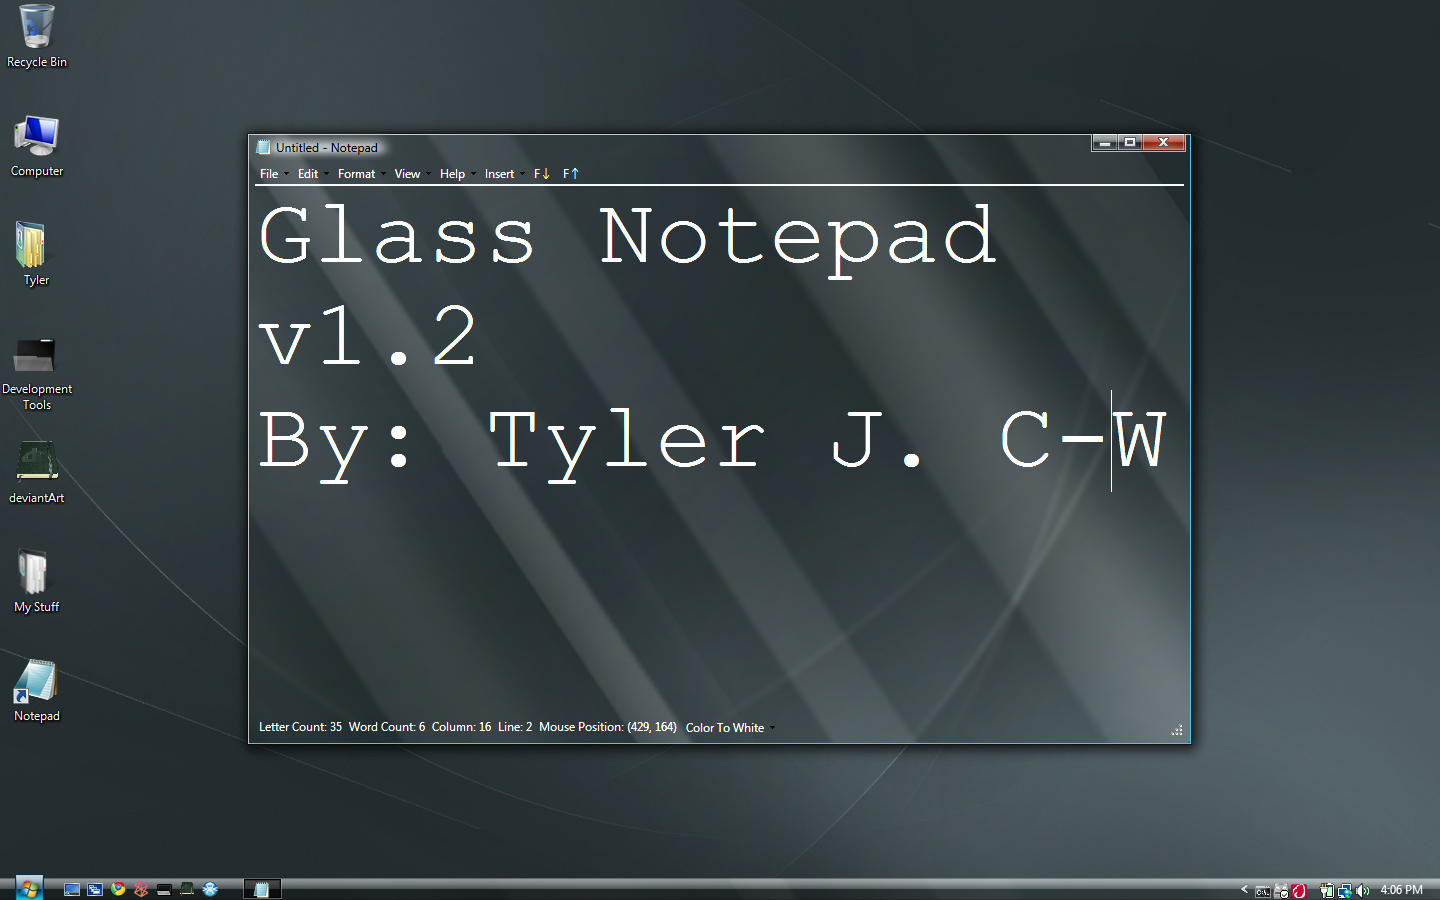
Get Glass Notepad in Windows Vista and 7

We have posted about "Glass CMD" in past which can enable Aero Glass in Command Prompt window under Windows Vista and 7. Now today we are going to share a similar thing with you all. "Glass Notepad" is a standalone application for Windows Vista and 7 which provides full Glass interface. So if your graphics card supports Aero theme, you will definitely enjoy this nice application.

It supports all basic Notepad functions and the Menus are almost same as Windows default Notepad. It should also work in earlier Windows versions like Windows XP.
You can download it using following link:
Download Glass Notepad

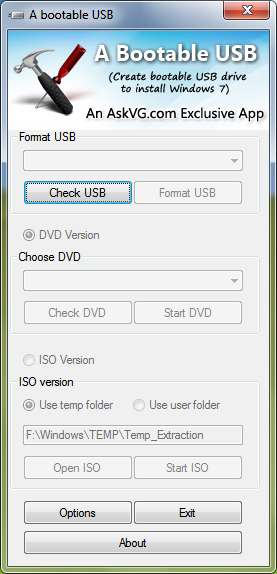
A Bootable USB: Utility to Create Bootable USB Drive to Install Windows Vista, Server 2008 and 7

Imagine a situation where you need to install Windows Vista or 7 in a system but you don't have access to DVD drive. We all know Windows Vista, Server 2008 or 7 comes in DVDs and you'll need a DVD drive to install them. Then how will you install them? The solution is, you can create a bootable USB drive which can be used to install Windows without using DVD drive. We have posted a detailed tutorial to create such bootable USB drive long time back, you can read about it here.
The above method is very easy to follow but wouldn't it be great if we can use a utility to do the whole task automatically? Our reader "Aris" has created a small utility exclusively for AskVG readers which creates a bootable USB drive to install Windows Vista, Server 2008 or 7.
Prerequisites:
  • A USB Drive (4 GB or more)
  • Windows Vista, Server 2008 or 7 ISO image or DVD
  • Host OS: Windows Vista (SP1 or SP2), Server 2008 or 7
How to Use:
Once you meet the requirements, run the utility. Its a portable utility so doesn't need installation. Simply run it and check the option "I have read and accepted the following License Agreement". Now click on OK button and it'll launch the main application.

It also shows a Help window so that you can use the utility easily. The utility requires only 4 easy steps to follow:
  • Check USB drive (To check whether your USB drive is attached or not)
  • Format USB drive
  • Choose DVD or ISO image (To copy the required files to USB drive)
  • Start the process to create bootable USB drive
Download Link
PS: It also works in 64-bit Windows versions.
NOTE: If you face problem while formatting the USB drive, click on "Options" button and then select "QUICK" option.

How to Remove Unwanted Items from Addressbar History in Windows Explorer?

Recently a visitor asked us how can he remove unwanted items from the drop-down box of Windows Explorer addressbar? We are sure many of you also want to know the same. Whenever we open a path using Explorer addressbar, its automatically stored in the history and anyone can see it by clicking on the addressbar drop-down arrow. Windows_Explorer_Addressbar_History.png
You can follow these simple steps to remove unwanted items from Windows Explorer addressbar history:
1. Type regedit in RUN dialog box and press Enter. It'll open Registry Editor.
2. Now go to following key:
HKEY_CURRENT_USER\Software\Microsoft\Windows\CurrentVersion\Explorer\TypedPaths
In right-side pane, you'll see various String values with the name url1, url2, url3 and so on. Their value will be set to the path which you see in addressbar drop-down history.
Remove_Windows_Explorer_Addressbar_.png
3. You just need to delete the String value which contains the path which you want to remove from addressbar history list. e.g. if you want to remove the 4th item "C:\ProgramData\Microsoft\Windows" from history, then delete the "url4" String value.
4. That's it. Now the deleted path will no longer appear in Explorer addressbar history.
PS: If you want to clear the whole history, you can right-click on the addressbar in Windows Explorer and select "Delete history" option.
NOTE: You can also visit following related articles:
How to Remove Any Particular URL from Internet Explorer URL History?
How to Remove An Item from RUN Dialog Box History / MRU List?
How to Remove Location History from Desktop Background List in Windows Vista and 7

How to Add Recycle Bin, Run, Search and Many Other Useful Shortcuts in My Computer?

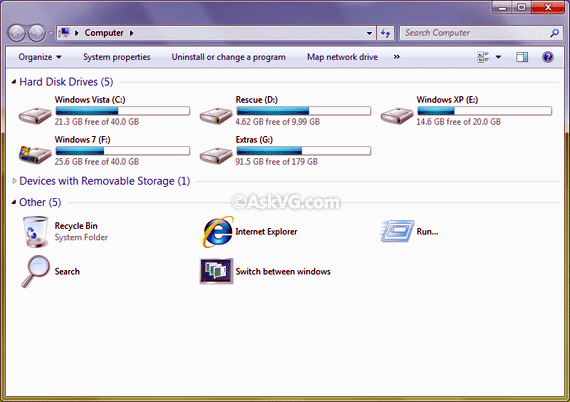
Recently someone asked us how to add "Recycle Bin" shortcut in My Computer? Actually its very easy and can be done using a very simple registry trick which we are going to reveal in this tutorial. Today we'll learn how to add various useful shortcuts in My Computer window for quick and easier use as shown in following screenshot:
Add_Items_in_My_Computer_Window.png
So without wasting any time, here we start the tutorial:
1. Type regedit in RUN or startmenu search box and press Enter. It'll open Registry Editor.
2. Now go to following key:
HKEY_LOCAL_MACHINE\SOFTWARE\Microsoft\Windows\CurrentVersion\Explorer\MyComputer\NameSpace
3. Now we'll need to create a new key under "NameSpace" key. Right-click on "NameSpace" key and select "New -> Key". Now you'll need to set its name to any of the following value mentioned in BOLD:
Recycle Bin - {645FF040-5081-101B-9F08-00AA002F954E}
Control Panel - {21EC2020-3AEA-1069-A2DD-08002B30309D}
Run - {2559A1F3-21D7-11D4-BDAF-00C04F60B9F0}
Search - {2559A1F0-21D7-11D4-BDAF-00C04F60B9F0}
Flip 3D - {3080F90E-D7AD-11D9-BD98-0000947B0257}
Internet Explorer - {871C5380-42A0-1069-A2EA-08002B30309D}
Administrative Tools - {D20EA4E1-3957-11D2-A40B-0C5020524153}
Network Connections - {7007ACC7-3202-11D1-AAD2-00805FC1270E}
Printers - {2227A280-3AEA-1069-A2DE-08002B30309D}
As shown in following screenshot:
Adding_Items_in_My_Computer_Window.png
4. That's it. As soon as you set the value in registry, it'll immediately start showing the item in My Computer.
NOTE: To delete the item from My Computer window, simply delete the associated key from registry.
PS: If you want ready-made registry scripts to add these shortcuts automatically, then download following ZIP file, extract it and run the desired .REG file. It'll automatically add the item in My Computer window. An uninstall script is also included in the pack to remove these items.
Download Registry Scripts

Show/Hide Hidden Files & Folders on the fly in Windows XP, Vista & 7

hich shows you how to hide your private data from others without using any 3rd party software. Its easy to follow and absolutely free. Hidden_Files.png
The above guide requires you to disable "Folder Options" menu in Explorer. So if you want to enable "Show Hidden Files" option, you'll need to re-enable Folder Options using Registry Editor or gpedit.msc.
Wouldn't it  be easier if we can get a shortcut to enable/disable "Show Hidden Files" option easily and quickly? Double-click on a shortcut and it'll start showing Hidden files in Explorer and double-click on another shortcut to stop showing hidden files. Sounds interesting?
Here we are sharing 2 registry scripts. One enables "Show Hidden Files"option and the other disables it. You just need to run the script and that's it.
You can download the script using following link:
Download Link
You can store them in a safe place so that no one else can use them. Simply place them in root of a drive like D: and rename them to a short names like h.reg and u.reg and hide them. Now whenever you need to use them, type their name in the addressbar and press Enter. It'll run the scripts.
PS: You'll need to Refresh the Explorer window to see the changes. Press "F5" or right-click in empty area and select "Refresh" option.

7Stacks: Get Mac OS X Stacks in Windows XP, Vista and 7

7stacks is a free application for Windows XP, Vista and 7 users that lets you have "stacks" of icons in the Taskbar (in Windows 7) or Quick Launch Toolbar (in Windows Vista and XP). By using stacks, users can reduce icon clutter, and combine a group of related icons into a single icon. For instance, if you use application suites such as Microsoft Office, OpenOffice, or Adobe CS4, you can have all the suite's icons combined into one icon! You can also use it to browse and access documents within a folder very quickly. Just create a stack to the desired document's folder, and open that document in a couple of clicks.
7stacks is incredibly easy to use, and has a variety of looks and features, allowing anyone to customize the look of their stack however they'd like. And using Windows 7, its easy to create new stacks by right-clicking on any stack, and selecting "Create New Stack" in the JumpList. 7stacks will place an shortcut icon on your desktop to this new stack, which you can then pin to your Windows 7 taskbar, or Vista or XP QuickLaunch bar.
7Stacks.jpg
Features List:
  • In 7 and Vista, 7stacks uses Aero, making the stacks look like part of Windows itself.
  • Browse sub-folders within a stack, just like in OS X Snow Leopard.
  • 3 different styles of stacks: Normal, Grid, and Menu.
  • In Windows 7, create a new stack by right-clicking on any stack and selecting "Create New Stack" from the JumpList entry.
  • In Menu mode, 7stacks doesn't even need to be in a toolbar. You can use it right from your desktop, or any other folder.
  • Pin up to 10 different stacks on the Windows 7 taskbar.
You can download it using following link:
Download Lin

Download Seven Transformation Pack for Windows XP and Vista

"Seven Transformation Pack" is a customization pack for Windows XP and Vista users. It can transform your Windows XP and Vista into Windows 7 by installing Windows 7 theme, several icons, boot screen, login screen, sounds and a few eye candy software which provide additional functionality. STP is one of the best transformation packs for Windows users. Its reliable and easy to apply.
STP1.0 version was only available for Windows XP users but the new version also supports Windows Vista users. So now Vista users can also enjoy Windows 7 look.

There are many bug fixes and improvements in new version. You can download it using following link:
Download Seven Transformation Pack

Snow Leopard Startup Animation and Login Screen for Windows Vista

Bored with Windows Vista default startup animation, sound and Welcome screen? Then here is something interesting for all Windows Vista users. balderoine and fediafedia have modified Windows Vista system files which bring a new Welcome screen, startup animation, sound and spiny wheel for you.
You can take a look at these new stuffs in following animation:

This release contains 32-bit software only.
Includes:
  • Startup animation
  • New startup sound (it's awesome)
  • New login screen
  • New spinny wheel thing
Note: There is only one imageres.dll file because it works on both SP1 and SP2 and probably even SP0 considering it's version number. Authui, however, not. There are 2 authui files included. For SP1 and SP2
Installation:
If you don't have take ownership option in context menu, follow this guide. After that:
  • Take ownership of imageres.dll and authui.dll in C:\windows\system32.
  • Rename both files to something like imageres1.dll and authui1,dll
  • Copy the new files from this folder to system32 and Reboot.
These files were tested on 32-bit editions of vista SP1 and SP2.
Download Link
More Info

Microsoft Launched TechNet Widget for Blogs and Windows Sidebar

Microsoft has launched TechNet widget which can be put in blogs. The widget will provide the latest content from TechNet on your blogs. The Widget has integration built into Social networking sites Facebook, Twitter, Stumble Upon etc.
This widget pulls the latest RSS feeds from TechNet and has selections from Videos, Webcasts, TechNet Magazine, TechNet Flash and TechNet Podcasts.
Microsoft_TechNet_Widget.png
Once it is embedded in a site, it will allow the site/blog users to take it and embed it on their sites.
You can also put this widget in your Windows Vista or 7 Desktop Sidebar.
You can watch the widget in action at following link:
TechNet Widget Demo
If you want to put the widget in your blog or Windows Sidebar, simply follow instructions given at following link:
Get Microsoft TechNet Widget

IconPhile: A Freeware to Change System Icons Easily & Quickly

As you know Windows Vista and 7 contain revamped icons, many of which make the average XP user feel jealous. Rather than paying for a software, you can easily change your system icons with a few clicks of a button with "Icon Phile", a free, portable and easy-to-use program. IconPhile.png
To change the icon displayed for a System Drive, Folder, Control Panel, Programs and other hard-to-change things:
  • Simply browse through the drop-down menu at the top
  • Double click on an icon or right-click on it and select "Change Icons" option
  • Select the desired icon from the list
  • Click on Apply button and you’re done.
Also at the top there are different buttons for saving and opening IconPhile theme packages and customizing various icon-related system settings.
There’s also a browser which allows you to customize any folder or file type you want.
It works in almost all Windows versions including Windows XP, Vista and 7.
Download Link

[Update] How to Enable / Activate Aero Theme in Windows Vista Home Basic Edition?

Windows Vista Home Basic edition doesn't come with Aero interface, so you don't get the transparency and glass effects at all. Once we posted a small tutorial for enabling Aero theme in Home Basic edition which you can read here. It works but some people reported that it didn't work for them. Today we are going to share another method to enable Aero theme in Windows Vista Home Basic edition. Actually Basic edition can provide the Aero interface but its disabled by default. So if your system hardware meets the minimum requirements to run Aero theme, you can give following method a try. We would like to clear, we have not tested this method yet. So we request you to try the method and post your comments about it:
1. First you'll need "Ave's Vista Style Builder" program which you can get from following link:
Get Vista Style Builder
Its not a free program. You'll need to purchase it for $22.5 but its worth to buy.
2. Now open your theme's .msstyles file in this program. If you are using Windows default theme, open "%windir%\Resources\Themes\Aero\Aero.msstyles" file in this program. (Here %windir% means "Windows" directory present in the system drive where Windows Vista is installed.)
Image1.png
3. Now navigate to "Fonts, Colors & System Metrics -> Colors (Globals)" section.
4. In right-side pane, you'll see a property with the name "COLORIZATIONCOLOR:INT".
Image2.png
5. You'll need to change its value to 0 (Yup, Zero).
Image3.png
6. Now save the file and re-apply the theme and you'll get Aero theme enabled in your system.
Image4.png
All credit goes to "killermole23" @ DeviantART for finding this cool trick and thanks to "fediaFedia" for sharing it...

[Fix] ICO Files Not Showing their Icons in Windows Explorer

Recently a reader asked this problem. The .ICO files were not showing their icons in Explorer. Usually Windows Explorer shows separate icons for each .ICO file but sometimes it starts showing the default system icon for all .ICO files. It happens when the .ico file association is missing or damaged in Windows registry. This article will help you in fixing this problem and you'll get the actual icons for all .ICO files:
Repair_Icon_Files.png
Simply download following ZIP file:
Download Link
Extract it and run the .REG file. It'll ask for confirmation, accept it and restart your system. It'll fix the problem.

“The Search Bar” Gadget for Windows 7: Search From Your Windows Desktop

"The Search Bar" gadget is an excellent gadget for Windows 7 users which allows you to easily search from various providers right from your desktop. You can search from Amazon, AOL, Ask.com, Bing, Google, Wikipedia or Yahoo. If you want to switch search providers, simply click on the icon and select one from the list.
At the moment, this gadget is intended for Windows 7 and does not include a smaller "docked" mode for use with the Vista Sidebar. It is designed to float on your desktop.
You can download the gadget using following link:
Download "The Search Bar" Gadget for Windows 7

How to Disable “Switch User” Option in Windows Vista and 7?

"Switch User" feature was introduced in Windows XP which allows one user to switch to other user without ending the current session. Its a very useful feature and also available in Windows Vista and 7. Many system administrators might want to disable this feature to restrict end-users. If the users are using Windows XP, its very easy task. You can disable "Switch User" option using "User Accounts" applet in Control Panel.
But its not that easy under Windows Vista and 7 as there is no such option available anywhere in Control Panel. So how to disable "Switch User" option in Vista and 7?
Although its hard but not impossible. It can be done using Group Policy Editor as well as Registry Editor. So here we are sharing both methods which can be used to disable "Switch User" option in Windows Vista and 7:
Switch_User_Disabled_in_Win_Vista_7.png
A. Disable "Switch User" Option Using Group Policy Editor:
1. Type gpedit.msc in RUN or Startmenu Searchbox and press Enter. It'll open Group Policy Editor.
2. Now go to:
Local Computer Policy -> Administrative Templates -> System -> Logon
3. In right-side pane, double-click on "Hide entry points for Fast User Switching" option and set it to Enabled.
Disable_Switch_User_in_Win_Vista_7.png
4. That's it. Now "Switch User" option will be disabled from Welcome screen as well as from Shutdown menu.
B. Disable "Switch User" Option Using Registry Editor:
Since Group Policy Editor doesn't come with some specific Windows Vista and 7 editions, here is another method to disable "Switch User" option using Registry Editor:
1. Type regedit in RUN or Startmenu Searchbox and press Enter. It'll open Registry Editor.
2. Now go to:
HKEY_LOCAL_MACHINE\SOFTWARE\Microsoft\Windows\CurrentVersion\Policies\System
3. In right-side pane, create a new DWORD value HideFastUserSwitching and set its value to 1
Disable_Switch_User_2_in_Win_Vista_.png
4. That's it. Now "Switch User" option will be disabled from Welcome screen as well as from Shutdown menu.
PS: If you want a ready-made script to do the task automatically, download following ZIP file, extract it and run the extracted .REG file. It'll ask for confirmation, accept it:
Download Script

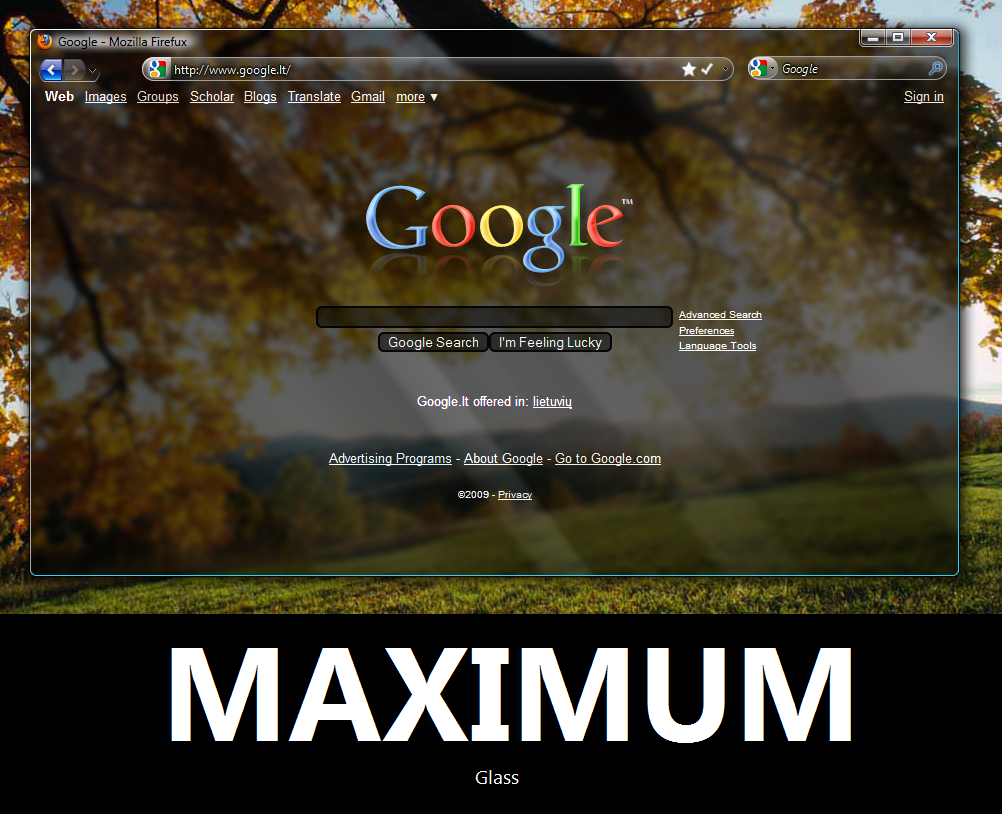
Get Maximum Glass in Mozilla Firefox 3.5 Under Windows Vista and 7

We all know Mozilla Firefox 3.7 and above versions will support Aero Glass under Windows Vista and 7 as announced earlier by Mozilla Wiki. Of course, you can get the glass in existing Firefox versions using "Glasser" or "All-Glass Firefox" add-ons. Today we are going to share another interesting stuff for Firefox users. Its a very simple "Stylish" code which can bring Aero Glass to Firefox.
Note that, it works only in Windows Vista and 7 and you'll need Mozilla Firefox 3.5 to enjoy it.
Following is a preview of what you are going to get after following this tutorial:

If you like it, follow these simple steps:
1. Install "Stylish" add-on in Mozilla Firefox.
Install Stylish
2. Now open following link and click on "Install with Stylish" button present at top-right corner of the page:
Glass every single part of Mozilla Firefox 3.5
You can also install following Stylish code to get glass in Google homepage as well as shown in above screenshot:
Google Glass
3. That's it. Now you'll have maximum glass in your favorite browser.

Get Windows 7 “Show Desktop” Taskbar Icon in Windows XP & Vista

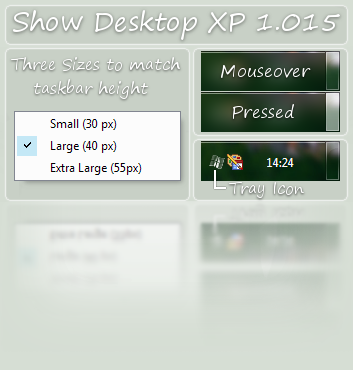
Windows 7 shows a small rectangle at the end of Taskbar which works like good old "Show Desktop" shortcut. When you click on it, it minimizes all running windows so that you can work on Desktop. Its new in Windows 7 and Windows XP and Vista users have to use 3rd party themes to get this rectangle but unfortunately the rectangle in such themes is a fake one and doesn't provide any functionality.
But no no need to use fake one when you can get a working one. "Cellular" @ DA has created a very small portable utility which sits in system tray and shows Windows 7 look-like "Show Desktop" rectangle at the end of Taskbar:

As you can see in the above screenshot, it looks almost same as Windows 7.
If you change Windows theme, you'll need to refresh the rectangle image. You can do that by right-clicking on its system tray icon (Windows flag) and selecting "Refresh Image" option.
Its very small utility and doesn't need to install. Simply run EXE file and enjoy it.
You can download it using following link:
Download Link

How to Fix “Copy Items” & “Move Items” Dialog Box Cut-Off Problem?

Today we are sharing solution of a very common and annoying problem in Windows. Many times when you select "Copy to folder" or "Move to folder" command from Edit menu or by right-click on a file/folder, the "Copy Items" or "Move Items" dialog box is not displayed properly on the screen. It opens partially off the screen and you need to drag the dialog box up to show it properly. Dialog_Box_Partially_Off_Screen.png
As you can see in above screenshot, the dialog box is not showing properly.
Actually it happens when you resize the dialog box and its registry setting gets corrupted. The problem can be fixed easily using a simple registry trick as mentioned below:
1. Type regedit in RUN or Startmenu Searchbox and press Enter. It'll open Registry Editor.
2. Now go to following key:
HKEY_CURRENT_USER\Software\Microsoft\Windows\CurrentVersion\Explorer
3. In right-side pane, you'll see following 2 DWORD values:
Browse For Folder Height
Browse For Folder Width
Deleting_Browse_for_folder_height_a.png
4. Delete both DWORD values and exit Registry Editor.
5. That's it. Now "Copy Items" and "Move Items" dialog box will be shown properly on screen in their default size.
Copy_Items_Dialog_Box.png
PS: If you want a ready-made registry script to fix the problem automatically, download following ZIP file, extract it and run the .REG file. It'll ask for confirmation, accept it:
Download Link

How to Remove Program Icons from Windows Titlebar and Taskbar Buttons?

Today we are going to share a very small utility which can hide program icon from its window and Taskbar button. Why to use it? Actually lots of people like minimal look and as you can see Microsoft removed icons from Explorer toolbar to make it minimal, the same thing applies for Taskbar buttons. No_Titlebar_and_Taskbar_Button_Icon.png
As you can see in above screenshot, the program icon is not visible in window titlebar as well as in Taskbar button.
This utility works in Windows XP, Vista and 7. But in Vista and 7, it only hides titlebar icon, Taskbar button icon remains visible.
You can download the utility from following link:
Download Link
Simply run the EXE file and enjoy the minimal look.
To get the icons back, open Task Manager (by right-clicking on Taskbar and select "Task Manager" or by pressing "Ctrl+Shift+Esc" keys together) and End Task of "TBarIconBlanker.exe".
You can add its shortcut to "Startup" folder in All Programs menu to start it automatically with Windows.
This utility has been developed by "skwire" @ Donationcoder. Thanks to St-Ang3R @ DA for sharing it...

Microsoft Released Updates for Windows XP, Server 2003 and Vista to Restrict AutoRun Entries in AutoPlay Dialog to Only CD and DVD Drives Just Like Windows 7

Windows 7 comes with a new enhancement in "AutoRun" feature which restricts the AutoRun entry to only CD and DVD drives. It helps in keeping your system safe from malware, etc. Now a good news for Windows XP, Server 2003 and Vista users. Microsoft has released an update "KB971029" for XP, Server 2003 and Vista which brings the same feature to these older Windows versions.
AutoRun_Windows_7.png
You can download the updates using following links:
Download Update for XP
Download Update for Server 2003
Download Update for Server 2003 (64-bit)
Download Update for Vista
Download Update for Vista (64-bit)

Permanently Set Process Priority in Windows Task Manager Using Prio

Do you know "Windows" shares the processor time between all running processes based upon their priority? If a process has higher priority, it gets more processor time compared to a process having lower priority. But we can change process priority using "Windows Task Manager". Open Task Manager by right-clicking on Taskbar and select "Task Manager" or by pressing "Ctrl+Shift+Esc" keys together.
Once you open Task Manager, go to "Processes" tab, right-click on any running process and change the priority using "Set Priority" menu. You'll notice some system processes are set to "High" priority and almost all 3rd party processes are set to "Normal" by default.
Although you can change the priority according to your requirement, but the priority is not set permanently. Once you restart your system, Windows forgets your custom priority and assigns the process default priority.
So how to set a process priority permanent? Don't worry, here is the solution.
"Prio" is a free for personal use utility which solves the problem. It adds a new option "Save Priority" in "Set Priority" menu:
Save_Process_Priority.png
So now you can save the priority permanently.
It works in Windows XP, Vista and 7. It also adds a few extra features as mentioned below:
  • Adds a new tab "Services" which shows the installed processes along with their status
  • Adds another new tab "TCP/IP" which shows all established TCP/IP connections and all open ports
  • Adds a new option "Silent Elevation" which allows you to execute a software with administrative privileges
You can download it using following link:
Download Link
Download Link (64-bit)

How to Create Removable Media Shortcuts Automatically on Windows Desktop?

Whenever you insert your USB drive into your computer, Windows shows the Autorun dialog box and asks you "What do you want Windows to do?". But the Autorun dialog box is shown only once and if you close it, you'll need to manually open the drive from My Computer. Consider a situation when you disabled "Autorun" feature to prevent virus infection. Again you'll need to manually open the drive from My Computer.
Wouldn't it be great and easier if you can add a shortcut to your USB drive on Desktop so that you can easily and quickly open the drive?
Today we are sharing 2 FREE utilities which can add shortcuts to USB drives, CD/DVD drives, hard drives, network drives and RAM disk drives.
1. Desktop Media:
Desktop Media is small application for Windows (any flavor) that automatically adds drive icons to your desktop. It will detect USB drives, fixed drives (ie. your hard drives), CD/DVD drives, network drives, and even RAM disk drives. For removable media (such as USB drives and CD/DVD drives), it will only add the drive to your desktop if it is present. So if you have a CD/DVD drive, but no disc is present, you won't see the icon on your desktop.
Features List:
  • Automatically detects new (or existing) media and adds the icons to your desktop.
  • Has the ability to create soft links (shortcuts) or hard links (symbolic links).
  • Supports removable, fixed, network, CD/DVD, and RAM disk drives.
  • Ability to ignore user-specified drive letters.
  • Has the option to save the positions of the icons.
You can access it settings using its system tray icon.
You can select which drives shortcuts you want to show on Desktop. You can even select drives to ignore so that Desktop Media doesn't create their shortcuts on Desktop.
Download Link
2. Desk Drive:
Desk Drive is another similar software which does the same job. It adds a desktop icon pointing to the drive automatically. Remove the media and the shortcut goes away.
You can access its settings using its system tray icon as usual.
Similar to Desktop Media, you can select which drives shortcuts you want to show and which you want to hide.
Download Link
Download Link (64-bit)

Download FREE Image Resizer Powertoy Clone for Windows XP, Vista and 7

"Image Resizer Powertoy Clone" is a free tool to resize one or more images at a time. It has been created after inspiring from Microsoft's official Image Resizer Powertoy for Windows XP. Since there is no official Image Resizer powertoy for Windows Vista, 7 and all 64-bit Windows OS, "BriceLambson" @ CodePlex decided to create one.
According to Brice, this clone was created to extend support to non-XP and 64-bit versions of Windows (including Windows 7 & Vista).
Using this tool is very simple. Simply right-click on the image(s) which you want to resize and select "Resize Pictures" option.
Image_Resizer_Powertoy_Clone_2.png
It'll ask you to select the new size from the pre-defined size list. You can also define a custom size.
Image_Resizer_Powertoy_Clone.png
Once decided, click on OK button and your image(s) will be resized.
You can download it using following link:
Download Image Resizer Powertoy Clone

How to Clear / Remove Unwanted Items from “Hide Inactive Icons” Customization Box History in Notification Area (System Tray) of Windows XP, Vista and 7

Actually that's true. Windows doesn't remove uninstalled program icon from "Hide Inactive Icons" list automatically and sometimes it becomes annoying. If you doesn't know about "Hide Inactive Icons" feature, lets provide some details about it.
Have you ever noticed the small arrow present near System Tray icons in Windows Taskbar? Following are 3 screenshots of Windows XP, Vista and 7 Taskbars:
Windows XP:
Hidden_Inactive_Icons_Win_XP.png
Windows Vista:
Hidden_Inactive_Icons_Win_Vista.png
Windows 7:
Hidden_Inactive_Icons_Win_7.png
This arrow is used to hide inactive icons and once you click on the arrow, it shows all icons for a few seconds.
You can enable/disable this feature using Taskbar Properties. You can also customize which icons should be always visible or hidden:
Windows XP "Hide Inactive Icons" Customization Box:
Notification_Area_Past_Icons_Win_XP.png
Windows Vista "Hide Inactive Icons" Customization Box:
Notification_Area_Past_Icons_Win_Vi.png
Windows 7 "Hide Inactive Icons" Customization Box:
Notification_Area_Past_Icons_Win7.png
As you can see in above 3 screenshots, Windows shows all system tray icons in the list and you can customize them according to your requirements.
In the last screenshot, "oldmcdonald.exe" program has been removed from the system but its icon is still visible in the list.
So today in this tutorial, we are going to share a small registry trick to CLEAR "Hide Inactive Icons" history list which will help in removing those unwanted past items from the customization box.
So here we go:
1. Type regedit in RUN dialog box and press Enter. It'll open Registry Editor.
2. Now goto following key:
For Windows XP:
HKEY_CURRENT_USER\Software\Microsoft\Windows\CurrentVersion\Explorer\TrayNotify
For Windows Vista and 7:
HKEY_CURRENT_USER\Software\Classes\Local Settings\Software\Microsoft\Windows\CurrentVersion\TrayNotify
3. In right-side pane, you'll see following 2 Binary values:
  • IconStreams
  • PastIconsStream
Windows XP:
Remove_Notification_Area_Icons_Hist.png
Windows Vista and 7:
Remove_Notification_Area_Icons_H-1.png
4. Delete both of them and log off or restart your system. It'll clear the "Hide Inactive Icons" history and all those unwanted icons from uninstalled programs will be removed from the list.
PS: If you want ready-made registry scripts to do the task automatically, download following ZIP file, extract it and run the extracted REG file. it'll ask for confirmation, accept it:
Download Registry Script

#
### ###