Friends

This is default featured post 1 title

Go to Blogger edit html and find these sentences.Now replace these sentences with your own descriptions.This theme is Bloggerized by Lasantha Bandara - Premiumbloggertemplates.com.

This is default featured post 2 title

Go to Blogger edit html and find these sentences.Now replace these sentences with your own descriptions.This theme is Bloggerized by Lasantha Bandara - Premiumbloggertemplates.com.

This is default featured post 3 title

Go to Blogger edit html and find these sentences.Now replace these sentences with your own descriptions.This theme is Bloggerized by Lasantha Bandara - Premiumbloggertemplates.com.

This is default featured post 4 title

Go to Blogger edit html and find these sentences.Now replace these sentences with your own descriptions.This theme is Bloggerized by Lasantha Bandara - Premiumbloggertemplates.com.

This is default featured post 5 title

Go to Blogger edit html and find these sentences.Now replace these sentences with your own descriptions.This theme is Bloggerized by Lasantha Bandara - Premiumbloggertemplates.com.

Saturday, August 4, 2012

Simple Trick to Replace Default Built-in “Flower” Profile Picture for All User Accounts in Windows Vista, 7 and 8

UPDATE: This method also works in Windows Vista and Windows 8. Thanks to our readers "MasterDevil" and "Swapnil"...
I was looking into various system files using Resource Hacker to find a BITMAP file. Although I couldn't find that particular BITMAP file but found something interesting which I would like to share in this topic.
When you install Windows 7 in a new computer system or create a new user account in Windows 7, by default Windows assigns built-in "Flower" image as profile picture for the new user account.
You can change this profile picture using User Accounts applet in Control Panel. But if you have many user accounts in your computer and want to set your desired image or company logo as user profile picture for all accounts in a single step, this tutorial will definitely help you.
Default_Builtin_User_Profile_Picture_Windows_7.png
Today we are going to share a very simple and secret trick which will allow you to replace default built-in flower profile picture with your desired image so that if you create a new user account in Windows, the new account will have your desired image as its profile picture instead of default flower picture.
We are not going to use any registry trick or Resource Hacker trick in this tutorial. We'll just replace an existing BITMAP file with our desired BITMAP file.
So without wasting time, lets start the tutorial:
1. The default flower profile picture is actually a BITMAP file which is stored in following folder:
%ProgramData%\Microsoft\User Account Pictures\
PS: Copy the above string and paste in RUN or start menu search box and press Enter. It'll directly open the folder in Explorer window.
The BITMAP file name is user.bmp and its a 128x128, 24-bit bitmap file.
Default_User_Profile_Bitmap_Windows_7.png
2. We just need to create a new BMP file in an image editing software like MS Paint, Adobe Photoshop, GIMP, etc but we'll keep its size 128x128 pixels similar to default BITMAP file.
3. Once you finish creating the desired BITMAP file, save it at any location with user.bmp file name.
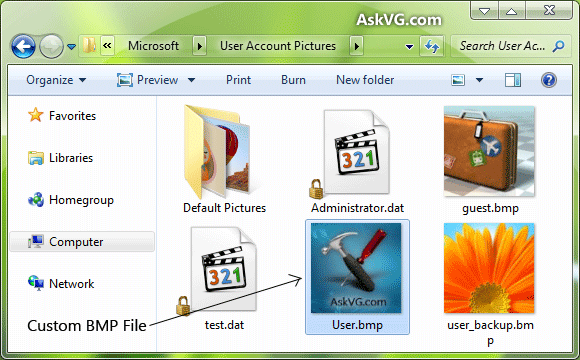
4. Now you'll need to replace existing user.bmp file present in "User Account Pictures" folder mentioned in STEP 1 with your newly created BMP file.
Before replacing default user.bmp file, you should create a backup of the file so that you can restore it later if you want. To take a backup, you can simply rename it to any other name like user_backup.bmp.
Now copy new user.bmp file to "User Account Pictures" folder.
Custom_User_Profile_Bitmap_Windows_7.png
5. That's it. Since you have replaced default BITMAP file with your new one, now all new and existing user accounts which have their profile picture set to default flower picture will automatically start showing new picture which you created in STEP 2.
Customized_User_Profile_Picture_Windows_7.png
If your existing user account doesn't show new picture, restart or log off and it'll start using new BITMAP as profile picture.
BONUS TIP: All other profile pictures which are shown when you click on "Change your picture" link in User Accounts applet of Control Panel, are stored in "%ProgramData%\Microsoft\User Account Pictures\Default Pictures" folder. If you want to customize all of them, you can follow above mentioned steps for each BITMAP file.
BONUS TIP 2: You can also customize profile picture for "Guest" account by replacing guest.bmp file present in same folder mentioned in STEP 1.
PS: I don't have Windows XP and Vista installed, so can't check this trick in both OS. If you have Windows XP or Vista, please check this method and let me know if it also works in XP and Vista or not.

OEM Configurator 2.0: Free Portable Utility to Add Customized Strings (OEM Information) and Logo in Windows XP, Vista, 7 and 8 System Properties


NOTE: You can check other interesting and useful free software created by our readers here.
UPDATE: New version 2.0 released which comes with support for Windows 8 Developer Preview. Now Windows XP users can also enjoy this tool. The tool now also supports 64-bit Windows editions in this new version.
Long time back we posted tutorials for customizing System Properties window in Windows XP, Vista and 7:
The above tutorials inspired our reader "Hackerpunk1" and he created an awesome portable utility "OEM Configurator" which allows you to customize Windows XP, Vista, 7 and Windows 8 System Properties window look without any manual registry editing. You just need to enter desired text and select desired logo file and it'll do the rest automatically.
OEM_Configurator
It also allows you to customize and change various items in System Properties window like Owner name, processor name, product ID, etc. Many times when we share our System Properties screenshot with others, we hide product ID from others. Now no need to do this. You can set any desired text string or numbers as Product ID using this tool. Don't worry! It'll now change the actual product ID in your system. It'll just replace the text which is shown in System Properties window.
OEM_Configurator_Extra_Options
Following is a result of the output which you can get with the help of this awesome little tool. You can see extra entries like Manufacturer, Model, Phone number, Support hours, Website and logo in right-side in System Properties window:
Add_OEM_Info_Windows_Vista_7_System_Properties
You can download it using following link:
Download Link

How to Extract / Copy System Files from Windows XP, Vista, 7, 8, Server 2003 and Server 2008 Setup?

Today we are going to address a very common Windows problem. Many times we modify or replace system files in Windows for customization purposes. For example, to customize or change login screen, boot screen, Start ORB, Windows theme, etc. Most common system files which are replaced by Windows users are Explorer.exe, NTOSkrnl.exe, LogonUI.exe, Shell32.dll, MSgina.dll, authui.dll, uxtheme.dll, etc. But sometimes we don't like the end result or we face problems after replacing or modifying those system files. In such case, we can perform a System Restore to restore our Windows to a previous working state or we can restore the backup of the system file which we created before replacing or modifying the original file.
But what to do if we neither created a System restore point nor took a backup of the file? In such condition, we have no other option left except repairing or reinstalling Windows or we can copy the same file from another system and paste it in our system.
Don't worry! Today we are going to share a small and easy to use trick which can help you in extracting any system file from Windows setup disc or ISO image file so that you can easily restore the original system file in Windows.
This trick will also help customization lovers who always want to grab system files from a new Windows OS to extract new resources from it without installing the OS in their system.
The one and only tool which we use in this tutorial is 7-Zip which is an awesome and absolutely free file archive software. So first download it using following link:
Download 7-Zip
For your convenience, we have divided the tutorial in 2 parts:
  • Extracting system files from Windows XP and Windows Server 2003 setup
  • Extracting system files from Windows Vista, 7, 8, Windows Server 2003 and 2008 setup
So without wasting time, lets start the tutorial:
Extracting System Files from Windows XP and Server 2003 Setup
Extracting a system file from Windows XP and Windows Server 2003 is very simple and easy. All system files in XP and Server 2003 setup are stored in "I386" folder present in the setup and all files are stored in compressed format. For example, Explorer.exe file will be present as Explorer.ex_, Shell32.dll file will be present as Shell32.dl_ and so on.
You just need to right-click on the file which you want to copy or extract, go to 7-Zip context menu and click on "Extract Here" option.
Extracting_Windows_XP_System_File_Setup_ISO_7_Zip.png
That's it. It'll immediately extract the original system file which you can use anywhere you want.
Extracting System Files from Windows Vista, Server 2008, 7 or Windows 8 Setup
Extracting a system file from Windows Vista, Windows 7, Windows 8, Server 2003 and Server 2008 setup is a bit tricky because the setup ISO of these Windows OS uses a new file format .WIM to store all system files in it. Normally this file format is not recognized by many popular file archiving utilities but 7-Zip can recognize it without any problem.
Many people mount Windows setup ISO to extract the files but if you use 7-Zip, you'll not need to mount it. You can directly extract any desired system file using following simple steps:
1. If you have Windows setup disc, insert it in the drive or if you already have Windows setup copied in your hard disk, go to that folder.
2. Now go to "Sources" folder and look for a file "install.wim". That's the file which contains all system files. Once you find the file, right-click on it and select "7-Zip -> Open archive" option. It'll open the file in 7-Zip.
Now jump to Step 3.
NOTE: For people who have copied Windows setup ISO directly in their hard disk, right-click on it and select "7-Zip -> Open archive" option.
Opening_Windows_Setup_ISO_File_7_Zip.png
Now go to "Sources" folder and look for a file "install.wim". Once you find the file, right-click on it and select "Open" option.
Opening_Install_WIM_File_7_Zip.png
3. Once you open "install.wim" in 7-Zip, you'll see a few folders having numbers in their names like 1, 2, 3, 4 and 5 as shown in following screenshot:
Viewing_Install_WIM_File_Content_7_Zip.png
Actually each number is associated with a different edition of Windows. These numbered folder may vary for different setup ISO.
Now you just need to find the correct folder which corresponds to the correct Windows edition installed in your system. To find out the correct edition, you can extract [1].xml file present in the archive and open it. This file contains information about all these numbered folders.
Look for a line <IMAGE INDEX="1"> in the [1].xml file. It should be 4th line in the file. After a few lines under it, you'll see <EDITIONID>, <NAME>, <DESCRIPTION>, <DISPLAYNAME> and <DISPLAYDESCRIPTION> tags. These tags will give you an idea which number corresponds to which edition of Windows.
Edition_Info_XML_Windows_Setup_ISO.png
The number of occurrence of <IMAGE INDEX="#"> tag in xml file will be equal to number of folders present in "install.wim" file.
If the first occurrence of <IMAGE INDEX="#"> tag doesn't match with your installed edition of Windows, go to next occurrence until you find the correct edition and its index.
Once you find out the correct edition and its index number, open that numbered folder within 7-Zip and you'll see all files and folders which you normally see in C: drive after installing Windows as shown in following screenshot:
Viewing_Windows_Setup_ISO_Content_7_Zip.png
That's it. Now you can browser through folders and copy/extract the desired file.
Feel free to post your feedback about this tutorial in your comment. Do you already use 7-Zip to extract system files or was it new for you? If you know any other interesting method, please share it in your comment...

[AIO] Ultimate Tutorial to Customize Desktop Context Menu in Windows Vista, 7 and 8

UPDATE: This tutorial will also work in Windows 8.
As you all know AskVG.com is always the first website which shares interesting tweaks and customization related stuffs. We have posted so many tutorials in past which help you in customizing Desktop context menu in Windows Vista and 7. Many of them allow you to add new items to Desktop context menu and some of them allow you to remove existing items which you find unnecessary.
We are proud to say that we were the first to post about adding your favorite program shortcut in Desktop context menu, adding cascading menus in Desktop context menu, adding restart Explorer option and many other exclusive tutorials.
Today in this article, we are going to list all such tutorials in a single place for your convenience. It'll help you in reading all these tutorials quickly and easily and will also make sure that you have not missed any of them.
So without wasting any time lets make an ultimate list of all these tutorials:
Add Program Shortcuts in Desktop Context Menu:
Following tutorials allow you to add your desired program's shortcut in Desktop context menu. You can add your favorite browser shortcut, media player shortcut or any other shortcut to access it quickly and easily:
New_Program_Shortcut2.png
Add Favorite Website Link in Desktop Context Menu:
This tutorial helps you in adding your favorite website links in Desktop context menu. You can add AskVG.com or any other website link to open it directly in your favorite web browser:
AskVG_in_Desktop_Context_Menu.jpg
Add AskVG.com or Other Website Links in Desktop Context Menu in Windows Vista, Server 2008 and 7
Add Your Name in Desktop Context Menu:
Customization lovers can also add their name or any other desired text in Desktop context menu for fun:
Name_in_Win_7_Desktop_Context_Menu.png
How to Add Your Name in Windows 7 Desktop Context Menu
Add Cascading Menus in Desktop Context Menu:
You can also add groups of shortcuts in Desktop context menu. For example, you can add a folder "Browsers" which will contain all web browsers shortcuts installed in your system. Having a group of shortcuts saves space and doesn't make your context menu look weird.
Windows_7_System_Tools_Menu.png
Customizing "Screen Resolution", "Gadgets" and "Personalize" Options in Desktop Context Menu:
This tutorial allows you to customize the default 3 options "Screen Resolution", "Gadgets" and "Personalize" present in Windows 7 Desktop context menu. You can change their text, icons and positions in context menu. You can even remove them according to your requirements:
Display_at_top_personalize_at_botto.png Change_icons_of_options.png Change_Names_of_Desktop_context_men.png
Customizing “Screen Resolution”, “Gadgets” and “Personalize” Options in Windows 7 Desktop Context Menu
Remove "Next Desktop Background"Option from Desktop Context Menu:
When you use Desktop SlideShow feature in Windows 7, it automatically adds a new option "Next Desktop Background" in Desktop context menu which makes the whole context menu a bit wide. If you don't like this new option, you can remove it using following tutorial:
Next_Desktop_Background.png
How to Remove “Next Desktop Background” Option from Windows 7 Desktop Context Menu?
Add "Show/Hide Hidden Files" Option in Desktop Context Menu:
This tutorial allows you to add "Show/Hide Hidden Files" option in Desktop context menu so that you can enable or disable "Show Hidden Files" option in Folder Options quickly and easily by just right-click on Desktop and select the option:
http://fc01.deviantart.net/fs70/i/2010/359/d/7/show___hide_hidden_files_mod_by_vishal_gupta-d35n4n8.png
Add “Show / Hide Hidden Files” Option in Desktop and Explorer Context Menu in Windows XP, Vista and 7
Add "Show/Hide File Extensions" Option in Desktop Context Menu:
This tutorial allows you to add "Show/Hide File Extensions" option in Desktop context menu so that you can enable or disable "Show Known File Extensions" option in Folder Options quickly and easily by just right-click on Desktop and select the option:

Add “Show / Hide File Extensions” Option in Desktop and Explorer Context Menu in Windows XP, Vista, 7
Add "Show/Hide Checkbox" Option in Desktop Context Menu:
This tutorial allows you to add "Show/Hide Checkbox" option in Desktop context menu so that you can enable or disable "Show Checkbox to Select Items" option in Folder Options quickly and easily by just right-click on Desktop and select the option:

Add “Show / Hide Checkbox” Option in Desktop and Explorer Context Menu in Windows Vista and 7
Add "Kill Not Responding Tasks"Option in Desktop Context Menu:
It'll add a new option "Kill Not Responding Tasks" in Desktop context menu which allows you to immediately kill or end tasks which are not responding:

How to Add “Kill Not Responding Tasks” in Desktop Context Menu Under Windows Vista and 7
Add "Restart Explorer" Option in Desktop Context Menu:
Many times we need to restart Explorer to complete a software installation or some other reasons. This tutorial helps you in adding a new option "Restart Explorer" which restarts Explorer immediately as soon as you select the option:

Add “Restart Explorer” Option in Desktop and Explorer Context Menu under Windows Vista and 7
Add "Restart uxsms" Option in Desktop Context Menu:
Many times we need to restart uxsms service to fix Windows Aero related problems. This tutorials adds a new option "Restart uxsms" in Desktop context menu which restarts uxsms service automatically:

Add “Restart uxsms” Option in Desktop and Explorer Context Menu under Windows Vista and 7
Add "Network Connections" Option in Desktop Context Menu:
This tutorial helps you in adding "Network Connections" shortcut in Desktop context menu:
Network_Connections_Desktop_Context.png
How to Add “Network Connections” Shortcut in Desktop Context Menu Under Windows Vista and 7
Add "God Mode"Option in Desktop Context Menu:
"God Mode" is a secret Windows component which shows all Control Panel items in a single place. This tutorial adds a shortcut to God Mode in Desktop context menu:
God_Mode_in_Bottom_Desktop_Context_.png
How to Add Windows 7 “God Mode” Shortcut in Desktop Context Menu?
Add Change Sound, Task manager and Other Shortcuts in Desktop Context Menu:
This tutorial helps you in adding many useful system shortcuts in Desktop context menu:
System_Properties-1.png
Add “Change Sound”, “Change Cursor” and Other Shortcuts in Windows Vista and 7 Desktop Context Menu
Add Change Wallpaper, Change Theme and Other Shortcuts in Desktop Context Menu:
This tutorial adds various useful shortcuts related to Desktop customization in Desktop context menu:
Change_Wallpaper.png
Add “Change Wallpaper”, “Change Theme” and Other Shortcuts in Windows Vista, 7 Desktop Context Menu
Add "Aero On / Off"Shortcut in Desktop Context Menu:
This tutorial allows you to add a shortcut to quickly turn Windows Aero on or off in Desktop context menu:

Add Aero ON / OFF Shortcuts in Desktop and My Computer Context Menu Under Windows Vista and 7
Remove Display Driver Entry from Desktop Context Menu:
When we install display driver like nVidia, Intel, etc, it adds a new entry for it in Desktop context menu. This tutorial helps you in removing that extra entry from Desktop context menu:
nVidia_Intel_Desktop_Context_Menu_E.png
How to Remove nVidia and Other Display Driver Entries from Desktop Context Menu in Windows XP, Vista, 7
Customize "New"Item in Desktop Context Menu:
Following tutorials help you in customizing "New" item present in Desktop context menu:
Vista_New_Context_Menu_without_Shor.jpg
Free Software to Add Program Shortcuts in Desktop Context Menu:
Also check following 2 free utilities created by AskVG readers which allow you to add your favorite program shortcuts in Desktop context menu automatically:
That's all for now. We'll keep updating the list whenever we post a new tutorial to customize Desktop context menu. So stay tuned and keep visiting AskVG...

[AIO] Ultimate Tutorial to Customize My Computer Context Menu in Windows XP, Vista, 7 and 8


UPDATE: This tutorial will also work in Windows 8.
Context menu is basically the menu which appears when you right-click somewhere e.g. Desktop, shortcuts, etc. Almost all Windows users use My Computer context menu to access "System Properties", "Computer Manager" and other tools.
We have posted many tutorials in past which allow you to add many interesting and useful shortcuts to My Computer context menu like Device Manager, Services, Network Connections, God Mode, Task Manager and many more.
Recently we posted a long article which is actually a collection of all Desktop context menu related tutorials posted here at AskVG:
[AIO] Ultimate Tutorial to Customize Desktop Context Menu in Windows Vista and 7
Using the same idea, today in this article we are going to put our best My Computer context menu tutorials together for your convenience. It'll help you in reading all these tutorials quickly and easily and will also make sure that you have not missed any of them.
Most of these tutorials work in almost all Windows versions including XP, Vista, 7 and Server editions but some are exclusive for Windows 7 only.
So without wasting any time lets make an ultimate list of all these tutorials:
Add Control Panel, Task Manager and Other Useful Shortcuts in My Computer Context Menu:
Following articles will help you in adding your desired program shortcuts and various useful system tools shortcuts like Add/Remove Programs, Disk Cleanup, Control Panel, Device Manager, Event Viewer, Computer Manager, MSConfig, Registry Editor, Services Manager, Task Manager and Windows Update with icons in My Computer context menu:
My_Computer_Context_Menu_Shortcuts_.png
Add Cascading Menus in My Computer Context Menu:
This tutorial helps you in adding group of shortcuts in My Computer context menu. For example, you can add a folder "System Tools" which will contain all system tools shortcuts like Folder Options, Power Options, Administrative Tools, etc installed in your system. Having a group of shortcuts saves space and doesn't make your context menu look weird.

Add Windows XP Style "Classic System Properties" Shortcut in My Computer Context Menu:
If you use Windows Vista or 7, you might miss the classic System Properties window which used to show in Windows XP. Following tutorial helps you in adding the same classic System Properties shortcut in My Computer context menu under Windows Vista and 7.
Classic_System_Properties.jpg
Add Windows XP Style Classic System Properties Shortcut in My Computer Context Menu
Add "Network Connections" Shortcut in My Computer Context Menu:
This tutorial helps you in adding a shortcut to "Network Connections" window in My Computer context menu so that you can access it quickly and easily:

How to Add “Network Connections” Shortcut in My Computer Context Menu?
Add Windows 7 "God Mode" Shortcut in My Computer Context Menu:
"God Mode" in Windows 7 allows quick access to all Control Panel options in a single place. This tutorial helps you in adding a shortcut to "God Mode" in My Computer context menu so that you can quickly and easily access it by right-clicking on My Computer icon and selecting "God Mode" option.

How to Add Windows 7 “God Mode” Shortcut in My Computer Context Menu?
Add Aero ON / OFF Shortcuts in My Computer Context Menu:
If you want to turn Aero on or off in Windows Vista and 7, you need to do it using System Properties or Desktop Properties. But there are 2 simple commands which quickly enable / disable Aero.
Following tutorial helps you in adding shortcuts to these 2 commands in My Computer context menu so that you can turn Aero on / off quickly and easily.

How to Add Aero ON / OFF Shortcuts in My Computer Context Menu Under Windows Vista and 7
 Add Useful Shortcuts in My Computer Main Window:
Following tutorials will help you in adding various useful shortcuts like Recycle Bin, Network Connections, etc directly in My Computer window:
Add_Shortcuts_Computer_Network_Locations.png
Other Useful Explorer Context Menu Tutorials:
Following are a few other tutorials which help you in adding various useful shortcuts in Explorer context menu:

[Guide] How to Restore “TrustedInstaller” as Default Owner of a File, Folder or Registry Key in Windows?

We all customization lovers know that we need to take ownership of a system file before replacing or modifying the file in Windows. Almost all Windows customization stuff require modification of system files for example, you need to edit Explorer.exe file to customize Start ORB in Windows 7, you need to edit authui.dll file to change login screen, etc. By default, a built-in system account "TrustedInstaller" has ownership and full control of all system files in Windows Vista, Windows 7 and Windows 8, so you need to take ownership and assign full permission to yourself before modifying or replacing the system file.
Taking ownership of a file or folder is very easy. We have provided a ready-made registry script which automatically adds a new option "Take Ownership" in file and folder context menu (right-click menu). So you just need to right-click on a file or folder and select "Take Ownership" option and it automatically makes you the owner of that file/folder and assigns you full permission on that file/folder.
How to Add “Take Ownership” Option to File or Folder Context Menu in Windows
We have also posted a detailed and easy to understand guide which teaches you how to take ownership of a file or folder manually in Windows:
[Guide] How to Take Ownership (Permission) of a File or Folder Manually in Windows?
Now the question comes! Once you have taken ownership of a file and now you want to restore "TrustedInstaller" as default owner of that file, how will you do that? How will you change the owner of a file back to "TrustedInstaller"?
We never realized that someone might need to restore ownership of a file to "TrustedInstaller" until we received following comment from an AskVG reader "KS":
How do I give permissions back to TrustedInstaller, when I changed it, TrustedInstaller wasn't in the list of possible owners anymore??
That was really an interesting point. Once you take ownership of a file or folder in Windows, if you go back to its Properties and try to change the owner back to "TrustedInstaller", you'll be surprised to see that "TrustedInstaller" is no longer present in the users list.
So how to bring back the built-in system user "TrustedInstaller" and set it as default owner of a file or folder? Don't worry! Here is the solution.
Today in this tutorial, we'll tell you how to restore "TrustedInstaller" as default owner of a file or folder in Windows if you changed its owner to yourself?
So without wasting time, lets start the tutorial:
NOTE: The same method will apply to restore "TrustedInstaller" as owner of registry keys in Registry Editor.
1. Go to the folder which contains the file or folder for which you want to restore ownership to "TrustedInstaller". Right-click on the file or folder and select Properties.
2. It'll open its Properties window. Now go to "Security" tab and click on Advanced button.
File_Permissions_Details.png
3. It'll open a new window. Now go to "Owner" tab and you'll see that the owner would be set to your username and "TrustedInstaller" would not be present in the list as we mentioned above.
Don't worry. We'll add it manually. Click on "Edit" button:
Editing_Owner_File_Folder.png
4. It'll open another window. Click on "Other users or groups" button.
Changing_Owner_File_Folder.png
5. Now type NT SERVICE\TrustedInstaller in "Enter the object name to select" text box and click on OK button as shown in following screenshot:
Restoring_TruestedInstaller_as_Owner_File_Folder.png
6. It'll immediately add "TrustedInstaller" to the users list. Click on Apply button.
Setting_TruestedInstaller_as_Owner_File_Folder.png
7. Windows will show a message box, click on OK button to close it. Again click on OK button in all opened windows and you have successfully restored "TrustedInstaller" as default owner of the file or folder.
You can check and confirm the owner by opening the file or folder Properties and you'll see that "TrustedInstaller" has become the owner of that file or folder again.

Will Windows 8 be a Good OS for Desktop PCs?

We all know that Microsoft's upcoming OS "Windows 8" is under development. Microsoft has released a Developer Preview build of Windows 8 to public in past and very soon Microsoft is going to release a Beta (Consumer Preview) build of Windows 8 to public on Feb 29, 2012. Everyone will be able to download and use it absolutely free. Windows 8 comes with several new features and enhancements like new Start Screen which has completely replaced traditional Start Menu, Ribbon UI in Windows Explorer, redesigned and enhanced file copy/move dialog box, enhanced Task Manager, Refresh/Reset PC functionality and much more. You can learn more about all new Windows 8 features in our exclusive Windows 8 section.
New_Start_Screen_Windows_8.png
Although there are many improvements and new additions in this new Windows OS but the question comes, will Windows 8 be a good OS for Desktop and laptops? This question came in my mind because it seems Microsoft is mainly targeting touch-devices like Tablets for Windows 8 development. Why? Please read below:
Windows 8 Start Screen
Lets talk about Start Screen first. Start Screen shows big live thumbnails (called Tiles) of installed programs in Windows 8. Its extremely cool to have such kind of screen in touch devices as the user needs to use his finger to select an item and it would be really hard to select an item from traditional start menu. Big thumbnails help user in opening a program easily and quickly.
But what about Desktop and laptop users? Why would a Desktop user want new Start Screen to forcefully occupy the whole screen area to show big thumbnails of programs? Start Menu takes a very small amount of screen space and the user also have access to Desktop but in Start Screen, if you want to look at Desktop, you'll need to click on Desktop tile or use keyboard shortcuts.
Also using mouse to scroll between several program tiles on Start Screen takes much time compared to the good old start menu where it shows a list of all installed programs using small icons and text which doesn't take much space.
So for a Desktop user, Start Menu is far better than new Start Screen.
PS: There is a registry tweak to enable Start Menu in Windows which can be found here. But again its a hidden trick and I'm not sure whether it'll work in final RTM build of Windows 8 or not? Microsoft can disable this trick in RTM build.
Removal of Start Button
Now the news are coming from latest Windows 8 testing build that Microsoft has removed "Start button" from Taskbar.
First removal of Classic start menu from Windows 7, then removal of the whole start menu from Windows 8 and now they removed Start button from Taskbar? Where are they going?
The Start button in Windows 8 Developer Preview build used to launch new Start Screen and now after the removal of Start button, you need to move your mouse cursor to the bottom-left corner of screen which shows a small thumbnail of Start Screen. You need to click on that thumbnail to launch Start Screen.
Windows_8_Consumer_Preview_Start_Button.png
The reason behind this move is the presence of actual "Start Button" key on all touch devices. Actually Microsoft has provided some guidelines to all computer manufacturer companies to develop devices compatible with Windows 8. The first and most important guideline is the presence of Start button key. All touch devices must have a Start button on the device panel which should launch the Start Screen.
Now Microsoft is again thinking about touch devices and forgetting about Desktop users. Desktop users don't need Start Screen. They just need to click on Start Button and launch the desired program.
Instead of completely removing the Start button, Microsoft could have made it a bit shorter or could have used a rectangular shape similar to Aero Peek (Show Desktop) rectangle present in the end of Taskbar. Microsoft can make it completely transparent or put Windows flag icon or a big S on it. So that at least users can know that they need to click on it to access Start Screen.
Metro Apps
And about Metro Apps, why would a Desktop user need a chromeless Internet Explorer metro version when he already have an excellent IE9 version? Metro IE is great for touch devices like tablets where the screen is small and you need to use your fingers to browse the sites but for a Desktop user its not so great. IE9 already comes with minimal UI. It hardly takes screen space and provides much space to browse websites.
Again Metro Apps are great for touch devices but not for Desktops.
What Would Be The Best Solution?
Its true that tablets are becoming popular day by day but Desktop users are still there and will always be there so we should not forget about them.
Why to create a single OS which is perfect for tablets but not very good for Desktops?
What Microsoft should do is to develop 2 separate editions of Windows 8, one for tablets and the other for Desktops. Desktop edition should come with traditional Start button and Start Menu and the Tablet edition should come with new Start Screen.
Or Microsoft can program Windows 8 setup in such a way that it should automatically detect the computer system at the installation time whether its a touch device or Desktop and then it should install the right edition.
Also instead of completely removing a component, Microsoft should provide an option to switch between features. If they wish, they can disable Start menu but they should also provide an option in Taskbar Properties to enable traditional start menu. Same thing can be done for Start button. Providing options to user is better instead of forcing him to use something which he doesn't want to use.
I'm sure if tablets were not so popular and Microsoft didn't think about them, Windows 8 would have been something different than what we are seeing today.
Just my two cents. What do you think???

Windows 8 Gets New Metro Style Logo, Goodbye Windows Flag

There were many rumors lately that Microsoft is going to use a new Windows logo for Windows 8. But now Microsoft has officially confirmed this rumor. Today at Windows Team Blog, Microsoft announced about new Windows logo which will be used for Microsoft's upcoming OS Windows 8.
According to Microsoft, Windows 8 is a complete reimagination of Windows operating system. the Windows logo is a strong and widely recognized mark. In some ways you can trace the evolution of the Windows logo in parallel with the advancements of the technology used to create logos. From the simple two color version in Windows 1.0 to the intricate and detailed renderings in Windows Vista and Windows 7, each change makes sense in the context in which it was created. As computing capabilities increased, so did the use of that horse power to render more colors, better fonts, and more detailed and life-like 3D visual effects like depth, shadows, and materiality. And what started as a simple "window" to compliment the product name became a flying or waving flag. But if you look back to the origins of the logo you see that it really was meant to be a window.
Following is the brand new Windows 8 logo:
Windows_8_New_Logo.png
With Windows 8, Microsoft approached the logo redesign with a few key goals on mind:
1. Microsoft wanted the new logo to be both modern and classic by echoing the International Typographic Style (or Swiss design) that has been a great influence on Metro style design philosophy. Using bold flat colors and clean lines and shapes, the new logo has the characteristics of way-finding design systems seen in airports and subways.
2. It was important that the new logo carries Metro principle of being "Authentically Digital". It does not try to emulate faux-industrial design characteristics such as materiality (glass, wood, plastic, etc.). It has motion – aligning with the fast and fluid style you'll find throughout Windows 8.
3. Microsoft's final goal was for the new logo to be humble, yet confident. Welcoming you in with a slight tilt in perspective and when you change your color, the logo changes to reflect you. It is a "Personal" Computer after all.
So what do you think about this new logo? Like it or do you find it too simple? Feel free to share your feedback about this new Windows 8 logo...

#
### ###