Friends

This is default featured post 1 title

Go to Blogger edit html and find these sentences.Now replace these sentences with your own descriptions.This theme is Bloggerized by Lasantha Bandara - Premiumbloggertemplates.com.

This is default featured post 2 title

Go to Blogger edit html and find these sentences.Now replace these sentences with your own descriptions.This theme is Bloggerized by Lasantha Bandara - Premiumbloggertemplates.com.

This is default featured post 3 title

Go to Blogger edit html and find these sentences.Now replace these sentences with your own descriptions.This theme is Bloggerized by Lasantha Bandara - Premiumbloggertemplates.com.

This is default featured post 4 title

Go to Blogger edit html and find these sentences.Now replace these sentences with your own descriptions.This theme is Bloggerized by Lasantha Bandara - Premiumbloggertemplates.com.

This is default featured post 5 title

Go to Blogger edit html and find these sentences.Now replace these sentences with your own descriptions.This theme is Bloggerized by Lasantha Bandara - Premiumbloggertemplates.com.

Friday, April 22, 2011

How to Change Internet Explorer Title Bar Caption?

Have you ever wondered how people change their Internet Explorer window titlebar text? Many times you must have noticed some special titlebar captions in Internet Explorer. Most of the times you see them in customized Internet Explorer setups like Yahoo! version, etc. Here is a small tutorial which will help you in change the Internet Explorer window titlebar caption to your desired text.

1. Open regedit and goto:
HKEY_CURRENT_USER\Software\Microsoft\Internet Explorer\Main
2. In right-side pane, create a new String value Window Title and set its value to your desired text.
3. Thats it. Launch Internet Explorer and see your changed caption instantly.
NOTE: You can also use this tutorial in case the titlebar caption has changed automatically and you want to revert it back to default. Just delete the "Window Title" key and it'll fix the problem

Cannot Install New Fonts in Windows, Install New Fonts Command is Missing in File Menu

If you have downloaded some fonts from Internet or anywhere else, you can install them in your Windows by using following method: 1. Type fonts in RUN dialog box and press Enter.
2. It'll open Fonts folder. Click on "File -> Install New Font..." option, browse to the folder containing font files and click on Install button. It'll install new fonts.
But sometimes people face strange problem. They cannot find the "Install New Font..." option in "File" Menu. If you are also facing this problem, then use following method to fix the problem:
1. Open Command Prompt and provide following commands:
CD\Windows
Attrib +s +r fonts
2. Restart your Windows and now your problem should be fixed.
3. If it doesnt work, then extract the "fontext.dll" file from Windows Setup CD and copy it to "%windir%\System32" and "%windir%\System32\DLLcache" folders.
NOTE: To know how to extract a file from Windows Setup, please go through following link:
How to Include Your Edited System Files in Windows Setup?

Favorite Links is Empty in Windows Vista Explorer Navigation Pane

Sometimes Windows Vista users face a problem when the "Favorite Links" section in Windows Explorer Navigation Pane doesnt show any item:
If you are facing this problem, then use following methods:
Method A:
1. Right-click in Favorite Links section and select "Restore Default Favorite Links" option.

2. It'll restore all the shortcuts immediately and your problem will be solved.
If the above mentioned method doesnt work, then use following method:
Method B:
1. Open regedit and goto:
HKEY_CLASSES_ROOT\lnkfile
2. In right-side pane, create a new String Value IsShortcut
3. Close Registry Editor and restart your Windows. It'll fix the problem.

Sidebar Video Player: A New Gadget for Windows Vista Sidebar

This is a basic media player intended for streaming video or audio, but it will play local files as well. You can enter a URL, browse for a file, or choose a video preset. It does not allow for the creation of playlists, but you can load existing ones. Download Link

Get Approx. 1 GB Free Space by Removing Unnecessary Files After Installing SP1 in Windows Vista

When you install SP1 in Windows Vista, it creates a backup of system files in case you want to uninstall the SP1 in future. It takes approx. 1 GB space, so if you are running out of space and want to free up some space on your hard disk, then you can follow this tutorial to get the free space. 1. Click on “Start button -> All Programs -> Accessories“. Right-click on “Command Prompt” and select “Run As Administrator“. If you are prompted to enter password, enter the password and continue. You can also open Command Prompt in Administrator mode by typing “cmd” in Startmenu Search box and press “Ctrl+Shift+Enter“.
2. Now provide following command:
vsp1cln.exe
3. It'll ask for confirmation, type Y and wait for a few minutes.
4. You'll get approx. 1 GB free space when the command ends executing.
NOTE: Use this command, if you don't want to uninstall SP1 in future cause after using this command you'll no longer be able to uninstall SP1.

Download Windows Vista PRODUCT (RED) Suite: Theme, Sidebar Gadgets, Wallpapers, Screen Saver, Dreamscene Video

Recently Microsoft and Dell joined to manufacture PRODUCT (RED) PC containing Windows Vista Ultimate. It was done to help eliminate AIDS in Africa. When you buy a Dell (PRODUCT) RED PC with Windows Vista Ultimate (PRODUCT) RED, Windows and Dell will jointly contribute $50 to $80, depending on the product, to The Global Fund.
The special thing in this PC is the new customization stuffs. It contains:
  • 6 New Wallpapers
  • 1 New Dreamscene Video
  • 1 New Screensaver
  • 2 New Sidebar gadgets
  • 1 New Red Theme
If you want to have those new extras, then download following .ZIP file:
Windows Vista PRODUCT (RED) Suite
Put the Screensaver in "%windir%\System32" folder and Theme in "%windir%\Resources\Themes" folder. You can install the sidebar gadgets by double-clicking on them. Wallpapers and dreamscene video can be applied by using context menu options.

“This File Does Not Have a Program Associated with it” Error Message While Running a Game from Game Explorer in Windows Vista and 7

Sometimes Windows Vista and 7 users face a problem while running games. Whenever they try to run a game from Game Explorer, they get following error message:
This file does not have a program associated with it for performing this action. Create an association in the set associations Control Panel.
It happens when you delete the "IsShortcut" String value in Registry Editor or you use a tweaking software to remove the shortcut arrow from icons.
If you are also facing this problem, then follow these simple steps and your problem will be fixed:
1. Open regedit and goto:
HKEY_CLASSES_ROOT\Lnkfile
2. In right-side pane, create a new String Value IsShortcut
3. Close Registry Editor and restart your Windows. It'll fix the problem.

Download Windows XP “Royal Blue” Theme “Vista Blue Refresh” for Windows Vista

After getting a lot of demand for a Basic version of my theme "AeroVG for Vista", I'm pleased to announce my new theme "Vista Blue Refresh". It'll give you same Royal Blue experience in Windows Vista.
So now Windows Vista Basic users can also enjoy this theme.
I have created this theme for "Windows Vista Basic" users who can't use "Aero" in their systems and are forced to use the Vista Basic theme. It also contains a version for Aero which is same as "AeroVG" theme.
FEATURE LIST:
This theme contains almost all new features which were present in my previous "AeroVG" theme like:
  • New Details pane which have different colors for different folders like Video, Pictures, etc.
  • Semi-Transparent addressbar and searchbar which get mixed with the window titlebar.
  • Darker hovered, clicked, selected area in Explorer.
  • New Statusbar matching with menubar.
  • Blue Control panel sidebar.
  • Cool dialog box buttons.
  • Only active window taskbar button is visible to make the taskbar more clean.
  • Checkbox and radio buttons are Apple leopard styled.
  • Cool blue progressbar in dialog boxes.
NOTE: It'll apply the Aero theme by default. If you want to use the "basic" version which I made specially, then change it from "Windows Color and Appearance -> Open classic appearance properties for more color options" and select the Basic version from the list and then apply.
Download Link
Alternate Download Link
How to Install & Use?

How to Create a Fully Automatic Internet Connection?

Recently a visitor asked me how can he make his Internet connection automatic so that he doesn't need to double-click on the connection, enter credentials, click on Connect button, etc? All of us use Internet and most of us want the same thing as the above mentioned guy asked. So here I'll tell you a detailed step-by-step method to make your existing or new Internet connection fully automatic. You'll not need to enter your user name and password again and again, you'll not need to click on "Connect" button each time.
1. When you double-click on the connection and click on "Connect", it starts connecting. But next time, when you start the connection, it doesn't save your credentials and shows a window with blank user name and password.
So when you enter your credentials, make sure you have enabled the checkbox "Save this user name and password for the following users". You can select "Me only" or "Anyone who uses this computer" acc. to your requirements.
Now it'll always save your credentials and you'll not need to enter them every time you start the connection.
2. Now lets move further. Even it saves your credentials, whenever you double-click on the connection, it still shows the dialog box containing your user name and password.
If you want to bypass this window and want the connection to immediately dial whenever you double-click on it, then click on "Properties" button and disable "Prompt for name and password, certificate, etc" option.
Now it'll not show the dialog box and will connect to Internet as soon as you double-click on it.
3. You can also create a shortcut to your Internet Connection on Desktop to quickly start it. Open Network Connections and right-click on your connection and select "Create Shortcut". It'll create a shortcut on Desktop.
You can rename it. You can also move it to "Quick Launch" toolbar.
4. If you want the connection to immediately start with Windows, then you can add this shortcut to Windows Startup.
Type "shell:startup" in RUN dialog box and press Enter. Now paste the shortcut in this folder. Thats it. Now whenever you'll start Windows, the connection will start automatically and will connect to Internet.
So after following all the above mentioned steps, you'll come up with a fully automatic connection which will require nothing from you and will do the whole task automatically.
NOTE: If you want to change the user name or password in future, then open "Internet Options" from Internet Explorer or Control Panel and go to "Connections" tab. Select your connection in list and click on "Settings" button. Now you can change your user name or password.

Troubleshooting Windows Vista Activation Error Codes and Error Messages

When you try to activate Windows Vista by using the Windows Vista activation process, you may receive an error code or an error message. This article contains a list of Microsoft Knowledge Base articles that can help you troubleshoot these error codes and error messages. Just locate that error code or error message in the following list, and then follow the instructions.

Error code 0xC004C003

The activation server determined that the specific product key is in use.
This error code indicates that the product key that you entered has already been activated, and you must obtain a different product key.

Error code 0xC004E003

The Software Licensing Service reported that the license evaluation failed.
This error code indicates that you must rerun the Windows Vista activation process.
For more information about error code 0xC004E003, click the following link:
950755

Error code 0x80072EFD

A Connection with the server could not be established.
This error code indicates that there may be issues with your Internet connection. Verify that your Internet connection is working, and then try to activate Windows Vista again.
For more information about error codes 0xC004C003, 0xC004E003, and 0x80072EFD, click the following link:
931276

Error code 0xC004F050

The Software Licensing Service reported that the product key is invalid.
For more information about this error code, click the following link:
938450
950756

Error code 0xC004F061

The Software Licensing Service determined that this specified product key can only be used for upgrading, not for clean installations.
For more information about this error code, click the following link:
930373

Error code 0x8007000D

Unable to Open the License. The Data is Invalid.
This error code indicates that the initial download may have been corrupted, and you may have to download the package again.
For more information about this error code, click the following link:
930378

Error message

The Product Key You Have Entered Will Not Work With This Edition or Version of Windows Vista.
If you receive this error message, you may have inserted a product key for an edition of Windows Vista that does not match the installed edition.
For more information about this error message, click the following link:
949744

Error message

The Windows Vista (product version) product key you typed is invalid for activation.
If you receive this error message, there may be an issue with the installed version of Windows and with the product key that you used.
For more information about this error message, click the following link:
937768

Error message

To Use the Product Key You Entered, Start the Installation from Your Existing Version of Windows.
If you receive this error message, you must first start the computer by using the currently installed version of Windows. Then, start Windows Vista Setup.
For more information about this error message, click the following link:
947214

Error message

Your Activation Period Has Expired.
If you receive this error message, Windows Vista may not have been activated within the 30-day activation period, or there may have been significant hardware changes on the system.
For more information about this error message, click the following link:
925616
Microsoft Help and Support

New Free Windows Vista How-to Guide in PDF Format Released by Microsoft

Microsoft has released an 8.98 MB Pdf file which might become useful to new Windows Vista users. You can learn how to get the most out of Windows Vista Ultimate with this how-to booklet, available as a free PDF download.
Download Link

How to Get Drive Capacity Bar aka HDD Meter Back in Windows Vista and 7 Explorer?

If you are using Windows Vista or 7, then you must be well aware of the small horizontal capacity meter showing under HDD icons in My Computer. Sometimes a few Vista or 7 users face a problem. These HDD meters don't show under drive icons.

It happens when you change the "Views" settings of My Computer window. The "Views" settings in your Windows must be set to "Tiles" if you want to show those HDD meters.
So just change the "Views" settings by clicking on "Views" button at toolbar and select "Tiles".
You can also set it to "Tiles" using right-click menu. Now the HDD meters should be back in your Windows.

How to Restore Missing Send To Menuitem in File and Folder Context Menus?

If you can’t find “Send To” menu item in file/folder context menu, just download following Zip file, extract it and then run the extracted .REG file: Download Registry Script
It’ll restore the missing “Send To” menu item and it’ll be back.

Glasser: An Extension to Add Windows Vista and 7′s Aero Glass to Mozilla Firefox

Vista Glass for Firefox:
For all you people who have been looking for a way to get Vista's glass effect in Firefox, look no further. Here is an extension for Firefox that will do it. Please read this entire article before install this extension.
Known Issues:
It will work on the Vista Basic theme, but will not produce the blue toolbars as Windows Explorer does, this will still a work in progress.
Download Link

RSS Email Twitter FB In Google New Windows Vista Ultimate Extras Released

If you're running Windows Vista Ultimate and noticed two new Ultimate Extras have shown up on Windows Update - don't worry, your eyes do not deceive! Today Microsoft has released two new Ultimate Extras: Windows Sound Schemes and Windows DreamScene Content Pack #3.
Windows Sound Schemes is a pack of 2 new sound schemes for Windows Vista: Glass and Pearl. For more details on the Windows Sound Schemes - click here.
Windows DreamScene Content Pack #3 brings you 3 new DreamScenes for your Windows Vista desktop. For more information on Windows DreamScene - click here.
Here is a small preview of the new DreamScenes in Content Pack #3:


And be sure you keep your eyes on UltimatePC.com for more Ultimate Extra news in future as well as hot Ultimate Exclusives for Windows Vista Ultimate users.

MyColors: Change Look and Feel of Your Windows Desktop

MyColors is a safe way to change the look and feel of your Windows desktop. These MyColors themes let you show your personal style with a theme that can transform your entire desktop into your favorite sports club, activity, ride, and more! The MyColors theme manager can help you organize all your favorite themes in to one easy application.

System Requirements:
  • Windows XP (32-bit) or Vista/Windows 7 (32-bit and 64-bit)
  • Minimum screen resolution: 1024 width and 768 height
  • 256MB RAM
  • 100MB free drive space
  • Internet Connection to download, install and activate
Download Link

How to Open Help Files (.hlp) in Windows Vista and Server 2008 that Require Windows Help Program (WinHlp32.exe)?

Since Windows 3.1, Microsoft included Windows Help Program (Winhlp32.exe) in new Windows versions. It is used to view 32-bit help files having .hlp file extension. But Microsoft decided to no longer include this program in Windows Vista and Server 2008. But there are many software that provide .hlp files as help and support. So if you also have such files and can't view them in Windows Vista or Server 2008, then download following update and install it in your Windows. It'll install the Windows Help program and you'll be able to view the .hlp files:
Download Windows Help program (WinHlp32.exe) for Windows Vista
Download Windows Help program (WinHlp32.exe) for Windows Server 2008

How to Back up and Restore Registry in Windows XP, Vista, Server 2008 and 7

Since most of the tutorials on this website deal with Windows registry, today I decided to post a tutorial for creating backup of registry and restoring the backup using Windows built-in tool "System Restore".
Backup Registry in Windows XP, Vista, Server 2008 and 7:
Steps for Windows Vista, Server 2008 and 7:
1. Type systempropertiesprotection in Startmenu Search box or RUN dialog box and press enter. It'll open "System Protection" tab of "System properties". You can also open System properties by giving sysdm.cpl command or by right-click on My Computer icon and select Properties.
2. Now click on "Create" button and provide a name for restore point.
3. When the restore point is made successfully, click OK.
Steps for Windows XP:
1. Type %SystemRoot%\system32\restore\rstrui.exe in RUN dialog box and press enter. It'll open System Restore page. You can also open it from Programs menu.
2. Now click on "Create a restore point" and then click on Next.
3. Provide a name for restore point and click on Create.
4. When the restore point is made successfully, click on Close.
Restore Registry in Windows XP, Vista, Server 2008 and 7:
Steps for Windows Vista, Server 2008 and 7:
1. Type systempropertiesprotection in Startmenu Search box or RUN dialog box and press enter. It'll open "System Protection" tab of "System properties". You can also open System properties by giving sysdm.cpl command or by right-click on My Computer icon and select Properties.
2. Now click on "System Restore" button.
3. In System Restore dialog box, select "Choose a different restore point" and then click on Next.
4. Select the desired restore point which you made earlier and click on Next.
5. Confirm your decision and click on Finish. Windows will restore the configuration and will restart the system.
6. When you'll log on to the computer, System Restore Confirmation page will appear, click on OK.
Steps for Windows XP:
1. Type %SystemRoot%\system32\restore\rstrui.exe in RUN dialog box and press enter. It'll open System Restore page. You can also open it from Programs menu.
2. Now click on "Restore my computer to an earlier time" and then click on Next.
3. Now click on the system checkpoint. In the "On this list select the restore point" area, click on "Guided Help (Registry Backup)" and then click on Next. A message will appear listing configuration changes that System Restore will make, click OK.
4. Now on Confirm Restore Point Selection page, click Next.
5. System Restore will restore the configuration and will restart the system.
6. When you'll log on to the computer, System Restore Confirmation page will appear, click on OK

BitLocker Repair Tool: Access Encrypted Data from Physically Damaged Hard Disk

The BitLocker Repair Tool can assist administrators in recovering data from a corrupted or damaged disk volume that was encrypted with BitLocker. This tool helps access data encrypted with BitLocker if the hard disk has been physically damaged. This tool attempts to reconstruct critical data from the drive and salvage any recoverable data.
To decrypt the data, a recovery password or recovery key is required. In some cases, a backup of the key package is also required.
Use this command-line tool if the following conditions are true:
  • A volume has been encrypted by using BitLocker Drive Encryption.
  • Windows does not start, or you cannot start the BitLocker recovery console.
  • You do not have a copy of the data that is contained on the encrypted volume.
NOTE: BitLocker does not need to be installed on the computer for you to use the BitLocker Repair Tool, but the system must be running.
Download Link

Dual Boot Problem: Windows Vista No Longer Starts After Installing Windows XP

If you want to have a dual boot system with Windows XP and Windows Vista, then you must first install Windows XP and then Windows Vista. Windows Vista uses a newly designed boot loader and if you install Windows XP after Windows Vista, then it'll overwrite Windows Vista boot loader and you'll not be able to boot into Vista.
If you have installed XP after Vista and you are not able to boot into Vista, then follow these simple instructions and you'll get the Vista boot loader back:
1. Download "VistaBootPRO". Its an excellent software which can reinstall Vista boot loader within a few seconds.
Download Link
2. Install it and run the software.
3. Now click on "Bootloader" button as shown in following screenshot:
Reinstall_Vista_boot_loader.jpg
4. Select "Reinstall the Vista Bootloader" option and click on "Configure It" button.
5. Thats it. It'll install the Vista Boot loader. You can also edit other settings like boot loader timeout, default boot entry, boot entry labels, etc.
You can also repair Vista boot loader using Vista Setup DVD but the above mentioned method is the easiest method and works even you don't have the CD/DVD.

How to Fix Explorer Freezing Problem with Large Zip Files in Windows Vista?

If you are a Windows Vista user and face Explorer freezing problem frequently, then this tutorial might help you. Windows Vista has built-in support for zip files. It can create, extract, browse through zip files which is a good feature but this good feature can give you troubles if you are dealing with large zip files.
Actually this problem has been faced by lots of Vista users. Vista explorer freezes or starts taking 100% CPU resources while opening a large zip file or opening a folder containing a large zip file.
To fix this problem, you'll have to disable the built-in zip support in Windows Vista:
1. Open regedit and goto following key:
HKEY_CLASSES_ROOT\CLSID
2. Under this key, delete following 2 keys:
{E88DCCE0-B7B3-11d1-A9F0-00AA0060FA31}
{0CD7A5C0-9F37-11CE-AE65-08002B2E1262}
3. Restart your system and now your problem should be fixed. You can use freeware like 7-Zip to open, create, extract zip files.

How to Reset / Remove / Bypass a BIOS or CMOS Password?

BIOS passwords are used to add some extra security to computers. You can either set a password to prevent access to BIOS settings or to prevent PC from booting. But sometimes this extra security might become a pain when you forget the BIOS password or someone changes your system BIOS password intentionally.
But there is no need to worry. There are many known ways to reset / remove / bypass the password:
  • By removing CMOS battery
  • By using motherboard jumper
  • By using MS DOS command
  • By using software
  • By using Backdoor BIOS password
Now I'll try to explain each method one by one:
DISCLAIMER: This information is intended for experienced users. It is not intended for basic users, hackers, or computer thieves. Please do not try any of following procedures if you are not familiar with computer hardware. We'll not be responsible for the use or misuse of this information, including personal injury, loss of data or hardware damage. So use it at your own risk.
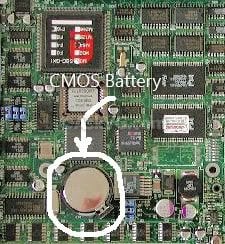
By Removing CMOS Battery:
CMOS_Battery.jpg
Almost all motherboards use a small coin sized CMOS battery to store all BIOS settings along with the password. To reset the password, unplug the PC, open the cabinet and remove the CMOS battery for approx. 15-30 minutes and then put it back. It'll reset all BIOS settings as well as the password and you'll need to re-enter all settings.
If it fails, then try to remove the battery for at least one hour.
By Using Motherboard Jumper:
Almost all motherboards contain a jumper that can clear all CMOS settings along with the BIOS password. The location of this jumper varies depending upon the motherboard brand. You should read your motherboard manual to check its location. If you don't have the manual then look for the jumpers near the CMOS battery. Most of the manufacturer label the jumper as CLR, CLEAR, CLEAR CMOS, etc.
When you find the jumper, look carefully. There will be 3 pins and the jumper will be joining the center pin to either left or right pin. What you need to do, is remove the jumper and join the center pin to the opposite pin. e.g. if the jumper joins center pin to left pin, then remove it and join center pin to right pin. Now wait for a few seconds and then again remove the jumper and join the center pin to left pin.
Make sure to turn the PC off before opening the cabinet and resetting the jumper.
By Using MS DOS Command:
This method works only if you have access to the system when its turned on because this method requires MS DOS. Open Command Prompt from Programs menu and provide following commands one bye one:
debug
o 70 2E
o 71 FF
quit
NOTE: The first character in the above commands is English alphabet "o" and not the number 0.
After providing the above commands, restart your system and it should reset the CMOS Settings along with the BIOS password.
If you are curious to know how it works? then let me explain the above commands:
In this method we are using the Debug tool of MS DOS. The "o" character present at first in these commands, outputs the values to IO ports. The number 70 and 71 are port numbers which are used to access CMOS memory. By providing FF value we are telling CMOS that there is an invalid checksum and it resets the CMOS settings as well as BIOS password.
By Using Software:
There are a few software which can also reset CMOS settings or BIOS password or both within a few clicks. But as stated above you should have access to a system which is turned on and should have access to MS DOS or MS Windows:
CmosPwd
KillCMOS
By Using Backdoor BIOS Password:
Some BIOS manufacturer put a backdoor password in BIOS which always works irrespective of what password you have set in BIOS. Its a master password which is used for testing and troubleshooting purposes.
AMI BIOS Passwords:
A.M.I.
AAAMMMIII
AMI?SW
AMI_SW
AMI
BIOS
CONDO
HEWITT RAND
LKWPETER
MI
Oder
PASSWORD
AWARD BIOS Passwords:
01322222
589589
589721
595595
598598
ALFAROME
ALLy
aLLy
aLLY
ALLY
aPAf
_award
award
AWARD_SW
AWARD?SW
AWARD SW
AWARD PW
AWKWARD
awkward
BIOSTAR
CONCAT
CONDO
Condo
d8on
djonet
HLT
J64
J256
J262
j332
j322
KDD
Lkwpeter
LKWPETER
PINT
pint
SER
SKY_FOX
SYXZ
syxz
shift + syxz
TTPTHA
ZAAADA
ZBAAACA
ZJAAADC
PHOENIX BIOS Passwords:
BIOS
CMOS
phoenix
PHOENIX
Misc Common Passwords:
ALFAROME
BIOSTAR
biostar
biosstar
CMOS
cmos
LKWPETER
lkwpeter
setup
SETUP
Syxz
Wodj
Other Manufacturer BIOS Passwords:
Biostar - Biostar
Compaq - Compaq
Dell - Dell
Enox - xo11nE
Epox - central
Freetech - Posterie
IWill - iwill
Jetway - spooml
Packard Bell - bell9
QDI - QDI
Siemens - SKY_FOX
TMC - BIGO
Toshiba - Toshiba
VOBIS & IBM - merlin

How to Enable / Disable “Always use the selected program to open this kind of file” Option in Open With Dialog Box?

Whenever we use "Open With" option to open a file in Windows, it shows a dialog box containing a list of installed programs to choose from. There is also a checkbox "Always use the selected program to open this kind of file" given at the bottom of this dialog box which is used to set the selected program permanent to open that file type. Sometimes it gets irritating when we accidentally select a program from the list and click on "OK" button. It sets the selected program as default to open that file type which adds some extra work to our life.
So here I'll tell you a simple registry trick to permanently disable this checkbox:
For Windows XP:
Method A:
1. Open regedit and goto:
HKEY_CLASSES_ROOT\Unknown\shell\openas\command
2. In right-side pane, change value of "Default" key to as following:
%SystemRoot%\system32\rundll32.exe %SystemRoot%\system32\shell32.dll,OpenAs_RunDLL %1 %2
NOTE: We have only appended %2 at last of default value. You can use any number from 2-9.
3. Exit registry editor and try to open "Open With" dialog box. You'll find that the checkbox is disabled now as shown in following screenshot:
Open_with_disabled_XP.jpg
Method B:
1. Open regedit and goto:
HKEY_LOCAL_MACHINE\SOFTWARE\Microsoft\Windows\CurrentVersion\ Policies\Explorer
If the "Explorer" key is not present, create it manually.
2. Now in right-side pane, create a new DWORD value NoFileAssociate and set its value to 1
3. Exit registry editor and try to open "Open With" dialog box. You'll find that the checkbox is disabled now as shown in following screenshot:
Open_with_invisible_XP.jpg
For Windows Vista, 7 or Server 2008:
Method A:
1. Open regedit and goto:
HKEY_CLASSES_ROOT\Unknown\shell\opendlg\command
2. In right-side pane, change value of "Default" key to as following:
%SystemRoot%\system32\rundll32.exe %SystemRoot%\system32\shell32.dll,OpenAs_RunDLL %1 %2
NOTE: We have only appended %2 at last of default value. You can use any number from 2-9.
3. Exit registry editor and try to open "Open With" dialog box. You'll find that the checkbox is disabled now as shown in following screenshot:
Open_with_disabled.jpg
Method B:
1. Open regedit and goto:
HKEY_LOCAL_MACHINE\SOFTWARE\Microsoft\Windows\CurrentVersion\ Policies\Explorer
If the "Explorer" key is not present, create it manually.
2. Now in right-side pane, create a new DWORD value NoFileAssociate and set its value to 1
3. Exit registry editor and try to open "Open With" dialog box. You'll find that the checkbox is completely removed now as shown in following screenshot:
Open_with_invisible.jpg
NOTE: As you can see, when we use Method A to disable the checkbox, the "Open With" dialog box doesnt show recommended programs list which it does when we use Method B. Also if you see the last screenshot of Windows Vista, the Method B totally remove the checkbox instead of disabling it.

Mavis Up Button: Add the Missing “Up” Button to Windows Vista and 7 Explorer Toolbar

Many Windows Vista and 7 users complain about the missing "Up" button in Windows Explorer. The Up button can be found in all previous Windows versions but its strange that Microsoft decided to remove it from Vista and 7. But there is no need to miss it any more. There is a small utility "Mavis Up Button" which can bring back the "Up" button in Vista and 7 Explorer.

Its not a freeware. You'll need to purchase it . It costs $4.95 which I think is not very high and everyone can spend to get this cool software.
You can also try it for 5 days for free.
Download Trial Version
Purchase Full Version
Homepage

Vistalizator: Change Display Language in All Windows Vista and 7 Editions

Vistalizator allows you to change display language in Windows editions other than (officially supported) Ultimate, like Starter, Home Basic, Home Premium and Business/Professional. Vistalizator overrides the limit of one MUI language on non-Ultimate Windows editions.
Feature List:
  • Works in 32-bit and 64-bit Windows Vista/Windows 7
  • Change Windows display language in less than 5 minutes! (Express installation mode)
  • Uses official Microsoft Windows language packs
  • You can install all 36 MUI languages and switch between them easily
  • You can install 55 Vista LIP languages on top of specific MUI languages
  • Compatible with Vista Service Pack 1 and Vista Service Pack 2
  • User Account Control (UAC) compliant - prompts for administrative privileges
  • Windows Speech Recognition works with all supported languages
  • Languages can be installed either in Internal or in Express mode
Download Link

Add Windows XP Styled System Properties Link in My Computer Context Menu Under Windows Vista and 7

If you use Windows Vista or 7, you might miss the classic System Properties window which used to show in previous Windows versions. Windows Vista and 7 shows a new System Properties window containing detailed system information and various links to other sections in left side. In previous Windows versions, whenever you click on My Computer icon and select "Properties", it shows a small window containing various tabs like Hardware, Advanced, System Restore, etc.
Here is a small trick to show the same System Properties window in Windows Vista and 7. After following this tutorial, you'll get a new option in My Computer context menu which will directly show the good old System properties window containing various tabs:
1. Open regedit and goto:
HKEY_CLASSES_ROOT\CLSID\{20D04FE0-3AEA-1069-A2D8- 08002B30309D}\shell
2. Right-click on "Shell" key and select "New -> Key". Give this new key any name e.g. "System Properties". The same name will be shown in context menu.
3. Right-click on this new key "System Properties" and select "New -> Key". Give it name "command".
4. Select this new key "command" and in right-side pane change the value of "Default" to:
control sysdm.cpl
5. That's it. Exit Registry editor and right-click on My Computer icon, you'll get this new option there:
Classic_System_Properties.jpg
When you'll click on this new option, it'll open the Classic System Properties window:
Classic_System_Properties_Window.jpg
NOTE: If you want a ready-made registry file to add this option, then download following ZIP file, extract it and run the extracted .REG file:
Download Zip File

How to Disable Full Row Select Functionality in Windows Vista and 7 Explorer?

In Windows Vista and 7, if you are using "Details" view in Explorer you have noticed that when you hover mouse cursor over any item, it highlights or selects the full row. This behavior is different than the previous Windows versions. In previous Windows like XP, only the file/folder name was selected instead of the full row. So if you want the same functionality in Windows Vista and 7 i.e. want to disable the "Full Row Select" functionality in Explorer, then follow this tutorial.
Before applying this tutorial:
FullRowSelect.jpg
After applying this tutorial:
ClearFullRowSelect.jpg
PS: Following method will only work in Windows Vista. For Windows 7, download and run the REG file given at the end of this topic.
1. Open regedit and goto:
HKEY_CURRENT_USER\Software\Microsoft\Windows\CurrentVersion\ Explorer\Advanced
2. In right-side pane, create a new DWORD value FullRowSelect and keep its value to 0
3. After applying this tweak, if you create a new folder it'll have the Full Row Select functionality disabled. But the existing folders will still have the Full Row Select functionality enabled.
4. To disable Full Row Select functionality in all existing folders as well, go to following key:
HKEY_CURRENT_USER\Software\Classes\Local Settings\Software\Microsoft\ Windows\Shell
and delete "Bags" key under it.
5. Again goto following key:
HKEY_CURRENT_USER\Software\Microsoft\Windows\CurrentVersion\ Explorer\Streams
And delete "Defaults" key under it.
6. Log off and now the "Full Row Select" functionality will be disabled in all existing as well as new folders.
NOTE: If you want ready-made scripts to do the task automatically, download following ZIP file, extract it and run extracted REG (for Windows 7) or VBS (for Windows Vista) files. Thanks to "Keith Miller", my fellow MVP for creating VBS batch files for Windows Vista.
Download Script

How to Restore “Show Desktop” Shortcut Icon in Quick Launch Toolbar?

Most of the times most of the people make this mistake when they delete the "Show Desktop" icon from Quick Launch toolbar either accidentally or intentionally. After some time they might want to restore this useful icon which helps in minimizing all opened windows in a single go. Although you can do the same thing using keyboard shortcut key "Win+D" or "Win+M". So in this tutorial, we'll tell you 2 ways to restore "Show Desktop" icon in Quick Launch toolbar:
METHOD 1:
1. Paste following code in Notepad and save the file with name "Show Desktop.scf" (including quotes):
[Shell]
Command=2
IconFile=explorer.exe,3
[Taskbar]
Command=ToggleDesktop
2. Now you have to copy this new file and paste in "Quick Launch" toolbar. You can do it in 2 ways:
a. Drag-n-drop the new file to Quick Launch toolbar.
b. Type "%appdata%\Microsoft\Internet Explorer\Quick Launch" in RUN dialog box and press Enter. It'll open Quick Launch folder. Paste the file in this folder.
METHOD 2:
1. Open RUN dialog box and provide following command:
regsvr32 /n /i:U shell32.dll
2. It'll restore the Show Desktop icon in Quick Launch toolbar. You might need to restart your system to take effect.

How to Enable / Disable Animations in Copy / Move / Delete Dialog Boxes Under Windows Vista and 7?

In Windows Vista and 7, whenever you copy, move or delete a file or folder, the progress dialog box shows an animated AVI as well as a cool animation in the progressbar as shown in following screenshot:
With_Animation.jpg
Sometimes you might face a problem when the dialog box doesnt show the AVI and the animation in progressbar which looks like shown in following screenshot:
No_Animation.jpg
If you are also facing this problem and want to enable the animation in progress dialog box, then follow this simple and small tutorial and your problem will be fixed:
1. Right-click on My Computer icon on Desktop and select Properties (or press <WIN> + <Pause/Break> key), click on Advanced system settings link in left side pane (You can also open it by typing sysdm.cpl in RUN or start menu search box and press Enter). Now click on Settings button in Performance section:
2. It'll open another window. Now make sure "Animate controls and elements inside windows" option is enabled. If its not enabled, enable it and click on "Apply" button.
Animate_Controls.jpg
3. That's it. It should solve your problem and you should be able to see the animations in progress dialog box.
NOTE: If you want to disable the animation intentionally, then just disable the above mentioned option and the animations will be disabled in progress dialog box.

How to Enable / Disable Changing Themes, Wallpapers, Screen Savers and Other Desktop Settings?

In Windows you can change desktop wallpaper, screen saver, themes and other appearance settings by right-click on Desktop and select "Properties". Sometimes you might want to disable all or a few options in Desktop Properties to restrict users or you might want to enable those options in case they are disabled by your system administrator or a virus infection.
Following tutorial will help you in enabling or disabling all or a particular option in Desktop Properties:
NOTE: This tutorial will work for almost all Windows versions.
A. Disable Themes Tab in Desktop Properties:
Open regedit and goto:
HKEY_CURRENT_USER\Software\Microsoft\Windows\CurrentVersion\Policies\ Explorer
If "Explorer" key is not present, then create it. Now in right-side pane, create a new DWORD value NoThemesTab and set its value to 1 to disable it.
Restricted_XP_Themes.jpg
B. Disable Desktop Tab in Desktop Properties:
Open regedit and goto:
HKEY_CURRENT_USER\Software\Microsoft\Windows\CurrentVersion\Policies\ System
If "System" key is not present, then create it. Now in right-side pane, create a new DWORD value NoDispBackgroundPage and set its value to 1 to disable it.
Restricted_XP_Desktop.jpg
C. Disable Screen Saver Tab in Desktop Properties:
Open regedit and goto:
HKEY_CURRENT_USER\Software\Microsoft\Windows\CurrentVersion\Policies\ System
If "System" key is not present, then create it. Now in right-side pane, create a new DWORD value NoDispScrSavPage and set its value to 1 to disable it.
Restricted_XP_Screen_Saver.jpg
D. Disable both Themes and Appearance Tabs in Desktop Properties:
Open regedit and goto:
HKEY_CURRENT_USER\Software\Microsoft\Windows\CurrentVersion\Policies\ System
If "System" key is not present, then create it. Now in right-side pane, create a new DWORD value NoDispAppearancePage and set its value to 1 to disable it.
Restricted_XP_Appearance.jpg
E. Disable Settings Tab in Desktop Properties:
Open regedit and goto:
HKEY_CURRENT_USER\Software\Microsoft\Windows\CurrentVersion\Policies\ System
If "System" key is not present, then create it. Now in right-side pane, create a new DWORD value NoDispSettingsPage and set its value to 1 to disable it.
Restricted_XP_Settings.jpg
BONUS TIP: In case you want to enable a restricted tab in Desktop Properties, just delete the required DWORD value as mentioned above or change its value to 0 instead of 1.

WordPress Gadget for Windows Vista Sidebar Users

If you are WordPress as well as Windows Vista user, then this post might be useful for you. Here I'm sharing a cool gadget for Windows sidebar which can make your daily wordpress administration tasks easier by providing some handy shortcuts directly in your sidebar.
Download WordPress Gadget
Download it and double-click on the file. Windows sidebar will automatically open and install it. Open gadget Options and enter the URL of your wordpress root folder.
Now you can open your site, open wordpress dashboard, write new post, add new blogroll link or moderate comments using this sidebar gadget.
Its really a useful gadget for WordPress users.
Download WordPress Gadget

How to Re-Enable Missing Details Pane in Windows Vista and 7 Explorer?

Unlike Windows XP, the common tasks pane is shown at bottom in Windows Vista and Windows 7 explorer and is called "Details Pane". Sometimes you might find that the Details Pane is no longer shown in Explorer window. I have received many e-mails asking for its solution, so here I'm posting a detailed tutorial with screenshots to re-enable missing Details Pane in Vista and 7 explorer:
Without Details pane the explorer window looks like as following:
No_Details_Pane.jpg
Click on "Organize -> Layout -> Details Pane".
Enable_Details_Pane.jpg
It'll re-enable the Details Pane:
Details_Pane.jpg
Sometimes you might face a strange problem when the option to re-enable "Details Pane" in "Layout" menu will be missing:
No_Details_Pane_Option.jpg
Don't worry. It happens when Classic folder option is enabled in "Folder Options". Goto "Organize -> Folder and Search Options" and enable "Show preview and filters" option.
Show_Preview_and_Filters.jpg
Apply it and it'll re-enable the option to show/hide Details Pane and Preview Pane.
NOTE: If you are wondering why the Details Pane is shown at top instead of bottom in the screenshots, then you can visit following tutorial:
How to Move / Show Details Pane At Top in Windows Vista Explorer?

Options to Change Hidden Files and Folders Settings are not Available in Folder Options

As we all know we can change the settings to show / hide hidden files and folders from "Folder Options" which can be found under Tools menu in Windows XP or in Organize menu under Windows Vista and 7. Default_Hidden_Options.jpg
But sometimes you might find that the options to change the settings of hidden files and folders are not available in Folder Options. There may be following 4 cases:
  • The whole Hidden Files and Folders tree is not visible.
  • Only the heading Hidden files and folders is visible but it doesn't contain any option to choose from.
  • Only Do not show hidden files and folders option is available.
  • Only Show hidden files and folders option is available.
If you are also facing such problem, then download following ZIP file, extract it and then run the extracted .REG file. It'll ask for confirmation, accept it and your problem will be solved:
Download Registry Script

Pitaschio: A Free Utility to Customize Windows and Desktop Experience

Pitaschio (yes, its the correct name not a spelling mistake) is a great, must have and absolutely free application for Microsoft Windows OS. It lets you customize how your icons appear on Desktop, how your opened Windows behave? You can customize lots of handy features which are not available in Windows settings by default.
Following are a few interesting things which can be done using this small nifty utility:
  • You can set Small Icons view on Desktop
  • You can disable Minimize, Maximize, Close button in Windows titlebar
  • You can disable Windows, CAPs Lock, ALT, Insert, Function keys
  • You can change Desktop icons text color
  • You can control volume using your mouse wheel
  • You can use virtual desktops
  • You can set Windows to stay within the visible display screen
  • You can set various mouse shortcuts
  • You can go to the parent folder by double-clicking anywhere in the child folder
  • You can set Windows transparency using mouse wheel
There are many other useful tweaks inside this small application. It supports both Windows XP as well as Windows Vista.
It doesnt need to install. Just download the ZIP file, extract it and run the application directly.
Download Link
Homepage

How to Hide / Show Specific Control Panel Applets / Icons in Windows?

This tutorial will guide you to hide or show any specific Control Panel applet in Windows. This tutorial will work for all Windows versions: NT, 95, 98, Me, 2000, XP, Server 2003, Vista, Server 2008 and 7.
METHOD A: For All Windows Versions except Windows 95, 98 & Me
1. Open regedit and goto:
HKEY_CURRENT_USER\Control Panel\
OR
HKEY_LOCAL_MACHINE\SOFTWARE\Microsoft\Windows\CurrentVersion\Control Panel\
2. Under this key create a new key with the name don't load , so the new path will be:
HKEY_CURRENT_USER\Control Panel\don't load
OR
HKEY_LOCAL_MACHINE\SOFTWARE\Microsoft\Windows\CurrentVersion\Control Panel\don't load
3. Now in right-side pane, create new String value. Set its name to the file name of the applet which you want to hide, e.g. if you want to hide Display applet then set its name to Desk.cpl now set its value to no to hide it. If you want to show it again, either set its value to yes or simply delete the String value.
To use the above mentioned method, you'll need to know the .CPL file name of the desired applet. You can search for .CPL in Windows Search or you can use help of following list which contains .cpl file names of almost all default Control Panel applets:

METHOD B: For All Windows Versions except Windows 95, 98 & Me
1. Open regedit and goto:
HKEY_CURRENT_USER\Software\Microsoft\Windows\CurrentVersion\Policies
2. Look for a key "Explorer" under it. If its not present, then create a new one and give it name Explorer.
3. Select "Explorer" key and in right-side pane, create a new DWORD value DisallowCpl and set its value to 1
4. Now create another new key under Explorer key with the name DisallowCpl so the new path will be:
HKEY_CURRENT_USER\Software\Microsoft\Windows\CurrentVersion\Policies\ Explorer\DisallowCpl
5. Select "DisallowCpl" key and in right-side, create new String value with name 1 and set its value to the applet name which you want to hide.You don't need to use the .cpl file name of applet in this method. You have to put the applet label which you see in Control Panel.

e.g., If you want to hide AutoPlay applet, then create a new String value, give it name 1 and set its value to AutoPlay. If you want to hide more applets, then simply create more String values with names 2, 3 and so on and set their values to the applet label.
METHOD C: For All Windows Versions except Windows 95, 98 & Me
This method is opposite of METHOD B. In this method, you'll tell Windows which applets should be visible and Windows will automatically hide the rest.
Its useful when you want to show a few specific applets and want to hide remaining applets. So you just need to create a few String values to tell Windows which applets you want to show. It'll save your valuable time.
1. Open regedit and goto:
HKEY_CURRENT_USER\Software\Microsoft\Windows\CurrentVersion\Policies
2. Look for a key "Explorer" under it. If its not present, then create a new one and give it name Explorer.
3. Select "Explorer" key and in right-side pane, create a new DWORD value RestrictCpl and set its value to 1
4. Now create another new key under Explorer key with the name RestrictCpl so the new path will be:
HKEY_CURRENT_USER\Software\Microsoft\Windows\CurrentVersion\Policies\ Explorer\RestrictCpl
5. Select "RestrictCpl" key and in right-side, create new String value with name 1 and set its value to the applet name which you want to show.You don't need to use the .cpl file name of applet in this method. You have to put the applet label which you see in Control Panel.

e.g., If you want to show AutoPlay applet, then create a new String value, give it name 1 and set its value to AutoPlay. If you want to show more applets, then simply create more String values with names 2, 3 and so on and set their values to the applet label.
Now Windows will only show the applets which you mentioned in String values, other applets will be hidden.
METHOD D: For Windows 95, 98 & Me
1. Open "%windir%\Control.INI" file. Where "%windir%" denotes Windows folder which is present in system drive where Windows is installed.
2. You'll see a line saying [don't load] in the file. If you can't find it, then create a new line at last.
3. Now under this line, you can set .CPL file name of your desired applet which you want to hide in following format:
filename.cpl=no
e.g.,
If you want to hide Display applet, then the syntax will be:
desk.cpl=no
You can create similar lines for other applets which you want to hide. The .CPL file name can be obtained from the list mentioned in METHOD A.
METHOD E: Using TweakUI Power Toy
You can also use Microsoft official powertoy "TweakUI" to easily hide/show control panel applets.
Download TweakUI from here. Run it and click on "Control Panel" in left side section. Now in right-side list, you can easily hide/show desired applets by just enabling/disabling the appropriate applet checkbox.

Click on Apply button and you have done.
NOTE: This tutorial can also be used in case some applets in Control Panel have been disabled accidentally and you want to enable them again. Just follow the steps mentioned in above methods and delete the required string value or line.

Download All Missing 100+ Wallpapers Not Included in Windows Vista

Although Windows Vista comes with some pretty nice wallpapers but there are lots of people of different tastes who didnt like the bundled wallpapers. Here I'm sharing 100+ wallpapers created by the same person Mike Swanson, a Microsoft Technical Evangelist with the Developer and Platform Evangelism organization, who also created a few Vista default wallpapers.

All wallpapers are available in 1920 x 1200 (16:10 aspect ratio, "widescreen") and 1600 x 1200 (4:3 aspect ratio, "standard").
Download Widescreen Wallpapers Pack (53.1 MB)
Download Standard Wallpapers Pack (45.6 MB)
Download Separate Wallpapers Here

Solution: Windows Desktop Does Not Save User Customized Settings

Sometimes people face a problem in Windows when Windows doesnt remember their customization settings on Desktop and taskbar, like icons positions, toolbars positions, taskbar position, etc. Recently I got a similar mail from a visitor "Onie Ward":
I downloaded something called Vista Customization Pack.
I've tried to uninstall this program (I'm on Windows XP) and it seems to have worked, EXCEPT that every time I login, my icons all line up on the left hand side of the page. I move them back to where I want them, but every login...moved. It all started when I installed Vista Customization Pack. I've emailed them, but haven't heard back.
Can you help?? Thanks.
So if you are also facing such problem, then this tutorial will help you in fixing the issue:
1. Open regedit and check for a DWORD value "NoSaveSettings" in right-side pane under following keys:
HKEY_CURRENT_USER\Software\Microsoft\Windows\CurrentVersion\Policies\Explorer
HKEY_USERS\.Default\Software\Microsoft\Windows\CurrentVersion\Policies\Explorer
HKEY_LOCAL_MACHINE\Software\Microsoft\Windows\CurrentVersion\Policies\Explorer
HKEY_USERS\.Default\Software\Microsoft\Windows NT\CurrentVersion\Program Manager\Restrictions
The DWORD value must present in any of above mentioned locations, most probably in the last one.
2. Once you find the DWORD value, delete it and restart your system. It'll solve your problem and Windows will remember your desktop settings.

How to Fix / Troubleshoot Various Taskbar Problems in Windows?

Here you can find solutions for a few frequently asked problems which are related to Windows Taskbar like:
  • Taskbar context menu is disabled. No menu appears when you right-click on taskbar.
  • "Lock the Taskbar" option is disabled.
  • Can't add toolbars using "Toolbars" option in Taskbar context menu.
  • Can't open Taskbar Properties. An error message appears.
  • Can't resize or move Taskbar.
So here we start:
=======================================
1. Taskbar context menu is disabled. No menu appears when you right-click on taskbar.
Sol. Open regedit and goto:
HKEY_CURRENT_USER\Software\Microsoft\Windows\CurrentVersion\Policies\Explorer
In right-side pane, delete "NoTrayContextMenu" DWORD value.
=======================================
2. "Lock the Taskbar" option is disabled. Whenever you right-click on Taskbar, "Lock the Taskbar" option is grayed out:
Lock_Taskbar_Option_Disabled.jpg
Sol. Open regedit and goto:
HKEY_CURRENT_USER\Software\Microsoft\Windows\CurrentVersion\Policies\Explorer
In right-side pane, delete "LockTaskbar" DWORD value.
=======================================
3. Can't add toolbars using "Toolbars" menu in Taskbar context menu. All options are grayed out:
Taskbar_Toolbars_Restriction.jpg
Sol. Open regedit and goto:
HKEY_CURRENT_USER\Software\Microsoft\Windows\CurrentVersion\Policies\Explorer
In right-side pane, delete "NoCloseDragDropBands" DWORD value.
=======================================
4. Can't open Taskbar Properties. Whenever you click on "Properties" in taskbar context menu, an error message appears:
Taskbar_Properties_Restrictions.jpg
Sol. Open regedit and goto:
HKEY_CURRENT_USER\Software\Microsoft\Windows\CurrentVersion\Policies\Explorer
In right-side pane, delete "NoSetTaskbar" DWORD value.
=======================================
5. Can't resize or move Taskbar even "Lock the Taskbar" option is unchecked.
Sol. Open regedit and goto:
HKEY_CURRENT_USER\Software\Microsoft\Windows\CurrentVersion\Explorer\Advanced
In right-side pane, delete "TaskbarSizeMove" DWORD value.

#
### ###