I was looking into various system files using Resource Hacker to find a BITMAP file. Although I couldn't find that particular BITMAP file but found something interesting which I would like to share in this topic.
When you install Windows 7 in a new computer system or create a new user account in Windows 7, by default Windows assigns built-in "Flower" image as profile picture for the new user account.
You can change this profile picture using User Accounts applet in Control Panel. But if you have many user accounts in your computer and want to set your desired image or company logo as user profile picture for all accounts in a single step, this tutorial will definitely help you.

Today we are going to share a very simple and secret trick which will allow you to replace default built-in flower profile picture with your desired image so that if you create a new user account in Windows, the new account will have your desired image as its profile picture instead of default flower picture.
We are not going to use any registry trick or Resource Hacker trick in this tutorial. We'll just replace an existing BITMAP file with our desired BITMAP file.
So without wasting time, lets start the tutorial:
1. The default flower profile picture is actually a BITMAP file which is stored in following folder:
%ProgramData%\Microsoft\User Account Pictures\PS: Copy the above string and paste in RUN or start menu search box and press Enter. It'll directly open the folder in Explorer window.
The BITMAP file name is user.bmp and its a 128x128, 24-bit bitmap file.

2. We just need to create a new BMP file in an image editing software like MS Paint, Adobe Photoshop, GIMP, etc but we'll keep its size 128x128 pixels similar to default BITMAP file.
3. Once you finish creating the desired BITMAP file, save it at any location with user.bmp file name.
4. Now you'll need to replace existing user.bmp file present in "User Account Pictures" folder mentioned in STEP 1 with your newly created BMP file.
Before replacing default user.bmp file, you should create a backup of the file so that you can restore it later if you want. To take a backup, you can simply rename it to any other name like user_backup.bmp.
Now copy new user.bmp file to "User Account Pictures" folder.
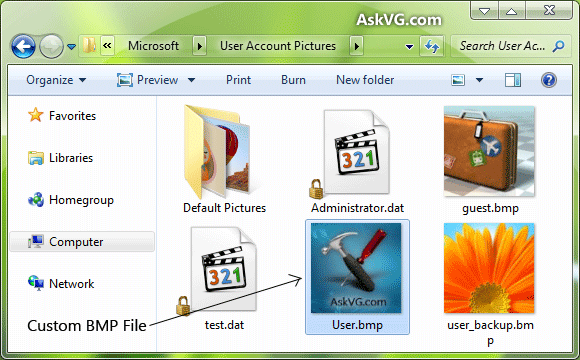
5. That's it. Since you have replaced default BITMAP file with your new one, now all new and existing user accounts which have their profile picture set to default flower picture will automatically start showing new picture which you created in STEP 2.

If your existing user account doesn't show new picture, restart or log off and it'll start using new BITMAP as profile picture.
BONUS TIP: All other profile pictures which are shown when you click on "Change your picture" link in User Accounts applet of Control Panel, are stored in "%ProgramData%\Microsoft\User Account Pictures\Default Pictures" folder. If you want to customize all of them, you can follow above mentioned steps for each BITMAP file.
BONUS TIP 2: You can also customize profile picture for "Guest" account by replacing guest.bmp file present in same folder mentioned in STEP 1.
PS: I don't have Windows XP and Vista installed, so can't check this trick in both OS. If you have Windows XP or Vista, please check this method and let me know if it also works in XP and Vista or not.


