Friends

This is default featured post 1 title

Go to Blogger edit html and find these sentences.Now replace these sentences with your own descriptions.This theme is Bloggerized by Lasantha Bandara - Premiumbloggertemplates.com.

This is default featured post 2 title

Go to Blogger edit html and find these sentences.Now replace these sentences with your own descriptions.This theme is Bloggerized by Lasantha Bandara - Premiumbloggertemplates.com.

This is default featured post 3 title

Go to Blogger edit html and find these sentences.Now replace these sentences with your own descriptions.This theme is Bloggerized by Lasantha Bandara - Premiumbloggertemplates.com.

This is default featured post 4 title

Go to Blogger edit html and find these sentences.Now replace these sentences with your own descriptions.This theme is Bloggerized by Lasantha Bandara - Premiumbloggertemplates.com.

This is default featured post 5 title

Go to Blogger edit html and find these sentences.Now replace these sentences with your own descriptions.This theme is Bloggerized by Lasantha Bandara - Premiumbloggertemplates.com.

Thursday, June 30, 2011

Official Windows 7 RC Build 7100 Released to OEM Partners and TAP Gold Customers

Now its clear that Build 7100 is the official Windows 7 RC (Release Candidate) build. Neowin is reporting that Microsoft has provided this RC build to OEM partners and TAP gold customers. RC build 7100.0.winmain_win7rc.090421-1700 was compiled on Tuesday.
Windows_7_RTM.png
MSDN and TechNet subscribers are expected to receive this build within next week where as the Public release might happen on 5th May.

Windows 7 RC Release Schedule: TechNet & MSDN on 30 April, Public Release on 5 May

Finally Microsoft has officially announced the release schedule for Windows 7 Release Candidate. Today Windows Team Blog made an announcement about Windows 7 RC:
There certainly has been a lot of discussion about Windows 7 in the last few weeks. A lot of folks want to know when they can get their hands on the official RC, when we are going to RTM, and what I had for breakfast.
I’m pleased to share that the RC is on track for April 30th for download by MSDN and TechNet subscribers. Broader, public availability will begin on May 5th.
So if you are a TechNet or MSDN subscriber, you can download Windows 7 RC on April 30. If you are not a subscriber, no need to worry. The public release would be on May 5.

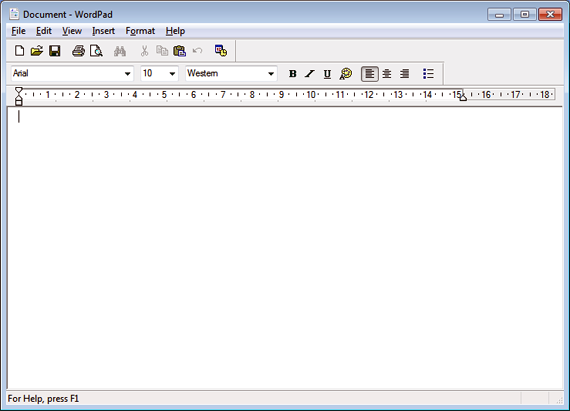
How to Get the Good Old Wordpad (without Ribbons) Working in Windows 7?

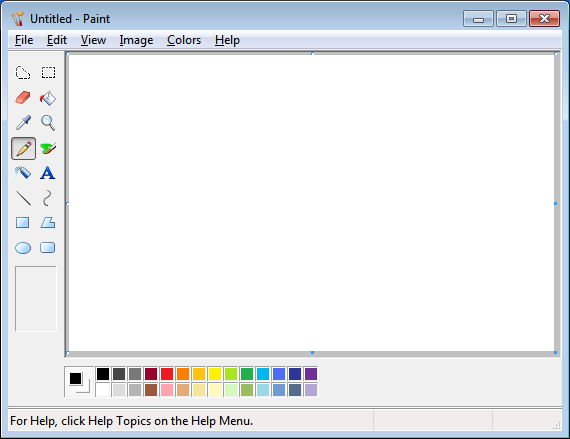
Someone asked us how can he get the good ol' Wordpad and Paint back in Windows 7 as he can't get used to the new ribboned interface. So here we'll tell you the way to get the old Wordpad and Paint back in Windows 7. Actually Windows 7 supports the old Wordpad and Paint.
Following tutorial will show you how to get old Paint working in Windows 7:
How to Get the Good Old MS Paint (without Ribbons) Working in Windows 7
And here is step-by-step tutorial to get old Wordpad working in Windows 7:
Get Old Wordpad working in Windows 7:
If you have Windows Vista installed along with Windows 7, you can directly run the "wordpad.exe" file present in "%Programfiles%\Windows NT\Accessories" folder and it'll run the old Wordpad without any problem.
You can also create a shortcut of this file at Desktop or in Startmenu so that you can easily access it.
But if you want to completely replace the new Wordpad in Windows 7 with the old Wordpad, then you can follow these simple and easy to use steps:
1. Open following folder:
%Programfiles%\Windows NT\Accessories
You can open it by typing the path in RUN dialog box and press Enter.
2. Now take ownership of "wordpad.exe" file. To take ownership, please follow this tutorial:
Add Take Ownership Option in File / Folder Context Menu in Windows Vista and 7
3. Now rename the "wordpad.exe" file to "wordpad_backup.exe".
4. Now go to "en-US" folder and take ownership of "wordpad.exe.mui" file.  After taking ownership rename the file to "wordpad_backup.exe.mui".
5. Now copy "wordpad.exe" file from Vista and paste it in "%Programfiles%\Windows NT\Accessories" folder.
Renaming_Wordpad_exe_file.png
Do the same thing for "wordpad.exe.mui" file, copy it from Vista and paste in "%Programfiles%\Windows NT\Accessories\en-US" folder.
Renaming_Wordpad_MUI_file.png
That's it. Now Windows 7 will start using the old Wordpad.

If you want to use the new Wordpad later, simply delete the new "wordpad.exe" and "wordpad.exe.mui" files and then rename the backup files to their default names.
NOTE: If you don't have Windows Vista installed, you can download the required "wordpad.exe" and "wordpad.exe.mui" files from following link:
Download Link

How to Get the Good Old MS Paint (without Ribbons) Working in Windows 7?

Recently we told you how can you get old Wordpad working in Windows 7: How to Get the Good Old Wordpad (without Ribbons) Working in Windows 7
Now its turn of MS Paint.
Get Old Paint working in Windows 7:
If you have Windows Vista installed along with Windows 7, you can directly run the "mspaint.exe" file present in "%windir%\System32" folder and it'll run the old Paint without any problem.
You can also create a shortcut of this file at Desktop or in Startmenu so that you can easily access it.
But if you want to completely replace the new Paint in Windows 7 with the old Paint, then you can follow these simple and easy to use steps:
1. Open following folder:
%windir%\System32
You can open it by typing the path in RUN dialog box and press Enter.
2. Now take ownership of "mspaint.exe" file. To take ownership, please follow this tutorial:
Add Take Ownership Option in File / Folder Context Menu in Windows Vista and 7
3. Now rename the "mspaint.exe" file to "mspaint_backup.exe".
4. Now go to "en-US" folder and take ownership of "mspaint.exe.mui" file.  After taking ownership rename the file to "mspaint_backup.exe.mui".
5. Now copy "mspaint.exe" file from Vista and paste it in "%windir%\System32" folder.

Do the same thing for "mspaint.exe.mui" file, copy it from Vista and paste in "%windir%\System32\en-US" folder.

That's it. Now Windows 7 will start using the old Paint.

If you want to use the new Paint later, simply delete the new "mspaint.exe" and "mspaint.exe.mui" files and then rename the backup files to their default names.
NOTE: If you don't have Windows Vista installed, you can download the required "mspaint.exe" and "mspaint.exe.mui" files from following link:
Download Link
NOTE: 64-bit Windows users will need to follow the above steps in "Windows\sysWOW64" and "Windows\sysWOW64\en-US" folders as well.

Windows 7 RC Available to Connect, TechNet and MSDN Subscribers, Public Release on 5th May

The much awaited Windows 7 Release Candidate (RC) is now available to Connect, TechNet and MSDN subscribers as announced earlier by Microsoft. So if you are a Connect, TechNet or MSDN subscriber, just log into your account and start downloading Windows 7 RC.
Windows_7_RTM.png
If you are not a subscriber, no need to worry. Microsoft will release the same RC build to public on 5th May on Microsoft Download Center. There will be no download limit this time, so you can download your very own Windows 7 RC copy as soon as it releases.

Windows 7 Release Candidate (RC) Build Information

As we know Windows 7 RC has been released to Connect, TechNet and MSDN subscribers. Following is some important information about this RC build, which you should know:
File Size:
x86 version - 2.47 GB
x64 version - 3.2 GB
Product Key:
Windows 7 Beta Product key will not work in RC build. So you'll need to obtain a new Product key which is available in your account page.
Expiry Date:
Windows 7 RC will expire on March 1, 2010. At this time the system will reboot every two hours. The license of windows 7 RC will expire June 1, 2010.
Installation:
You can either upgrade from a Windows Vista system, or do a custom (clean) installation of Windows 7 RC. Windows 7 Beta users will need to do a custom (clean) installation.
Windows XP users will also need to do a custom (clean) installation.
Bug Report:
Since its an RC build, the Launch UI for the Feedback Tool has been removed but its still there. If you really want to provide feedback, you can run the Feedback Tool by using following command:
rundll32.exe FeedbackTool.dll,ShowWizard
You can also create a shortcut on Desktop for it.
You should only use the Feedback Tool for reporting:
  • Issues that prevent installation or upgrade
  • Any issues that involve corruption or data loss
  • Security issues
  • Regressions from Beta (Things worked in beta but do not work now)
  • Any application or device issues that would prevent you from using Windows 7 as your primary OS.
  • Reproducible crashes or hangs (issues that you cannot reproduce will be captured by CEIP Telemetry)
Public Release:
Microsoft will release the same RC build to public on 5th May on Microsoft Download Center. There will be no download limit.

How to Upgrade from Windows 7 Beta to RC Build?

As we all know Microsoft has released Windows 7 RC build to Connect, TechNet and MSDN subscribers and public release is set to 5th May. Now if you have downloaded the RC build and you are trying to upgrade existing Windows 7 Beta build to RC, you'll get following error message:
Win_7_Beta_to_RC_Upgrade_Error.png
Actually Microsoft doesn't recommend upgrading from Windows 7 Beta builds to RC build. So its not possible unless you hack a file "cversion.ini" present in Windows 7 RC setup folder.
So if you want to upgrade existing Windows 7 Beta build to RC build, follow these simple steps:
1. Download the Windows 7 RC ISO file and extract it using 7-Zip.
2. Now go to "Sources" folder and look for "cversion.ini" file.
3. Open the file in Notepad and you'll see following lines in the file:
Default_cversion_ini_file.png
4. As you can see the MinClient value is set to 7077 but the public Beta build number was 7000. So just change 7077 to 7000.
Modified_cversion_ini_file.png
5. That's it. Save the file and run the setup.exe file again. Now it'll allow you to upgrade from Beta build to RC build.

[Video] What’s New in Windows 7 Release Candidate (RC)

As we know Windows 7 RC has been released to Connect, TechNet and MSDN subscribers and public release is set to 5th May. The first testing build of Windows 7 released to public was Windows 7 Beta build 7000. If you are still using that Beta build and want to know what things have been changed or added in RC build, then you should watch a new video which has been released by Microsoft:
Download "What's New in Windows 7 Release Candidate (RC)" Video
This video walks through all new changes and features implemented in Windows 7 RC build.
You can also read following topic which describes some new and interesting features of Windows 7:
List of Important Changes from Windows 7 Beta to RC
Also make sure to read some important information about RC build given at following link:
Windows 7 Release Candidate (RC) Build Information

Learn More About Windows 7 Using Free Guides from Microsoft

Tomorrow everyone is going to get the free evaluation copy of Windows 7 RC (We'll post the direct download links tomorrow). If you want to learn more about Windows 7 before start using it, then you must download following interesting guides and videos:
Power Management in Windows 7 Overview
This white paper provides an overview of the power management features in Windows 7. Discover how Windows 7 reduces power consumption and makes power management easier.
Download Link
Enterprise Search in Windows 7 Overview
This document outlines how Windows 7 provides users with an improved and seamless search experience across local and networked corporate data directly within Windows Explorer.
Download Link
Windows 7 Manageability Overview
Windows 7 introduces a number of manageability improvements that can reduce total cost of ownership by helping to increase automation, improve user productivity, and provide flexible administrative control to meet compliance requirements. This paper provides an overview of each of these improvements.
Download Link
Demonstration: Windows 7 VHD Boot
This command line demonstration explains how to build a bootable Windows 7 VHD image from a Windows 7 “install.wim” file using diskpart.exe and imagex.exe.
Download Link
Demonstration: Migrating from Windows XP to Windows 7
Learn how to use the User State Migration Tool (USMT) to migrate user files and settings from Windows XP to Windows 7 using a default installation.
Download Lin

3 Things You Should Kno Before Downloading Windows 7 RC Build

Almost everyone is ready to download free Windows 7 RC build which is going to release to public within few hours. Microsoft has announced that the public release of Windows 7 RC build would happen on 5th May i.e. today. If you have decided to download the RC build and planning to use it, we request you to read following important things which you should know before downloading it:
1. No Download Limit This Time
When Microsoft released Windows 7 Beta build 7000 to public, it was available for a limited period of time. But this time there would be no download limit. You'll have approx. 3 months time to download the RC build. The free public access to Windows 7 RC will end in July 2009.
2. System Requirements
Make sure your system meets the minimum requirements to install Windows 7 RC before you waste your valuable bandwidth in downloading it. Following are the minimum requirements:
x86:
  • 1GHz or faster processor
  • 1 GB of RAM
  • 16 GB of available disk space
  • DirectX 9 graphics device with Windows Display Driver Model 1.0 or higher driver
x64:
  • 1GHz or faster processor
  • 2 GB of RAM
  • 20 GB of available disk space
  • DirectX 9 graphics device with Windows Display Driver Model 1.0 or higher driver
3. Upgrade from Windows 7 Beta to RC is Blocked
Microsoft doesn't allow you to upgrade your system from Windows 7 Beta to RC build because its always advisable to do a clean install of a new test build. But if you don't want to do a fresh installation, you can follow steps given in following tutorial to upgrade from Beta to RC build:
How to Upgrade from Windows 7 Beta to RC Build?
That's all. At last we just want to say, go ahead and install Windows 7 on your system if it supports. Windows 7 is a rock solid OS from Microsoft and you can use it as your primary OS without any problem.
You can get more information about Windows 7 RC build at following link:
Windows 7 Release Candidate (RC) Build Information
Also if you want to know what's new in this RC build, don't forget to watch following video:
What’s New in Windows 7 Release Candidate (RC)
You can find lots of tutorials and interesting information about Windows 7 in our special "Windows 7" section.

Windows 7 RC Build 7100 Released to Public, Download NOW

Finally, finally Microsoft has released the much awaited Windows 7 RC to public as announced earlier. No download limit, no speed limit, so download whenever and wherever you want. Just goto following link and start downloading Windows 7 RC:
Download Windows 7 RC Build 7100
Alternate Link
The download is available in ISO format, so you'll need to burn the image.
Windows 7 RC will expire on March 1, 2010. At this time the system will reboot every two hours. The license of windows 7 RC will expire June 1, 2010.
You can either upgrade from a Windows Vista system, or do a custom (clean) installation of Windows 7 RC. Windows 7 Beta users will need to do a custom (clean) installation. Windows XP users will also need to do a custom (clean) installation.
You can get more information about Windows 7 RC build at following link:
Windows 7 Release Candidate (RC) Build Information
If you are already using an earlier Beta build of Windows 7 and want to upgrade to RC build, you'll not be able to do it because Microsoft has blocked upgrade from Windows 7 Beta to RC build. But there is a small hack to make it possible:
How to Upgrade from Windows 7 Beta to RC Build?
Also make sure your system meets following requirements before installing Windows 7 RC:
Windows 7 System Requirements
If you are eager to know what's new in this RC build, take a look at following video:
[Video] What’s New in Windows 7 Release Candidate (RC)
And don't forget to visit our special "Windows 7" section where you can find lots of interesting tutorials and information about Windows 7:
Windows 7 Section on AskVG
So go fast and grab your very own Windows 7 RC copy and start enjoying it...

Direct Download Links for Windows 7 RC Build

Windows 7 RC build 7100 has been released to public which can be downloaded using following link: Windows 7 RC Build 7100 Released to Public, Download NOW
You'll need to go through a few steps before starting the actual download. A few readers requested for the direct download links, that's why we are putting the direct download links for Windows 7 RC build:
Direct Download Links:
x86 / 32-bit:
http://wb.dlservice.microsoft.com/dl/download/release/windows7/4/0/c/40c1e714-7910-4b38-9b5e-67fa522e6a44/7100.0.090421-1700_x86fre_client_en-us_retail_ultimate-grc1culfrer_en_dvd.iso
x64 / 64-bit:
http://wb.dlservice.microsoft.com/dl/download/release/windows7/e/b/5/eb58e76e-17fa-409b-855f-11fbe84d1c93/7100.0.090421-1700_x64fre_client_en-us_retail_ultimate-grc1culxfrer_en_dvd.iso
NOTE: Copy the link and paste in your browser addressbar and press Enter. It'll work.
So enjoy the links.

“Windows XP Mode” for Windows 7 Released to Public, Download NOW

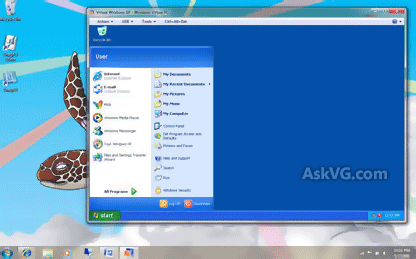
After announcing the public release of Windows 7 RC build, Microsoft has released the much awaited "Windows XP Mode" to public. Windows_7_XP_Mode.png
If you don't know about "Windows XP Mode", here is what "Windows 7 Team Blog" says:
Windows XP Mode is specifically designed to help small businesses move to Windows 7. Windows XP Mode provides you with the flexibility to run many older productivity applications on a Windows 7 based PC.
All you need to do is to install suitable applications directly in Windows XP Mode which is a virtual Windows XP environment running under Windows Virtual PC. The applications will be published to the Windows 7 desktop and then you can run them directly from Windows 7.
You can download Windows XP Mode and Windows Virtual PC using following link:
Download Windows Virtual PC and Windows XP Mode

15 Things To Do After Installing Windows 7 RC

Most of you have already downloaded and installed Windows 7 RC build which was released to public yesterday. If you have not downloaded it yet, then grab your copy now and start enjoying it. Here we would like to mention a few things which you should do after installing Windows 7 RC build:
1. Download Free Windows 7 Guides and Videos from Microsoft
Microsoft is offering a few free guides and videos which can help you in understanding Windows 7 better. So don't forget to take a look at these goodies:
Learn More About Windows 7 Using Free Guides from Microsoft
2. Make Windows 7 Faster
Although Windows 7 is already very fast but we can make it a bit more fast by disabling unnecessary services, startup items and animations. You should take a look at following tutorial:
Master Tutorial to Make Your Windows 7 Super Fast
3. Customize Windows 7 Login Screen
Windows 7 allows you to easily change the Login Screen (or Welcome Screen) using Windows registry. You even don't need any 3rd party software for it. So change the login screen background with your favorite picture:
Windows 7 Supports Login Screen Customization Without 3rd Party Software

4. Remove Unwanted Windows Components
You can completely remove Internet Explorer, Windows Media Player, Windows Search and many other Windows components in Windows 7 which was not possible in previous Windows versions:
Windows 7 Allows to Remove IE, WMP and Many Other Windows Components
5. Organize Taskbar Buttons
Did you know you can move Taskbar buttons to change their positions? Windows 7 allows you to re-arrange taskbar buttons:
Did You Know You can Move Taskbar Buttons in Windows 7?
6. Link your Windows User Account with your Windows Live ID
If you have a Windows Live ID, you can link your Windows 7 user account with your Windows Live ID to start communication between various computers:
How to Link Your Windows 7 User Account with Windows Live ID
7. Show Titlebar Text in Windows 7 Explorer
Windows 7 doesn't show Titlebar text in Explorer. If you want to enable it, you can use small utilities mentioned in following articles:
Classic Shell: Get “Up” Button and Titlebar Text Back in Windows Vista and 7 Explorer
AeroBar: Show Titlebar Text in Windows Vista and 7 Explorer
8. Change Startmenu Power Button Action
By default, Windows 7 Startmenu power button is set to "Hibernate". If you want to change it to Shutdown or anything else, you can follow this tutorial:
How to Customize Power Button Action in Windows 7 Start Menu?
9. Become Familiar with Windows 7 Keyboard Shortcuts
Learn all useful keyboard shortcuts which can make your Windows 7 experience better and easier:
Some Useful Keyboard Shortcuts for Windows 7
10. Customize System Tray Clock
Windows 7 shows both date and time in system tray clock. You can customize it to show Day and Month names as well.
How to Show Day and Month Names in System Tray Date in Windows 7
How to Show AM / PM Symbols in System Tray Clock in Windows 7
11. Get Classic Thin Taskbar Back
If you don't like the new Superbar, you can get the classic thin Taskbar back:
How to Get the Old Thin Taskbar Buttons with Text in Windows 7?
12. Get Windows Media Player Taskbar Toolbar Back
Windows Media Player in Windows 7 doesn't contain the mini Taskbar toolbar. If you are missing it, you can get it back using following tutorial:
How to Get Windows Media Player (WMP) Taskbar Toolbar Back in Windows 7?
13. Get Classic Wordpad Back
Windows 7 contains new redesigned Wordpad which provides Ribbon interface. If you are not used to this new interface, you can get classic Wordpad back using following tutorial:
How to Get the Good Old Wordpad (without Ribbons) Working in Windows 7?
14. Get Classic Paint Back
Windows 7 contains new redesigned Paint which provides Ribbon interface. If you are not used to this new interface, you can get classic Paint back using following tutorial:
How to Get the Good Old MS Paint (without Ribbons) Working in Windows 7?
15. Get "Quick Launch" Toolbar and "Show Desktop" button Back
Microsoft has removed the "Quick Launch" toolbar from Taskbar. That's why you can't even access the "Show Desktop" button. You can get both things back using following tutorial:
How to Get the Good Old "Quick Launch" Toolbar and "Show Desktop" Shortcut Back in Windows 7?

Microsoft Released 2 New IE8 Updates for Windows 7 RC

Microsoft has released 2 new updates for IE8 in Windows 7 RC. These updates will come automatically via Windows Update. [KB969497] Update for IE8 Compatibility View list for Windows 7 RC
This Compatibility View list update makes Web sites that are designed for older browsers look better in Internet Explorer 8. When you install Internet Explorer 8, you can decide whether the sites that you visit should be displayed in Compatibility View. After you install this item, you may have to restart Internet Explorer.
[KB970858] Update to Fix "A webpage is not responding" Error in IE8 for Windows 7 RC
When you use Internet Explorer 8 to browse a Web site on a computer that is running Windows 7 Release Candidate (RC), Internet Explorer 8 stops responding. Additionally, you receive the following error message:
A webpage is not responding on the following website: website_name
So make sure Windows Update is enabled in your system.

How to Disable Aero Shake in Windows 7?

If you are using Windows 7, you might be familiar with its new "Aero Shake" feature which lets you minimize all running windows except the one which you are currently working on using a simple mouse shake. Its quite handy feature but if you by any chance don't like this new feature and want to disable it (as a few people requested in their e-mails), then this tutorial will help you.
First Method: Using Group Policy Editor
1. Type gpedit.msc in RUN or Startmenu Searchbox and press Enter. It'll open Group Policy Editor.
2. Now navigate to:
User Configuration -> Administrative Templates -> Desktop
3. In right-side pane, double-click on "Turn off Aero Shake window minimizing mouse gesture" option and set its value to "Enabled".
Disable_Aero_Shake_in_Win_7_using_g.png
4. That's it. It'll immediately disable Aero Shake in your system.
Second Method: Using Registry Editor
1. Type regedit in RUN or Startmenu Searchbox and press Enter. It'll open Registry Editor.
2. Now go to:
HKEY_CURRENT_USER\Software\Policies\Microsoft\Windows
3. Create a new key Explorer under Windows key so the new path would be:
HKEY_CURRENT_USER\Software\Policies\Microsoft\Windows\Explorer
4. Now select "Explorer" key and in right-side pane, create a new DWORD value NoWindowMinimizingShortcuts and set its value to 1
Disable_Aero_Shake_in_Win_7_using_r.png
5. Restart or log off your system and Aero Shake will be disabled.
NOTE: If you want a ready-made registry script to do the task automatically, then download following ZIP file, extract it and then run "Disable Aero Shake.REG" file to disable Aero Shake feature. A restore script is also included in case you want to restore the default setting.
Download Registry Script

How to Disable Aero Peek in Windows 7?

Yesterday we told you about how to disable Aero Shake in Windows 7: How to Disable Aero Shake in Windows 7?
Now its turn of "Aero Peek" which has replaced the old "Show Desktop" button. It can be found as a small rectangle present at the end of Windows 7 taskbar. When you hover the mouse cursor over it, it allows you to peek behind all open windows by hiding all windows and showing only outlines of all windows.
You can follow this tutorial in case you want to disable "Aero Peek":
First Method: Using Taskbar Properties
The most easiest way to disable "Aero Peek" is using Taskbar Properties.
1. Right-click on Taskbar and select "Properties". Now uncheck the option "Use Aero Peek to preview the desktop".
Disable_Aero_Peek_in_Win_7.png
2. Click on Apply button and it'll disable Aero Peek feature.
Second Method: Using System Properties
You can also disable "Aero Peek" from System Properties.
1. Right-click on Computer icon on Desktop and select Properties (or press WIN + Pause/Break keys). Now click on Advanced system settings link in left side pane (You can open it directly by giving sysdm.cpl command in RUN or start menu search box).
Opening_Advanced_system_Settings_in.png
2. Now click on Settings button in Performance section:
Opening_Performance_Settings_in_win.png
3. Now uncheck "Enable Aero Peek" option.
Disable_Aero_Peek_in_Windows_7.png
4. Click on Apply button and it'll disable "Aero Peek" feature in Windows 7.

Windows 7 RC (32-Bit) Users Immediately Download “KB970789″ Update

Its the first important update for Windows 7 RC. Today Microsoft released this update via Windows Update. The update is "KB970789" which fixes a compatibility issue in Windows 7 RC. This issue is only present in 32-bit version of Windows 7 RC build. Here is what it fixes:
In the English version of Windows 7 Release Candidate (build 7100) 32-bit Ultimate, the folder that is created as the root folder of the system drive (%SystemDrive%) is missing entries in its security descriptor. One effect of this problem is that standard users such as non-administrators cannot perform all operations to subfolders that are created directly under the root. Therefore, applications that reference folders under the root may not install successfully or may not uninstall successfully. Additionally, operations or applications that reference these folders may fail.
Furthermore, the missing security descriptor entries protect non-admin file operations directly under the root.
This problem occurs because the English version of Windows 7 Release Candidate 32-bit Ultimate incorrectly sets access control lists (ACLs) on the root.
We advise you to immediately download and install this update using Windows Update.
More Info

How to Disable Aero Snap in Windows 7?

Recently we posted 2 tutorials for disabling "Aero Shake" and "Aero Peek" features in Windows 7: How to Disable Aero Shake in Windows 7?
How to Disable Aero Peek in Windows 7?
And today, we'll learn how to disable "Aero Snap" feature in Windows 7.
"Aero Snap" lets you minimize, maximize or resize programs windows by dragging-n-dropping them to the screen corners e.g. you can maximize a window by dragging-n-dropping it to the top of screen.
If you want to disable "Aero Snap" in Windows 7, you can follow these simple steps:
1. Open Control Panel and click on "Ease of Access Center" icon.
Opening_Easy_of_access_center.png
2. Now click on "Make it easier to focus on tasks" link present at the end.
Disable_Aero_Snap_in_windows_7.png
3. Now enable "Prevent windows from being automatically arranged when moved to the edge of the screen" option given at last and click on Apply button.
Disable_Aero_Snap_in_win_7.png
4. That's it. It'll disable "Aero Snap" feature in Windows 7.

10 Test Updates Coming for Windows 7 RC (Build 7100) on May 12th

Today "Windows 7 Team Blog" announced about 10 test updates for Windows 7 RC coming on May 12th. If you can remember, the same thing happened with Windows 7 Beta build when Microsoft released 5 test updates on Feb 24th. Here is what "Windows 7 Team Blog" says:
Starting this Tuesday (May 12th) we will release up to ten test updates to PCs running the Windows 7 RC in order to verify our ability to deliver and manage updating of Windows 7 in certain real-life scenarios. These updates do not deliver any new features or fixes.
And here is what "Microsoft Update Blog" says:
We need to verify the update infrastructure to ensure that when we need to release real updates, the process will run smoothly. There will be at most 10 updates, and as before, they will not deliver any new features or fixes.
Many of the updates will install automatically, and a few will not. One of the updates will test a new update notification feature that provides detailed information about available updates that need to be installed manually. Windows 7 RC users will be prompted to install this update and provided more information about this feature –it will not install automatically.
Users will need to go to the Windows Update control panel and manually start installation of the updates that don’t install automatically, and the updates will be clearly marked as test updates.
So guys, make sure to install all these test updates on May 12th.

Windows 7 RTM (Final Version) Coming This Holiday Season

Now its official. No more guesses. Microsoft has officially announced that Windows 7 RTM will release this Holiday season. "Engineering Windows 7" blog made an announcement:
Back in January we released the Beta and updated you on our overall engineering process that will get us from Beta to the Release Candidate. Today, downloading of the Release Candidate started and we’re already seeing a lot of installations and a lot of excitement.
This post is about the path from RC to what we call RTM, release to manufacturing. RTM is the final stage in our engineering of Windows 7, but the engineering continues from RTM until you can purchase Windows 7 and Windows 7 PCs in stores at General Availability, or GA.
Once we have entered the RTM phase, our partners will begin to make their final images and manufacture PCs, and hardware and software vendors will ready their Windows 7 support and new products. We will also begin to manufacture retail boxes for shipment around the world.
Ultimately our partners will determine when their PCs are available in market. If the feedback and telemetry on Windows 7 match our expectations then we will enter the final phases of the RTM process in about 3 months. If we are successful in that, then we tracking to our shared goal of having PCs with Windows 7 available this Holiday season.
Windows_7_RTM.png
So if everything goes fine and on schedule, we can expect Windows 7 RTM this Holiday season. Quite exciting, huh?

Get Glass CMD (Command Prompt) in Windows Vista and 7

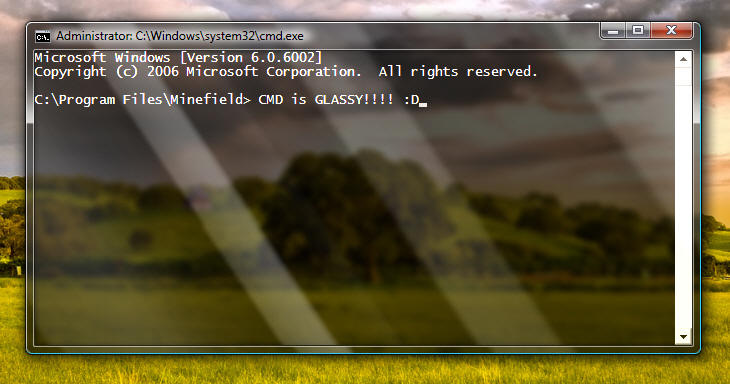
If you are using Windows Vista or 7 and your graphics card supports Aero, then you must be enjoying the transparent windows having glass in their borders. The one and only thing which doesn't match with the new Aero interface is "Command Prompt" window. Microsoft has not changed anything in the Command Prompt window. Its same since ages. Many people use Command Prompt regularly. Wouldn't it be great if we can somehow make the Command Prompt window transparent and have glass in it?
Here your wish comes true. Our friend "komalo" has developed a very small AutoIt script which runs in background and enables glass in all command prompt windows.
Following is a screenshot of Command Prompt window having glass:

As you can see it looks awesome. You can download the script using following link:
Download Glass CMD
More Info
Simply run the EXE file and open Command Prompt. It'll have the glass automatically. So start enjoying it now...

Download Test Updates for Windows 7 RC NOW

As we earlier mentioned Microsoft is going to release 10 test updates for Windows 7 RC build 7100 in order to verify the ability to deliver and manage updating of Windows 7 in certain real-life scenarios. These updates do not deliver any new features or fixes. Now Microsoft has started delivering these test updates and we have received 3 such test updates so far, "KB970420", "KB967355" and "KB970419".
Open Control Panel, click on "Windows Update" and search for new updates and you'll get these test updates in the list.
Remember there will be at most 10 updates, and as before, they will not deliver any new features or fixes.

Windows 7 RTM Branch Build 7127 Leaked and Available for Download

Its not being long time since Microsoft released Windows 7 RC build 7100 to public and now a new build 7127 has been leaked and available for download on various torrent sites. This new build 7127 is a post RC build. Its the second RTM branch build to leak.
The build string is 7127.0.090507-1820. It means the build was compiled on 7th May 2009.
Windows_7_RTM.png
This build was released to a few selected Connect testers but now has been leaked and can be downloaded from torrent sites.
This new build is not much different than the RC build. GUI is same but there might be some bug fixes which are unknown atm.

Get Detailed Power Management Report Using “Powercfg -ENERGY” Command in Windows 7

Here is another interesting feature in Windows 7. Windows 7 comes with a built-in command "powercfg -ENERGY". This command creates a detailed report about your current power management plan. The format of this report is HTML. The report helps in rectifying the issues which decrease the battery backup of your system and you can increase the backup time by fixing those issues.
To use this built-in command:
1. Click on "Start button -> All Programs -> Accessories". Right-click on "Command Prompt" and select "Run As Administrator". If you are prompted to enter password, enter the password and continue. You can also open Command Prompt in Administrator mode by typing "cmd" in Startmenu Search box and press "Ctrl+Shift+Enter".
2. Now provide following command:
powercfg -energy
3. That's it. It'll take 60 seconds and will create an HTML file which you can open in your web browser.
Powercfg_energy_command.png
Thanks to our friend "Rob Margel" for sharing it...

Download Windows XP SP3, Vista SP1 and 7 Features Comparison Chart

If you are wondering which features are new to Windows 7 or which features have been improved in Windows 7, then you should take a look at following comparison chart which can be downloaded from Microsoft Download Center. This chart compares various features like File organization and Search, Security, etc across Windows XP SP3, Windows Vista SP1 and Windows 7.
Windows_XP_Vista_7_Comparison.png
Download Link (PDF File)

Windows 7 Starter Edition Will Not Have 3 Applications Limit

Now that's really interesting. Recently we blogged about the weird 3 applications limit in Windows 7 Starter Edition: Windows 7 Restricted Edition
Windows 7 Starter Edition contains 3 applications limit, i.e. you can't run more than 3 applications simultaneously. If 3 programs are already running and you try to run a new program, you get following message:
Windows_7_Starter_Edition_3_Program.jpg
Now it seems that Microsoft is going to remove this 3 app limit from Windows 7 Starter Edition. Our friend "Paul Thurrott" shared this information:
Microsoft to remove 3 app limit from Windows 7 Starter . No word yet on whether the other lame limitation--the bizarre inability to change the desktop wallpaper--will be fixed as well. To be honest, this is a bigger issue than the 3 app limit, which sounds horrible but doesn't actually come up all that often if at all.
So Microsoft is really going in the right direction with Windows 7. Isn't it?

All-Glass Firefox: Extension to Enable Aero Glass in Mozilla Firefox in Windows Vista and 7

Attention customization lovers! Here is another nice add-on for Mozilla Firefox which enables Aero Glass under Windows Vista and 7. Following is a preview of the final result which you are going to get after installing this small add-on:
All_Glass_Firefox.png
The add-on is called "All-Glass Firefox" created by our friend Ambroos. This add-on adds Aero Glass in Firefox menubar, addressbar, statusbar, Navigation and Bookmarks toolbar.
It also adds a text shadow effect for the text which looks great with the glass.
You can download it using following link:
Download Link
The add-on has been discontinued. You can try a similar add-on Glasser.

Wednesday, June 29, 2011

Microsoft Touch Pack for Windows 7

The most interesting feature about Windows 7 is its in-built touch capability which didn't get much attention among Windows 7 testers. Today Microsoft introduced "Microsoft Touch Pack for Windows 7" which consists of some applications providing touch capabilities. Here are the details taken from "Windows 7 team Blog":
Microsoft Touch Pack for Windows 7 is a set of six multi-touch optimized applications and games that are designed to truly showcase the capabilities of Windows Touch in Windows 7. It consists of 3 casual games, and 3 Microsoft Surface applications that have been created for Windows 7:
Microsoft Surface Globe:
It uses the Virtual Earth 3D engine to display a 3D version of the world. Using multi-touch, you can navigate to different regions, get local information, and “pin” your favorite locations. You can even “fly” around 3D models of buildings in some cities.
Microsoft Surface Collage:
Take your favorite digital photos and arrange and resize them using only your fingertips with Microsoft Surface Collage! Once you have your photos in an arrangement you like, it’s simple to save your collage and make it your desktop background.
Microsoft Surface Lagoon:
It's a screensaver that you can interact with using multi-touch. It recreates the natural environment of water and schooling fish. It is really relaxing to run your fingers through the “water” and hold your finger down and watch the fish gather around.
Microsoft Blackboard:
Solve a puzzle game of physics, called Microsoft Blackboard, by creating a nifty machine on a virtual blackboard. Use gestures to rotate and resize gears, fans, seesaws and more to move balloons and balls toward the light bulbs - and victory.
Microsoft Rebound:
Use your fingers to propel a ball and annihilate your opponent in Microsoft Rebound. Play against the computer or challenge a friend and battle it out in the electrified court to see who the champion is.
Microsoft Garden Pond:
You can guide your origami creations to peaceful areas on the pond or direct them with gestures to complete goals that have been set for you. Gently move the origami by making ripples in the water.
In order to use the Microsoft Touch Pack for Windows 7 – you’ll need a Windows 7 PC that supports multi-touch. The Microsoft Touch Pack for Windows 7 will be available to PC makers (OEMs) who will have the option to pre-install some, none, or all of the applications available in the Microsoft Touch Pack for Windows 7 on PCs designed for Windows Touch.

How to Disable Display of Recent Search Entries in Windows 7 Explorer Search Box?

We have received so many mails about this particular problem so today we decided to post the solution here so that everyone can follow it without any need to send the query to us. Windows 7 automatically stores the search entries which you enter in Windows Explorer Search box:
Recent_Search_History.png
Whenever you click into the Search box, it displays the recent search entries automatically. While its useful for frequent search users, it might become problematic if you use a shared computer and don't want other people know about your recent searches.
So if you want some privacy and don't want people know what you search, here are some easy to use instructions to disable the display of recent search entries in Search box:
1. Type gpedit.msc in RUN or Startmenu Search box and press Enter. It'll open Group Policy Editor.
2. Now go to:
User Configuration > Administrative Templates > Windows Components > Windows Explorer
3. In right-side pane, double-click on "Turn off display of recent search entries in the Windows Explorer search box" and set it to Enabled.
Disable_Recent_Search_History.png
4. That's it. Now Windows will no longer display the recent search entries in Search box.
NOTE: If you don't want to completely disable the display of recent search entries but want to remove a particular entry from the list, then you can simply hover on the entry in Search box and press "Delete" key. It'll immediately delete it from the list.

How to Disable Display of Recent Search Entries in Windows 7 Explorer Search Box?

We have received so many mails about this particular problem so today we decided to post the solution here so that everyone can follow it without any need to send the query to us. Windows 7 automatically stores the search entries which you enter in Windows Explorer Search box:
Recent_Search_History.png
Whenever you click into the Search box, it displays the recent search entries automatically. While its useful for frequent search users, it might become problematic if you use a shared computer and don't want other people know about your recent searches.
So if you want some privacy and don't want people know what you search, here are some easy to use instructions to disable the display of recent search entries in Search box:
1. Type gpedit.msc in RUN or Startmenu Search box and press Enter. It'll open Group Policy Editor.
2. Now go to:
User Configuration > Administrative Templates > Windows Components > Windows Explorer
3. In right-side pane, double-click on "Turn off display of recent search entries in the Windows Explorer search box" and set it to Enabled.
Disable_Recent_Search_History.png
4. That's it. Now Windows will no longer display the recent search entries in Search box.
NOTE: If you don't want to completely disable the display of recent search entries but want to remove a particular entry from the list, then you can simply hover on the entry in Search box and press "Delete" key. It'll immediately delete it from the list.

Hacking “Screen Resolution”, “Gadgets” and “Personalize” Options in Windows 7 Desktop Context Menu

NOTE: This tutorial has been featured by Microsoft. AskVG.com was the first website posting this unique trick.
Windows 7 Desktop context menu contains 2 extra options which were not present in Windows Vista:
  • Screen resolution
  • Gadgets
Win_7_Desktop_Context_Menu_with_Gad.png
Windows 7 stores all these 3 options "Screen resolution", "Gadgets" and "Personalize" under following Registry key:
HKEY_CLASSES_ROOT\DesktopBackground\Shell
This key is new in Windows 7 and none of previous Windows versions including Vista used it.
Here in this tutorial, we'll learn:
  • How to remove "Screen resolution", "Gadgets" and "Personalize" options
  • How to change position of these options
  • How to change icons of these options
  • How to change names of these options
  • How to enable "Personalize" option in Safe Mode
1. How to Remove "Screen resolution", "Gadgets" and "Personalize" Options
Although Windows 7 provides these 2 extra options but it makes the whole context menu a bit larger and some people might not like it. If you are also among those people who prefer minimal things, here are the steps to remove all or any of these 3 context menu items:
Personalize_Only.png Screen_Resolution_Only.png Gadgets_Only.png
1. Type regedit in RUN or startmenu search box and press Enter. It'll open Registry Editor.
2. Now go to:

How to Remove “Next Desktop Background” Option from Windows 7 Desktop Context Menu?

Recently we posted a detailed tutorial to hack Windows 7 Desktop context menu: Hacking "Screen Resolution", "Gadgets" and "Personalize" Options

Here is another small tutorial to remove "Next Desktop Background" option from Desktop context menu which appears when you use Desktop SlideShow feature which allows you to run a SlideShow of selected wallpapers.
Next_Desktop_Background.png
Personally I don't like this extra option because it makes the whole context menu a bit large which doesn't look good. So here are the steps to remove it:
1. Type regedit in RUN or startmenu search box and press Enter. It'll open Registry Editor.
2. Now go to:
HKEY_CLASSES_ROOT\DesktopBackground\shellex\ContextMenuHandlers
3. This key contains a sub-key "DesktopSlideshow".
Desktop_Slideshow_Key.png
4. Delete it and the option will be removed from Desktop context menu.
PS: If you want a ready-made registry script to do the task automatically, download following ZIP file, extract it and run "Remove Next Desktop Background Option.reg" file to remove the option. There is also a "Restore. reg" file to restore the option.
Download Registry Script

How to Add Program Shortcuts and Other Useful Shortcuts with Icons in Windows 7 Desktop Context Menu?


NOTE: This tutorial has been featured by Microsoft. AskVG.com was the first website posting this unique trick.
Today we'll learn how to add any desired program shortcut in Desktop context menu. Also we'll learn to add other useful shortcuts like "Change Wallpaper", "Screensaver", etc.
We have posted a few similar tutorials long time back:
Above tutorials do the same job but there is some difference between these old methods and the new one which we'll discuss today.
In old method, we can't define program icon and the option position in context menu but this new method will allow you to set an icon for the shortcut as well as define its position like on top or bottom.
So here we start the tutorial:
1. Type regedit in RUN or startmenu search box and press Enter. It'll open Registry Editor.
2. Now go to:
HKEY_CLASSES_ROOT\DesktopBackground\Shell
3. Now we'll need to create a new key under "Shell" key. Right-click on "Shell" key and select "New -> Key". Give the new key any desired name e.g. "Registry Editor" (without quotes).
4. Now we'll need to create another new key. Right-click on the new key which we created in the last step e.g. Registry Editor and select "New -> Key". Give the new key name of command.
5. Now select "command" key and in right-side pane, you'll see "Default" String value. Double-click on it and set its value to the path of desired program's EXE file. For example, if you want to add "Registry Editor" shortcut, then set value of "Default" to regedit.exe
Adding_Program_Key.png
6. Now the new shortcut will start appearing in Desktop Context Menu.
New_Program_Shortcut.png
7. Now some advanced options!
You can now define the shortcut icon and position.
To set an icon for the shortcut, select the key created in Step 3 and in right-side pane, create a new String value "Icon". Set its value to your desired icon or simply put the path of program's EXE file and it'll automatically show its default icon.
To set its position in the context menu, create a new String value "Position" and set its value to:
Top (To show it at top)
Bottom (To show it at bottom)
Adding_Program_Key2.png
That's it. Now you'll see an icon near the program shortcut and its new position.
New_Program_Shortcut2.png
8. If you want a ready-made registry script to do the task automatically, then copy paste following code in Notepad and save the file with name "AskVG.REG" (including quotes).
Windows Registry Editor Version 5.00
[HKEY_CLASSES_ROOT\DesktopBackground\Shell\regedit]
@="Registry Editor"
"Icon"="regedit.exe"
"Position"="Bottom"
[HKEY_CLASSES_ROOT\DesktopBackground\Shell\regedit\command]
@="regedit.exe"
Run the file and it'll add the program shortcut in Desktop context menu.
If you want to add other program shortcut, then simply change the BOLD part in the script.
NOTE: You can use this method to add any desired program shortcut or to add various useful shortcuts in Desktop context menu. You just need to simply change the Key name and the value of "command" key to the correct path.
Change_Wallpaper.png Change_Screensaver.png System_Properties-1.png

[Confirmed] No More 3 Application Limit in Windows 7 Starter Edition

Recently it was said that Microsoft might remove 3 application limit from Windows 7 Starter Edition. Today Microsoft has confirmed it. Now its official that Windows 7 Starter Edition will not have this limit and users will be able to run as many applications as they want. Brandon LeBlanc @ Windows 7 Team Blog said:
For the first time, we will be making Windows 7 Starter available worldwide on small notebook PCs. We are also going to enable Windows 7 Starter customers the ability to run as many applications simultaneously as they would like, instead of being constricted to the 3 application limit that the previous Starter editions included.
It is important to note that Windows 7 Starter still includes only a subset of the features offered in the higher editions of Windows 7 such as Windows 7 Home Premium, Windows 7 Professional and above. Windows 7 Starter does not include:
  • Aero Glass, meaning you can only use the “Windows Basic” or other opaque themes. It also means you do not get Taskbar Previews or Aero Peek.
  • Personalization features for changing desktop backgrounds, window colors, or sound schemes.
  • The ability to switch between users without having to log off.
  • Multi-monitor support.
  • DVD playback.
  • Windows Media Center for watching recorded TV or other media.
  • Remote Media Streaming for streaming your music, videos, and recorded TV from your home computer.
  • Domain support for business customers.
  • XP Mode for those that want the ability to run older Windows XP programs on Windows 7.
That's really a wise move. But what about the changing wallpaper restriction?

How to Add Your Name in Windows 7 Desktop Context Menu

NOTE: This tutorial has been featured by Microsoft. AskVG.com was the first website posting this unique trick.
Recently we posted a detailed tutorial about adding your desired application shortcut in Windows 7 Desktop context menu:
Add Program Shortcuts and Other Useful Shortcuts in Windows 7 Desktop Context Menu
Today we'll use the same tutorial for some interesting stuff.
You can add your name at top of the menu and can open any program, Explorer, Documents folder or User Accounts by clicking on it.
Name_in_Win_7_Desktop_Context_Menu.png
You can also add an icon for it as shown in the above screenshot.
So here is the step-by-step guide:
1. Type regedit in RUN or startmenu search box and press Enter. It'll open Registry Editor.
2. Now go to:
HKEY_CLASSES_ROOT\DesktopBackground\Shell
3. Now we'll need to create a new key under "Shell" key. Right-click on "Shell" key and select "New -> Key". Give the new key any desired name e.g. "Name" (without quotes).
4. Now in right-side pane, change value of "Default" to your desired name which you want to show in Desktop context menu. We have chosen ~:: VISHAL ::~ in our example.
5. Now right-click on the new key which we created in step 3, e.g. Name and select "New -> Key". Give the new key name of command.
6. In right-side pane, change value of "Default" to explorer.exe if you want to open Explorer by clicking on it. We have chosen Control userpasswords to open User Accounts applet in our example.
7. To set an icon for the shortcut, select the key created in Step 3 and in right-side pane, create a new String value "Icon". Set its value to your desired icon. We have set it to imageres.dll,206 in our example.
To set its position in the context menu, create a new String value "Position" and set its value to:
Top (To show it at top)
Bottom (To show it at bottom)
We have set it at top.
Add_Name_in_Win_7_Desktop_Context_M.png
8. That's it. Now you can have your name with an icon in Desktop context menu.
PS. If you want a ready-made registry script to do the task automatically, then copy paste following code in Notepad and save the file with name "AskVG.REG" (including quotes).
Windows Registry Editor Version 5.00
[HKEY_CLASSES_ROOT\DesktopBackground\Shell\name]
@="~:: VISHAL ::~"
"Icon"="imageres.dll,206"
"Position"="Top"
[HKEY_CLASSES_ROOT\DesktopBackground\Shell\name\command]
@="Control userpasswords"
Run the file and it'll add the program shortcut in Desktop context menu.
To change the name, icon or associated application path,simply change the BOLD part in the script.

#
### ###