
Part 3 - Functions
Functions explained. Frankenstein used these to create his monster although maybe not in PHP
Go to Blogger edit html and find these sentences.Now replace these sentences with your own descriptions.This theme is Bloggerized by Lasantha Bandara - Premiumbloggertemplates.com.
Go to Blogger edit html and find these sentences.Now replace these sentences with your own descriptions.This theme is Bloggerized by Lasantha Bandara - Premiumbloggertemplates.com.
Go to Blogger edit html and find these sentences.Now replace these sentences with your own descriptions.This theme is Bloggerized by Lasantha Bandara - Premiumbloggertemplates.com.
Go to Blogger edit html and find these sentences.Now replace these sentences with your own descriptions.This theme is Bloggerized by Lasantha Bandara - Premiumbloggertemplates.com.
Go to Blogger edit html and find these sentences.Now replace these sentences with your own descriptions.This theme is Bloggerized by Lasantha Bandara - Premiumbloggertemplates.com.


<?php include(); ?>
<li><a href="index.php">Home</a></li>

<li><a href="about.php">About Us</a></li>

<li><a href="products.php">Products</a></li>

<li><a href="services.php">Services</a></li>
<?php include("includes/menu.php"); ?>
<ul id="navigation"><?php include("includes/menu.php"); ?></ul>
<ul id="navigation">

<li><a href="index.php">Home</a></li>

<li><a href="about.php">About Us</a></li>

<li><a href="products.php">Products</a></li>

<li><a href="services.php">Services</a></li>
<ul id="navigation">

<li><a href="index.php">Home</a></li>

<li><a href="about.php">About Us</a></li>

<li><a href="products.php">Products</a></li>

<li><a href="services.php">Services</a></li>

<li><a href="contact.php">Contact Us<a/></li>

</ul>
<li><a href="../index.php">Home</a></li>

<li><a href="../about.php">About Us</a></li>

<li><a href="../products.php">Products</a></li>

<li><a href="../services.php">Services</a></li>
This won't work when the HTML is called because the links will be
pointing towards the wrong place. The same goes for images as well!
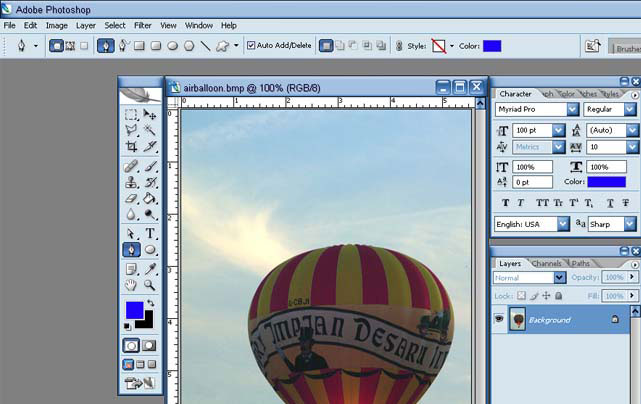 2. With the pen tool selected start at the top and place a point where there seem to be the start of a
main angle or a new line, try not to go crazy, will add more points in a bit. (For example, if you had a
square every corner would be the beginning of a new line/angle.)
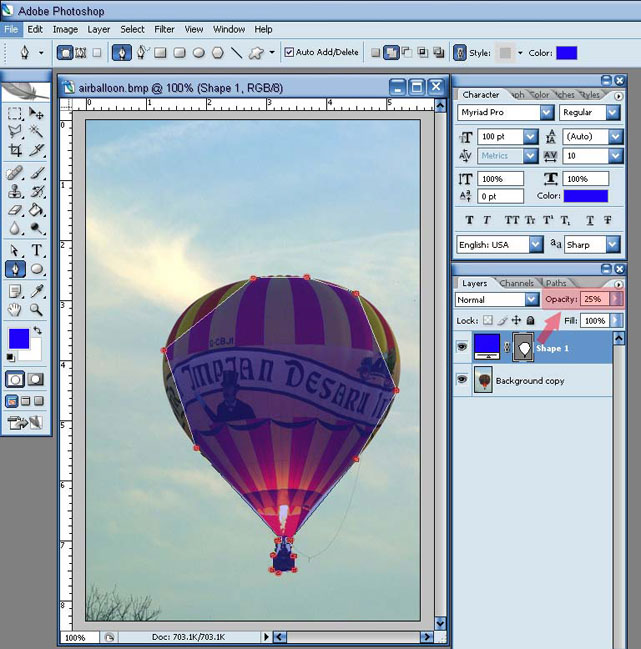 After you have about 3 points go over to you layers palate and change the Opacity for the shape layer to
about 25 percent. This way you can see what you're doing. When you get back to where you started click
on the very first point you made. A small circle will appear when your pen hovers over the first point
before you click on it.
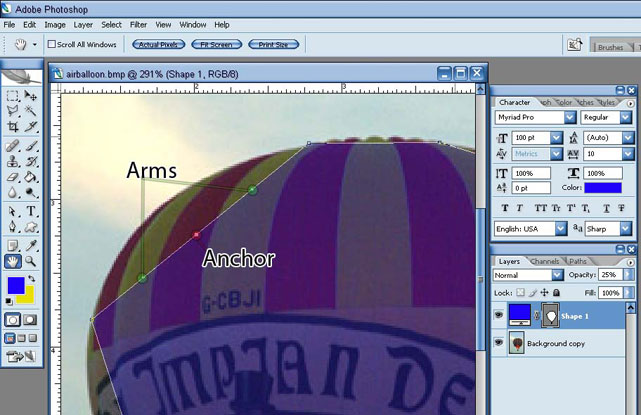 4. Now, with just the pen tool click on the line where you want to add the point. Once you do that 3
dots will appear. The one in the middle is the point or anchor. The 2 to the sides are the arms that allow you
to change the shape of the line. Hold down "ctrl" (or press A) and drag the anchor to the edge of the
picture. If it does not fit properly play around with the arms until it does. Drag the arms up or down to
change the arch and drag them in or out to change the length of the arch. (Note: you have to use the Direct
Selection Tool to move points)
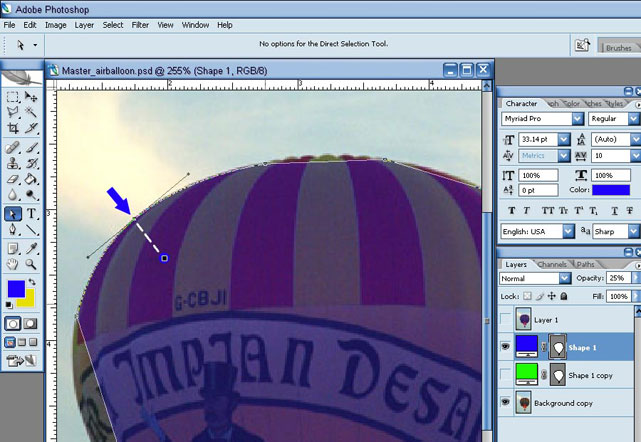 5. Do this with the rest of the balloon until you have all of the points outlining the balloon. Don't
worry about the inside of the basket where the arms are. You will see how to fix those later. Your outline
should now look like this.
 6. Now, select the Move tool (keyboard shortcut V). Hold down the "ctrl" key and click on the
outline layer of the balloon. In previous versions of Photoshop you could control click anywhere on the
desired layer within the layers palate, but in PS2 you must control click on the picture or shape within the
layers palate. (You will know you are doing it correctly when the white hand turns into a white hand with a
dotted square box.) Once you click on the layer your outline will become a dotted outline just like when
you use the marquee tool.
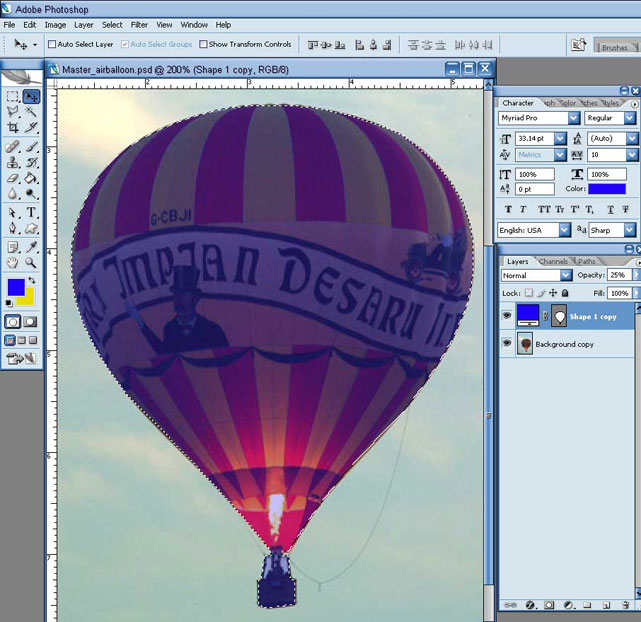 7. Next select the layer that has the actual picture you want to crop so that it's highlighted in the
layers palate. In this tutorial it's the "Background copy" layer. Then, at the top menu, go to "Layer" –
"Layer Mask" – and select "Reveal Selection". Or you can just click the "Layer Mask" icon at the bottom
of the layers palate. Your image should now be cropped and look like this.
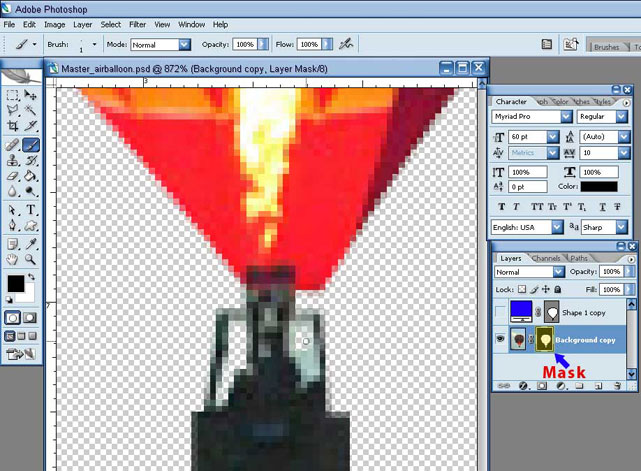
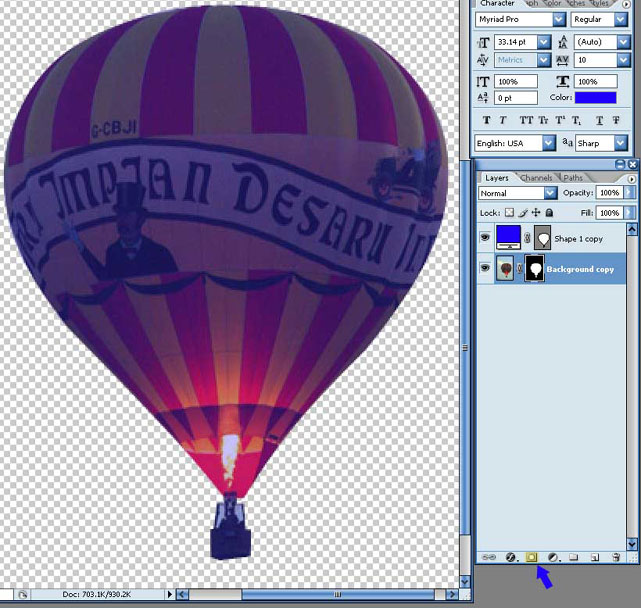 8. You can now turn off your "Shape" or the outline you made of the balloon. Now if you
remember the basket had arms that came up and attached to the balloon and you could see the sky in
between those arms. We are now going to fix that. Select the mask of your balloon layer, which is the
black/white outline next to your balloon image. Then select the brush tool (keyboard shortcut B). Your
colors turn to 100% black and white. If not you do not have the masked selected. Now, with the black
selected use your brush to and draw over the area you want to disappear. It will work like an eraser.
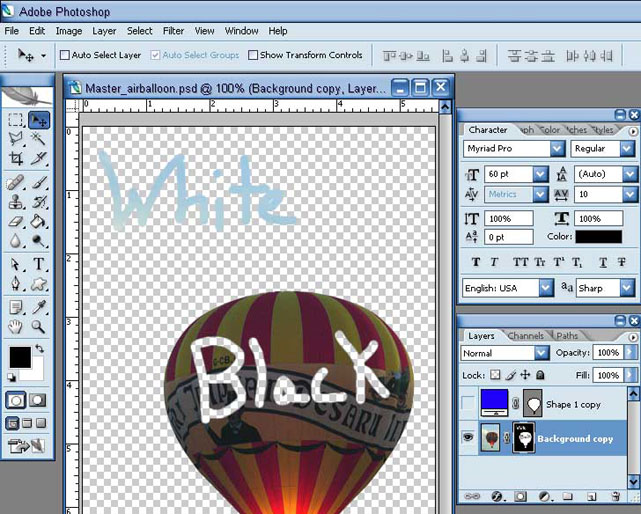
 9. Using the color white will add the image back. Experiment, select the white color and drag your
brush across the picture and watch how the image reappears. Or do it with the black color selected and
scribble over the picture. This really helps when you are cropping out hard object like people and hair. Best
of all it saves the picture and keeps you from having to duplicate the image a bunch of times, or make a
bunch of layer and so on.
 10. Now you can add any background you want to your balloon image. I hope this tutorial was fun
and informative.
<?php

//--------------------------Set these paramaters--------------------------


// Subject of email sent to you.

$subject = 'Results from Contact form';


// Your email address. This is where the form information will be sent.

$emailadd = 'mail@rdsnetworks.net';


 // Where to redirect after form is processed.

$url = 'http://www.rdsnetworks.net/confirmation.html';


// Makes all fields required. If set to '1' no field can not be empty. If set to '0' any or all fields can be empty.

$req = '0';


// --------------------------Do not edit below this line--------------------------

$text = "Results from form:\n\n";

$space = '  ';

$line = '

';

foreach ($_POST as $key => $value)

{

 if ($req == '1')

 {

  if ($value == '')

  {echo "$key is empty";die;}

 }

 $j = strlen($key);

  if ($j >= 20)

  {echo "Name of form element $key cannot be longer than 20 characters";die;}

 $j = 20 - $j;

  for ($i = 1; $i <= $j; $i++)

  {$space .= ' ';}

 $value = str_replace('\n', "$line", $value);

 $conc = "{$key}:$space{$value}$line";

 $text .= $conc;

 $space = '  ';

}

mail($emailadd, $subject, $text, 'From: '.$emailadd.'');

echo '<META HTTP-EQUIV=Refresh CONTENT="0; URL='.$url.'">';

?>
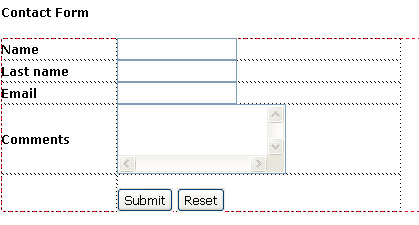
 The Name attribute is very clear gives your form a name. We have given our form name as Contact form.


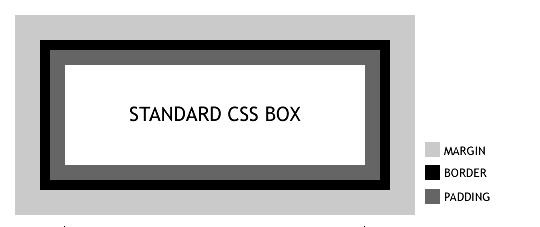 Margins are always transparent. They seperate the box from surrounding elements. They do not contribute to the width of the box.
#example { width: 300px; border: 10px; padding: 15px; margin: 25px; }
For the above CSS, the diagram below shows how a standard browser renders the box in comparision to IE 5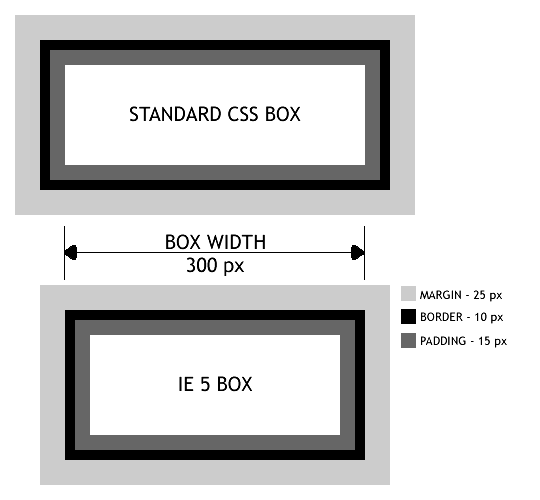 IE 5 considers the width 300px inclusive of border and padding, hence for IE 5,
#example {

 width: 350px;

 border: 10px;

 padding: 15px;

 margin: 25px;

}
Now its time to combine the 2 widths and feed the correct browser the correct width
<style>

#example {

 width: 300px; /* for standards based browsers */

 border: 10px;

 padding: 15px;

 margin: 25px;

} </style>

<!--[if IE 5]>

<style>

#example {

 width: 350px; /* for IE 5 */

}

</style>

<![endif]-->
ass="wrapper"> all page content goes here
div.wrapper  {

       margin-left : 10%;

       margin-right : 10%;

}>
ass="wrapper"> ALL content goes here
>
body {

   text-align : center ;

   }

div.wrapper {

   text-align : left ;

   margin-left : auto ;

   margin-right : auto ;

   }
>


ass="wrapper"> all content goes here


>body {
text-align : center ;
min-width : 770px ;
}
div.wrapper {
width : 770px ;
text-align : left ;
margin-left : auto ;
margin-right : auto ;
position : relative ;
}


