 System Restore is a very useful feature included in Windows
How to open System Restore
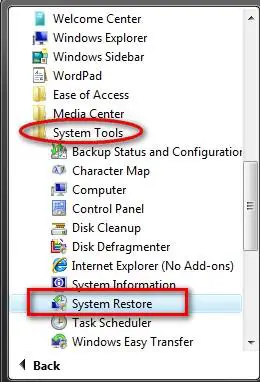
First, type 'system restore' in the Start Menu search field and press Enter or click on the search 
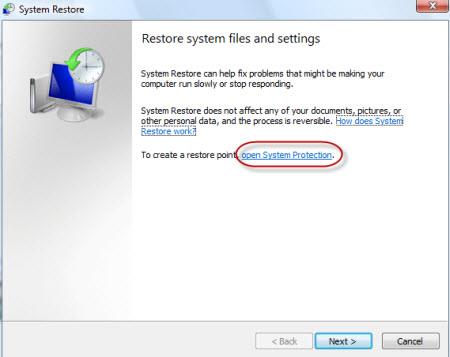
The main System Restore window will now open. Click on the 'open System Protection' link shown below.
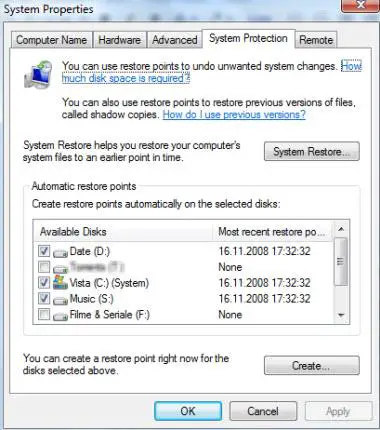
In the new window you will see a list with all your partitions and when was the most recent restore point created.
How to disable System Restore
Each partition on which System Restore is enabled has a box checked on its left. To disable System Restore on any of the selected partitions you need to uncheck those boxes. Unchecking all boxes will mean that System Restore is completely disabled.
When you uncheck a box, you will receive a warning like the one shown below.
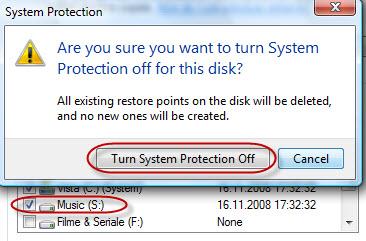
Click on 'Turn System Protection Off' and System Restore will be disabled.
NOTE: Unless you use other system recovery tools, it is recommended to leave System Restore enabled at least for your main system 'C:' drive.
How to enable System Restore
Enabling System Restore on other partitions than the 'C:' drive is very easy. In the System Protection tab, simply check the other partitions for which you want to enable it.
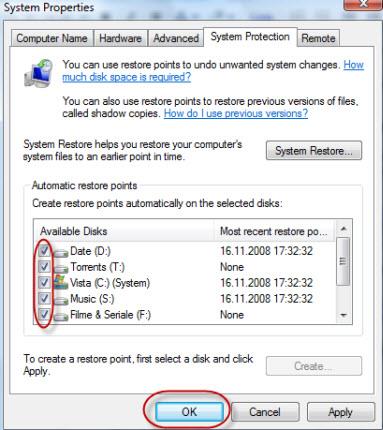
When done, click on OK. From now on, System Restore will create restore points for all the partitions that you have selected.
Followers
Labels
- All (2600)
- win 7 (496)
- win vista (329)
- download (219)
- win xp (199)
- tutorial web (112)
- troubleshooting (72)
- servis (70)
- win 8 (70)
- anti virus (42)
- design (20)
- game (15)
- Windows (5)
- alqur'an (1)
- ubuntu (1)
Blog Archive
-
▼
2011
(2867)
-
▼
March
(322)
-
▼
Mar 06
(15)
- Discover Windows Live Photo Gallery 2011 In Screen...
- Discover Windows Live Messenger 2011 in Screenshots
- How to Install Windows Live Essentials 2011 Tools
- Changing the Display Language Used by Windows Live...
- What Is an User Account & When You Need More than One
- How to Edit User Accounts
- Log on Automatically to Windows 7 Without Typing Y...
- Manage User Accounts
- Change Owner v1.0
- How to disable or enable System Restore
- Change the amount of space used by System Restore
- Change the System Restore Frequency with CSRF v1.0...
- Change the System Restore Frequency with CSRF v1.0...
- Change the amount of space used by System Restore
- System Restore
-
▼
Mar 06
(15)
-
▼
March
(322)
Total Pageviews
Popular Posts
-
We have posted about " Windows 7 Little Tweaker " in past which allows you to tweak a few interesting things in Windows 7. Today w...
-
We all customization lovers know that we need to take ownership of a system file before replacing or modifying the file in Windows. Almos...
-
Tentunya para blogger atau siapa-pun ingin agar web atau blog-nya mendapatkan predikat atau yang biasa disebut dengan pagerank-nya bisa ...
-
This feature is called " Password Reveal Button " or " Show Password Button ". You might have noticed that whenever yo...
-
Mbah dukun ini benar-benar mantep ilmu sihirnya, ini adalah kejadian nyata dimana dukun ini telah melakukan perbuatan cabul kepada ...
-
The perfect storm is on the loose … harness it’s energy while picking up objects in its path. Your storm gains force and life by eating ...
-
If you can't see your optical drives (CD/DVD Drives/Writers) in My Computer, then this tutorial will help you: 1. Type regedit in RUN d...
-
Recently one of our reader " James " asked us about following problem in an email: Whenever he tries to start " Speech Recog...
-
ArcSoft Audio Decoder Pack It’s important to note that changing a filter’s merit probably won’t have an immediate effect. At the...
-
" The Search Bar " gadget is an excellent gadget for Windows 7 users which allows you to easily search from various providers ri...
Blogger Tricks
Blogger Themes
Download
Copyright © 2011 Ilmu Komputer & Software Gratis | Powered by Blogger


0 comments:
Post a Comment