
Did you know you can link your Windows Live ID with your Windows 7 user account? Yep, if you are a Windows 7 user and also have a Windows Live ID, you can link both of them. Why? Here is what Microsoft has to say:
1. Open Control Panel and click on "User Accounts" applet. Now click on "Link online IDs" link given in left sidebar.
2. Now click on "Add an online ID provider" link given at the bottom.
3. It'll open a web page in your browser. You'll need to click on the "Windows Live" logo present in the middle.
4. It'll open a new web page where you can download the "Windows Live ID Sign-in Assistant" which will install the required "Windows Live ID online provider".
PS: You can download the "Windows Live ID sign-in assistant" directly by going to following link:
Download Windows Live ID Sign-in Assistant
Now you can ask why should you follow steps 1-3 when you can directly download the sign-in assistant using the above mentioned link? The answer is very simple. At the moment only "Windows Live ID online provider" is available but there would be many other online providers in future and you'll need to follow steps 1-3 to install them.
5. After installing the sign-in assistant, again go to Control Panel -> User Accounts -> Link online IDs. Now you'll notice the newly added "Windows Live ID online provider".
6. Click on "Add linked ID" link and it'll show following login box where you'll need to provide your Windows Live credentials.
7. After filling the credentials, click on "Sign in" button. It'll take a few seconds and your Windows 7 user account will be linked with your Windows Live account:
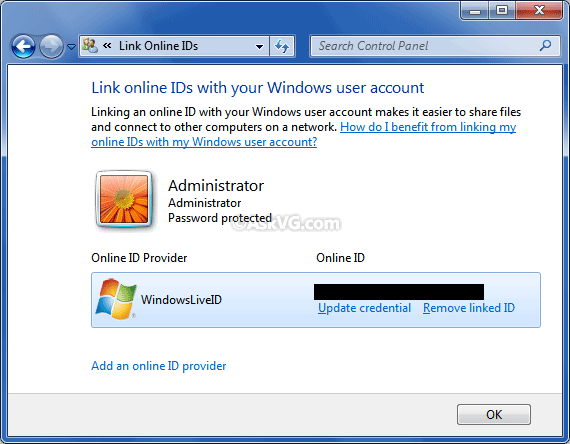
8. If you want to edit or remove the linked Windows Live ID later, you can do by clicking on "Update credential" or "Remove linked ID" links, respectively.
Through the online provider, the Sign-in Assistant helps a Windows 7 application running on one computer identify and communicate with other computers that are associated with the same Windows Live ID. Just by linking your Windows Live ID to the user account on each Windows 7 computer you own, you enable those computers to identify each other and work together more easily than has been possible in the past. Applications can take advantage of this capability to support scenarios as in the following example:Here is the step by step guide to do the task:
On his homegroup, Bob wants to share certain documents with his wife but not with his kids. Simply by specifying his wife’s Windows Live ID user name, Bob can give his wife exclusive permission to access documents on his computer.
1. Open Control Panel and click on "User Accounts" applet. Now click on "Link online IDs" link given in left sidebar.
2. Now click on "Add an online ID provider" link given at the bottom.
3. It'll open a web page in your browser. You'll need to click on the "Windows Live" logo present in the middle.
4. It'll open a new web page where you can download the "Windows Live ID Sign-in Assistant" which will install the required "Windows Live ID online provider".
PS: You can download the "Windows Live ID sign-in assistant" directly by going to following link:
Download Windows Live ID Sign-in Assistant
Now you can ask why should you follow steps 1-3 when you can directly download the sign-in assistant using the above mentioned link? The answer is very simple. At the moment only "Windows Live ID online provider" is available but there would be many other online providers in future and you'll need to follow steps 1-3 to install them.
5. After installing the sign-in assistant, again go to Control Panel -> User Accounts -> Link online IDs. Now you'll notice the newly added "Windows Live ID online provider".
6. Click on "Add linked ID" link and it'll show following login box where you'll need to provide your Windows Live credentials.
7. After filling the credentials, click on "Sign in" button. It'll take a few seconds and your Windows 7 user account will be linked with your Windows Live account:
8. If you want to edit or remove the linked Windows Live ID later, you can do by clicking on "Update credential" or "Remove linked ID" links, respectively.


0 comments:
Post a Comment