
First 5000 comments deleted to reduce database overhead!
NOTE 1: If you want to download all BITMAPs, AVIs and other files mentioned in this tutorial in a single pack, you can download it using this link.
NOTE 2: Please create a Restore point using "System Restore" before applying anything mentioned in this tutorial so that you can restore your system back to default if you don't like the changes.
Also take a backup of system files before modifying them, so that you can restore them if anything goes wrong or you don't like the new change.
NOTE 3: If you are facing problems while saving a file after editing in resource hacker, then make sure you have disabled WFP (Windows File Protection) service using "WFP Patcher" or use "Replacer" to replace the file. Both utilities can be found in our "Download" section.Windows 7 provides lots of new features along with a newly designed interface. It looks very similar to Windows Vista but there are many GUI changes like redesigned taskbar, Explorer, new boot screen and login screen, etc.
Also if you are getting error "Can't create file...", that means you have edited and saved the same file in past and there is a backup file which need to be deleted before saving this file again. Go to the folder containing this file and you'll see a similar file having "_original" in its name. Delete it and try to save the file in resource hacker.
If you are still using Windows XP but want to enjoy the new Windows 7 look, then this tutorial will definitely help you.
After following this tutorial, you'll get the same Windows 7 look in your Windows XP. Following is a list of things which are going to change after following this tutorial:
- Windows Theme or Visual Style
- Icons
- Boot Screen
- Login Screen or Welcome Screen
- Cursors
- Taskbar
- Wallpaper
- Sidebar
- Progress Dialog Box
- Shutdown / Log off Dialog Box
- About Windows Box
- System Properties Dialog Box
- Volume Control Window
- Extras like "Aero Shake", "Aero Snap", "Aero Peek", "Calculator" and "Paint"
- A Few Other Mods...
Windows 7 provides a new refreshing look which includes redesigned taskbar and start menu, Windows Explorer and a few other small changes.1. Windows Theme or Visual Style:
You can get the same look in Windows XP by using following theme:

Download SevenVG RTM Theme for Windows XP
If you want a Black version, then you can get it using following link:

Download SevenVG Black RTM Theme for Windows XP
If you don't like the new Windows 7 Superbar, then you can download Normal Taskbar versions of these themes as well:
Download SevenVG RTM Theme with Normal Taskbar for Windows XP
Download SevenVG Black RTM Theme with Normal Taskbar for Windows XP
You can also use an excellent WindowBlinds skin created by "fediaFedia". It requires Stardock WindowBlinds to be installed in your system.
Download Windows 7 WindowBlinds Skin for Windows XP
You can get Windows 7 icons in XP using "SevenVG Icon Pack":2. Icons:
Download SevenVG Icon Pack for IconTweaker
Download SevenVG Icon Pack for Icon Packager
Windows 7 contains a new animated boot screen which shows animated items/balls that come together to form Windows logo.3. Boot Screen:
You can get a similar boot screen in Windows XP:

Download Windows 7 Boot Screen for Windows XP
Windows 7 login screen looks similar to Vista login screen except the new background image and the text displayed at bottom.4. Login Screen or Welcome Screen:
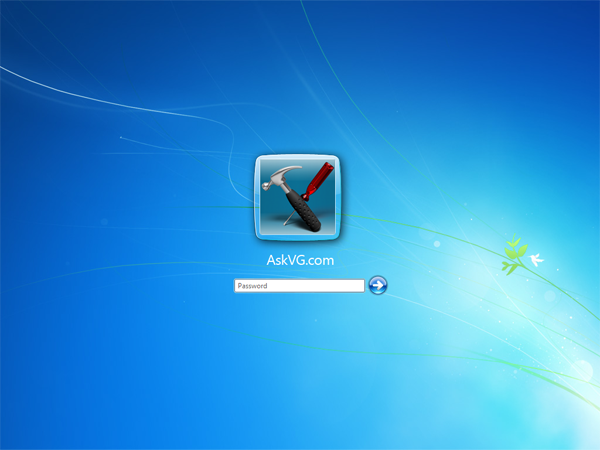
Download Windows 7 Login Screen for Windows XP
Windows 7 cursors are also similar to Vista which you can download using following link:5. Cursors:
Download Cursors
Windows 7 taskbar has been highly redesigned. It doesn't show opened program's name in their taskbar buttons, instead it only shows their icons. Also the taskbar buttons are a bit large in their size.6. Taskbar:

You can get the same behavior in XP by using following tutorial:
Get Windows 7 Iconized (Icon Only) Taskbar Feature in Windows XP
Or you can use following small utility which can do the task automatically:
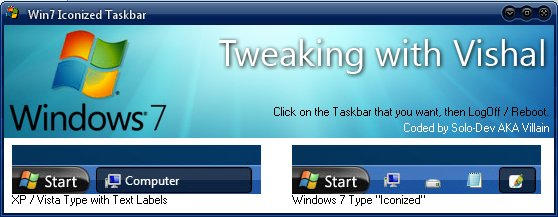
Taskbar Iconizer: Utility to Iconize Taskbar in Windows XP
You can also use following tool to get Windows 7 look-like Superbar in XP:
ViGlance: Get Windows 7 Look-Like Superbar in Windows XP
Windows 7 taskbar also allows you to move taskbar buttons to change their positions, you can get the same feature in Windows XP by using "Taskbar Shuffle" utility:
Taskbar Shuffle: Move Taskbar and System Tray Buttons in Windows
And if you want to get the small "Show Desktop" rectangle at the end of Taskbar just like Windows 7, please visit following topic:
Get Windows 7 “Show Desktop” Taskbar Icon in Windows XP & Vista
You can get Windows 7 Desktop wallpaper using following link:7. Wallpaper:
Download Wallpaper (via TheVista.Ru)
Windows 7 comes with a cool Sidebar which is displayed on Desktop.8. Sidebar:
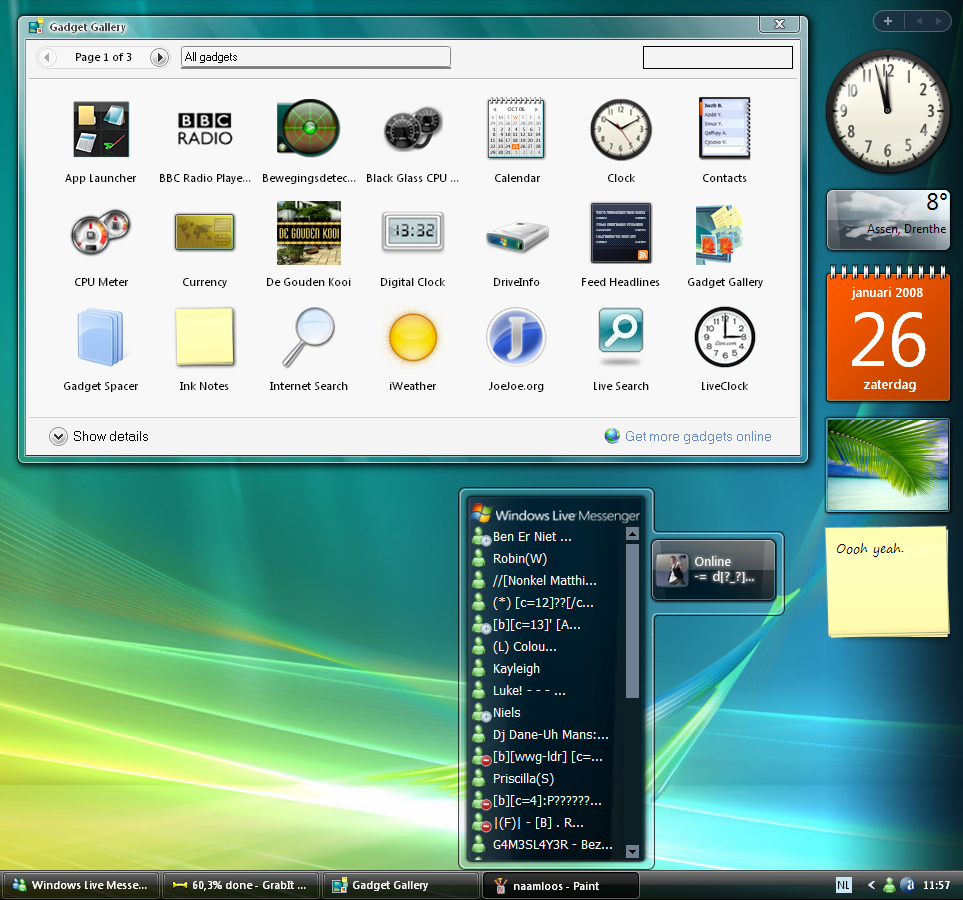
"joshoon" @ DA has ported the same Sidebar to XP which can be downloaded using following link:
Download Link
Windows 7 progress dialog box is different from XP. But we can make our XP dialog box to look-a-like Windows 7 by using Resource Hacker.9. Progress Dialog Box:

Just open "%windir%\System32\Shell32.dll" file in Resource Hacker and then go to:
Dialog -> 1020 -> 1033
Now replace the existing code in right-side pane with the following code:
1020 DIALOGEX 20, 20, 237, 134Click on Compile Script button.
STYLE DS_FIXEDSYS | DS_MODALFRAME | DS_NOIDLEMSG | WS_MINIMIZEBOX | WS_POPUP | WS_CAPTION | WS_SYSMENU
EXSTYLE WS_EX_APPWINDOW
CAPTION ""
LANGUAGE LANG_ENGLISH, SUBLANG_ENGLISH_US
FONT 8, "MS SHELL DLG"
{
CONTROL "", 106, "SysAnimate32", ACS_TRANSPARENT | ACS_AUTOPLAY | ACS_TIMER | WS_CHILD | WS_VISIBLE, 65532, 0, 236, 25
CONTROL "Location:", 0, STATIC, SS_LEFT | WS_CHILD | WS_VISIBLE | WS_GROUP, 10, 30, 31, 10
CONTROL "", 103, STATIC, SS_LEFT | SS_NOPREFIX | WS_CHILD | WS_VISIBLE, 70, 30, 155, 10
CONTROL "File name:", 0, STATIC, SS_LEFT | WS_CHILD | WS_VISIBLE | WS_GROUP, 10, 45, 33, 10
CONTROL "", 102, STATIC, SS_LEFT | SS_NOPREFIX | WS_CHILD | WS_VISIBLE, 70, 45, 155, 10
CONTROL "Time remaining: About", 0, STATIC, SS_LEFT | WS_CHILD | WS_VISIBLE | WS_GROUP, 10, 60, 83, 10
CONTROL "", 105, STATIC, SS_LEFT | SS_NOPREFIX | WS_CHILD | WS_VISIBLE, 93, 60, 155, 10
CONTROL "Speed: 10.2 MB/sec", 0, STATIC, SS_LEFT | WS_CHILD | WS_VISIBLE | WS_GROUP, 10, 73, 103, 10
CONTROL "", 104, "msctls_progress32", PBS_SMOOTH | WS_CHILD | WS_VISIBLE, 10, 88, 217, 10
CONTROL 404, 0, STATIC, SS_BITMAP | WS_CHILD | WS_VISIBLE | WS_CLIPSIBLINGS | WS_GROUP, 65530, 107, 267, 28
CONTROL "Cancel", 2, BUTTON, BS_DEFPUSHBUTTON | WS_CHILD | WS_VISIBLE, 177, 113, 50, 16
}
You'll also have to replace existing AVIs in the file with new ones. Just download following ZIP file and extract it:
Download AVIs and BMP
After extracting the ZIP file you'll get 3 AVI files and 1 BMP file. Replace existing AVIs in shell32.dll file with these new ones in following manner:
AVI -> 160 ->1033 with 160.avi
AVI -> 161 ->1033 with 161.avi
AVI -> 162 ->1033 with 162.avi
AVI -> 163 ->1033 with 162.avi
AVI -> 164 ->1033 with 162.avi
Now add the 404.bmp file at 404 location in file. Just click on Action -> Add a new resource and then click on Open file with new resource button. Select the downloaded BMP file and click on Open. Now in Resource Name enter 404 and in Resource Language enter 1033 and click on Add Resource button. That's it.
Windows 7, similar to Vista, doesn't have any shutdown / log off dialog box but we can redesign Windows XP default shutdown box to make it more refreshing like following screenshot:10. Shutdown / Log off Dialog Box:

Download required BMP files from here:
Download Shutdown BMPs
Extract the file and you'll get 4 BMPs with the name:
1.bmp
2.bmp
3.bmp
4.bmp
Now open "%windir%\System32\Shell32.dll" file in Resource Hacker and then replace following BITMAPs with the mentioned BMP files:
Bitmap -> 14351 -> 1033 with 1.bmp
Bitmap -> 14353 -> 1033 with 2.bmp
Bitmap -> 14354 -> 1033 with 1.bmp
Bitmap -> 14355 -> 1033 with 2.bmp
Bitmap -> 14356 -> 1033 with 3.bmp
now save the file and open %windir%\System32\msgina.dll file in Resource Hacker and then replace following BITMAPs with the mentioned BMP files:
Bitmap -> 20140 -> 1033 with 1.bmp
Bitmap -> 20141 -> 1033 with 2.bmp
Bitmap -> 20142 -> 1033 with 1.bmp
Bitmap -> 20143 -> 1033 with 2.bmp
Bitmap -> 20150 -> 1033 with 4.bmp
Now save the file.
To change the About Windows box you'll need to change 2 things: The top logo and the text part.11. About Windows Box:

Download the required BITMAP file from here:
Download About Windows BMP
Open "%windir%\System32\Shell32.dll" file in Resource Hacker and then replace following BITMAPs with the downloaded BMP file:
Bitmap -> 131 -> 1033 (For XP Professional)
Bitmap -> 147 -> 1033 (For XP Home)
Now open %windir%\System32\msgina.dll file in Resource Hacker and then replace following BITMAPs with the downloaded BMP file:
Bitmap -> 101 -> 1033 (For XP Professional)
Bitmap -> 107 -> 1033 (For XP Professional)
Bitmap -> 128 -> 1033 (For XP Home)
Bitmap -> 129 -> 1033 (For XP Home)
Now to change the text of dialog box, open "%windir%\System32\xpsp1res.dll" file in Resource Hacker and then goto:
Dialog -> 14352 -> 1033
Now replace the existing code in right-side pane with the following code:
14352 DIALOGEX 20, 20, 275, 198Click on Compile Script button and save the file.
STYLE DS_FIXEDSYS | DS_MODALFRAME | WS_POPUP | WS_CAPTION | WS_SYSMENU
CAPTION "About %s"
LANGUAGE LANG_ENGLISH, SUBLANG_ENGLISH_US
FONT 8, "MS Shell Dlg"
{
CONTROL 0, 12297, STATIC, SS_ICON | WS_CHILD | WS_VISIBLE, 7, 55, 21, 20
CONTROL "Microsoft %s", 13568, STATIC, SS_LEFTNOWORDWRAP | SS_NOPREFIX | WS_CHILD | WS_VISIBLE, 35, 55, 200, 10
CONTROL "Copyright (c) 2009 Microsoft Corporation. All rights reserved.", 13578, STATIC, SS_LEFT | SS_NOPREFIX | WS_CHILD | WS_VISIBLE, 35, 75, 210, 10
CONTROL "", 13581, STATIC, SS_LEFT | SS_NOPREFIX | WS_CHILD | WS_VISIBLE, 35, 85, 180, 20
CONTROL "This product is licensed under the Microsoft Software License Terms to:", 13586, "SysLink", 0x50000000, 35, 105, 180, 20
CONTROL "user name", 13575, STATIC, SS_LEFT | SS_NOPREFIX | WS_CHILD | WS_VISIBLE, 45, 125, 180, 10
CONTROL "org name", 13576, STATIC, SS_LEFT | SS_NOPREFIX | WS_CHILD | WS_VISIBLE, 45, 135, 180, 10
CONTROL "", 13095, STATIC, SS_ETCHEDHORZ | WS_CHILD | WS_VISIBLE, 35, 147, 235, 1
CONTROL "Physical memory available to Windows:", 13570, STATIC, SS_LEFT | SS_NOPREFIX | WS_CHILD | WS_VISIBLE, 35, 152, 133, 10
CONTROL "", 13571, STATIC, SS_LEFT | SS_NOPREFIX | WS_CHILD | WS_VISIBLE, 170, 152, 88, 10
CONTROL "OK", 1, BUTTON, BS_DEFPUSHBUTTON | WS_CHILD | WS_VISIBLE | WS_TABSTOP, 220, 178, 50, 14
CONTROL "Version 6.1", 0, STATIC, SS_LEFTNOWORDWRAP | SS_NOPREFIX | WS_CHILD | WS_VISIBLE, 35, 65, 235, 10
}
To make System Properties dialog box look like Windows 7 one, visit following tutorial:12. System Properties Dialog Box:
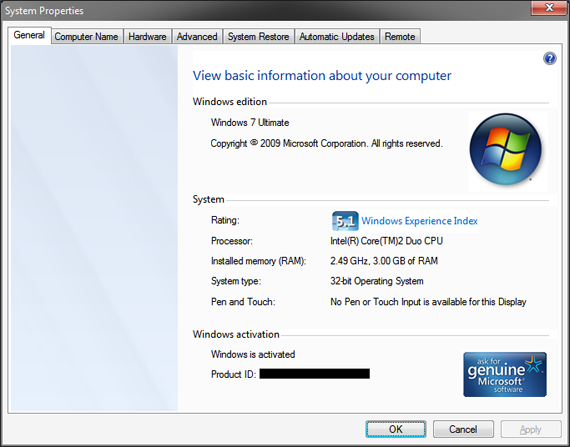
Get Windows 7 System Properties Dialog Box in Windows XP
Windows 7 contains a redesigned Volume Control window which shows better details and graphics for device volumes. Now you can get a similar window in your XP.13. Volume Control Window:
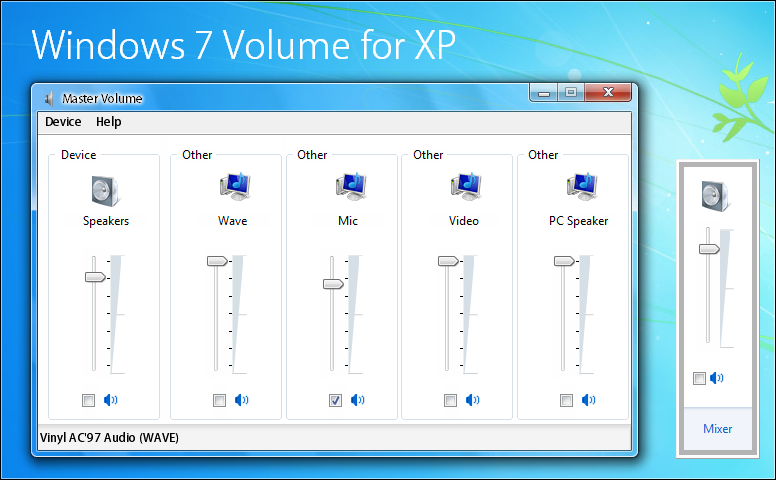
Get Windows 7 Volume Control Box in Windows XP
Windows 7 provides 3 new features which are called "Aero Shake", "Aero Snap" and "Aero Peek".14. A Few Extras:
"Aero Shake" is quite useful. Suppose you have more than one windows opened and you want to minimize all other windows except the window which you are working on, then you have to simply shake the current window with your mouse and all other windows will be minimized automatically. Shake it again and all minimized windows will be maximized again.
Using "Aero Snap", you can minimize, maximize, resize windows by just dragging-dropping them to the screen corners.
"Aero Peek" has replaced the old "Show Desktop" feature in Windows 7. It can be found as a small rectangle present at last in Windows 7 taskbar. When you hover the mouse cursor over it, it allows you to peek behind all open windows by hiding all windows and showing only outlines of all windows.
There are several 3rd party software available to provide these features in Windows XP. Some of them are AeroSnap, AquaSnap, Aero Shake, Acer Gridvista, WinShake, TrueTransparency, WinSplit Revolution and WindowSpace.
Windows 7 also contains a new redesigned Calculator which has new GUI and new options.
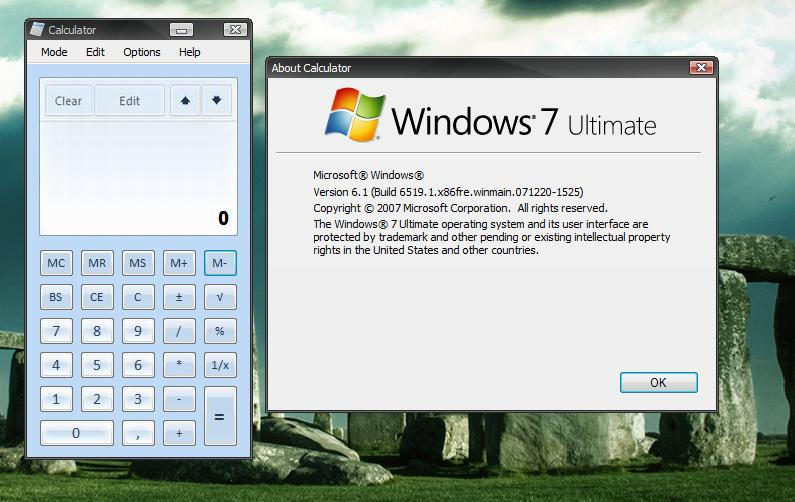
You can get the same calculator in Windows XP using following link:
Get Windows 7 Like Calculator in Windows XP
Windows 7 contains re-designed "MSPaint" program which provides Ribbons interface. You can get a similar MSPaint program in Windows XP:

Get Windows 7 Look Like Paint in Windows XP and Vista
1. Windows 7 Desktop context menu is much different than XP one.15. A Few Other Mods:

Following are a few things which are new in Windows 7 menu:
- "View" menu visible in Desktop context menu
- "Arrange Icons By" renamed to "Sort by"
- "Properties" renamed to "Personalize"
- "Auto arrange icons" and "Align icons to grid" options moved from "Sort by" menu to "View" menu
- 2 new options "Screen resolution" and "Gadgets" added to the menu
Get Windows 7 Desktop Context Menu in Windows XP
2. Windows 7's Programs menu is similar to Vista but very different from XP, you can use following tutorial to make your XP Programs menu similar to Windows 7:
Change Look-n-Feel of Windows XP Start Menu
3. In Windows 7 explorer, A small status bar is displayed under each drive icon showing the filled and free space in the drive.

You can also do the same in XP by using a 3rd party utility:
Download Vista Drive Status for XP
Just run the file and it'll add the status bar for each drive.
4. To get the Breadcrumbs in addressbar you can use "QT Addressbar":

QT Addressbar: Windows 7 Addressbar Clone for Windows XP
5. In Windows 7 whenever you hover your mouse cursor over a Desktop icon, it shows a cool transparent rectangle over the icon. You can get the same effect in XP using following tool:
Get Windows Vista and 7’s Desktop Icon Mouse Hover Effect in Windows XP
6. In Windows 7 when you press Alt-Tab to switch between opened applications, a glassy switcher screen is displayed which shows thumbnails of all running applications. You can get similar feature in Windows XP using following tool:
VistaSwitcher: The Best FREE Windows Alt-Tab Feature Replacement
That's all for now. After following all the above mentioned steps, you'll get Windows 7 look-n-feel in Windows XP.
NOTE: If you have any problem with Resource Hacker and want to know about it, then please go through following tutorials:PS: If you are a Windows Vista user and want to transform your Vista into 7, then following link will help you:
All About Resource Hacker in a Brief Tutorial
List of Files to be hacked using Resource Hacker
List of a few Locations in Windows XP System Files to be Hacked using Resource Hacker
Transform Windows Vista into Windows 7 without using Customization Pack


0 comments:
Post a Comment